How to weathering a new Roundhouse loco

Do you have a problem? Here is the place to appeal for help
Post Reply
User avatar
KjellAn
Trainee Fireman
Trainee Fireman
Posts: 228
Joined: Sun Nov 07, 2010 9:46 pm
Location: Norway, Sarpsborg
Contact:

How to weathering a new Roundhouse loco

Post by KjellAn » Tue Dec 31, 2013 2:56 pm

I have a new Roundhouse Little John - but I think the paint is too shiny.

Image

I have tried some different weathering-effects on wagons and buildings, but these are totally painted from the primer to the final paint coat.

Has anyone here good advises about weathering rust streaks, grime, mud and soot on these engines?
And how to achieve a not so shiny look?
And how to seal the weathering effect?
Kjell Anderdal :)

Livesteam 16mm on my line - the Pine Hill Railway (PHRy)

MDLR

Post by MDLR » Tue Dec 31, 2013 3:31 pm

Sealing's the easiest - apply a coat of varnish over all the weathering. Whether or not you use satin or matt is entirely up to you - the latter will do two jobs - REALLY tone down the gloss and will make it look really unloved!

steamie1

Post by steamie1 » Tue Dec 31, 2013 7:19 pm

http://www.deluxematerials.com/download ... st-pg1.pdf
Have you seen this stuff? I use it in corners etc. weathering powders are a great start as they can be rubbed clean if not wanted. Applied in earnest they can etch the surface to be more permanent. The way I'd go about it would be to use an enamel silver dry brushed on the steps and handle. Then add the real rust to corners couplings an wheels. Then I'd use a pray for the matt soot from the exhaust and then a matt light brown for brake dust. Finally weathering powders...
I would paint the cab inside cream to show off my driver..

User avatar
Gremlin
Trainee Driver
Trainee Driver
Posts: 695
Joined: Sun Feb 08, 2009 2:46 pm
Location: Kent

Post by Gremlin » Wed Jan 01, 2014 4:02 pm

I tend to use ground pastels for weathering, just rub on sandpaper
then apply by brush. They won't stick to your nice shiny finish so a coat of matt varnish will be needed. Then another to fix when finished.
Here is an Andel model I finished this way

Image

jim@NAL
Driver
Driver
Posts: 1142
Joined: Sun Sep 23, 2012 11:01 am
Location: haverhill suffok

Post by jim@NAL » Thu Jan 02, 2014 6:39 pm

very nice weathering there

User avatar
KjellAn
Trainee Fireman
Trainee Fireman
Posts: 228
Joined: Sun Nov 07, 2010 9:46 pm
Location: Norway, Sarpsborg
Contact:

Post by KjellAn » Thu Jan 02, 2014 9:43 pm

Gremlin:94720 wrote:I tend to use ground pastels for weathering, just rub on sandpaper, then apply by brush. They won't stick to your nice shiny finish so a coat of matt varnish will be needed. Then another to fix when finished.
Thanks for all good advices, but how to achieve a matt finish without using sandpaper or emery paper?

Will any chemical do the job instead? I think most of these engines have a matt and rusty finish - and no shiny spots at all. By rubbing with sandpaper or emery paper I think some spots will left shiny.
I think some chemical stuff (whatever it is) may illustrate the natural weathering in some way. Then put on some rust streaks, soot and dirt, before sealing the hole body with a matt varnish.
Kjell Anderdal :)

Livesteam 16mm on my line - the Pine Hill Railway (PHRy)

MDLR

Post by MDLR » Thu Jan 02, 2014 10:12 pm

The matt varnish will dull it all down!

User avatar
Keith S
Driver
Driver
Posts: 1668
Joined: Thu Feb 24, 2011 11:44 pm
Location: Canada

Post by Keith S » Wed Jan 08, 2014 12:32 am

KjellAn:94815 wrote: Will any chemical do the job instead? I think most of these engines have a matt and rusty finish - and no shiny spots at all. By rubbing with sandpaper or emery paper I think some spots will left shiny.
I think some chemical stuff (whatever it is) may illustrate the natural weathering in some way. Then put on some rust streaks, soot and dirt, before sealing the hole body with a matt varnish.
Gremlin was not suggesting using sandpaper on your locomotive! He was suggesting that you use pastels, which are like chalk. You rub the chalk on a piece of sandpaper to make a powder.

You should spray your engine first with a coat of matte (or flat) varnish to make it less shiny. Then use this powdered pastel with a brush to apply it to your locomotive in the spots you want to look rusty or dirty. Then when you are satisfied, spray it again with another coat of matte varnish. Do not sand the locomotive!!

User avatar
KjellAn
Trainee Fireman
Trainee Fireman
Posts: 228
Joined: Sun Nov 07, 2010 9:46 pm
Location: Norway, Sarpsborg
Contact:

Post by KjellAn » Wed Jan 08, 2014 9:49 pm

Thanks for the explanation. :D

I have tried some weatheringeffects from AK Interactice on a gravelwagon - ruststreaks. I have also some chalks and colorpowder. Maybe this will work as large rustmarks.
Kjell Anderdal :)

Livesteam 16mm on my line - the Pine Hill Railway (PHRy)

Bill/Rubery

Post by Bill/Rubery » Sun Jan 12, 2014 7:44 pm

Why don't you just repaint the whole locomotive in a company colour (your choice) and then add a dark brown here and there then varnish the engine in matt varnish? I use Humbrol and a brush. Far better to have a true to life engine than the usual sort of engine that is was too shiny and unreal......You could also put a real wooden floor in the cab!

User avatar
KjellAn
Trainee Fireman
Trainee Fireman
Posts: 228
Joined: Sun Nov 07, 2010 9:46 pm
Location: Norway, Sarpsborg
Contact:

Post by KjellAn » Thu Mar 06, 2014 12:13 pm

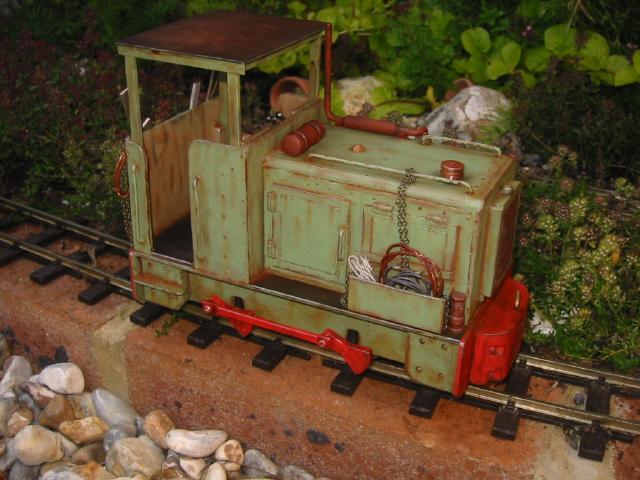
Here is the result of the weathering of my RH Little John and a rake of gravel wagons.

Image

Image

And here is the way I did it. Thanks to all the good advises is this tread. :)

First a thinn coat of matt varnish, then a wash of black and rust colors mixed with white spirit.
The rusty chimney and the footstep are drybrushed with burnt sienna powder color. Inside the cab a woodenplank floor.
The roof is first painted in different rust colors, then a layer of chipping fluid, and a topcoat of silver acrylic paint.
When the acrylic was dry, the roof was dampened with water and scratches made to look like rust spots.
Then some ruststeaks and some soot from the chimney.
Finally the little beast was given a matt varnish to seal the weathering.

Those gravel wagons were also weathered in the same way as the roof of the engine:
First painted in different rust colors, then a layer of chipping fluid, and a topcoat of grey acrylic paint. When the acrylic was dry,
the wagons were dampened with water and scratches made to look like rust spots.
Finally ruststreaks and a topcoat with matt varnish to seal the weathering.
Kjell Anderdal :)

Livesteam 16mm on my line - the Pine Hill Railway (PHRy)

User avatar
Gremlin
Trainee Driver
Trainee Driver
Posts: 695
Joined: Sun Feb 08, 2009 2:46 pm
Location: Kent

Post by Gremlin » Thu Mar 06, 2014 12:30 pm

Nicely done and changes it from a toy look to something much more realistic. I'll have a word with my crew as yours obviously take more care of their loco :lol: To finish off I'd dirty up the cranks a bit, they shine too much now.
User avatar
KjellAn
Trainee Fireman
Trainee Fireman
Posts: 228
Joined: Sun Nov 07, 2010 9:46 pm
Location: Norway, Sarpsborg
Contact:

Post by KjellAn » Thu Mar 06, 2014 12:48 pm

I agree. I think the crew must have thought that the engine should have oiled up those cranks, just to make sure the little beast would manage to haul those heavy gravel wagons this spring.

The Pine Hill Railway (PHRy) will need some more ballast to keep the tracks in satisfactory conditions for the 2014-sesson. ;)
Kjell Anderdal :)

Livesteam 16mm on my line - the Pine Hill Railway (PHRy)

RuneK

Post by RuneK » Sat Feb 28, 2015 10:00 am

That is superb Kjell! I must study the technique, and see if I can apply it to some of my rather "plastic fantastic" looking rolling stock. Where do you get all the materials needed?

User avatar
andymctractor
Trainee Driver
Trainee Driver
Posts: 712
Joined: Fri Feb 01, 2013 12:03 am
Location: Suffolk, UK
Contact:

Post by andymctractor » Sat Feb 28, 2015 11:04 am

If you are not sure of what you are doing then practice on a cheaper model such as an old wagon. Spray it with a gloss paint first if you need to. If you don't acheive exactly what you intended at least the lesson won't be too expensive.

Good luck
Regards
Andy McMahon

If it moves, salute it.  If it doesn't move, paint it. (RN sailors basic skills course 1968)

User avatar
KjellAn
Trainee Fireman
Trainee Fireman
Posts: 228
Joined: Sun Nov 07, 2010 9:46 pm
Location: Norway, Sarpsborg
Contact:

Post by KjellAn » Sun Mar 01, 2015 7:57 am

RuneK:108610 wrote:Where do you get all the materials needed?
First I paint rust colors - Hubrol Enamels - on the engine/waggons.
To make spots and lose paint flakes of the top coat, I have used this stuff:
http://www.amazon.com/Ak-Interactive-Ak ... B00AMB67W2
You may also use a hairspray from your girlfriends stuff in the bathroom. :D
When the chipping fluid/hairspray is dry, then spraypaint a top layer with the right color of the engine/waggons. Here it is important to use a watercolor/acrylic paint.
When the acrylic paint is dry, then you can make scrathes in it. The chipping fluid/hairspray makes the acrylic paint to loosen from the surface, then to expose the rusty colors under.
To make ruststreaks I have used Humbrol or other enamels witch are washed out with whitespirit.
Finally to protect the rusty finish, I spray a thinn layer of matt varnish on the engine and waggons.

You may also find more about how I did this in SMT #150, page 22-23.
Kjell Anderdal :)

Livesteam 16mm on my line - the Pine Hill Railway (PHRy)

RuneK

Post by RuneK » Mon Mar 02, 2015 12:49 am

Thank you for the guide!

Post Reply

Who is online

Users browsing this forum: No registered users and 13 guests