Great Eastern brake third no515

This is the place to talk about news, TV, music and other hobbies
User avatar
Snailrail
Trainee Fireman
Trainee Fireman
Posts: 156
Joined: Thu Dec 05, 2013 5:49 pm
Location: Essex

Great Eastern brake third no515

Post by Snailrail » Fri Sep 26, 2014 11:26 pm

In response to overwhelming public demand elsewhere on the forum here is the first episode in an occasional series about my first attempt at garden railways before I realised I would have to change to a more practical scale.

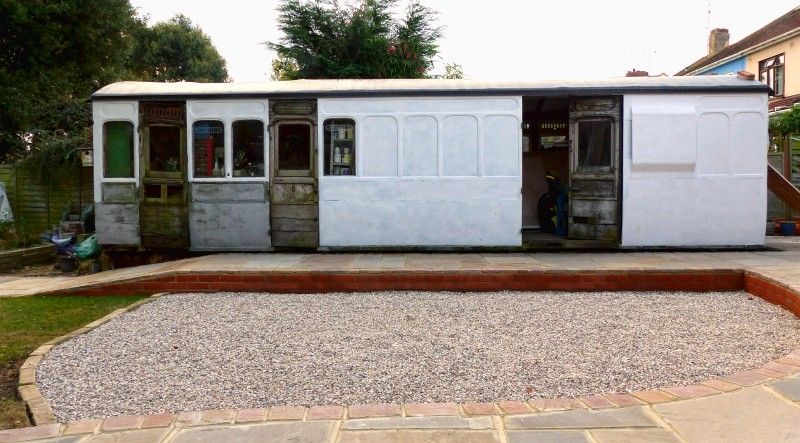
My first item of rolling stock :

Image

Image

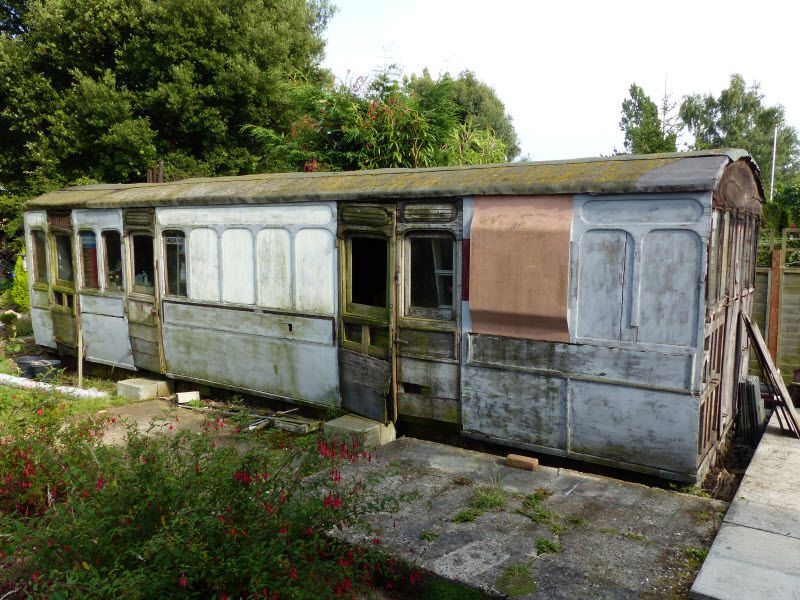
This coach was already in situ in the back garden when we bought the house 32 years ago. Apart from the fact that we wanted a large garden so that we could have a dog (no thoughts of garden railways at that stage) the fact that there was a railway carriage in the garden helped to swing it for me. I'm sure you would all be with me on that one !

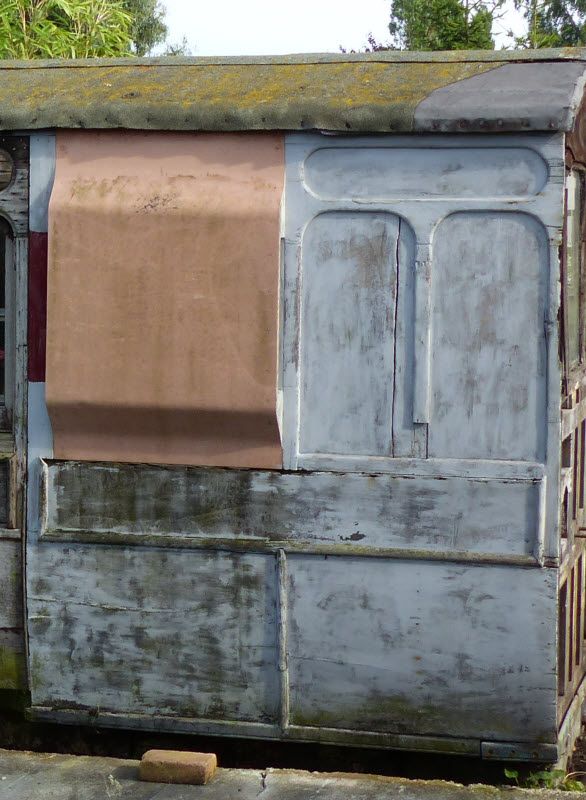
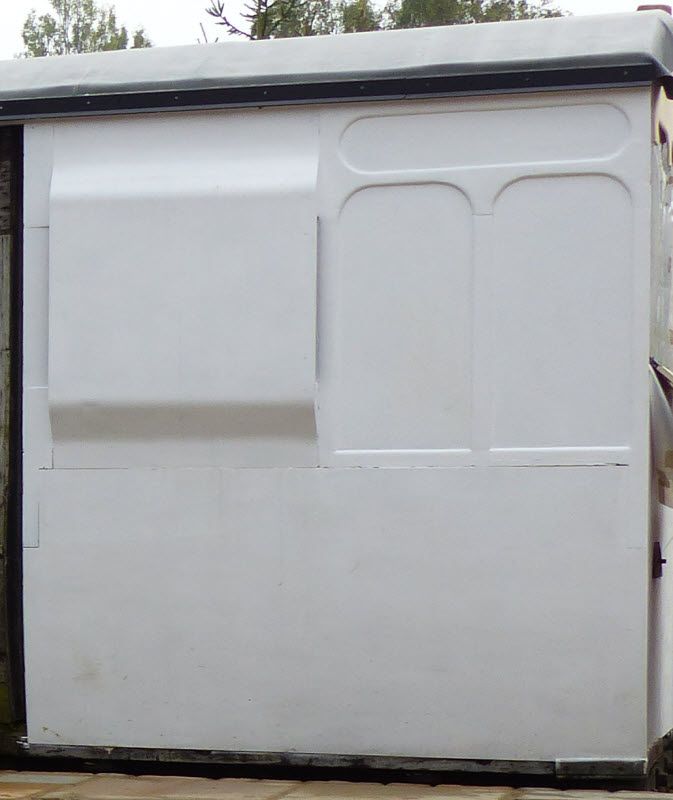
I must admit that for most of those years I have just taken it for granted as a useful place to hoard junk. It has always been in the back of my mind to restore it but the usual things got in the way, working, raising a family,diy and a classic car restoration which also became a long term project for the same reasons. However with retirement came a bit more time, (and unfortunately a bit less energy !) and I suddenly became aware that it was deteriorating and I had to do something to stop the rot - literally - and preserve what was left, so I have now made a start.

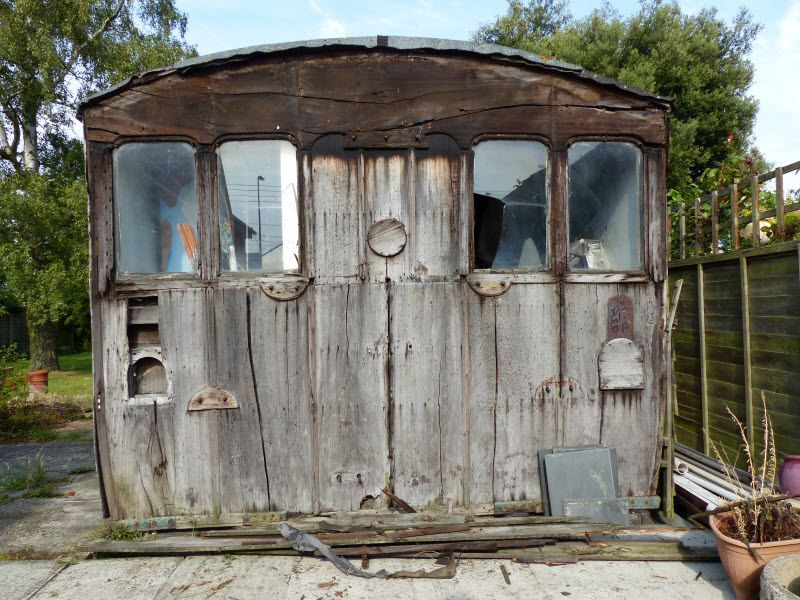
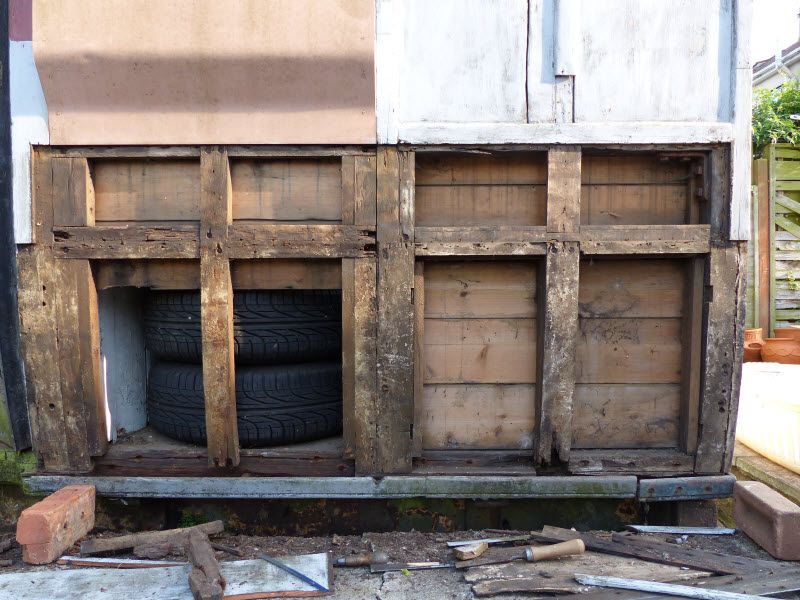
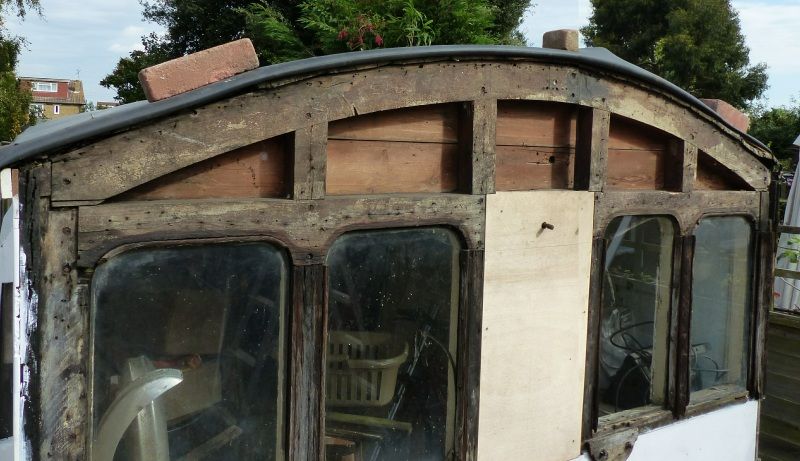
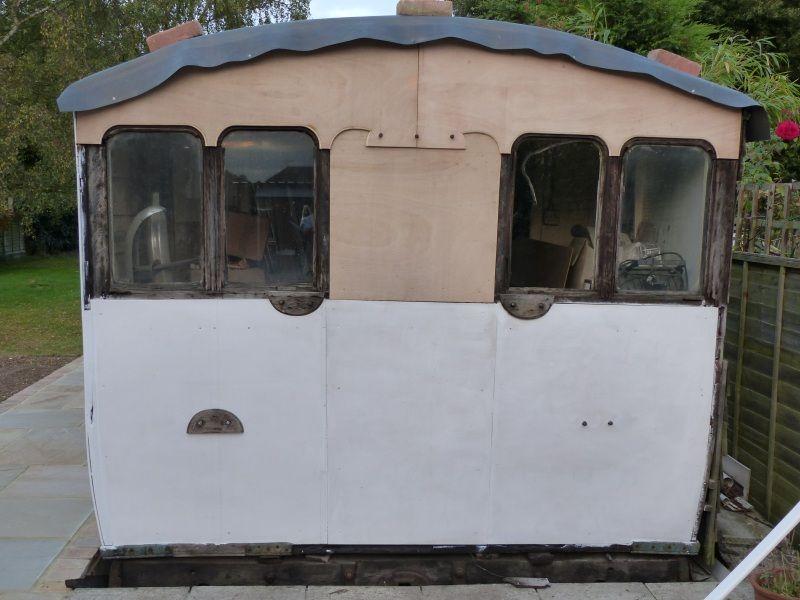
It is actually not as bad as it looks. There is some rot but it is still fairly sound structurally. The panelling appears to be mahogany rather than teak and in places has split and warped but is still solid. The worst problem is the doors, one or two of which have almost disintegrated. I will probably have to try and make some new ones using what's left as a pattern. That should test my woodworking skills !

I will post progress reports in future episodes but finish for now with what I know of the history.
The coach sits on its steel underframe. I assume it arrived here minus wheels and nearly all of its fittings, though how they got it to where it is I don't know. If anyone has any original GER T-type coach door handles knocking about I would be very pleased to hear from you, mine went missing long before my time.

For many years I knew nothing about what the coach was, and in fact only identified it definitely a couple of months ago. I guessed it might be Great Eastern as we are in GE territory and the old couple we bought the house from said they had been told it was brought here from our local station, Rochford, hauled by a team of horses. Despite looking all over it I never found any identifying marks until eventually I found a small GER under the paint stamped into some large brass brackets which go round the lower corners. I also found 515BT stamped into the timber headstocks which, being a bit slow, never meant anything to me until it suddenly hit me - coach no 515, Brake Third !

I thought the best people to help me confirm the identity would be the Great Eastern Railway Society so e-mailed them and in return received a far more comprehensive history than I had expected :

Yes it is GE brake third no515 to diagram 510

It was the final one of a class of sixty built at Stratford works for main line service in 1883 at a cost of about £320

It was withdrawn at the end of 1923

It is 27ft long and originally 8ft wide. During the 1890's it was transferred to the suburban service and in 1902 it was widened to 9ft

The first 40 of the class had a flush facia above the windows, the last 20 had recessed panels like mine

The first 45 had three compartments, the last batch having only two

So it is the last coach built of only 15 to that exact design so, who knows, it could be the last survivor. Incidentally the widening, which was apparently done to hundreds of the old 8ft coaches, was done by splitting the coach lengthwise down the middle and inserting a 1ft section, though about the only visible evidence is in the roof hoops where you can see a section has been spliced in the middle.

I'll leave it there for now, I'm nodding off, even if you're not !

Will post some pictures of the progress in due course

Brian

User avatar
Dr. Bond of the DVLR
Retired Director
Retired Director
Posts: 4485
Joined: Tue Jun 09, 2009 9:43 pm
Location: Suffolk
Contact:

Post by Dr. Bond of the DVLR » Fri Sep 26, 2014 11:35 pm

I thought it looked like one. The mid suffolk have something rather similar...
http://s0.geograph.org.uk/geophotos/02/ ... 6c8612.jpg
Image
The railway which people forgot
(to build)

User avatar
andymctractor
Trainee Driver
Trainee Driver
Posts: 705
Joined: Fri Feb 01, 2013 12:03 am
Location: Suffolk, UK
Contact:

Post by andymctractor » Fri Sep 26, 2014 11:52 pm

Preservation of 12"/ft stuff is not my scene but I'm glad others do it. This project, together with numerous others is of interest. I don't know if I'm being negative by suggesting one of the preservation organisations would be better equipped to give this coach the best chance of being bought back to some credible level of finish.
I can understand how using it as a garden shed as part of a garden railway would seem like a good idea and it might be what I'd do if I had one like it but I don't think Snailrail for all his/her efforts would do it justice, unless the other organisations showed no interest or were unable to justify funding.

Good luck with whatever you do.
Regards
Andy McMahon

If it moves, salute it.  If it doesn't move, paint it. (RN sailors basic skills course 1968)

User avatar
Snailrail
Trainee Fireman
Trainee Fireman
Posts: 156
Joined: Thu Dec 05, 2013 5:49 pm
Location: Essex

Post by Snailrail » Sat Sep 27, 2014 12:46 am

Zach,

thank you, yes very similar. One of the things that first made me think it was GE was the styling of panelling/beading being very similar to the photos I'd found online, though the GE seems to have had an enormous variety of detailed differences even between coaches of the same basic class.

I was put onto an organization called the Vintage Carriages Trust who have a database of all surviving old coaches that they know of (mine was a new one to them ). If you do a search for Great Eastern it is surprising how many are still left dotted around East Anglia. Amongst them are quite a few brake thirds but if you look at the brake end they all seem to be different and none just like mine.

Andy,

I can't say the thought hasn't crossed my mind that it would be nice to see it properly restored and even running somewhere but
a. It came with the house and I like it as a feature in the garden, despite the state it has got into. My aim is to make it look decent and preserve it belatedly as best I can
b. It would be very difficult, and expensive, to extract it from where it is. My garage would probably have to be removed to get a crane close enough
c. From what I've seen the preservation societies have more than enough derelict old rolling stock laying around waiting their turns for a rebuild, I doubt they would want another. For example I was at Bressingham recently and there is what appears to be a Great Eastern coach body similar style to mine and a similar condition sitting on the grass beside the signal box. I don't know how long it's been there or how much longer it's likely to be.

Keep an eye on my future reports and let me know what you think

Brian

User avatar
steamie1
Trainee Driver
Trainee Driver
Posts: 685
Joined: Tue Nov 13, 2012 11:04 pm

Post by steamie1 » Sat Sep 27, 2014 9:11 am

Could you get a good carpenter to replicate/rebuild the doors. I know it would be expensive but this is hard with a capital H. The you get on with the more straight forward body work. Only ideas. I would love any form of rolling stock like this. Magic. Thanks for the shots and details.

User avatar
steamie1
Trainee Driver
Trainee Driver
Posts: 685
Joined: Tue Nov 13, 2012 11:04 pm

Post by steamie1 » Sat Sep 27, 2014 9:19 am

http://anderson-carriage-and-wagon.co.u ... pairs.html

saw this on the net. A company like this may hold contacts to rebuild curved doors.

User avatar
Snailrail
Trainee Fireman
Trainee Fireman
Posts: 156
Joined: Thu Dec 05, 2013 5:49 pm
Location: Essex

Post by Snailrail » Sat Sep 27, 2014 10:52 am

Thanks Steamie, I had no idea such a company existed. Might be worth an enquiry but I suspect the cost would be pretty prohibitive for a pensioner - even with a decent pension ! I see they can help with spare parts so it would certainly be worth asking if they could help with some fittings like grab handles etc which have long since disappeared.

Brian

User avatar
Alan P
Trainee Fireman
Trainee Fireman
Posts: 194
Joined: Sun Aug 24, 2014 6:43 am
Location: Salisbury, UK
Contact:

Post by Alan P » Sat Sep 27, 2014 12:52 pm

Brian,

Thank you so much for sharing the pictures and information. I am very envious, not that anything like that would fit in my tiny 9' by 12' backyard :) I look forward to your progress reports with great interest, good luck with the restoration.

Alan.

Big Jim
Moderator
Moderator
Posts: 2694
Joined: Sat Jul 06, 2013 5:28 pm
Location: Near Llanelli

Post by Big Jim » Sat Sep 27, 2014 6:51 pm

Very nice project you have there, good luck with it.
It is interesting what is still out there in gardens and yards around the country.
If at first you don't succeed, use a bigger hammer!

User avatar
Peter Butler
Driver
Driver
Posts: 5294
Joined: Sun Sep 09, 2012 10:33 pm
Location: West Wales

Post by Peter Butler » Sat Sep 27, 2014 9:53 pm

I'm sure restoration is possible, but at a price!
Under your retirement circumstances (as are mine too!) the best short-term action to take is to prevent further deterioration by protecting against the ingress of water and frost damage by covering with tarpaulin. When you have time and funds, some repairs can then be undertaken as and when you are able.
It might not be possible, or even desirable, to return it to top condition, but to make it watertight and secure should keep it for another generation.
Please let us know what progress you are making.

User avatar
MuzTrem
Driver
Driver
Posts: 1122
Joined: Sun Feb 10, 2008 6:51 pm
Location: Buckinghamshire
Contact:

Post by MuzTrem » Sun Sep 28, 2014 8:49 pm

Good luck with the project! However you decide to proceed, I just hope the coach end ups better off for it.

I completely agree that the coach may in fact be better off where it is than waiting its turn in the "overhaul queue" at a preserved railway. It always saddens me that there is such an imbalance in our hobby between the interest in locomotives and in coaches. When visiting a preserved railway, I always much prefer lines where I can ride in a distinctive vintage carriage rather than yet another Mk. 1. But I digress!

The important thing is to do enough work to halt the further deterioration of the remains. That way, if a future generation decide they want to restore it to running order, they'll still have the chance! :)

Big Jim
Moderator
Moderator
Posts: 2694
Joined: Sat Jul 06, 2013 5:28 pm
Location: Near Llanelli

Post by Big Jim » Mon Sep 29, 2014 11:48 am

I think muztrem has hit the nail on the head, there is a great difference between preservation and restoration. Preserving something to halt decay and possibly allow full restoration in the future has got my vote.
I have a preserved early land rover, in daily use and maintained. It looks like a shed. I also have a restored one which will probably end up in better shape than anything that fell of the production line.

User avatar
Snailrail
Trainee Fireman
Trainee Fireman
Posts: 156
Joined: Thu Dec 05, 2013 5:49 pm
Location: Essex

Post by Snailrail » Mon Sep 29, 2014 1:26 pm

Sounds like you guys are in general agreement and this is exactly the way I have been looking at it. Obviously the only way to do a proper restoration would be to get it under cover and strip it to the frame for repairs, like a chassis-up car restoration. Equally obviously I don't have these facilities, my garage isn't quite big enough, and already has two classic cars in it.

The way I am going is to remove the damaged panelling, remove any flaky rotten wood I find back to fairly solid wood, which surprisingly is often not far below the surface and then treat it with Ronseal wet rot wood hardener, which does exactly what it says on the tin. Then repanel with 9mm ply, trying to eliminate all the places where the water got in in the first place as I go.

This is the same tactic I used when restoring my Austin Healey (but not with plywood !). I found places on that where the chassis had two layers of steel tacked on top with gaps in between. No wonder the water got in and did its worst. I repaired it in such a way that there were just no gaps at all for the water get in.

To go off at a tangent for a moment, talking about over restored cars, I took the Healey to a car show yesterday and there was an old couple there, must have been in their eighties with a vintage Bentley which they'd obviously owned for many years. This car looked like, apart from routine maintenance, it hadn't been touched since it left the factory, leather seats all worn and torn with the stuffing coming out, doors all tatty from years of use, paintwork scruffy and the engine covered in oil. Fabulous, just the way a genuine old car should be.

Back to the subject, I have made a good start on the coach and I'll try and post a few pictures soon of the progress so far. Be interested to hear what you think.

Brian

User avatar
Snailrail
Trainee Fireman
Trainee Fireman
Posts: 156
Joined: Thu Dec 05, 2013 5:49 pm
Location: Essex

Post by Snailrail » Thu Oct 02, 2014 11:03 pm

So, I made a start.
The first, and urgent , priority was to reroof it. The old felt roofing was in a very poor state, bits had been torn off by gales and patched up numerous times, but was still leaking in places. I had replaced this several times in the past and didn't want to have to do it again so invested in some rubber roofing membrane as I had used on our flat roof extension. A bit expensive but should last longer than me !

Then I started work on the panelling on the guard's end of the side. This bit :

Image

The mouldings on the upper panels were motheaten, with bits missing and had been repaired a number of times and one panel was split. The waist and lower panels were in three parts, the joins covered with a moulding. Water had leaked in here over the years eating away at the panel edges and getting into the insides. So it all came off revealing the bare bones :

Image

There was some rot all along the bottom but once the flaky stuff was scraped away not too bad and it was all soaked in Ronseal rotten wood hardener and some refixing done. One big problem which is apparently well known in this sort of work is that the steel screws used to build these coaches rust over the years and eventually disappear but not before they have split the wood.

The three lower panels were replaced with a single sheet of 9mm ply. The moulding along the very bottom was also removed (fortunately held on with brass screws). I intend to try and fix this to the bottom of the panel rather than the frame underneath. This should help the water drip off harmlessly rather than be diverted inside.

I have tried to save as much as possible of the panels I have removed, there is still a lot of good wood in them, and recycle them into strips to remake mouldings etc.

And this is the current state of this area :

Image

Upper panel repaired and mouldings repaired/replaced, lower panels replaced. I have on order some new hardwood half round mouldings exactly matching the old to go round the waist panels and cover the joins, or where the joins should be. These I intend to bed on some modern silicone frame sealant and fix with stainless steel panel pins. I don't think I can do any more to preserve it from the rain.

You can also see the rubber roofing sheet which I have finished off with some black plastic mouldings from the same firm. These are obviously intended for domestic use, with a lip to deflect the rainwater into a gutter, but I think it looks quite neat with the added bonus of helping to divert some of the water away from running down the sides. Hopefully this will slow down the formation of green slime!

That's it for now, more in due course,

Brian

User avatar
Peter Butler
Driver
Driver
Posts: 5294
Joined: Sun Sep 09, 2012 10:33 pm
Location: West Wales

Post by Peter Butler » Thu Oct 02, 2014 11:21 pm

Well done Brian... you have made a promising start and are now aware of the way it was constructed which is always a good insight into what you might expect to find in the future.
The roofing material was a sound investment and should prevent further deterioration for quite some time.
Please let us know each step of the way.

User avatar
Snailrail
Trainee Fireman
Trainee Fireman
Posts: 156
Joined: Thu Dec 05, 2013 5:49 pm
Location: Essex

Post by Snailrail » Tue Oct 07, 2014 12:08 am

Unfortunately I lost a fortnight of fine weather in September as I couldn't get near the carriage to work on it. This was due to having workers in to construct us a new patio, something else which was about 20 years overdue. The upside is that I was able to incorporate a feature into the design which I have always intended . . . .


PLATFORM 1 !

Image

You can see in this photo I have also replaced the waist panel in the centre section and painted a few more bits which only needed the green slime cleaning off and a rub down. Work has also progressed on the brake end. Here is the top section with the panelling removed. Where I have added two thin yellow lines in the top timber you can see where it was cut in 1902 and the extra 12 in section put in,

Image

Just out of interest, here I have removed the extra section and returned it to 8 ft wide - photographically only ! Somehow the roof curve looks more natural like this, understandably, I suppose.

Image

And finally, for now, this is the end up to date, all panelling replaced, the new top panels cut to shape and fixed temporarily. Shame I had to do it in two halves but I couldn't find a 9ft piece of ply. The two left hand windows are out at present for some repairs to the woodwork. Once that is done the panels can be properly fixed, the various mouldings added and several coats of paint.

Image

Will post more in due course but with the weather turning pants I guess progress will be slow or non existent for the next few months,

Brian

User avatar
philipy
Moderator
Moderator
Posts: 5162
Joined: Sun Jan 30, 2011 3:00 pm
Location: South Northants

Post by philipy » Tue Oct 07, 2014 6:20 am

Oooh!!.... isn't that just crying out for a line to run in one end and out of the other, with station and storage facilities internally!

However, to return to the subject that is all looking very good and worth the effort. Well done.
Philip

User avatar
Peter Butler
Driver
Driver
Posts: 5294
Joined: Sun Sep 09, 2012 10:33 pm
Location: West Wales

Post by Peter Butler » Tue Oct 07, 2014 10:18 am

Excellent job there... surprising how well preserved the original timbers are and when the repair is painted it will look great.
I like the platform idea too but the first photograph is missing from my screen!

User avatar
Alan P
Trainee Fireman
Trainee Fireman
Posts: 194
Joined: Sun Aug 24, 2014 6:43 am
Location: Salisbury, UK
Contact:

Post by Alan P » Tue Oct 07, 2014 10:49 am

Brian, the platform is a brilliant idea, looks superb. You seem to have done a lot of work in a very short time. Can't wait to see it completed.

User avatar
Peter Butler
Driver
Driver
Posts: 5294
Joined: Sun Sep 09, 2012 10:33 pm
Location: West Wales

Post by Peter Butler » Tue Oct 07, 2014 2:08 pm

The photo-fairies have been at work and the platform photograph has suddenly materialised. What an impressive structure! That is a wonderful way of presenting your carriage in a sensitive surrounding. It will certainly look most professional when completed.
I can see how much renovation work has been carried out too from that picture. Keep up the good work, and remember to ask us all round for the grand opening!

Post Reply

Who is online

Users browsing this forum: No registered users and 1 guest