Accucraft Ragleth

Discussion of Live Steam locomotives should be located here
Post Reply
User avatar
Chris Cairns
Driver
Driver
Posts: 2366
Joined: Mon Oct 29, 2007 7:25 pm
Location: Glasgow, Scotland

Accucraft Ragleth

Post by Chris Cairns » Fri Jun 06, 2014 3:35 pm

OK, just had a productive few days in the 'workshop', but first a short background to 'set the scene'.

I'm an active footplate volunteer with the ARPG at Dunaskin. One of our members has set up an indoor scenic 45mm layout in the museum, which is very popular with the visitors (including the adjacent 'Have a Go' at driving a Bachmann Thomas the Tank set), on which he mainly runs R/C Roundhouse locomotives (live steam & diesel). However he has had some health issues recently and has admitted he may not be attending every running day. Another member helps him run the layout but has no locomotives or rolling stock of his own, and does not like manual controlled locos (the central operating position of the layout can no longer reach all the track due to scenery, etc.).

So I was in the market for a dual gauge live steam loco which could be radio controlled. I do have a 2nd hand Edrig I won last year but that still has a few issue to resolve. So on surfing eBay after our 1st running day I spotted a Buy It Now Accucraft Ragleth which was an unwanted raffle prize and thus still new & unused for the bargain price of £500 - Click and it was mine!

Image

Although a manual version Accucraft provide their locos with cutouts for an On/Off switch, holes to mount a servo for the reverser, and storage under the cab floor for receiver & battery pack.

Image
The body is held on by just 4 bolts

Having already bought some 2.4GHz transmitters, and with a few other bits in my R/C box I did not need much to put a single channel R/C on this loco.

Image
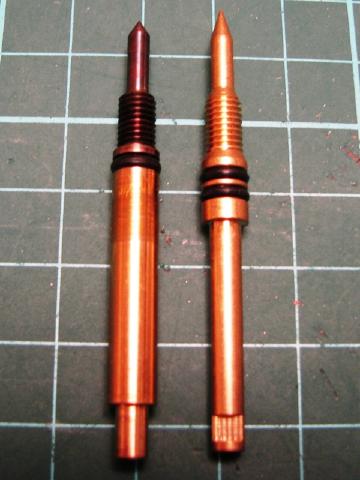
The power unit ready for R/C

I had been unable to source suitable sized mounting posts/standoffs for the servo but a newly found local-ish model shop suggested using some square wooden blocks and self tapping screws. Certainly an easy option to get me started so I painted & varnished the wooden servo posts.

Image
Most of the R/C to be used/fitted (EZ connector already fitted to reverser lever, and rubber/silicone cover for On/Off switch on order)

Image

I'm using loose AA NiMh cells so the battery pack is a tight fight, and I've used some plastic card to cover over the hole in the cab floor (presumably for a mini servo on the regulator).

Image

Accucraft recommend fitting the On/Off switch on the left side but that is beside the blow down valve that gets used to set the correct boiler water level (thus hot water & steam) so I mounted it on the right side as I tend to use a syringe & blunt needle to empty the water out of the lubricator rather than the drain. You can just see the short orange coloured aerial of the receiver sticking up through the plastic card into the cab.

Image

I've seen others fitting a second coal basket to hid the gas tank filler valve, but that really requires getting the same style basket. Following an idea I saw on a recent layout I have decided to use one of my Jurassic Models toolboxes by making the lid removable, and this will also make a handy storage place for loose 3 link coupling chains.

Image

Report on running-in to follow.

Chris Cairns
Last edited by Chris Cairns on Sun Dec 21, 2014 1:08 pm, edited 1 time in total.

Big Jim
Moderator
Moderator
Posts: 2694
Joined: Sat Jul 06, 2013 5:28 pm
Location: Near Llanelli

Post by Big Jim » Fri Jun 06, 2014 4:18 pm

Nice job you have done there. I do like the tool box.
If at first you don't succeed, use a bigger hammer!

User avatar
MDLR
Driver
Driver
Posts: 4027
Joined: Thu Jan 15, 2009 10:38 pm
Location: Near Ripley, Derbyshire, UK
Contact:

Post by MDLR » Fri Jun 06, 2014 5:52 pm

Big Jim:101492 wrote:Nice job you have done there. I do like the tool box.
Why didn't you make the lid hinge properly?
Brian L Dominic
Managing Director
Flagg Fluorspar Co
www.mdlr.co.uk/ff.html

User avatar
Chris Cairns
Driver
Driver
Posts: 2366
Joined: Mon Oct 29, 2007 7:25 pm
Location: Glasgow, Scotland

Post by Chris Cairns » Fri Jun 06, 2014 11:10 pm

MDLR wrote:Why didn't you make the lid hinge properly?
Because when I first made them up there was no requirement for them to be functional, and you cannot get suitable hinges plus postage costs for the same cost as the toolbox (£1 each at the 2013 Peterborough show).

Sadly we lost the Dolls House model shop in town when the owning couple decided to retire so I would need to order hinges on-line.

Hence the cheaper (i.e. free) option of just making the lid removable for now.

Chris Cairns

User avatar
MDLR
Driver
Driver
Posts: 4027
Joined: Thu Jan 15, 2009 10:38 pm
Location: Near Ripley, Derbyshire, UK
Contact:

Post by MDLR » Fri Jun 06, 2014 11:19 pm

Fair enough - I've got one of the biggest dolls house suppliers http://www.dollshouseemporium.co.uk/ less than rwo minutes away!
Brian L Dominic
Managing Director
Flagg Fluorspar Co
www.mdlr.co.uk/ff.html

black cat
Cleaner
Cleaner
Posts: 11
Joined: Thu May 08, 2014 7:01 pm

ragleth

Post by black cat » Fri Jun 06, 2014 11:42 pm

Funny that I never saw jurassic at the show..too much to see !! Very nice MDLR .I tried to fit 2channel r/c to my Ragleth ..I made up lots of little aluminium angles and it fitted-just..Unfortunately the levers on the mini servos werectoo longfor the reverser.It hit the boiler . and a very nice r/c unit I d bought couldnt be adjusted to a central position 'off' .My Ragleth remains manual but the new one has bigger tanks ,perhaps I can get inside there..you have a very nice looking loco there

User avatar
Chris Cairns
Driver
Driver
Posts: 2366
Joined: Mon Oct 29, 2007 7:25 pm
Location: Glasgow, Scotland

Post by Chris Cairns » Sun Jun 08, 2014 4:23 pm

MDLR wrote:I've got one of the biggest dolls house suppliers http://www.dollshouseemporium.co.uk/ less than two minutes away!
Now that is very handy. I've had an ongoing requirement to get some suitable figures for an open steam launch but not seeing them 'in the flesh' makes the decision harder.
black cat wrote:Unfortunately the levers on the mini servos were too long for the reverser.It hit the boiler. and a very nice r/c unit I d bought couldnt be adjusted to a central position 'off'
The holes on the running board are for a standard size servo as I've used. I fitted to 2 arm servo horn, cutting most of the arm off on the outside and trimming the arm on the inside so it did not foul the boiler. I use the Elevator channel (right stick forward & backward, centre sprung neutral) on my transmitter (needed to use the servo reverse facility for the correct operation) and fitted the ball joint for the push rod to the inner hole on the arm which corresponds to the full travel of the reverser (no servo throw adjustment on this budget transmitter).

My 2nd hand Edrig came with 2 servos fitted but the battery & receiver had been removed. The regulator is controlled by a mini servo under the cab floor so I've found it impossible to fit my standard loose 4 x AA battery pack so far. I may go back to just single channel on the reverser rather than have a special battery pack made up to fit into a side tank void.

Chris Cairns

User avatar
Chris Cairns
Driver
Driver
Posts: 2366
Joined: Mon Oct 29, 2007 7:25 pm
Location: Glasgow, Scotland

Running In

Post by Chris Cairns » Sun Jun 08, 2014 4:28 pm

Running In.

I always start by running in a locomotive on blocks. Whilst reviewing how the servo push rod would fit I noticed that the very long syphon tube would interfere with that push rod, so I annealed the syphon tube so it could be bent differently and be kept away from the servo push rod. Unlike my Edrig (0 to 80 PSI) this Ragleth has a different pressure gauge (0 to 100 PSI) which is too big to fit into the spectacle ring and the banjo bolt fitting is slightly longer thus pressing sideways against the gauge.

I went around the locomotive with the body removed checking the security of all bolts, e-clips, etc. I noticed that the push rod fitted to the reverser lever only had one nut on the reverser end which was working loose so I added a second nut which came from the tools bag.

This locomotive had obviously been tested in live steam before despatch (probably in China) so I was a little concerned with the white deposits (scale?) on the bottom of the safety valve & water filler plug. I've adopted a policy of flushing out the boilers of all 'new' locomotives I obtain, whether they are brand new or 2nd hand, so I heated up a weak vinegar/water solution in the boiler, let it cool twice with lots of agitation, then sucked it out with some silicon tubing on the end of syringe. I was surprised that it took 10 flushes of clean water before no more deposits came out of the boiler (very similar to my new MSS boiler flush out).

On the first run the burner was quieter than the one on my Accucraft Edrig, however due to a similar design of tank (the gas outlet is actually lower down than the filler valve) it still suffered from problems with liquid gas spilling out initially. The run proved that the reverser piston valve needed adjusting (it was still just running forward with the lever in neutral) and the exhaust pipe was not fully screwed in (this does not have a convenient spanner flange thus needle nose pliers are required).

Second run went well having adjusted the reverser piston valve.

For the third run I decided to record some times so we had something to refer to whilst running it on our 45mm indoor layout, filling the boiler with cold water first (I normally fill it straight from a kettle).

00:00 Gas Light Up
06:00 Steam emitting from blow down valve
09:25 Working Pressure of 37.5 PSI reached
30:50 Gas finishes
32:12 Loco stops running

Total running time on blocks 22:47

I've now fitted the Radio Control (just waiting for a rubber/silicone cover for the On/off switch) so the next run will be on track, either on my test 32mm loop once I've cleaned it (my stock has been getting very clogged axles with lots of oily hairs), or on our 45mm indoor layout.

This progress has had a significant knock on effect with my Edrig repairs, having now fixed the loose axle crank (found a suitable sized allen key to screw up the small retaining grub screw), and significantly reduced the steam oil usage (and corresponding blue exhaust!) by fitting a piece of copper wire into the oversize steam pipe hole and using a lower level of steam oil initially.

Chris Cairns

User avatar
Gremlin
Trainee Driver
Trainee Driver
Posts: 695
Joined: Sun Feb 08, 2009 2:46 pm
Location: Kent

Post by Gremlin » Mon Jun 30, 2014 12:28 pm

nice write up and pictures, shows people how easy it is to put radio in one of these :D

LnBmad
Trainee Driver
Trainee Driver
Posts: 884
Joined: Fri May 31, 2013 10:17 pm
Location: North Devon

Post by LnBmad » Wed Sep 10, 2014 9:04 pm

I'm considering fitting rc to my ragleth so this write up is a great help thanks...

just one question, will you charge the batteries inboard or will you remove them to charge? This is the only bit I'm unsure on ATM.
If it can be made full scale it can be made 16mm

My line: http://gardenrails.myfreeforum.org/about7200.html

User avatar
Chris Cairns
Driver
Driver
Posts: 2366
Joined: Mon Oct 29, 2007 7:25 pm
Location: Glasgow, Scotland

Post by Chris Cairns » Thu Sep 11, 2014 9:15 am

My preference is to use loose AA cells so I remove these for recharging (ideally trickle charge where possible). Being high capacity NiMH cells they last a long time whilst being used on one channel R/C.

It would be easy enough to fit a power switch harness that includes a charging lead for charging in situ.

Chris Cairns

User avatar
Chris Cairns
Driver
Driver
Posts: 2366
Joined: Mon Oct 29, 2007 7:25 pm
Location: Glasgow, Scotland

Post by Chris Cairns » Thu Sep 11, 2014 3:56 pm

As I've been running this loco on our indoor 45mm layout, plus a recent visit to the Llechfan Garden Railway & exhibiting on "Rhydypendryn" at the recent Llanfair Garden railway show, here are some operational observations.

Changing Gauge - The loco is supplied with the wheels set to 45mm and comes with a display board routered to 45mm. The axles have dimples which should allow easy gauge change with the supplied allen key. However I found that on one axle the dimples set the wheels wider than 28mm for running on 32mm track so I had to use a calliper gauge to carefully ensure they were set to 28mm back to back.

Gas Burner - The woes of liquid gas are well known in the Garden Railway community and the accepted solution is to vent off this liquid gas prior to lighting up. However I've not found it successful every time and still suffer from my burner going out on initial light up occasionally. Another solution is to partly fill the gas tank to raise steam pressure then refill the gas tank when it has warmed up but that would need further experimentation to ensure the boiler will not run dry.

Boiler Water Level - I'm not a fan of the water level check valve system used by Accucraft, and my Ragleth has had some very wet starts with lots of condensate. Initially I tried removing approx. 48 mls of water from a filled boiler through the safety valve insert, but I now remove approx. 53 mls of water which gives a more acceptable level. I've also been advised that the condensate is a function of the crimped exhaust pipe used, so I've obtained another exhaust pipe which I'll cut so I can push fit a Summerland Chuffer on top (I have one chuffer which I move around between locos to keep the costs down).

Couplings - On the 45mm layout I have been mainly running with the owner's W & L rake of rolling stock which now has an empty 1 plank wagon at the front, which has the chopper blade removed. Occasionally when passing over the 2 tight curves on this layout the loco uncouples. My solution has been to connect a 3 link chain to the 2 couplings thus holding the chopper blade down, but it will be interesting to see on the last running day at the end of this month if I suffer the same problem with my newly acquired Accucraft rake of rolling stock. I'm waiting for Back2Bay6 to get new stock of their coupling adaptors.

Regulator Valve - At the Llanfair show I watched several Caradoc's & another Ragleth running in manual control. Except for 1 Caradoc that had a modified regulator valve the answers to my question "How much do you open the regulator with the reverser fully forward?" were all "Not a lot" confirming that the Accucraft valve offers very coarse control. I just need to confirm that the regulator valve in my Edrig is the same type before ordering 2 replacement valves from The Train Department to improve control.

Chris Cairns

User avatar
mikewakefielduk@btinterne
Fireman
Fireman
Posts: 309
Joined: Wed Nov 28, 2012 1:43 pm
Location: Shropshire

Post by mikewakefielduk@btinterne » Fri Sep 12, 2014 10:14 am

re. your comments concerning the water level check valve system, I totally agree Chris. The Accucraft instructions say:

"To fill the boiler: remove the filler cap and also open the water level check valve. Leave the check valve open whilst raising steam. Fill up the boiler completely – ideally use filtered rainwater or distilled water using the large syringe provided......... When pressure starts to rise, water will be seen running out of the water level check valve. When the water reaches its correct level steam will be seen. Now screw shut the check valve."

Which is absolutely fine except you're going to get about 50mls of water ejected from underneath the footplate, which is messy to put it mildly. I personally think they should change the instructions to say "completely fill the boiler with the syringe and then extract 50mls"

Mike Wakefield

User avatar
Chris Cairns
Driver
Driver
Posts: 2366
Joined: Mon Oct 29, 2007 7:25 pm
Location: Glasgow, Scotland

Post by Chris Cairns » Thu Apr 30, 2015 11:59 pm

Been awhile since I've updated this Topic.

I did try the trick of partially filling the gas tank to raise pressure, then refill the gas tank to full to get around the liquid gas problem but I'm not convinced it is the best method particularly as I was left with not much in the way of water in the boiler at the end of the run.

Sadly with loss of Back2Bay6 I never got those coupling adaptors to convert the Accucraft chopper coupling. However I found by filing down an IP Engineering Roundhouse style centre buffer coupling it made a reasonable substitute, albeit more expensive.

Image

For the time being this loco has gained my 'Eairdsidh' nameplates (Scottish gaelic for Archie, pronounced AIRchie, named after my grandfather who used to take me to the Clyde Model Dockyard, and originally to be fitted to a modified Mamod SL1 project), and has been getting plenty of compliments whilst demonstrating around the country.

I recently fitted the replacement regulator valve from The Train Department which offers much finer control, and is a direct replacement.

Image
Standard Accucraft valve on the left, replacement Train Department valve on the right

Here is 'Eairdsidh' on a recent demonstration with the 16mm NGM East Of Scotland Group during the Model Steam Weekend event at the Dundee Museum of Transport this month.

Image

Chris Cairns

Post Reply

Who is online

Users browsing this forum: No registered users and 1 guest