Charging Current

Do you have a problem? Here is the place to appeal for help
Post Reply
Narrow Minded

Charging Current

Post by Narrow Minded » Sat Sep 07, 2013 7:38 pm

I've got my IP Engineering "Jessie" in bits at the moment and plan on fitting a charging socket as part of the rebuild - it'll save having to take the bonnet off and charging the cells individually ;)

Since I'm tackling everything with items I have "in stock", I want to use a constant current 1.2v - 12v Auto Detect charger.
This will be used to charge 6 NiMH cells (7.2v), that are individually rated at 2500mAh.
The charger has a rotary switch to set the charging current: 50mA/80mA/120mA/180mA/240mA/300mA.

So my question to the experts is;
can you tell me what's the correct setting for the charging current please? ;)
User avatar
Chris Cairns
Driver
Driver
Posts: 2372
Joined: Mon Oct 29, 2007 7:25 pm
Location: Glasgow, Scotland

Post by Chris Cairns » Sat Sep 07, 2013 8:11 pm

It is best to slow charge your batteries at 1/10th of their capacity - so here the rate would be 250mAh so set your charger to 240mAh and charge for 14-16 hours. At this rate there is less likelihood of damage from overcharging as there would be at much higher charging rates.

When you wire up the charging socket check the polarity is right, then check again, then check again. And make sure you cover the solder tags with heat shrink to prevent any short circuits as the IP Jessie is an all metal construction.

Chris Cairns.

WVLR

Post by WVLR » Sat Sep 07, 2013 8:11 pm

Try 10% of battery capacity for 16 hours, constant current, but beware the whole Nimh charging thing is a minefield.

Narrow Minded

Post by Narrow Minded » Sat Sep 07, 2013 11:18 pm

Thanks very much for the info guys :D
I'm all too aware of the potential problems with charging set-ups, it's why I've always avoided 'em in the past and taken the easy option of removing the individual cells and just dropping 'em into a proprietary charger :oops:

The main reason for wanting to charge "in-situ" is to avoid damaging the paintwork with repeated removal and refitting of the bonnet :D

User avatar
Chris Cairns
Driver
Driver
Posts: 2372
Joined: Mon Oct 29, 2007 7:25 pm
Location: Glasgow, Scotland

Post by Chris Cairns » Sun Sep 08, 2013 1:32 am

On my IP Jessie I have a 6 x AA battery box with a PP3 connector to the ESC so I can remove the battery box through the removable front grill.

I find it is best to discharge and recharge the batteries individually, but you should have no problems at the slow charge rate.

Sadly many of the supplied chargers are now the fast rate chargers and I'm not keen on using these regularly with NiMh cells where they come out 'hot enough to fry an egg on top'. That only reduces their useful life significantly and I've had to throw out a few NiMH cells recently that would not hold their charge (only really detectable when checking each cell individually).

Chris Cairns.

Narrow Minded

Post by Narrow Minded » Sun Sep 08, 2013 10:22 am

The "removable front grill" sounds an interesting feature - I've never seen one like that and I wish I'd thought of doing mine that way during the rebuild.
Something to bear in mind if this recycling experiment fails and I have to take it to bits again ;)

How's the grill held in place Chris?

User avatar
Chris Cairns
Driver
Driver
Posts: 2372
Joined: Mon Oct 29, 2007 7:25 pm
Location: Glasgow, Scotland

Post by Chris Cairns » Sun Sep 08, 2013 11:58 am

Not sure if the design was changed but my front grill is a white metal casting that is just a loose friction fit into the front of the bonnet body. All that stops it completely coming off is the wiring for the front headlight LED.

I'll take a photo for you when I return to Glasgow tomorrow.

At least the sun is out for the last day of steam at the Royal Deeside Railway when my 3rd bus of the day gets there!

Chris Cairns

User avatar
Chris Cairns
Driver
Driver
Posts: 2372
Joined: Mon Oct 29, 2007 7:25 pm
Location: Glasgow, Scotland

Post by Chris Cairns » Tue Sep 10, 2013 2:58 pm

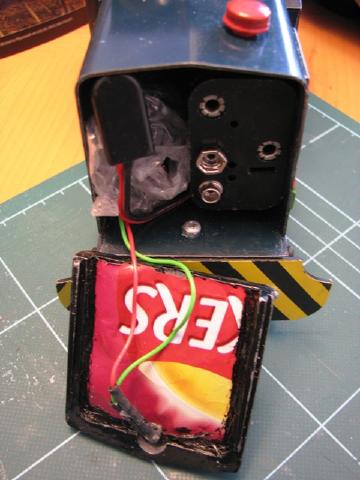
Here's my IP Jessie's removable front grill fitting.

Image

This is how my 2nd hand IP Jessie came. It has an Mtroniks Loco ESC mounted on front of the cab front inside the bonnet, a 6 x AA battery box with a very strong PP3 connector to the ESC, and a 27MHz receiver in the bubble wrap. I painted the grill material black and used the Walker's crisp bag to provide a reasonably flat silver coloured backing, and I wired up the front headlight (which had not been fitted by the previous owner) to a separate power switch.

Looking at your recently out-shopped "Marion" I'm guessing that the front grill fitting has been glued to the bonnet bodywork.

Chris Cairns.

Narrow Minded

Post by Narrow Minded » Tue Sep 10, 2013 11:10 pm

Thanks for that Chris, it's cerainly the same looking radiator grill but mine is far from a "friction fit" and yes, it has to be epoxied in place.

The bonnet looks very spacious - until you start putting stuff in there! :D
I've got a similar "load" to you, with the 6xAA holder, ESC and receiver plus 9v battery, soundcard and loudpeaker (the 9v batteries last ages with the Acme soundcards).

I've mounted a switched 2xAA holder in the cab, which powers the front and rear LED's which are selected by one of the "cab step switches" ;)
The soundcard on/off switch is also in-cab, mounted on the control panel along with the charging socket.

Hope to post a video as soon as the weather picks up :D

Post Reply

Who is online

Users browsing this forum: No registered users and 17 guests