Page 4 of 6
Re: A tiny G gauge indoor layout
Posted: Sun Feb 26, 2023 12:27 am
by gregh
Very timely Aaron. I am just about to try and make a tree! Yours look great.
I am still struggling to 'remember' how big G stuff is when it's indoors. Even a small tree will have to be 9" high
Re: A tiny G gauge indoor layout
Posted: Sun Feb 26, 2023 1:21 am
by GAP
Greg,
For tree trunks and branches look for dead branches that have dropped off a real tree or prunings.
Dry them out and put foam on as foliage that is how it was done on a club HO layout in Nowra that I used to frequent.
I use this method for foliage.
https://ringbalin.blogspot.com/p/homema ... liage.html
You could also experiment with teasing out a scotchbrite pad that I have seen in the past.
Re: A tiny G gauge indoor layout
Posted: Sun Feb 26, 2023 9:08 am
by ge_rik
If all else fails you can get them on eBay
https://www.ebay.co.uk/itm/160547933353
Rik
Re: A tiny G gauge indoor layout
Posted: Sun Mar 12, 2023 3:28 am
by gregh
Scenery progresses slowly on the line, with a 'lake' and waterfall and river gorge complete. Some track ballasting done too.
Here's a video of a 'pretend' operating session showing just the scenicked bit.
https://youtu.be/b3jd8w6tz28
and the gorge
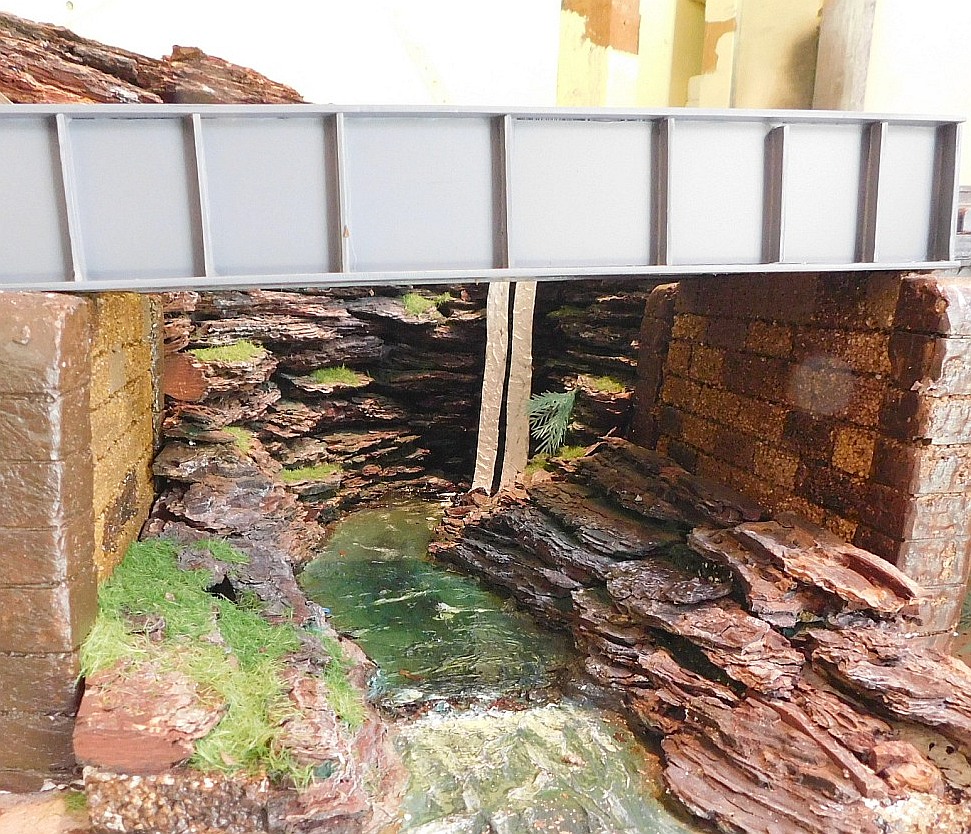
- DSCN4717.JPG (351.84 KiB) Viewed 3829 times
(not happy with the waterfall yet)
and lake
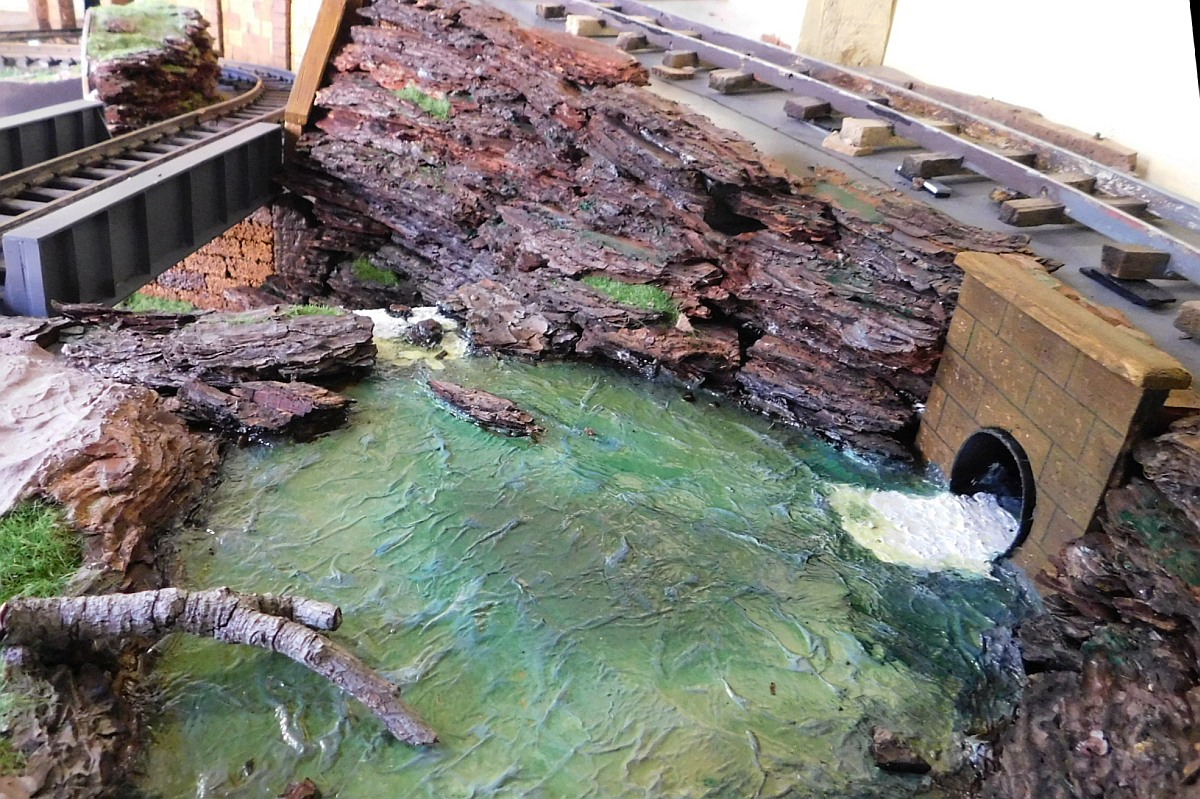
- DSCN4709.JPG (353.1 KiB) Viewed 3829 times
I still haven’t progressed on any backscene painting, but have ‘finished’ the pine bark rocky gorge, lake and waterfall. The lake is more of a pond – only 12” across and the river more a creek as it is only 3” (ie 6’) wide.
The waterfall is PVA glue poured onto clingwrap plastic, painted with thick acrylic white. The lake and river are made using marklinofsweden’s web tutorials with toilet paper and white glue over a timber base – thus giving ‘ripples’ in the water, then painted with acrylics and a couple of coats of clear polyeurethane (which I use on my house slate flooring)
Marklinofsweden has a great website and youtube tutorials...
https://www.youtube.com/@marklinofsweden/featured
https://www.youtube.com/watch?v=8b7H3xuEhW8
I need some more trees and scrub along the lake edge. And maybe a fisherman and his campfire. (or a Jolly swagman camped by the billabong?)
Re: A tiny G gauge indoor layout
Posted: Sun Mar 12, 2023 6:18 am
by philipy
gregh wrote: ↑Sun Mar 12, 2023 3:28 am
(not happy with the waterfall yet)
The outfall from the culvert and the final section of rapids both look brilliant, but the two main waterfall drops don't yet 'work' to my eyes, they look too 'solid' and white. IMO you need to inject some transparency... maybe go back to using the good old 'crinkled cellophane' type base with white flecks added to taste?
Having said that, the overall effect is fabulous.
Re: A tiny G gauge indoor layout
Posted: Sun Mar 12, 2023 5:33 pm
by ge_rik
gregh wrote: ↑Sun Mar 12, 2023 3:28 am
I need some more trees and scrub along the lake edge. And maybe a fisherman and his campfire. (or a Jolly swagman camped by the billabong?)
It is looking really effective. I love the way the stream cascades over the rocks.
Didn't you once have an animated swagman poking the fire?
Rik
Re: A tiny G gauge indoor layout
Posted: Sun Mar 12, 2023 9:39 pm
by gregh
philipy wrote: ↑Sun Mar 12, 2023 6:18 am
........ but the two main waterfall drops don't yet 'work' to my eyes, they look too 'solid' and white. IMO you need to inject some transparency... maybe go back to using the good old 'crinkled cellophane' type base with white flecks added to taste?
Thanks Philip. I did make some 'test' pieces using the PVA system but discarded them - now I think they look better than what I finally used.
Cellophane is an idea. And I just noticed the opaque corn flakes 'bag' might be good too.
First problem is how to remove the existing waterfalls.
ge_rik wrote: ↑Sun Mar 12, 2023 5:33 pm
Didn't you once have an animated swagman poking the fire?
Rik
Yes I do still have it but it makes me realise how things that are small in the garden take a huge space indoors! It is only about 6"x9" but I don't have that space on the indoor line! Here's the link to it...
http://youtu.be/jw1xwUXWhuI
Re: A tiny G gauge indoor layout
Posted: Mon Mar 13, 2023 6:52 am
by FWLR
I actually think it's brilliant. To get that much detail on such a small area is superb. Looking forward to a completed video of it, the pretend "video" is good too.
Re: A tiny G gauge indoor layout
Posted: Wed Mar 15, 2023 9:57 pm
by GAP
Superb scenery modelling there Greg.
It now has me wondering if I should sell all my HO trains and do something similar in its place.
Re: A tiny G gauge indoor layout
Posted: Mon Apr 03, 2023 10:23 am
by gregh
I think I have improved the waterfalls by just putting a few vertical scratches in the white.
Compare to pic a few posts back up the page.
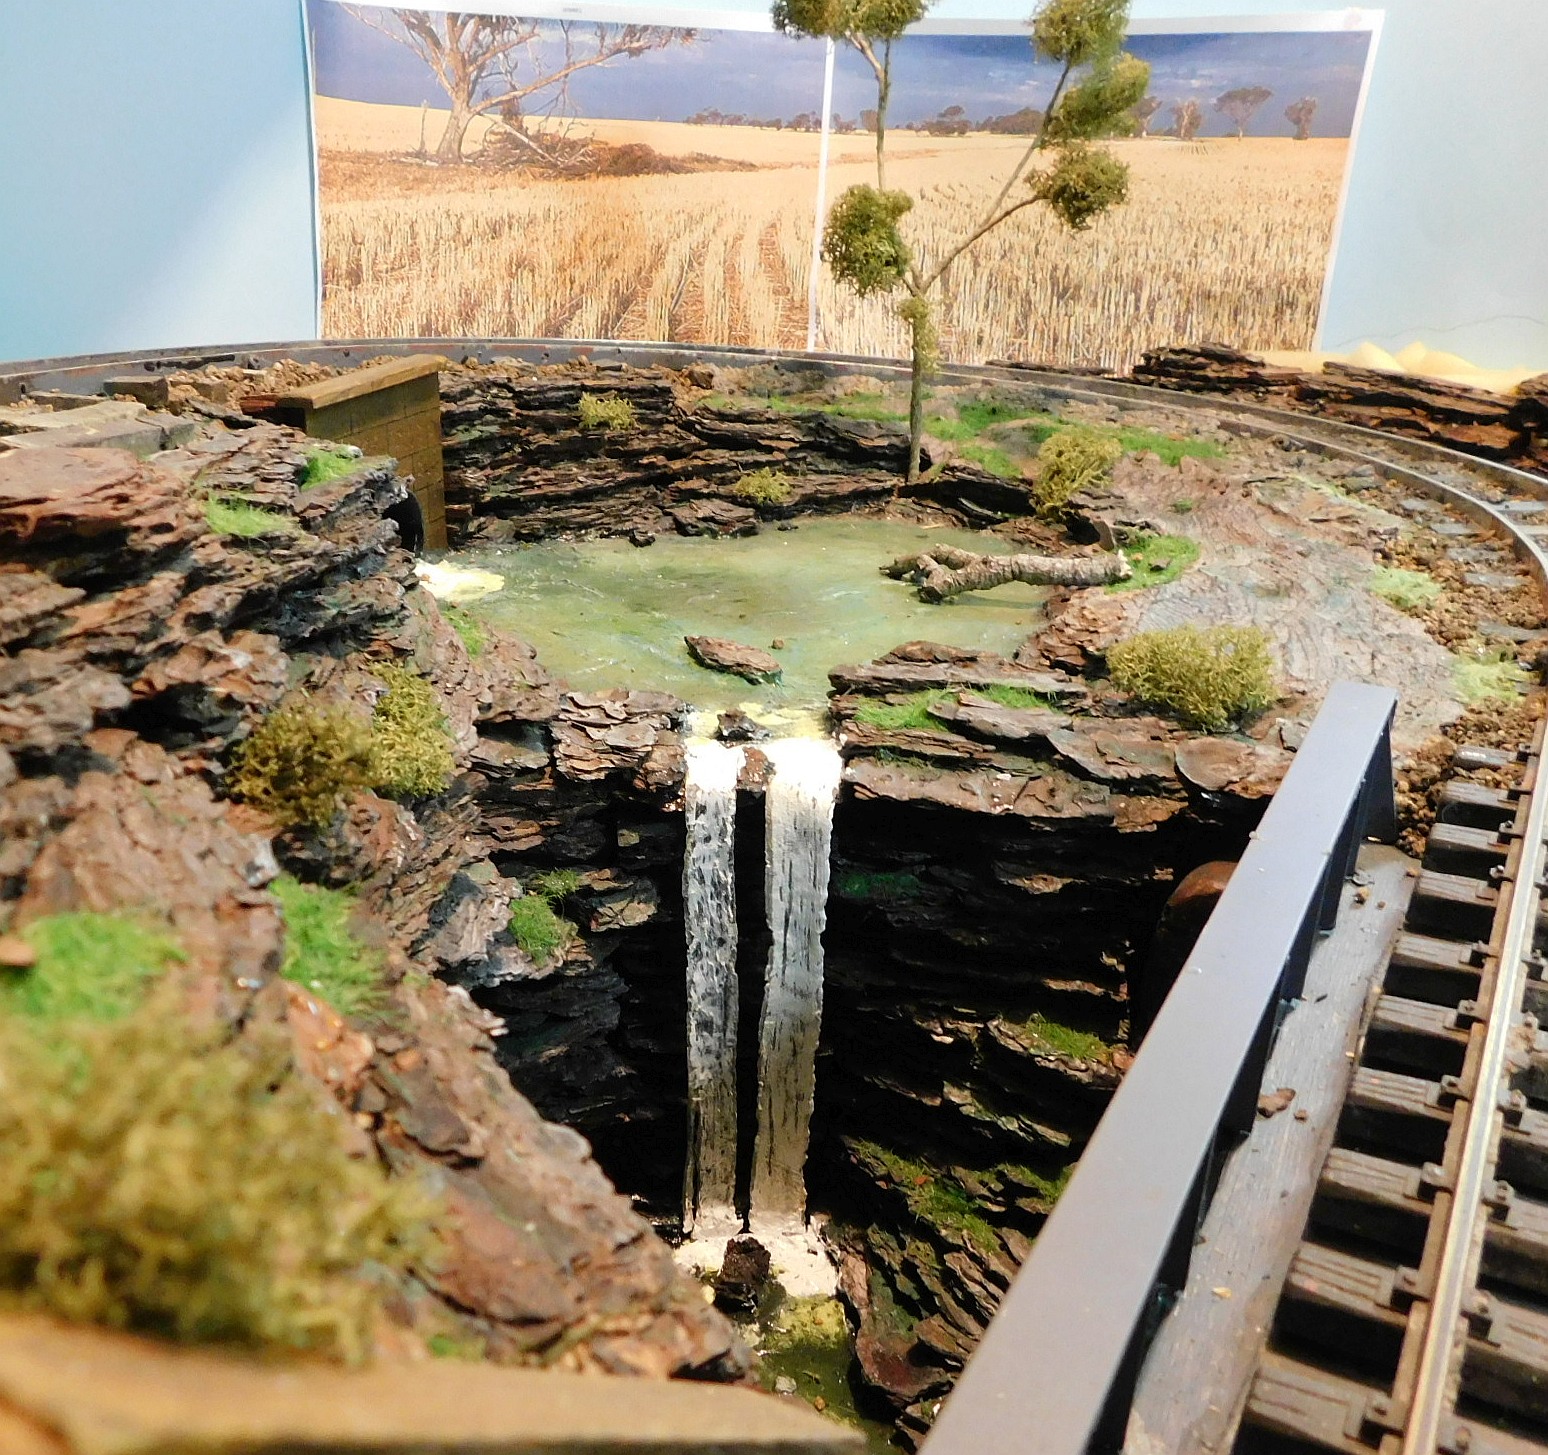
- waterfall redone 1-4-23 (2).JPG (710.06 KiB) Viewed 3502 times
The pic also shows my first rough attempt at printing a backscene from a photo. They are A4 landscape size and will be two sheets high when I decide whether I am happy. I need to blend the foreground better. Suggestions?
Re: A tiny G gauge indoor layout
Posted: Mon Apr 03, 2023 11:48 am
by philipy
gregh wrote: ↑Mon Apr 03, 2023 10:23 am
I think I have improved the waterfalls by just putting a few vertical scratches in the white.
.... I need to blend the foreground better. Suggestions?
Yep, the waterfall looks a lot better, well done.
To blend the foreground/background, I'd suggest a (very?) thin hedge attached to the base of the backscene but coloured to match the 'real' scenery. Failing that, you might get away with a fence? I'm not sure what the local field fences would be like in your neck of the woods, but something like a post and rail job with grass around the posts, might enough to take the eye away from the joint?
Re: A tiny G gauge indoor layout
Posted: Mon Apr 03, 2023 1:13 pm
by Old Man Aaron
The waterfall looks quite convincing.

I'll second the post-and-rail notion.
Re: A tiny G gauge indoor layout
Posted: Tue Apr 04, 2023 12:00 am
by gregh
Fences should be just a few strands of barbed wire, but maybe a post and rail would be the ticket in front of a wheatfield. I'll try raising the scene up a bit and then add some bushes (not hedges !)
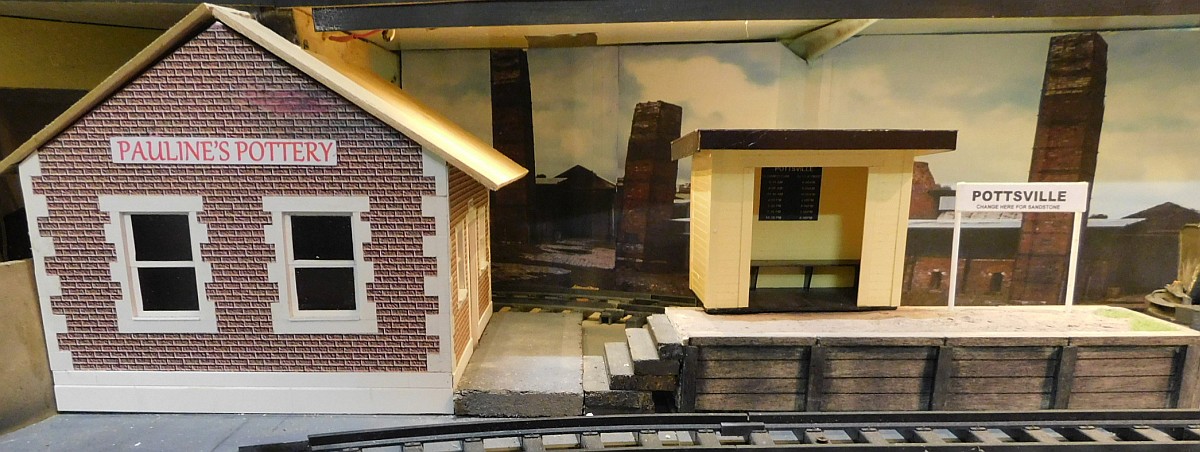
Meanwhile, after much experimentation I have got a backscene for the pottery works at Pottsville. And I have made an office building and a new station waiting shed.
The pottery scene is a picture, much repeated, and stretched - four A4 sheets in portrait as only 220mm high under the shelf.
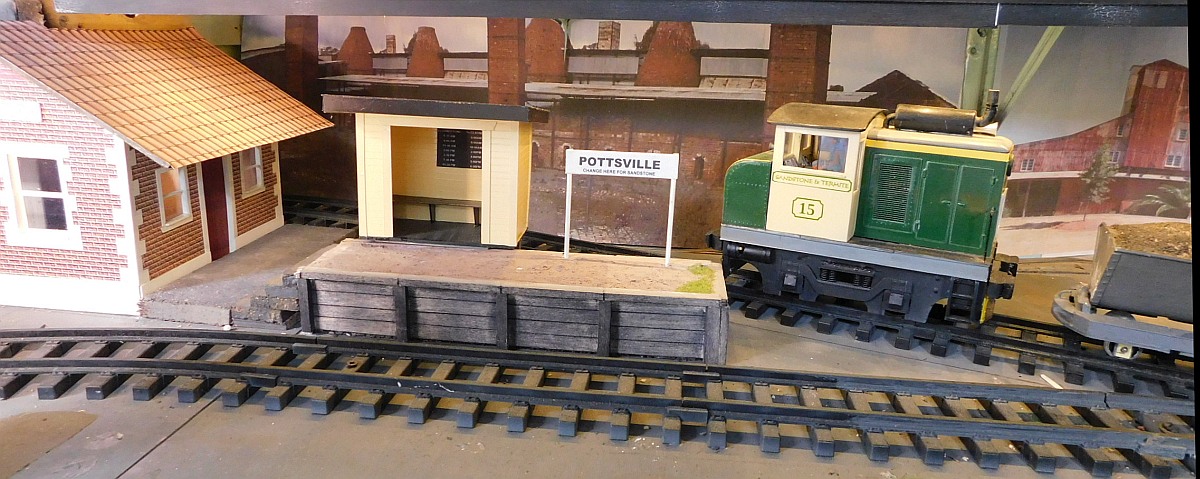
- pottsville backscene finish (2).JPG (219.71 KiB) Viewed 3467 times
I will build a 'real' chimney where that shelf support is behind the loco, to hide it.
This scene has the station building removed to give a better view of the scene.
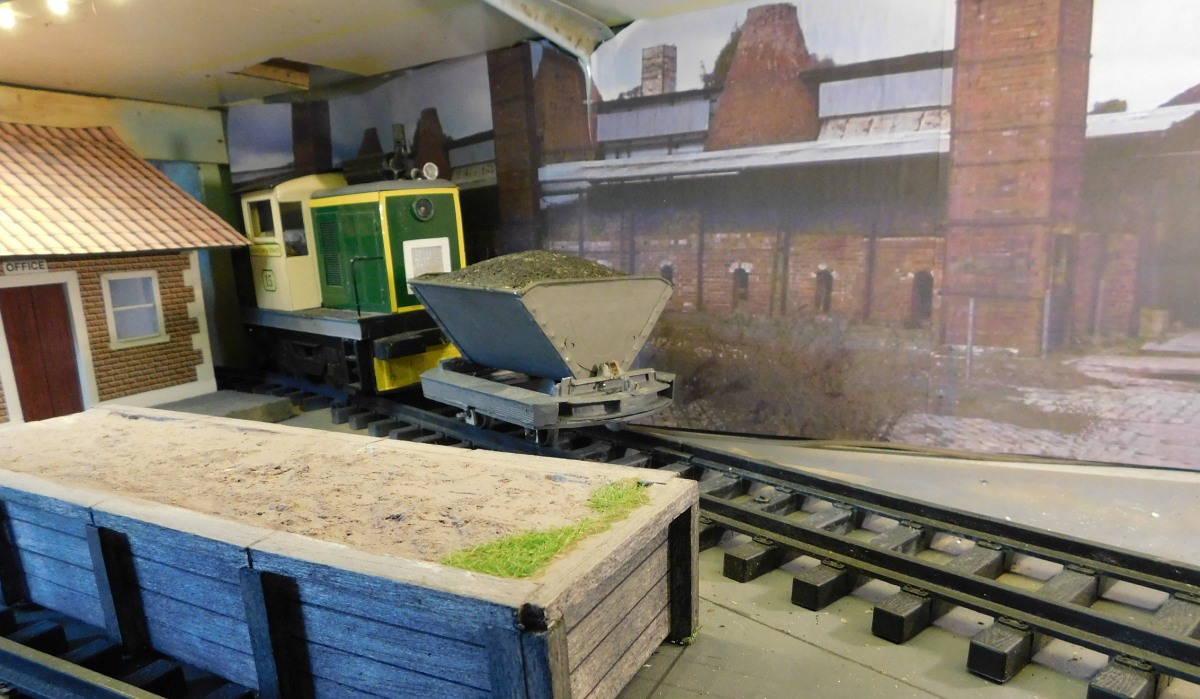
- pottsville backscene finish (4).JPG (221.29 KiB) Viewed 3467 times
This is the Pauline Pottery Office building. MDF covered with printed brickpaper (the internet is amazing for resources!), and lots of styrene. Note the backscene here was my first attempt and too small)
- DSCN4787.JPG (186.57 KiB) Viewed 3467 times
Re: A tiny G gauge indoor layout
Posted: Tue Apr 04, 2023 6:51 am
by FWLR
The waterfall is great Greg. Brilliant idea doing that, it takes the water to a different scale of view.
The building are nice too. The backdrop I feel needs altering a little bit I think, maybe make it a little taller

The fields of wheat look good, will you be joining them so the white line disappears. You may have said something about it I think...

I agree about the posts and wire, with perhaps some bits of grass or sheep wool maybe.
Re: A tiny G gauge indoor layout
Posted: Wed Apr 05, 2023 8:42 am
by GTB

gregh wrote: ↑Tue Apr 04, 2023 12:00 am
Fences should be just a few strands of barbed wire, but maybe a post and rail would be the ticket in front of a wheatfield. I'll try raising the scene up a bit and then add some bushes (not hedges !)
The scenery looks pretty good.
I'm not that familiar with NSWGR practice. The VR usually used wire fences along the railway reservation in country areas and only used post and rail fences on country station grounds. In the steam era there wouldn't be much long grass around, as the track gangs regularly burnt off any fuel build up before summer.
In livestock country any grass, bushes and trees within reach near the boundary fence would be grazed/browsed back by the stock. Even if the paddock was empty, you could always tell from the distinctive way the trees were browsed if there were cattle around.
You'll also need to work out how far this pottery is from Sydney, so you can get the right no. on the Griffiths Tea sign......
Regards,
Graeme
Re: A tiny G gauge indoor layout
Posted: Wed Apr 05, 2023 10:01 pm
by GAP
Coming along nicely there Greg.
Re: A tiny G gauge indoor layout
Posted: Thu Apr 06, 2023 6:15 am
by gregh
FWLR wrote: ↑Tue Apr 04, 2023 6:51 am
.........The backdrop I feel needs altering a little bit I think, maybe make it a little taller
The fields of wheat look good, will you be joining them so the white line disappears. You may have said something about it I think...
I agree about the posts and wire, with perhaps some bits of grass or sheep wool maybe.
Thanks for the ideas. Not sure what you mean by taller. The 3rd (ie last) pic above has the old smaller chimneys etc, but the 1st two have the final size. The scene can't be any taller because of the shelf above.
Yes the white line in the wheatfield will go - this is just a test piece held up with blue tack, till I try manipulating the pic some more.
This pic is what I will try printing next next. Maybe the fence will be printed or maybe real posts and real wire

- 2nd attempt and sml fence lowered.jpg (516.48 KiB) Viewed 3550 times
Re: A tiny G gauge indoor layout
Posted: Thu Apr 06, 2023 6:29 am
by philipy
I'd try real posts and wire a couple of mm in front of the pic. It would give the eye something to lock on and hence fade the picture behind it.
Re: A tiny G gauge indoor layout
Posted: Thu Apr 06, 2023 9:49 am
by Andrew
Really impressed with this so far - that rocky pool and waterfall scene is looking great!
Re: A tiny G gauge indoor layout
Posted: Sun Apr 30, 2023 4:28 am
by gregh
I saw a picture of a tiny passenger carriage, which immediately said “I need one” for my indoor line. It was in this Topic Yr Hen Felin & Yr Orsaf Newydd by gilfachphil.
https://gardenrails.org/viewtopic.php?f ... &start=120
so thanks to you and Plateway Models for the inspiration!
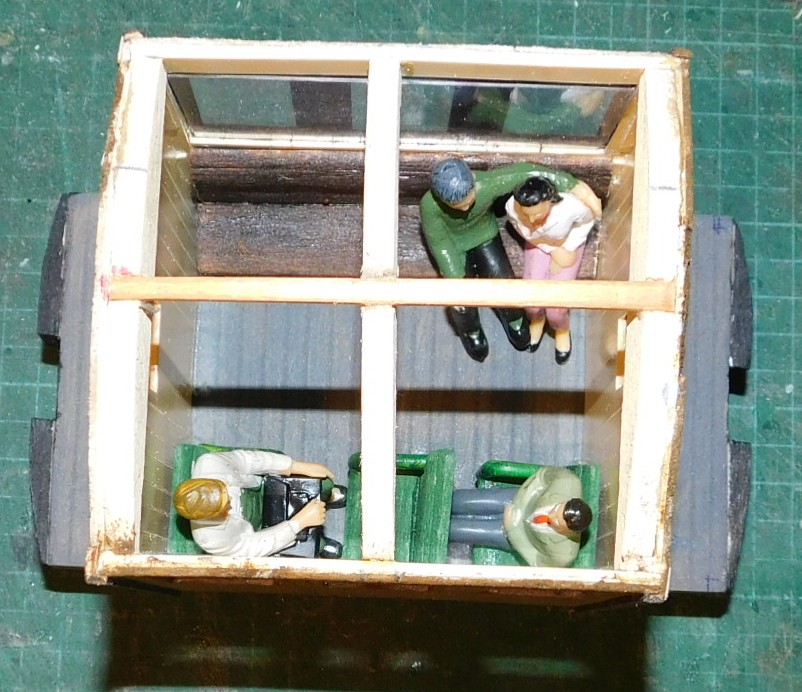
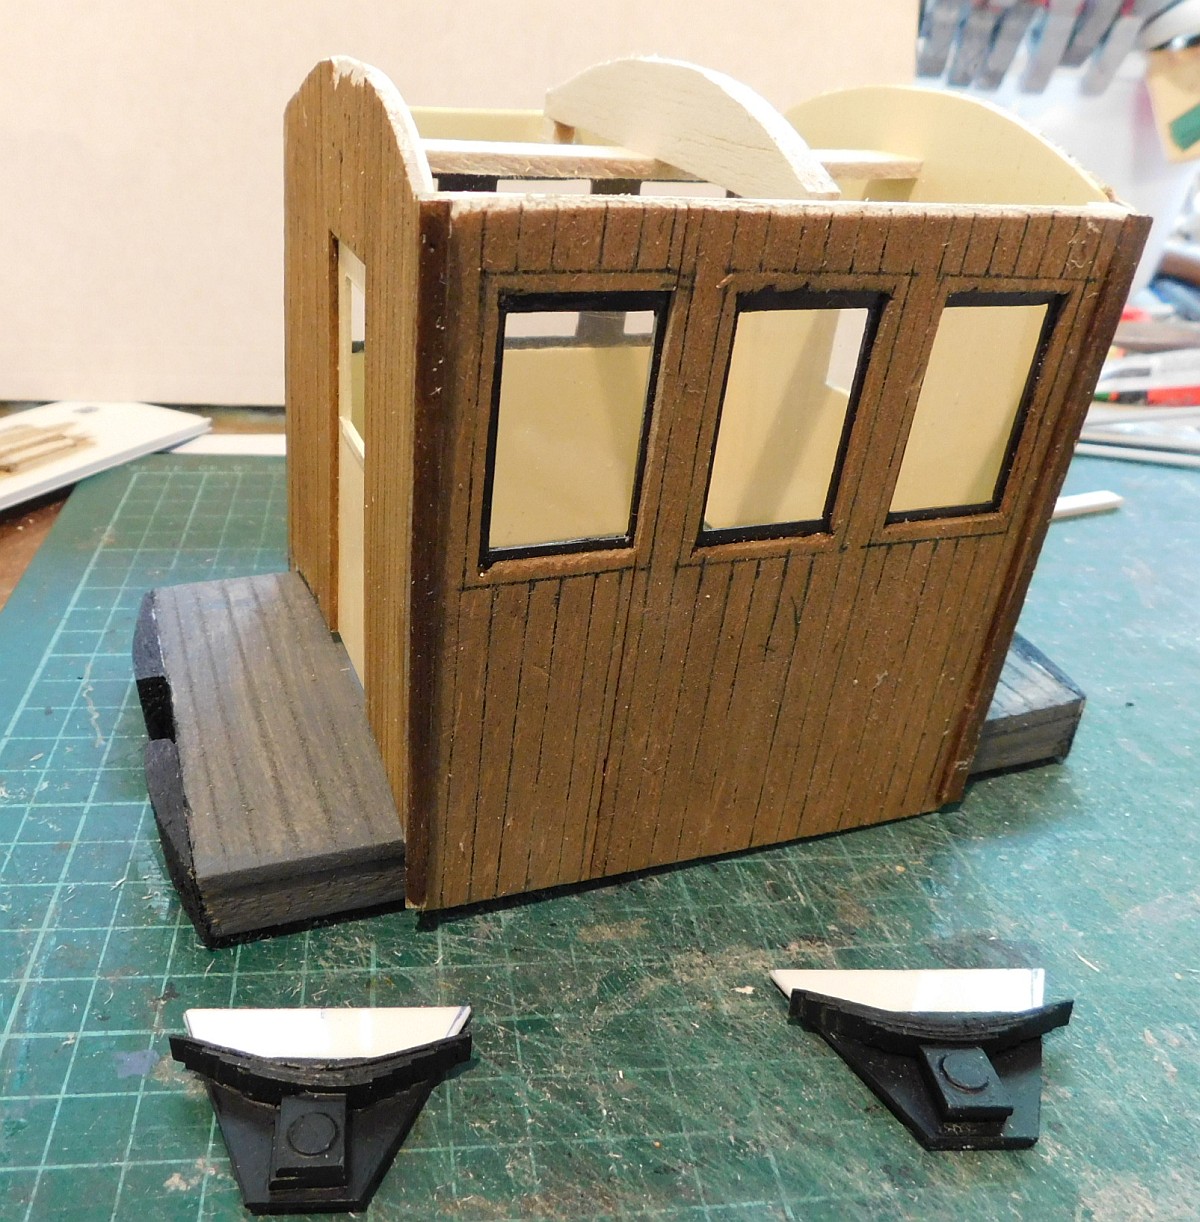
It’s been a while since I scratchbuilt anything and I seem to have ‘lost my touch’, but finally I have completed it. (Not to my complete satisfaction, but good enough.)
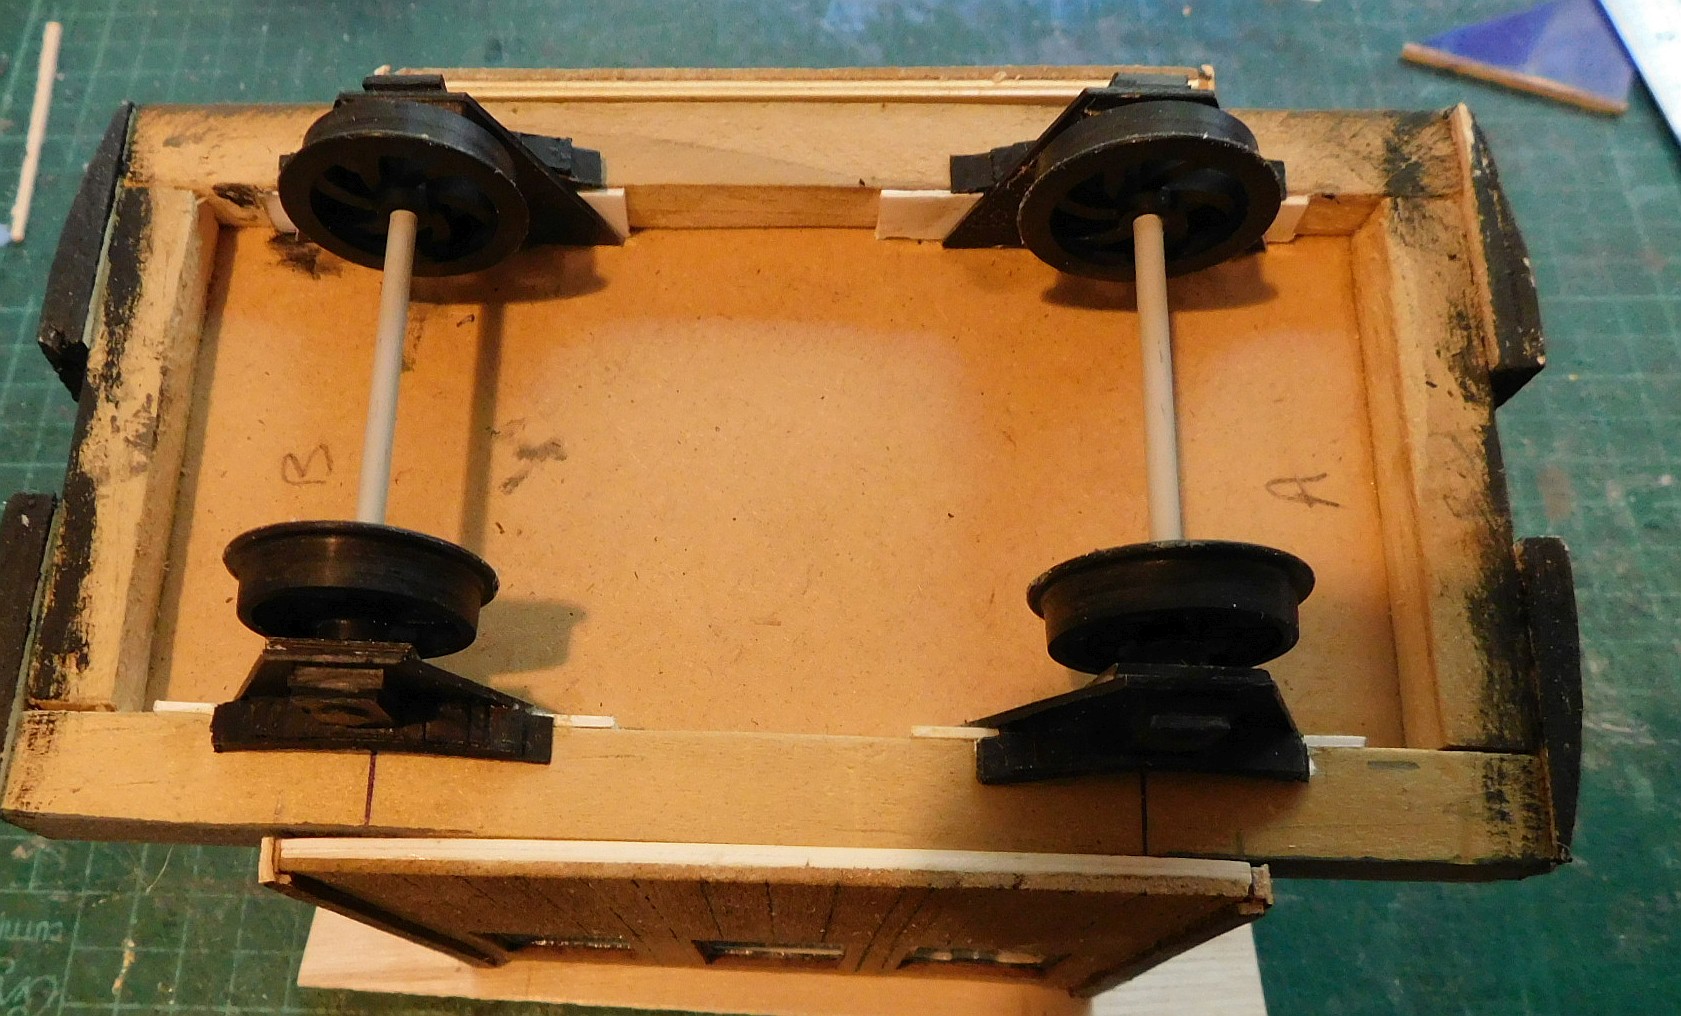
I built my standard frame from 8mm thick pine and 3mm MDF floor. I decided to build the passenger compartment separately to ‘slip on’ to the base.
I made the carriage from a laminate of styrene sheet and balsa on the outside – a big mistake as the contact adhesive I used caused the ends and sides to warp. So lots of bracing was used!
There is 1st and 2nd class seating
- tiny carriage (1).JPG (159.86 KiB) Viewed 3464 times
- tiny carriage (3).JPG (380.02 KiB) Viewed 3464 times
- tiny carriage (4).JPG (399.48 KiB) Viewed 3464 times
So it’s finally complete and had its first revenue run from Pottsville to Claymine.

- tiny carriage (7).JPG (663.01 KiB) Viewed 3464 times
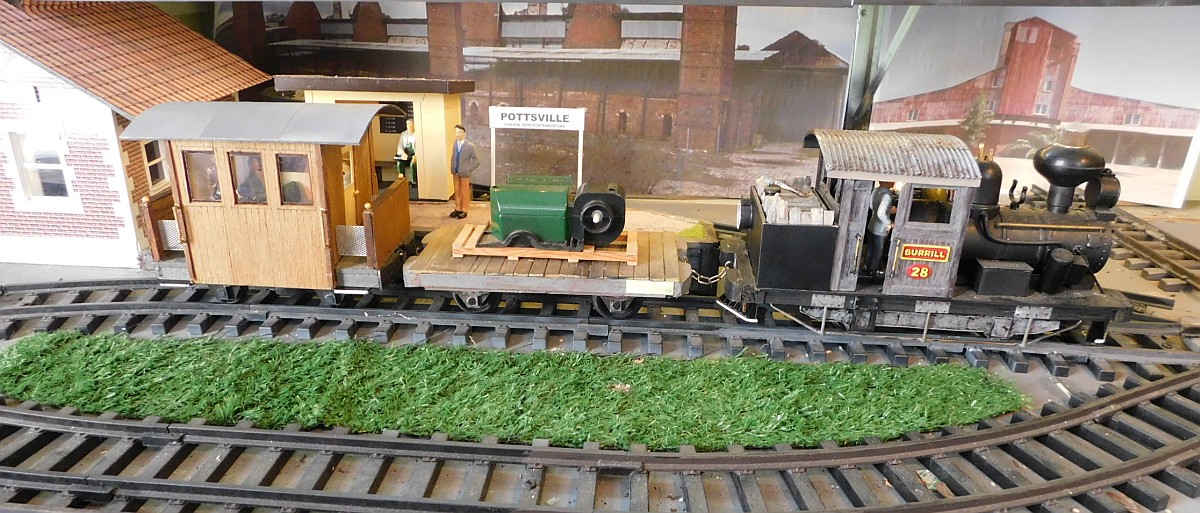
- tiny carriage (8).JPG (246.46 KiB) Viewed 3464 times

- tiny carriage (9) sml.jpg (320.12 KiB) Viewed 3464 times
And the video. https://www.youtube.com/watch?v=h1CIK_pZYvc
Notice the new backscenes too – more on that soon.