A tiny G gauge indoor layout

Re: A tiny G gauge indoor layout
Thats brilliant Greg. It takes awhile together back into things, but you have done a superb job. 
ROD
Life is so easy when I run my trains.


https://gardenrails.org/forum/viewtopic ... 41&t=11364
https://www.youtube.com/@fairywoodlightrailway
Life is so easy when I run my trains.


https://gardenrails.org/forum/viewtopic ... 41&t=11364
https://www.youtube.com/@fairywoodlightrailway
-
gregh
- Trainee Driver

- Posts: 572
- Joined: Sun Apr 01, 2018 5:44 am
- Location: Sydney, Australia
- Contact:
Re: A tiny G gauge indoor layout
That's Rod, much appreciated.
I forgot to 'credit' Peter Binnie for the wheels, which I put on 3mm knitting needles as axles. Axle boxes are just styrene with cardboard springs.
Greg from downunder.
The Sandstone & Termite's website: https://members.optusnet.com.au/satr/satr.htm
The Sandstone & Termite's website: https://members.optusnet.com.au/satr/satr.htm


Re: A tiny G gauge indoor layout
A great addition to the line, Greg. Absolutely looks the part!
Rik
Rik

Re: A tiny G gauge indoor layout
I like that new carriage very much! Nice work!
-
gregh
- Trainee Driver
- Posts: 572
- Joined: Sun Apr 01, 2018 5:44 am
- Location: Sydney, Australia
- Contact:
Re: A tiny G gauge indoor layout
2D printing......... Backscenes
I wanted to cover the walls around the layout with some sort of ‘scenery’.
There are 3x2” studs protruding from the walls every 2’ or so, and three wall angles of 90 degrees.
So to ‘round’ the scenes I used 3mm MDF. I curved it by pouring boiling water on it and bending to approx shape by hand, then screwing or gluing in place. It’s shown in red here:
Some of the MDF in place.
I was lucky to find a nice panorama of Aussie ploughed fields, that I could stretch and flip-copy to be 3.2m long. It have a nice foreground of tall grass which I can, I hope, blend into the real scenery.
To print this on my bubble-jet printer using A4 paper, I copied the pic into a spreadsheet (I use Libre Office). This allows you to see the page layout denoted by dotted lines on the spreadsheet. I needed 11, landscape sheets long and 2 sheets high, so 22 sheets in all. I think I finished printing most of them twice due to ‘errors’.
I tried gluing each A4 sheet direct onto the curved MDF, but in difficult to reach places it was just impossible to line them up with each other.
So I tried gluing 8 landscape sheets on a piece of cardboard approx 4’ long but it was too unwieldy to then glue it to the MDF, especially around the curves.
So I finished up using 2’ x 1’-6”’ cardboard (1mm thick) and gluing four, A4 sheets to that and that was manageable.
I sprayed each A4 sheet with matte photo finish before gluing using PVA glue. The cardboard was then glued to the MDF with contact adhesive. Unfortunately that meant noticeable ‘vertical joint lines’ in the overall effect. So I printed 2” wide strips of the scene and pasted over the joins.
I have used plaster of Paris to build up the baseboard to the grassy foreground.
Et voila, here is the finished 3.2m long scene.
This shows all the ugliness of the shed and how the line fits in and most of the backscene
And a few pics closeup pics..
Surprisingly, I only used about 1/3 of the ink cartridges, so only cost about $10. The MDF, glue and cardboard added $30 to that.
And that is the easy half! I still have another 3m to go, but this time I have to figure out how to blend the paddock scene into a mine scene and then into a town scene.
I wanted to cover the walls around the layout with some sort of ‘scenery’.
There are 3x2” studs protruding from the walls every 2’ or so, and three wall angles of 90 degrees.
So to ‘round’ the scenes I used 3mm MDF. I curved it by pouring boiling water on it and bending to approx shape by hand, then screwing or gluing in place. It’s shown in red here:
- nth wall backscene plan.jpg (110.39 KiB) Viewed 4358 times
- wall before backscene.jpg (146.23 KiB) Viewed 4358 times
To print this on my bubble-jet printer using A4 paper, I copied the pic into a spreadsheet (I use Libre Office). This allows you to see the page layout denoted by dotted lines on the spreadsheet. I needed 11, landscape sheets long and 2 sheets high, so 22 sheets in all. I think I finished printing most of them twice due to ‘errors’.
I tried gluing each A4 sheet direct onto the curved MDF, but in difficult to reach places it was just impossible to line them up with each other.
So I tried gluing 8 landscape sheets on a piece of cardboard approx 4’ long but it was too unwieldy to then glue it to the MDF, especially around the curves.
So I finished up using 2’ x 1’-6”’ cardboard (1mm thick) and gluing four, A4 sheets to that and that was manageable.
I sprayed each A4 sheet with matte photo finish before gluing using PVA glue. The cardboard was then glued to the MDF with contact adhesive. Unfortunately that meant noticeable ‘vertical joint lines’ in the overall effect. So I printed 2” wide strips of the scene and pasted over the joins.
I have used plaster of Paris to build up the baseboard to the grassy foreground.
Et voila, here is the finished 3.2m long scene.
This shows all the ugliness of the shed and how the line fits in and most of the backscene
- whole room.JPG (263.55 KiB) Viewed 4358 times
- DSCN4980.JPG (256.19 KiB) Viewed 4358 times
- east wall.JPG (249.01 KiB) Viewed 4358 times
- NE corner.JPG (269.23 KiB) Viewed 4358 times
Surprisingly, I only used about 1/3 of the ink cartridges, so only cost about $10. The MDF, glue and cardboard added $30 to that.
And that is the easy half! I still have another 3m to go, but this time I have to figure out how to blend the paddock scene into a mine scene and then into a town scene.
Greg from downunder.
The Sandstone & Termite's website: https://members.optusnet.com.au/satr/satr.htm
The Sandstone & Termite's website: https://members.optusnet.com.au/satr/satr.htm
-
GAP

- Trainee Driver
- Posts: 691
- Joined: Sun Dec 23, 2012 10:34 pm
- Location: Bundaberg QLD Australia
- Contact:
Re: A tiny G gauge indoor layout
Very impressive Greg the layout is coming along nicely.
Graeme
From the home of the Ringbalin Light Railway
https://ringbalin-light-railway.blogspo ... -page.html
From the home of the Ringbalin Light Railway
https://ringbalin-light-railway.blogspo ... -page.html
Re: A tiny G gauge indoor layout
I agree. Thats is really well done. The grass does look good too in the third shot of the closeups.
ROD
Life is so easy when I run my trains.
https://gardenrails.org/forum/viewtopic ... 41&t=11364
https://www.youtube.com/@fairywoodlightrailway
Life is so easy when I run my trains.
https://gardenrails.org/forum/viewtopic ... 41&t=11364
https://www.youtube.com/@fairywoodlightrailway
Re: A tiny G gauge indoor layout
Brilliant! That really transforms the whole thing, which seems to be coming together very nicely indeed - you must be very pleased with it!
Re: A tiny G gauge indoor layout
Excellent! The transition between real and backscene is really helped with that long grass.
Rik
Rik
-
Old Man Aaron

- Trainee Driver
- Posts: 816
- Joined: Wed Oct 19, 2016 11:08 am
- Location: Sunshine Coast QLD, Australia
-
Peter Butler

- Driver

- Posts: 5261
- Joined: Sun Sep 09, 2012 10:33 pm
- Location: West Wales
Re: A tiny G gauge indoor layout
A wonderful example of landscape artistry, it has tied everything together and given some meaning to its location.
The best things in life are free.... so why am I doing this?

Re: A tiny G gauge indoor layout
That's incredibly effective. Well worth the effort involved.
Phil
Sporadic Garden Railer who's inconsistencies know no bounds
My Line - https://gardenrails.org/forum/viewtopic ... 41&t=11077
Sporadic Garden Railer who's inconsistencies know no bounds
My Line - https://gardenrails.org/forum/viewtopic ... 41&t=11077

Re: A tiny G gauge indoor layout
That backscene is just so perfect!
Bishops Woodland Light Railway - Youtube
-
gregh
- Trainee Driver
- Posts: 572
- Joined: Sun Apr 01, 2018 5:44 am
- Location: Sydney, Australia
- Contact:
Re: A tiny G gauge indoor layout
Thanks everyone for your encouragement.
I'm glad none of you commented on the geological anomaly in the last pic where there is a good size creek/culvert on one side of the track but no water on the other side in the backscene. Must be an underground river. (My daughter did pick it up!)
I'm glad none of you commented on the geological anomaly in the last pic where there is a good size creek/culvert on one side of the track but no water on the other side in the backscene. Must be an underground river. (My daughter did pick it up!)
Greg from downunder.
The Sandstone & Termite's website: https://members.optusnet.com.au/satr/satr.htm
The Sandstone & Termite's website: https://members.optusnet.com.au/satr/satr.htm
-
GAP
- Trainee Driver
- Posts: 691
- Joined: Sun Dec 23, 2012 10:34 pm
- Location: Bundaberg QLD Australia
- Contact:
Re: A tiny G gauge indoor layout
The water is running through the rushes on the other side of the track and can't be seen because of the foliage?gregh wrote: ↑Thu May 18, 2023 12:27 am Thanks everyone for your encouragement.
I'm glad none of you commented on the geological anomaly in the last pic where there is a good size creek/culvert on one side of the track but no water on the other side in the backscene. Must be an underground river. (My daughter did pick it up!)
Graeme
From the home of the Ringbalin Light Railway
https://ringbalin-light-railway.blogspo ... -page.html
From the home of the Ringbalin Light Railway
https://ringbalin-light-railway.blogspo ... -page.html
Re: A tiny G gauge indoor layout
Really lovely Graeme, thats very much the kind of effect I was talking about at the beginning of the thread.
As for the stream in the foreground, well, clearly it can't be seen where it runs parallel to the track on the other side of the long grass. Of course with that much water about, shouldn't the grass be green not brown?? OK, I'll get my coat!
As for the stream in the foreground, well, clearly it can't be seen where it runs parallel to the track on the other side of the long grass. Of course with that much water about, shouldn't the grass be green not brown??
Philip
-
gregh
- Trainee Driver
- Posts: 572
- Joined: Sun Apr 01, 2018 5:44 am
- Location: Sydney, Australia
- Contact:
Re: A tiny G gauge indoor layout
My last post back in May described the farmland backscene on the north wall of the layout. I have now finished the west and south backscenes, which completes the whole “wallpaper”.
This time I wanted a town and ‘mine’ scene for the location of “Claymine” – the source of the clay for the pottery works. I had envisaged a large quarry with some sort of loader for hopper wagons but soon realised there was not enough room on the 12”wide baseboard to do this.
So I settled for a ‘less industrial’ type of clay mines shipping mainly bags of clay. This was partly driven from finding a good candidate picture for a backscene of the mullock heaps at Lightning Ridge. (Lightning Ridge is an Outback opal mining town). And Lightning Ridge just happened to be where Pauline and I first met. I even found a picture on the internet of The old Diggers Rest hotel where we had a few drinks on the night we met, so I have included that as well.
What could be more fitting in the shed that was her pottery studio?
So here is a composite picture showing the before and after
I made up the whole scene from 4 different pictures
The hotel,
a few houses in red dirt,
the mullock heap pic, which was stretched, copied and flipped to make it 3 m long, and
the tricky one-a transition from the mullock heaps to the existing north wall farmland. I decided to use a bushland scene for this.
I learned how to use MS Paint 3D Magic select tool to cutout pieces of pics I wanted and pasted them onto the main background. The ultimate setout and printing was done using a spreadsheet to layout the twenty, A4 sheets. Printing is just on plain paper, sprayed with Matte finish back and front before gluing and then clear lacquer after installation.
The individual panels look like this:-
1. The short south wall has the hotel
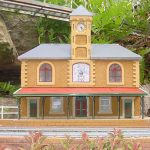
2. This is the south-west corner. The cream station building and platform are ‘real’ 3D models as are the crates etc on the goods platform. The goods shed is a pic of one of my goods sheds from the real garden railway and the water tower is to hide a transition between pics. On the right is the transition from town to mullock heaps disguised by trees pasted in.
3. Moving to the right, this is the original picture of the mullock backscene. The truck, kangaroo and old boiler are cut from other pics and electronically pasted on.
4. Moving to the right again, the background has been mirror flipped and stretched to make it look a little different. The goods shed is the same one used in pic 2 but front-on and shortened in length. The platform face is a pic from my Melaleuca station and the bags and hand cart are also pics from the garden line, all electronically cut and pasted. The truck is the same as in pic 3 but flipped.
5. And the final segment is the old mine loader. It is another cutout as is the emu.
Then there is a short Aussie bush scene backdrop to transition to the farmland backscene on the north wall. The buffer stop, lichen-trees and swagman are all real 3D to hide the transitions.
And that is all the backscene finished. My printer can have a rest.
The whole line is almost complete now. Just ballasting and some small scenery items and a building or two.
This time I wanted a town and ‘mine’ scene for the location of “Claymine” – the source of the clay for the pottery works. I had envisaged a large quarry with some sort of loader for hopper wagons but soon realised there was not enough room on the 12”wide baseboard to do this.
So I settled for a ‘less industrial’ type of clay mines shipping mainly bags of clay. This was partly driven from finding a good candidate picture for a backscene of the mullock heaps at Lightning Ridge. (Lightning Ridge is an Outback opal mining town). And Lightning Ridge just happened to be where Pauline and I first met. I even found a picture on the internet of The old Diggers Rest hotel where we had a few drinks on the night we met, so I have included that as well.
What could be more fitting in the shed that was her pottery studio?
So here is a composite picture showing the before and after
- composite.jpg (386.86 KiB) Viewed 3713 times
The hotel,
a few houses in red dirt,
the mullock heap pic, which was stretched, copied and flipped to make it 3 m long, and
the tricky one-a transition from the mullock heaps to the existing north wall farmland. I decided to use a bushland scene for this.
I learned how to use MS Paint 3D Magic select tool to cutout pieces of pics I wanted and pasted them onto the main background. The ultimate setout and printing was done using a spreadsheet to layout the twenty, A4 sheets. Printing is just on plain paper, sprayed with Matte finish back and front before gluing and then clear lacquer after installation.
The individual panels look like this:-
1. The short south wall has the hotel
- 2 DSCN5478.jpg (274.08 KiB) Viewed 3713 times
2. This is the south-west corner. The cream station building and platform are ‘real’ 3D models as are the crates etc on the goods platform. The goods shed is a pic of one of my goods sheds from the real garden railway and the water tower is to hide a transition between pics. On the right is the transition from town to mullock heaps disguised by trees pasted in.
- 3 DSCN5458.JPG (244.84 KiB) Viewed 3713 times
3. Moving to the right, this is the original picture of the mullock backscene. The truck, kangaroo and old boiler are cut from other pics and electronically pasted on.
- 4 DSCN5459.JPG (200.85 KiB) Viewed 3713 times
4. Moving to the right again, the background has been mirror flipped and stretched to make it look a little different. The goods shed is the same one used in pic 2 but front-on and shortened in length. The platform face is a pic from my Melaleuca station and the bags and hand cart are also pics from the garden line, all electronically cut and pasted. The truck is the same as in pic 3 but flipped.
- 5 DSCN5453.JPG (318.49 KiB) Viewed 3713 times
5. And the final segment is the old mine loader. It is another cutout as is the emu.
Then there is a short Aussie bush scene backdrop to transition to the farmland backscene on the north wall. The buffer stop, lichen-trees and swagman are all real 3D to hide the transitions.
- 6 corner transition.JPG (231.47 KiB) Viewed 3713 times
And that is all the backscene finished. My printer can have a rest.
The whole line is almost complete now. Just ballasting and some small scenery items and a building or two.
Greg from downunder.
The Sandstone & Termite's website: https://members.optusnet.com.au/satr/satr.htm
The Sandstone & Termite's website: https://members.optusnet.com.au/satr/satr.htm
Re: A tiny G gauge indoor layout
That is brilliant Sir! More an art exhibition than railway layout, but the finished effect is superb.
Philip
-
Peter Butler
- Driver
- Posts: 5261
- Joined: Sun Sep 09, 2012 10:33 pm
- Location: West Wales
Re: A tiny G gauge indoor layout
Naturally I'm not familiar with the Australian landscape but you have captured the wide expanse of country with huge skies very well.
The best things in life are free.... so why am I doing this?
Who is online
Users browsing this forum: No registered users and 1 guest