Page 1 of 6
A tiny G gauge indoor layout
Posted: Fri Nov 04, 2022 9:21 am
by gregh
Three years ago I started this topic on my dreaming of a small indoor G layout.
https://gardenrails.org/viewtopic.php?f=25&t=12349
I tested and proved that I could run my smaller ‘outdoor’ locos on 12 INCH radius curves, and I could build an 8” long rotating turnout to save space. This old video explains.
https://www.youtube.com/watch?v=gQxV7HT_bN0
After three terrible years, while I cared for my wife, I can now make a start.
And now that Sydney has had 6 months of almost daily rain, with little chance to run trains outside, an indoor line has even more appeal.
So I resurrected the plans for the pottery 'studio' layout and started ripping out all the shelving that Pauline and I had erected 20 years ago, to store all her clay, glazes and pots.
Now it will house the
Clay Mine Branch of the Sandstone and Termite.
I wanted more than an Industrial / shunting layout - there had to be somewhere for trains to go to, and come from.
Even though it is a small space (about 6' x 8') I wanted to use my existing G trains - my shorter locos and wagons - max 8" long with 4" wheelbase. The locos are all battery+RC.
Trains will have a maximum length of three of my existing 8” long wagons!
Here’s the plan

- IMG_8954J .jpg (307.45 KiB) Viewed 5982 times
You can see there are two stations more or less above one another with a height difference of 10" – the plan shows them separated for clarity.
And they are joined by a steep, curving line with a semicircle of 12" radius on a 1:18 grade. The 'straighter' parts of the line are on grades between 1:11 and 1:14.
to be continued as construction continues...
Re: A tiny G gauge indoor layout
Posted: Fri Nov 04, 2022 9:27 am
by philipy
Hi Greg,
It's good to see you feel able to start a new project.
This is looking very interesting and I'm looking forward to watching progress.
Re: A tiny G gauge indoor layout
Posted: Fri Nov 04, 2022 5:19 pm
by ge_rik
Great to see how much progress is being made in such a short time. I have always been impressed with your swivelling turnouts and this layout is clearly going to make the most of them.
Looking forward to the next update.
Rik
Re: A tiny G gauge indoor layout
Posted: Mon Nov 07, 2022 9:54 pm
by gregh
philipy wrote: ↑Fri Nov 04, 2022 9:27 am
Hi Greg,
It's good to see you feel able to start a new project.
This is looking very interesting and I'm looking forward to watching progress.
Thank you Philip.
Re: A tiny G gauge indoor layout
Posted: Mon Nov 07, 2022 10:02 pm
by gregh
Claymine station – the upper level
Tracklaying is complete at the upper level - I used lots of plastic track from cheap 'christmas train sets' where possible – these are 2’ radius. The crux of the whole small layout idea, allowing space saving, is the 'circular turnout' which I have devised. Instead of a 'normal' turnout 30cm long and needing say 3 of them in series taking a metre or so, this circular turnout is just 20cm long and allows up to 6 lines to radiate from it. BUT it is very finicky to build and install !!
I made the two of them on 7mm thick ply using plastic RAILS (not plastic track) epoxied to the wood. They are VERY finicky to make - all 4 ends must have EXACTLY the same gauge and make EXACTLY the same angles at the perimeter. And be all the SAME length to allow it to turn without binding. Using plastic rails made it a lot easier to do these adjustments - a dremel with cutoff disk! (the plastic rails came from TrainLi USA.)
Where I have to use curves less than 2' radius, I am making the track from brass rail (and to 46mm gauge) nailed to timber sleepers as I did outside, or LGB track.
The upper station has a main+loop and two sidings. One of these will be a 'clay mine', and the other a goods shed. In memory of Pauline and her pottery hobby, the clay will be transported downhill to the pottery factory at the lower station. This picture shows the plan and the actual build.
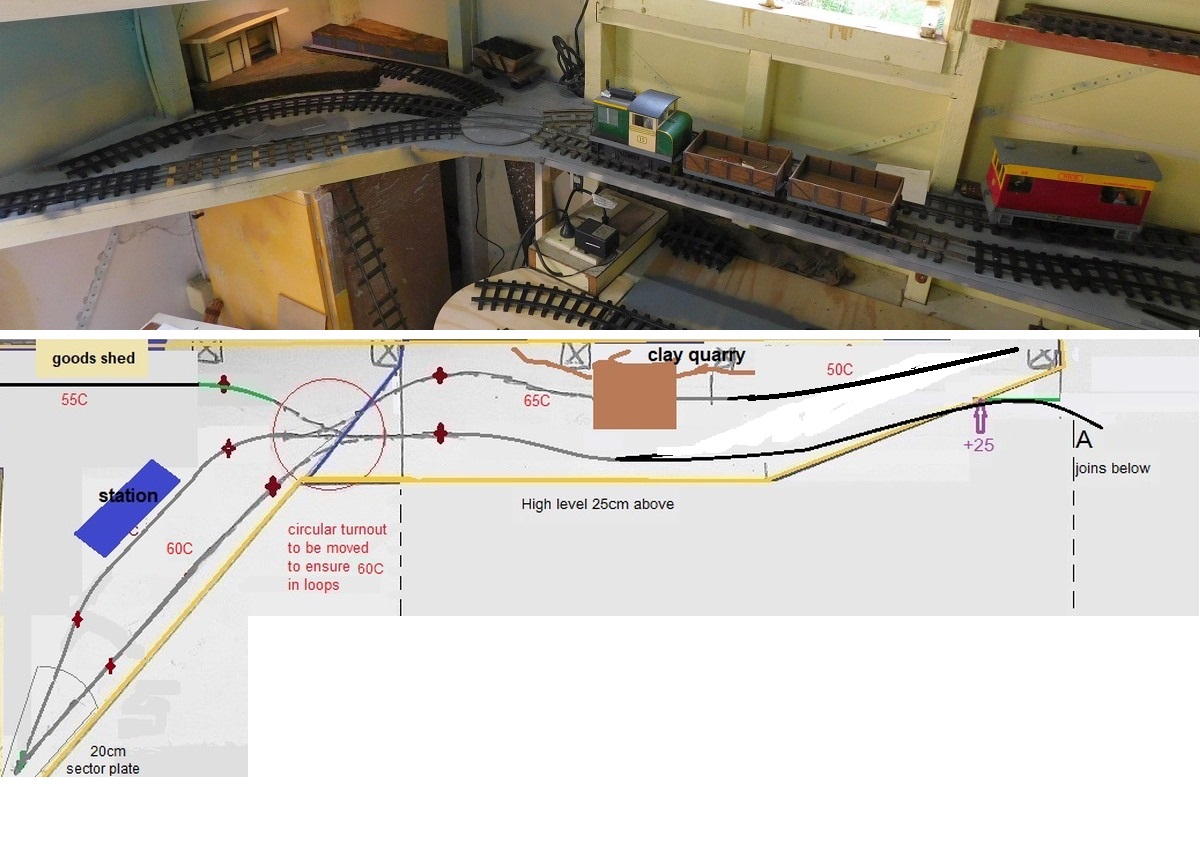
- upper station and dwg.jpg (240.82 KiB) Viewed 5864 times
This is a link to a video showing some testing: https://youtu.be/U7_h70yw74Y
Now to start work on the track down to the lower level...................
Re: A tiny G gauge indoor layout
Posted: Tue Nov 08, 2022 6:33 am
by philipy
The video is fascinating. The early shot pushing wagons into the clay siding is amazing but a bit heart in mouth though!
Re: A tiny G gauge indoor layout
Posted: Tue Nov 08, 2022 6:44 pm
by ge_rik
Very imaginative use of a tight space, Greg. I would never have thought of creating a double decker layout with so small a footprint. Those swivelling points are certainly space savers - and quite ingenious
Rik
Re: A tiny G gauge indoor layout
Posted: Tue Nov 08, 2022 7:04 pm
by ge_rik
I thought I'd see if anything like your turnouts exist(ed) in the real world. This was the nearest I could find. A dual gauge straight and curved turntable on a miniature railway in Brussels
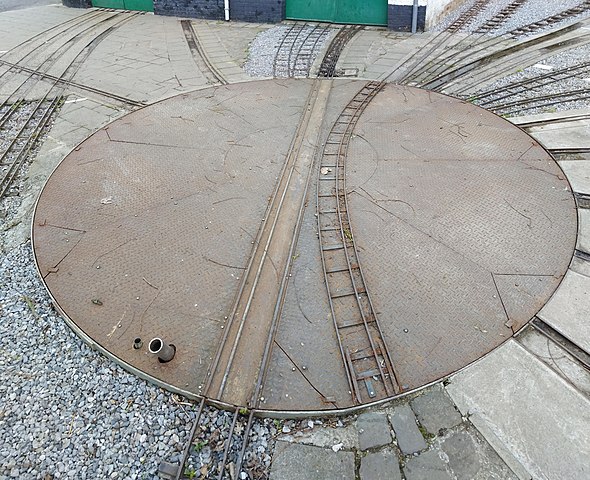
- 590px-Twin-gauge_straight_+_curved_turntable_at_PTVF,_Brussels.jpg (115.91 KiB) Viewed 5814 times
Rik
Re: A tiny G gauge indoor layout
Posted: Tue Nov 08, 2022 8:23 pm
by GAP
That looks great Greg
Some inspiration for my storage tracks under my HO layout future build
Re: A tiny G gauge indoor layout
Posted: Wed Nov 09, 2022 4:58 am
by gregh
ge_rik wrote: ↑Tue Nov 08, 2022 7:04 pm
I thought I'd see if anything like your turnouts exist(ed) in the real world. This was the nearest I could find. A dual gauge straight and curved turntable on a miniature railway in Brussels
Rik
Amazing. Really just a turntable as most of the tracks could not be lined up for 'through' running. But I wonder why they even bothered with the curved track.
Re: A tiny G gauge indoor layout
Posted: Wed Nov 09, 2022 10:32 am
by Phil.P
I think it probably evolved over time?
The curved route being a later addition..
Though I could envisage a through-route, using the curve, to the tracks to the right of the sheds?
Phil.P
Re: A tiny G gauge indoor layout
Posted: Sun Nov 13, 2022 5:45 am
by gregh
Part 3
The upper to lower level connecting track
This section is just 13’ of track long and rises 10 1/2” from the lower station. It is VERY steep and sharp curves, but it will let me do some scenery of mountains and tunnels etc. Maybe even a high trestle bridge.
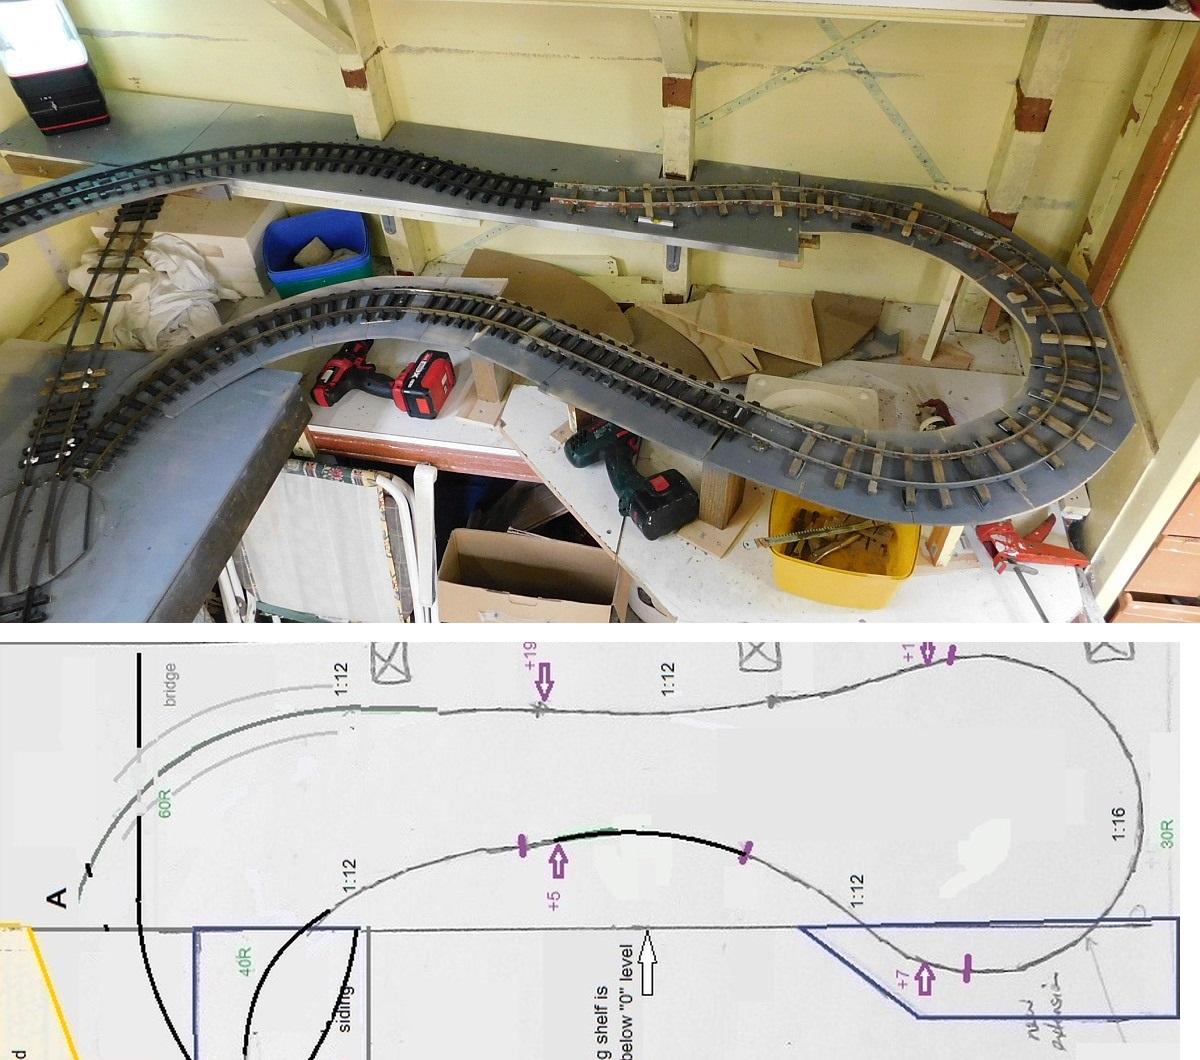
- the curve and dwg.jpg (369.15 KiB) Viewed 5699 times
For the 12" radius semicircle I used aluminum bar for the rail as it was easier to bend to such a sharp curve. (I used this method of making track when I first started outdoors.)
Vaseline is used to lubricate the inner parts of the rail heads!
I originally ‘designed’ the grades to be 1:16 on the semicircle and 1:14 on the straighter bits. But due to some miscalculation or mis-measurement by ‘someone who shall remain nameless’, I finished up with 1:18 on the semicircle and 1:11 on a 16” radius curve.
That is the new Ruling Grade and is the left end in this pic...
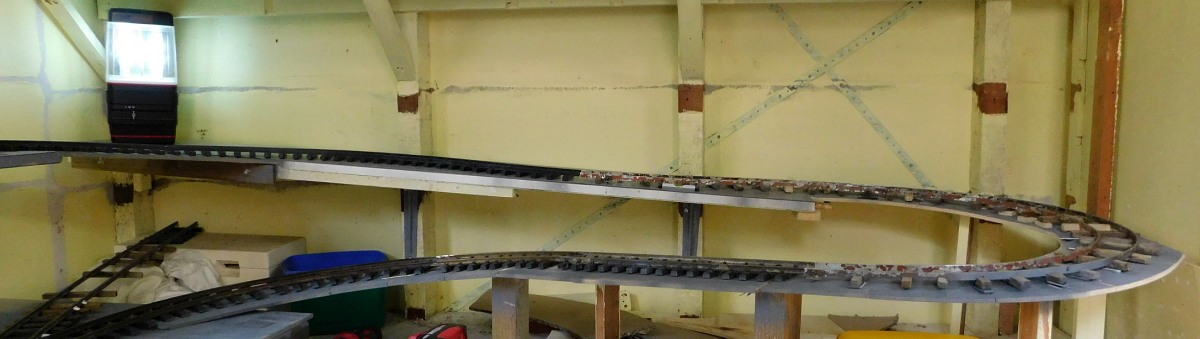
- side view of grade.JPG (102.87 KiB) Viewed 5699 times
One of the small locos I plan to use can handle 3 wagons on that grade but the other loco can only do two. Will make for more interesting operations!
Here's the link showing a test train: https://youtu.be/UlKOfV2FODQ
Re: A tiny G gauge indoor layout
Posted: Sun Nov 13, 2022 8:24 am
by Andrew
Just catching up with this thread - I love it!
It's going to look great once the scenery starts to go in. And that circular point is SO ingenious...
Re: A tiny G gauge indoor layout
Posted: Sun Nov 13, 2022 9:05 am
by philipy
Superb!
Re: A tiny G gauge indoor layout
Posted: Sun Nov 13, 2022 12:57 pm
by ge_rik
Love the video. There's an element of tension and jeopardy as the loco climbs .......

It'll be fun to run trains on wet days - of which you seem to have had more than your fair share recently!!
Rik
Re: A tiny G gauge indoor layout
Posted: Mon Nov 14, 2022 9:05 pm
by GAP
That looks great there Greg.
This may give you some ideas on how to do mountains in a corner.
https://ringbalin.blogspot.com/p/about-railway.html
I am starting to do a background similar to the one on here down my back fence to hide it.
I will use poly styrene foam and acrylic concrete render to cover it the same as I did here.
Re: A tiny G gauge indoor layout
Posted: Wed Nov 16, 2022 2:43 am
by gregh
GAP wrote: ↑Mon Nov 14, 2022 9:05 pm
That looks great there Greg.
This may give you some ideas on how to do mountains in a corner.
https://ringbalin.blogspot.com/p/about-railway.html
I am starting to do a background similar to the one on here down my back fence to hide it.
I will use poly styrene foam and acrylic concrete render to cover it the same as I did here.
Thanks Graeme. Using foam rubber is a new idea to me. I have been trawling the web for scenery making ideas. Not a lot has changed in 30 years since I built my N gauge scenery from chicken wire and plaster soaked paper. Some new use of expanding foam but that seems expensive to me.
I've started collecting big cardboard boxes and polystyrene foam. I'll need to make 7 tunnel portals too!
Re: A tiny G gauge indoor layout
Posted: Wed Nov 16, 2022 8:23 pm
by GAP
gregh wrote: ↑Wed Nov 16, 2022 2:43 am
GAP wrote: ↑Mon Nov 14, 2022 9:05 pm
That looks great there Greg.
This may give you some ideas on how to do mountains in a corner.
https://ringbalin.blogspot.com/p/about-railway.html
I am starting to do a background similar to the one on here down my back fence to hide it.
I will use poly styrene foam and acrylic concrete render to cover it the same as I did here.
Thanks Graeme. Using foam rubber is a new idea to me. I have been trawling the web for scenery making ideas. Not a lot has changed in 30 years since I built my N gauge scenery from chicken wire and plaster soaked paper. Some new use of expanding foam but that seems expensive to me.
I've started collecting big cardboard boxes and polystyrene foam. I'll need to make 7 tunnel portals too!
Greg,
The acrylic render from Bunnings is only $14, it goes for miles
https://www.bunnings.com.au/dunlop-20kg ... r_p0760242
The play sand also from Bunnings is $7-8
https://www.bunnings.com.au/richgro-20k ... d_p3022506
I look the cheapest white acrylic paint I can get and tint it with those artist's paints from the $2 shops, that is what the backdrop is done with.
I'm starting one to hide the fence across the back of my G scale layout.
I also look for mistints, of a colour I can use, in the paint dept and can get tins for about 1/2 price.
Re: A tiny G gauge indoor layout
Posted: Thu Nov 17, 2022 9:23 am
by gregh
Thanks for those hints and links Graeme. Will check them out.
Re: A tiny G gauge indoor layout
Posted: Thu Nov 17, 2022 7:48 pm
by GAP
gregh wrote: ↑Thu Nov 17, 2022 9:23 am
Thanks for those hints and links Graeme. Will check them out.
Another link to help you
https://ringbalin-light-railway.blogspo ... -make.html