Hi all,
I need some advice from all those more knowledgeable than myself. How does one typically go about scratch-building a removable roof? I was planning on using a layer of plasticard wrapped around the contour of the carriage body to give a good curve, but making this removable whilst keeping the curved roof could be tricky.
I could build a wooden frame, glued to the underside of the roof to be a snug fit within the walls of the carriage, but getting a sufficiently snug fit, and getting the frame to sit vertical on the curved roof seems like a potential stumbling point.
Curious as to what the "tried and tested" methods used by all of you are!
Scratch-building removable roofs
-
big-ted
- Trainee Fireman

- Posts: 239
- Joined: Fri Nov 25, 2011 4:13 pm
- Location: Vancouver, BC, Canada.
-
Narrow Minded
As you've suggested, a "snug fitting frame".
I built the frame inside the completed (van in this instance) body, so this ensured a perfect fit.
The frame ends and a mid-length spacer were also cut using the body ends as templates, the resulting depth of the ends with about a 1/4ins depth of side frame made for a secure fit.
I used plasticard for the frame because I was using a plastic roof, but would recommend wood framing for a wooden roof.
I built the frame inside the completed (van in this instance) body, so this ensured a perfect fit.
The frame ends and a mid-length spacer were also cut using the body ends as templates, the resulting depth of the ends with about a 1/4ins depth of side frame made for a secure fit.
I used plasticard for the frame because I was using a plastic roof, but would recommend wood framing for a wooden roof.
-
big-ted
- Trainee Fireman
- Posts: 239
- Joined: Fri Nov 25, 2011 4:13 pm
- Location: Vancouver, BC, Canada.
Thanks! I was planning on fitting a plasticard roof to my otherwise wooden carriage, as it seems plasticard will conform to the curve of the roof better. I'm worried that, if I use plywood, it'll always want to "spring" back flat and never stay in place?
Any chance of a photo of the underside of your roof? Presumably you had to cut some sort o chamfer around the outside top edge of your frame, to conform to the roof curve, else the vertical edges of the frame wouldn't be vertical?
Apologies if this isn't clear. This is my first time building any train stuff from scratch. I'm having a lot of fun and learning an awful lot at the same time!
Any chance of a photo of the underside of your roof? Presumably you had to cut some sort o chamfer around the outside top edge of your frame, to conform to the roof curve, else the vertical edges of the frame wouldn't be vertical?
Apologies if this isn't clear. This is my first time building any train stuff from scratch. I'm having a lot of fun and learning an awful lot at the same time!
-
Narrow Minded
If Mr Bond is reading this, I believe he now owns the van in question so he might take and post the photo's 
I think I might have another (now out of service) van and I'll have a look tomorrow.
Yep, you need to chamfer the edges for a good fit - again this is easy using the vehicle sides and ends as a guide.
Thin ply will hold its shape, but you can help it by scoring grooves lengthways on the inside or go "prototypical" and use strips of ply in a "planking" effect (aptly covered by MDLR on a couple of his documented builds on here)
I think I might have another (now out of service) van and I'll have a look tomorrow.
Yep, you need to chamfer the edges for a good fit - again this is easy using the vehicle sides and ends as a guide.
Thin ply will hold its shape, but you can help it by scoring grooves lengthways on the inside or go "prototypical" and use strips of ply in a "planking" effect (aptly covered by MDLR on a couple of his documented builds on here)
-
GTB
- Driver

- Posts: 1708
- Joined: Sat Mar 05, 2011 2:46 pm
- Location: Australia
I also use removable roof frames on my models similar to what Narrow Minded has described.
This is a photo of the all polystyrene (plasticard) roof in my guards van
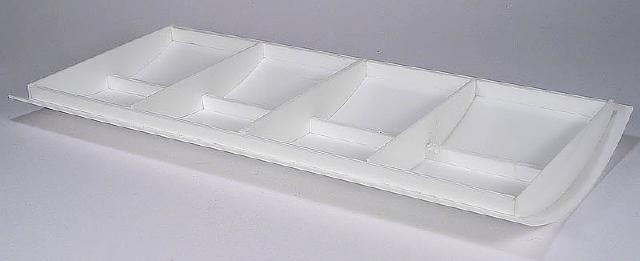
This railcar roof has a ply frame with a polystyrene sheet roof.

When I build a frame, I put a profile rib every 2-3" and another longitudinal down the centre, which stops the roof from sagging.
I make the roof frame a neat fit, but don't rely on just that to keep it in place. Sooner or later, someone will try and pick the model up by the eaves..........
Depending on the model, the roof is fixed in place with either small hex head screws through the ends, or I make up long screws that run between the roof and the floor and are screwed into a block of polystyrene glued to a couple of ribs.
If you use polystyrene sheet for the roof, precurve it, before fixing it to the frame. I just draw it over the bench edge until it takes up a curve that is a bit smaller in radius than the frame. This makes sure it seats nicely along the sides when you glue it down. Using rubber bands to hold a roof down while the glue dries pretty much ensures you'll get a wavy edge.....
Graeme
This is a photo of the all polystyrene (plasticard) roof in my guards van
This railcar roof has a ply frame with a polystyrene sheet roof.
When I build a frame, I put a profile rib every 2-3" and another longitudinal down the centre, which stops the roof from sagging.
I make the roof frame a neat fit, but don't rely on just that to keep it in place. Sooner or later, someone will try and pick the model up by the eaves..........
Depending on the model, the roof is fixed in place with either small hex head screws through the ends, or I make up long screws that run between the roof and the floor and are screwed into a block of polystyrene glued to a couple of ribs.
If you use polystyrene sheet for the roof, precurve it, before fixing it to the frame. I just draw it over the bench edge until it takes up a curve that is a bit smaller in radius than the frame. This makes sure it seats nicely along the sides when you glue it down. Using rubber bands to hold a roof down while the glue dries pretty much ensures you'll get a wavy edge.....
Graeme
Who is online
Users browsing this forum: No registered users and 2 guests