This weekend I have been mostly building....Gravity Griff wagon
A few photos of my latest coach build.
Built from a IP kit with added seat upholstery to give the interior some colour. I used coach & wagon paints which I've found excellent for brush painting without the need for primer.
Still some work to do on this one & another 2 to form a small rake. I've learnt a few lessons making this one & I won't be falling into the same trap on the next 2 kits.
Last edited by Simon-m on Sat Apr 09, 2022 9:11 pm, edited 7 times in total.
- Peter Butler
- Driver
- Posts: 5291
- Joined: Sun Sep 09, 2012 10:33 pm
- Location: West Wales
Re: I.P engineering Talyllyn coach 4
Please tell of the traps so we can avoid doing the same ourselves. I would be interested to see how you intend to glaze the windows too.
The best things in life are free.... so why am I doing this?
- Old Man Aaron
- Trainee Driver
- Posts: 830
- Joined: Wed Oct 19, 2016 11:08 am
- Location: Sunshine Coast QLD, Australia
Re: I.P engineering Talyllyn coach 4
Coming up beautifully, that. Looking forward to seeing the rake in service.
Regards,
Aaron - Scum Class Works
Re: I.P engineering Talyllyn coach 4
Thanks for the replies
The pit falls!
Because Talyllyn coaches have a complex multi coloured livery it needs some forward thought. Before I glued any parts together I pre painted most of the kit.
I decided to keep everything safe I would paint everything before removing the waste bits of wood. This way it would keep all the delicate beading parts from snapping. The problem is that you have to remove all the bits of tab from the pieces & this means more touch up.
The floor was something else that I pre painted with varnish & stain. It warped the wood which means it throws the trueness of the chassis out which again needs more work to fix.
It's now sat on all wheels & fine but next time the floor I will paint once assembled & all the beading will be removed before painting so I can clean up any tabs then I can paint everything before assembly.
The glazing on the coach I've been thinking about. The seating have notches in the tops of them I can only assume is to rest the glazing on for ease of fit. This wouldn't be bad if the glazing strip was the correct height. As it isn't I think I'm going to use strips of double sided tape fitted to the uprights of the doors as they are thicker & stick them in that way. I might run a bead of glazing glue along the edges to seal it all. Whilst glazing glue is good it's still runny & can smear on windows.
Re: I.P engineering Talyllyn coach 4
Excellent job and useful hints and tips. Thanks.
Just one question, you said "I used coach & wagon paints", but omitted to say which paint manufacturer?
Philip
Re: I.P engineering Talyllyn coach 4
Very tasty .... nay, delicious!
Rik
Rik
- Peter Butler
- Driver
- Posts: 5291
- Joined: Sun Sep 09, 2012 10:33 pm
- Location: West Wales
Re: I.P engineering Talyllyn coach 4
Simon, thank you for your response to my comments (shown above), my own experience with IP kits has been similar with warped plywood sections. I had a sealed plastic pack which immediately felt damp on opening, so warping was already there. If placed between two glass plates and allowed to dry naturally, this issue might be resolved, although Ivan agreed to replace mine.Peter Butler wrote: ↑Mon Jan 31, 2022 10:39 pm Please tell of the traps so we can avoid doing the same ourselves. I would be interested to see how you intend to glaze the windows too.
The window glazing was something I pondered about too, I avoided the use of double sided tape as it would inevitably dry out and come unstuck. I prefer to permanently stick my roof sections so replacing tape would be impossible. Instead, I cut an interior wall panel from card .....
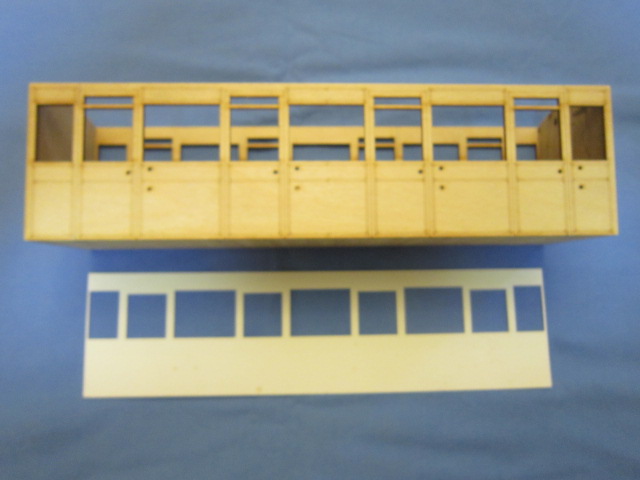
Then attached card strips above and below the glazing....
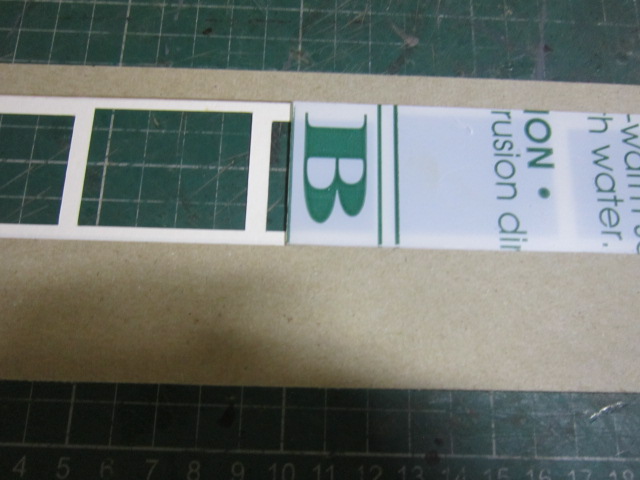
Finally, I fitted strips to show the interior detail, door frames etc....
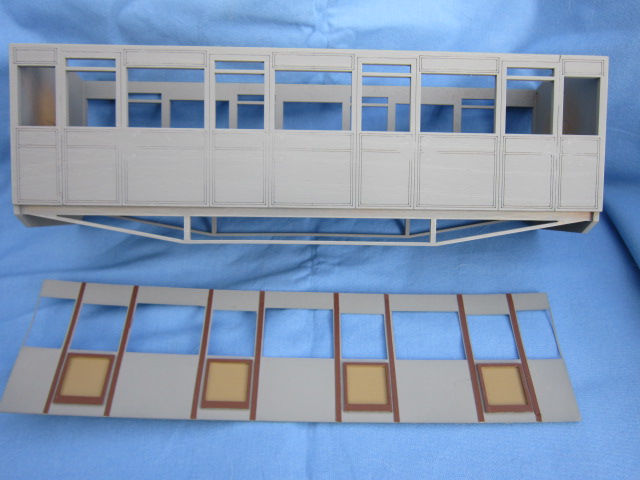
Much of this is included on my 'Time to build a railway...' thread under 'Railways and layouts'.
I hope you find this useful. Alternatively, you might prefer to stick the glazing inside directly to the plywood sides. For this I recommend Canopy Adhesive which dries clear and leaves no smears.
The best things in life are free.... so why am I doing this?
Re: I.P engineering Talyllyn coach 4
I assumed it was Coach & Wagon Works Simon? I've seen them at shows but never used them myself.
Re: I.P engineering Talyllyn coach 4
Thank you for that Simon. I have one of their coaches (they build IP engineering kits to a very high standard). I hadn't realised they do their own range of paint.SimonWood wrote: ↑Tue Feb 01, 2022 2:43 pmI assumed it was Coach & Wagon Works Simon? I've seen them at shows but never used them myself.
Phil
Sporadic Garden Railer who's inconsistencies know no bounds
My Line - https://gardenrails.org/forum/viewtopic ... 41&t=11077
Sporadic Garden Railer who's inconsistencies know no bounds
My Line - https://gardenrails.org/forum/viewtopic ... 41&t=11077
Re: I.P engineering Talyllyn coach 4
Hi Simon
Yes, those are the ones. Very nice paints I would certainly reccomend them.
Re: My workshop thread.
I decided to finish off a lingering model over the weekend. Its a lineside hut kit for a Ffestiniog brake van. I think it's been sat in various corners of the workshop & garage awaiting finishing for the past 18 months.
I painted the blackwork firstly before gluing glazing in & all the internals. Although I think the IP kit would have been better this one was cheap so I bought it.
I've also managed to make up another 2 kits today. First off a GRS water crane for the L&B. It's been soldered together & needed a good bit of fettle to get it right. I just need to find the prototypical colour for it.
Lastly I dug this kit out today & decided to make it. Its a jurassic models kit I got off ebay I think. The part fit needs a bit of work for a good fit but it does make into a nice wagon. I think it's a freelance model & so I decided for a quick finish I would just stain it with my usual interior coach stain.
I'm rather pleased with how this one's come out.
I'm going to get the Talyllyn coach 4 finished this week sp I can start the brake van next.
Re: Some wagons & bits I've built over the weekend
They all look good to me, but I see what you mean about the open wagon.
Rik
Rik
Re: Some wagons & bits I've built over the weekend
Three kits in one weekend? Quelle horreur I can't even approach that rate. I have a very big backlog!
Phil
Sporadic Garden Railer who's inconsistencies know no bounds
My Line - https://gardenrails.org/forum/viewtopic ... 41&t=11077
Sporadic Garden Railer who's inconsistencies know no bounds
My Line - https://gardenrails.org/forum/viewtopic ... 41&t=11077
Re: This weekend I have been mostly building..... a talyllyn covered van
So yesterday with an hour to spare I knocked up the basics of a talyllyn covered van.
I've been saving this one until I've been in the mood as the roof I knew would be problematic with such a tight radius.
The kit fell together if I am honest & was a breeze to make. All the parts fit as they should although the kit has a few small errors but nothing serious.
I've added a centre buffer/coupling to match my other rolling stock & I'm going to paint it later today all being well. Once it's painted I will add the final details which are parts of the ironwork.
All in all a nice little kit.
Re: This weekend I have been mostly building..... a talyllyn covered van
Nice little van, looking forward to seeing the finished job. Which kit is it?
Philip
Re: This weekend I have been mostly building..... a talyllyn covered van
Hi Phil
It's a ip Engineering kit from there Talyllyn range with ip couplings poached from one of the Talyllyn coach kits I have.
Re: This weekend I have been mostly building..... a talyllyn covered van
Very nice! I like all the vehicles, but particularly that little van. I can see why the prospect of bending that roof to shape alarmed you, but it looks just right.
You've got a very nice mixed rake there, I look forward to seeing picture of the whole train...
All the best,
Andrew.
You've got a very nice mixed rake there, I look forward to seeing picture of the whole train...
All the best,
Andrew.
Re: This weekend I have been mostly building..... a talyllyn covered van
Cheers Andrew, I've a few more Talyllyn wagons to make before I stock up on some more bits. Not sure what yet, maybe some more coaches, freelance.
Re: This weekend I have been mostly building..... a Brunel models, Chelfham station
I started Chelfham station about 18 months ago & then it just stopped. Its been sat needing finishing so I have made a start to get it finished. I wanted a more Welsh look to it & so I picked up from Coach & Wagon, a slate paint set. I've only used 2 of the 5 colours to paint the slate work using dry brushing to alter the tone. I've still some parts of the walling to complete but it's getting there.
I'm going to re visit this once it's basically completed. I want to add an interior & some lights so I can take a few shots at night of it lit up with a fairlie out front.
Who is online
Users browsing this forum: No registered users and 2 guests