

Glad you're feeling better - I wondered where you'd got to! Great work on the locos, thanks for the update.
All the best,
Andrew.
Time to build a railway...but where?
-
Peter Butler

- Driver

- Posts: 5291
- Joined: Sun Sep 09, 2012 10:33 pm
- Location: West Wales
I made the decision about which loco to fit my fourth Rx unit into and managed to install it today.
The concern was primarily about what battery power was required to drive the two Como motors in this loco and after trials with various packs I have installed eight rechargeable AA's which appear to give more than enough to propel the light engine at a good rate of knots. Once I have tried it under load I can increase the pack size if necessary but don't want to exceed 10 AA's to keep within my charger's capacity.
The loco fitted is.......

Because of the two motors the control is just amazing reducing the slow running to the slowest crawl, but having astonishing acceleration.
Rik..... I do hope you have more Rx units in stock now as further orders are inevitable.
The concern was primarily about what battery power was required to drive the two Como motors in this loco and after trials with various packs I have installed eight rechargeable AA's which appear to give more than enough to propel the light engine at a good rate of knots. Once I have tried it under load I can increase the pack size if necessary but don't want to exceed 10 AA's to keep within my charger's capacity.
The loco fitted is.......
Because of the two motors the control is just amazing reducing the slow running to the slowest crawl, but having astonishing acceleration.
Rik..... I do hope you have more Rx units in stock now as further orders are inevitable.
The best things in life are free.... so why am I doing this?
-
tom_tom_go

- Driver
- Posts: 4824
- Joined: Wed Feb 23, 2011 3:08 am
- Location: Kent, UK
- Contact:
-
Peter Butler
- Driver
- Posts: 5291
- Joined: Sun Sep 09, 2012 10:33 pm
- Location: West Wales
This is something I have so far managed to avoid! I know my camera is capable of carrying out such a deed, question is, am I?tom_tom_go:116320 wrote:We would like to see some running of this Peter if possible.
I once put a short clip on YouTube but almost lost the will to live.... perhaps I need to practise more and I might get it right.
I'll give it a try. Please be patient!
The best things in life are free.... so why am I doing this?

I'm sure you know a teenager who could show you.....Peter Butler:116324 wrote:This is something I have so far managed to avoid! I know my camera is capable of carrying out such a deed, question is, am I?tom_tom_go:116320 wrote:We would like to see some running of this Peter if possible.
I once put a short clip on YouTube but almost lost the will to live.... perhaps I need to practise more and I might get it right.
I'll give it a try. Please be patient!
youth is wasted on the young...
-
Peter Butler
- Driver
- Posts: 5291
- Joined: Sun Sep 09, 2012 10:33 pm
- Location: West Wales
Perhaps more of us should do this with our models and carry photographs of prototypes to show those who say it couldn't be so!TTHLRMatt:116351 wrote:Peter, going back to the different wheels comment, I know a locomotive which has both spoked and disk driving wheels. :lol:
The best things in life are free.... so why am I doing this?


Oooh, nice! Looks Chinese ... is it?TTHLRMatt:116366 wrote:And here is a photo for evidence! :D
There are plenty of FR slate waggons with odd wheels around too...


Tony Willmore
Rhos Helyg Locomotive Works: http://www.rhoshelyg.me.uk
Facebook: https://www.facebook.com/RhosHelygLocoWorks
Rhos Helyg Locomotive Works: http://www.rhoshelyg.me.uk
Facebook: https://www.facebook.com/RhosHelygLocoWorks
-
Peter Butler
- Driver
- Posts: 5291
- Joined: Sun Sep 09, 2012 10:33 pm
- Location: West Wales
-
Peter Butler
- Driver
- Posts: 5291
- Joined: Sun Sep 09, 2012 10:33 pm
- Location: West Wales
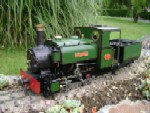
Now I'm back to model-making activities, and spending time in my engine shed again, I am looking around for things to complete which have been abandoned on the 'to do' list. One of the things I found was a kit which was given to me before Christmas. The owner had bought it with intentions of making a 'cheap and cheerful' loco but found it too much of a project to tackle. Originally I had little interest in making this but I don't like things hanging around indefinitely and decided to give it a try.
Before I started I made up my mind to build it to return to the original owner, and at 45mm gauge, which is the gauge he uses. As yet he doesn't know it will be returned, so I hope it will be well received!
It is a Locolines Kerr Stuart kit complete with low voltage motor and gearbox.
Firstly, I am a scratch-builder in Plasticard so this card kit was certainly different! It had been stored for many years and some areas were de-laminating so that was the first job. All sheets had to be cut with a very sharp Stanley knife blade and all edges coloured to match the panels. My preferred choice of adhesive was Evo-Stick white wood glue, possibly not the easiest as it requires drying time (unlike plastic solvents which are almost instantaneous) so the build took some time over a period of about four days.
The instructions were adequate but having cut out all of the parts some of the numbers disappeared! However, if you have some experience it should not be a problem. For the beginner it might be an issue?
I must admit to being disappointed with the visible coloured edges and ended up applying weathering colours and satin varnish to disguise the joins. Not everyone wants to do this but I feel much happier with the finished result.
Overall it looks quite satisfactory, especially as it is a low priced 'entry level' kit for the 16mm market.
This is it........
The best things in life are free.... so why am I doing this?
-
Peter Butler
- Driver
- Posts: 5291
- Joined: Sun Sep 09, 2012 10:33 pm
- Location: West Wales
A recent acquisition from Superbiker, on this Forum, of Coopercraft moulded letters (some of which he had already used for himself) gave me the opportunity to create a nameboard for one of my stations.
Here it is on the platform but not yet attached.

I still have some letters left over for my third station, I think it will have be called.... 'WJYZPXKR'
Not particularly Welsh but who will notice?
Here it is on the platform but not yet attached.
I still have some letters left over for my third station, I think it will have be called.... 'WJYZPXKR'
Not particularly Welsh but who will notice?
The best things in life are free.... so why am I doing this?
-
Superbiker_uk

- Fireman

- Posts: 371
- Joined: Wed Apr 01, 2009 7:36 am
That looks excellent Peter! Superb name board and pleased to see some of those left over letters put to good use. The parts I used were on my Finham Halt diorama.Peter Butler:116389 wrote:A recent acquisition from Superbiker, on this Forum, of Coopercraft moulded letters (some of which he had already used for himself) gave me the opportunity to create a nameboard for one of my stations.
Here it is on the platform but not yet attached.


That Locolines Kerr Stuart kit turned out well Peter. Like you I found that some additional work was necessary to get the best out of a Locolines kit, It's been several years since I built 'Emily', my large 2-6-2 tank engine, using a Locolines 'Mammoth' kit as a basis for the build. I used a certain amount of modelling ply reinforcement when I put 'Emily' together and while she could do with a little touching up here and there with her paintwork, structurally 'Emily' remains as sound as the day she was built.
As you say these are good entry level kits and the price is certainly right, but 'shake the box' kits they aren't.
As you say these are good entry level kits and the price is certainly right, but 'shake the box' kits they aren't.
What has Reality done for you lately?
TonyW:116368 wrote:Oooh, nice! Looks Chinese ... is it?TTHLRMatt:116366 wrote:And here is a photo for evidence! :D

Looking at just her wheels Tony, its quite easy to take her as being so but no. This is Adiela, a 9 1/2" gauge 2-6-2, based on a Columbian locomotive from the FCNDelM (Ferro Carril National Del Magdalena). She started life in the 1940's as a British 0-8-0 and soon progressed to being a 2-8-0. She was very successful until a riveted boiler was fitted whilst at East Ham and she fell out of use, subsequently ending up with us in the late 60's/early 70's in a literal tea chest. She was rebuilt with a bigger boiler and made all over beefier to a narrow gauge profile rather than standard gauge, being finished in 1976. With regards to wheels, one set was lost off the back of Jacks wagon whilst transporting her to the workshop after purchase (he did not believe in strapping bits down) and three more were found to be cracked so she has three disk wheels and three spoked.
I hope this is of interest Tony and Peter (sorry for hijacking your thread!).
-
Peter Butler
- Driver
- Posts: 5291
- Joined: Sun Sep 09, 2012 10:33 pm
- Location: West Wales
-
Peter Butler
- Driver
- Posts: 5291
- Joined: Sun Sep 09, 2012 10:33 pm
- Location: West Wales
Having fitted Rik's 'Deltang' RC control system to four of my locos I turned my attention to the Fairlie (and about time too!).
Some minor surgery was necessary first because the original is designed to be track powered and there are no openings for wires to be traced through the bodywork for battery and switch connections.
I like switches to be as unobtrusive as possible and searched for places to conceal both switch and charge point. Eventually I decided on this....
On/off switch...

Charge point....

I have also given the first coat of etch primer...


The detail on this model is amazing and it is going to try my patience and 'skill' with a paintbrush to make it look good enough to show.
Some minor surgery was necessary first because the original is designed to be track powered and there are no openings for wires to be traced through the bodywork for battery and switch connections.
I like switches to be as unobtrusive as possible and searched for places to conceal both switch and charge point. Eventually I decided on this....
On/off switch...
Charge point....
I have also given the first coat of etch primer...
The detail on this model is amazing and it is going to try my patience and 'skill' with a paintbrush to make it look good enough to show.
The best things in life are free.... so why am I doing this?
Who is online
Users browsing this forum: No registered users and 1 guest