Time to build a railway...but where?
-
Peter Butler

- Driver

- Posts: 5730
- Joined: Sun Sep 09, 2012 10:33 pm
- Location: West Wales
-
IrishPeter
-
Andrew

- Moderator

- Posts: 3422
- Joined: Tue Jul 03, 2012 1:33 pm
- Location: Bristol, UK
- Contact:
I've just dug out my copy of "British Rail - a journey by design", which insists that a lot of thought and many months/years work went into the corporate look - although that extended to typefaces, logos etc as well as coming up with "Monastral", as Rail Blue was apparently also known. The writer (Brian Haresnape) seems to think they did a pretty good job, although does concede that all-over blue looked pretty drab on locos previously in two-toe green.
Actually, I nearly crashed the car the other day as I drove past St Philip's Marsh depot and found my head involuntarily turning to better take in the sight of a freshly-outshopped "Thumper" unit in all-over blue (possibly there for tyre-turning?). It was quite a sight, but I think my wonderment was largely because it's been thirty years since I saw an all blue multiple unit (and I saw an awful lot of 'em growing up in South East London) rather than because of the awe-inspiring beauty of Rail Blue...
Anyway, back to your lovely Fairlie Peter. I reckon you could do worse than trying out a lining pen - it took a little practice and patience, but I really enjoyed getting to grips with mine and was pleasantly surprised by the results on my first attempt. I found Ian Stock's article (http://gardenrailwayrealism.pbworks.com ... ng%20stock) a useful introduction, and my own experiences are recorded on here somewhere...
Cheers,
Andrew.
Actually, I nearly crashed the car the other day as I drove past St Philip's Marsh depot and found my head involuntarily turning to better take in the sight of a freshly-outshopped "Thumper" unit in all-over blue (possibly there for tyre-turning?). It was quite a sight, but I think my wonderment was largely because it's been thirty years since I saw an all blue multiple unit (and I saw an awful lot of 'em growing up in South East London) rather than because of the awe-inspiring beauty of Rail Blue...
Anyway, back to your lovely Fairlie Peter. I reckon you could do worse than trying out a lining pen - it took a little practice and patience, but I really enjoyed getting to grips with mine and was pleasantly surprised by the results on my first attempt. I found Ian Stock's article (http://gardenrailwayrealism.pbworks.com ... ng%20stock) a useful introduction, and my own experiences are recorded on here somewhere...
Cheers,
Andrew.
-
Peter Butler
- Driver
- Posts: 5730
- Joined: Sun Sep 09, 2012 10:33 pm
- Location: West Wales
More scratch building took place yesterday evening whilst listening to the wind howling around my train shed.
Inspired by the SMT Ffestiniog modelling magazine I undertook some quarry type stock to add to my sidings. Page 61 has a wonderful picture of two bolsters in well worn condition...

Recently I purchased a load of Binnie wheels and axleboxes for such a project and found I had a scale drawing (by Colin) of similar bolsters. Once I had started it seemed to fall into place, with more time spent on them today they became working models, just waiting for paint.

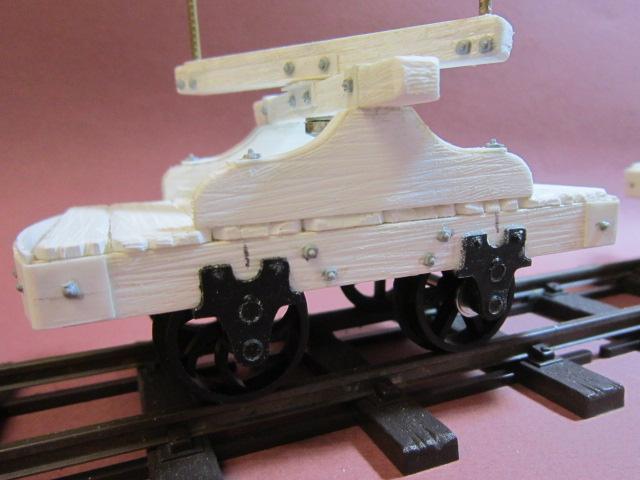
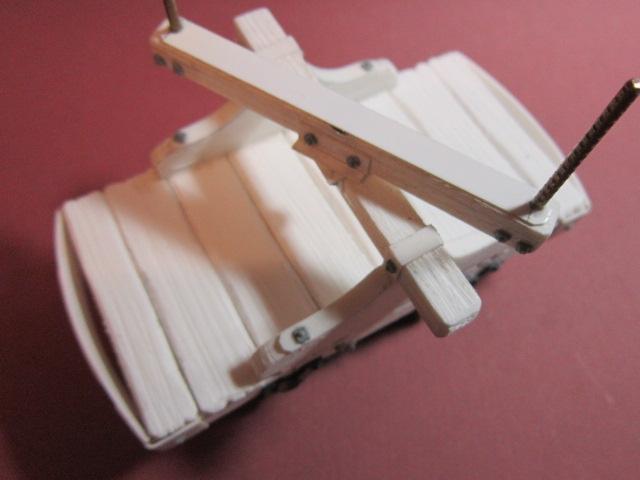
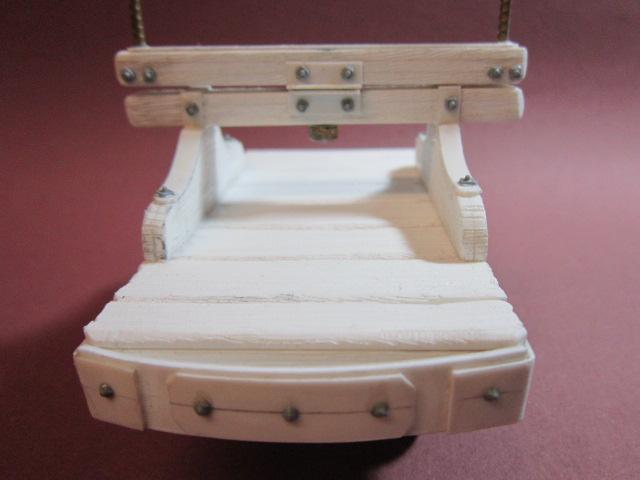
Inspired by the SMT Ffestiniog modelling magazine I undertook some quarry type stock to add to my sidings. Page 61 has a wonderful picture of two bolsters in well worn condition...
Recently I purchased a load of Binnie wheels and axleboxes for such a project and found I had a scale drawing (by Colin) of similar bolsters. Once I had started it seemed to fall into place, with more time spent on them today they became working models, just waiting for paint.
The best things in life are free.... so why am I doing this?
-
Andrew
- Moderator
- Posts: 3422
- Joined: Tue Jul 03, 2012 1:33 pm
- Location: Bristol, UK
- Contact:
Absolutely fantastic! I liked those little bolsters too when I saw them, and you've captured the look of them beautifully! Perhaps they'll move up my "to build" list a little now, although I ought to build some NWNGR/WHR ones first - I intend to resurrect the NWGNR's timber traffic on my imaginary Welsh Highland branch, adding a siding at Penlan to serve my wood store...
Looking forward to seeing the paint job...
Andrew [/code]
Looking forward to seeing the paint job...
Andrew [/code]
-
Daven
- Cleaner

- Posts: 16
- Joined: Tue Nov 12, 2013 5:57 pm
- Location: United Kingdom
Those look great Peter.
Narrow Gauge & Industrial Review 85 published an article by Stuart Baker on these with drawings and photographs. One photo shows a 2 ton slate wagon being used as a match truck which possibly explains the height of the bolsters. The theory put forward in Stuart's article is that it would be easy to find spare slate wagons to use whilst purpose built match trucks would add to the cost.
Regards
David
Narrow Gauge & Industrial Review 85 published an article by Stuart Baker on these with drawings and photographs. One photo shows a 2 ton slate wagon being used as a match truck which possibly explains the height of the bolsters. The theory put forward in Stuart's article is that it would be easy to find spare slate wagons to use whilst purpose built match trucks would add to the cost.
Regards
David
David Newell
-
Soar Valley Light

- Driver
- Posts: 1490
- Joined: Sun Dec 08, 2013 5:18 pm
- Location: North West Leicestershire
Hi Peter,
Once again I find myself in complete agreement with Rik. Did you carry out the wood graining yourself, It's very striking. Lovely wagons and I can't get over how quickly you created them!
Andrew
Once again I find myself in complete agreement with Rik. Did you carry out the wood graining yourself, It's very striking. Lovely wagons and I can't get over how quickly you created them!
Andrew
"Smith! Why do you only come to work four days a week?
"'cause I can't manage on three gaffer!"
"'cause I can't manage on three gaffer!"
-
Peter Butler
- Driver
- Posts: 5730
- Joined: Sun Sep 09, 2012 10:33 pm
- Location: West Wales
Hi Andrew, I think I have explained my wood graining technique on here before but I don't mind saying again how easy it is to create a convincing effect.
Firstly cut the card to size then run the teeth of a razor saw blade along it in the direction of the grain. Then take a Stanley type knife and using only the tip, scrape it freehand along the grain. You can be brutal with this as it can be sanded later. (Always work pushing the blade away from you for safety reasons). To create the worn sides and joins between planking, scrape the blade at an angle along the top and sides and make dips in the sides to make them uneven so that there forms a gap between them when laid side by side. The exposed ends of planks are scraped at an angle and 'v' cuts made to show signs of wear. I go to the trouble of scraping my razor saw along the ends to make grain, but that is just me!!!
Yesterday evening I cut a few 'kits' to batch build some flat wagons for the quarry. By the end of today I now have four completed and three just waiting for axleboxes which I have now run out of.
I will post pictures of these tomorrow.
The bolsters have been primer and base coat painted, more detailing to follow......
Firstly cut the card to size then run the teeth of a razor saw blade along it in the direction of the grain. Then take a Stanley type knife and using only the tip, scrape it freehand along the grain. You can be brutal with this as it can be sanded later. (Always work pushing the blade away from you for safety reasons). To create the worn sides and joins between planking, scrape the blade at an angle along the top and sides and make dips in the sides to make them uneven so that there forms a gap between them when laid side by side. The exposed ends of planks are scraped at an angle and 'v' cuts made to show signs of wear. I go to the trouble of scraping my razor saw along the ends to make grain, but that is just me!!!
Yesterday evening I cut a few 'kits' to batch build some flat wagons for the quarry. By the end of today I now have four completed and three just waiting for axleboxes which I have now run out of.
I will post pictures of these tomorrow.
The bolsters have been primer and base coat painted, more detailing to follow......
The best things in life are free.... so why am I doing this?
-
Soar Valley Light
- Driver
- Posts: 1490
- Joined: Sun Dec 08, 2013 5:18 pm
- Location: North West Leicestershire
Thanks Peter,
You make it sound so simple but I'm sure my efforts would be hard pressed to compare to yours! As and when the time comes I look forward to experimenting and developing skills such as this.
Please, keep the inspiration coming.
Andrew
You make it sound so simple but I'm sure my efforts would be hard pressed to compare to yours! As and when the time comes I look forward to experimenting and developing skills such as this.
Please, keep the inspiration coming.
Andrew
"Smith! Why do you only come to work four days a week?
"'cause I can't manage on three gaffer!"
"'cause I can't manage on three gaffer!"
-
Peter Butler
- Driver
- Posts: 5730
- Joined: Sun Sep 09, 2012 10:33 pm
- Location: West Wales
Here are the other flats I mentioned yesterday....


Four are ready for paint and three waiting for axleboxes to arrive from Binnie.
As they are so lightweight I always add lead sheet underneath the chassis but like to hide it from view. I always think the underside should look as tidy as the top.


However..... due to my hurry to complete the trucks I have discovered I made a mistake by mixing curly and straight spoked wheels resulting in me having to take the axleboxes off and refitting with the correct wheels. That's what happens when I buy job-lots on ebay and mix them up.... my own fault!
Four are ready for paint and three waiting for axleboxes to arrive from Binnie.
As they are so lightweight I always add lead sheet underneath the chassis but like to hide it from view. I always think the underside should look as tidy as the top.
However..... due to my hurry to complete the trucks I have discovered I made a mistake by mixing curly and straight spoked wheels resulting in me having to take the axleboxes off and refitting with the correct wheels. That's what happens when I buy job-lots on ebay and mix them up.... my own fault!
The best things in life are free.... so why am I doing this?
-
ge_rik
- Administrator
- Posts: 8051
- Joined: Sun Oct 25, 2009 10:20 pm
- Location: Cheshire
- Contact:
Peter
I'll bet that somewhere there's a prototype wagon with mixed wheels - assuming that over the years a quarry will have mixed and matched bits from wagons to keep them running.
A fine looking rake that - really great detail, as ever.
I do envy you your inside section - especially at this time of year.
Rik
I'll bet that somewhere there's a prototype wagon with mixed wheels - assuming that over the years a quarry will have mixed and matched bits from wagons to keep them running.
A fine looking rake that - really great detail, as ever.
I do envy you your inside section - especially at this time of year.
Rik
-
Peter Butler
- Driver
- Posts: 5730
- Joined: Sun Sep 09, 2012 10:33 pm
- Location: West Wales
Many thanks Rik, I had given thought to leaving them as they were, firstly to see whether anyone noticed, secondly so that I could use your excuse so not to risk damage whilst swapping them. In the end I couldn't live with them that way and had to take a chance.... it worked out just fine and all is now well with my world!
The best things in life are free.... so why am I doing this?
-
Peter Butler
- Driver
- Posts: 5730
- Joined: Sun Sep 09, 2012 10:33 pm
- Location: West Wales


-
rebelego
- Trainee Fireman

- Posts: 211
- Joined: Thu Aug 29, 2013 3:00 pm
- Location: Norway

-
Andrew
- Moderator
- Posts: 3422
- Joined: Tue Jul 03, 2012 1:33 pm
- Location: Bristol, UK
- Contact:
-
Peter Butler
- Driver
- Posts: 5730
- Joined: Sun Sep 09, 2012 10:33 pm
- Location: West Wales
While I'm in the mood for making quarry type stock I dug out a drawing from my collection of a Penrhyn coal wagon, drawn by Colin Binnie in 16mm/ft. scale.

I really like to make models which are not usually available as kits (not that I ever buy kits anyway!) and this stands out from the norm being unusual in its construction.
Not content with making just one, I made two...

The same method of wood graining is used and dozens of bolt heads from Cambrian Models stuck on for effect.
They are currently in grey primer...


I really like to make models which are not usually available as kits (not that I ever buy kits anyway!) and this stands out from the norm being unusual in its construction.
Not content with making just one, I made two...
The same method of wood graining is used and dozens of bolt heads from Cambrian Models stuck on for effect.
They are currently in grey primer...
The best things in life are free.... so why am I doing this?
Who is online
Users browsing this forum: No registered users and 14 guests