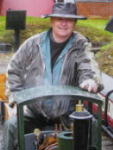
Hi, At midday it was 27C in the workshop. So, I decided to run a train on the garden railway, and in the cool edit a video made when it was running. I hope you enjoy.
Take care Tony.
Playing with a Cracker.
-
Tony Bird
- Trainee Driver

- Posts: 595
- Joined: Thu Jul 29, 2010 8:25 am
- Location: Cardiff, South Wales, UK.
-
Keith S
- Driver

- Posts: 1665
- Joined: Thu Feb 24, 2011 11:44 pm
- Location: Canada
Re: Playing with a Cracker.
Nice video, Tony. I like those “Crackers”.
-
Scrat

- Fireman

- Posts: 267
- Joined: Mon Jun 08, 2020 7:24 am
Re: Playing with a Cracker.
After more than 20 years under the bench (including a house move) my cracker has come to the top of the bench again.
Chassis is complete, Boiler also.
I am now making the cylinder and the components around it.
The only thing I do not want to build according to the plans are burner and tank.
Is there any "off the shelf" solution the other cracker-builders can recommend?
Chassis is complete, Boiler also.
I am now making the cylinder and the components around it.
The only thing I do not want to build according to the plans are burner and tank.
Is there any "off the shelf" solution the other cracker-builders can recommend?
-
Tony Bird
- Trainee Driver
- Posts: 595
- Joined: Thu Jul 29, 2010 8:25 am
- Location: Cardiff, South Wales, UK.
Re: Playing with a Cracker.
Hi,
As far as I know there isn't a commercially made burner small enough to fit a Cracker. I hope I have attached PDF is the burner drawing I designed which might help you..
Take care Tony.
As far as I know there isn't a commercially made burner small enough to fit a Cracker. I hope I have attached PDF is the burner drawing I designed which might help you..
Take care Tony.
-
Tony Bird
- Trainee Driver
- Posts: 595
- Joined: Thu Jul 29, 2010 8:25 am
- Location: Cardiff, South Wales, UK.
Re: Playing with a Cracker.
Hi,
Sorry not the drawing that I hoped it would be I will try again. T
Sorry not the drawing that I hoped it would be I will try again. T
-
Tony Bird
- Trainee Driver
- Posts: 595
- Joined: Thu Jul 29, 2010 8:25 am
- Location: Cardiff, South Wales, UK.
Re: Playing with a Cracker.
- Mod. Cracker drawing 5 burner.JPG (283.3 KiB) Viewed 214 times
-
Scrat
- Fireman
- Posts: 267
- Joined: Mon Jun 08, 2020 7:24 am
Re: Playing with a Cracker.
Hi tony,
thanks for the drawing.
I a just sorting out mistakes I made back then.
Now I have a well-running chassis. Binding has been dealt with.
I had to make new buffer blocks. The old ones were just filed. I made the new ones on my (tiny) mill and they are square. What a difference.
Made the cylinder yesterday.
I still hope to find some burner as I do not have the experience to make one.
My last attempt to copy the famous Falk burner turned into a pocket sized flamethrower.....
-
Scrat
- Fireman
- Posts: 267
- Joined: Mon Jun 08, 2020 7:24 am
Re: Playing with a Cracker.
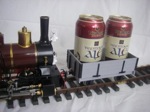
While waiting for more brass stock for the cracker to arrive I did something different.
As I was not sure I could build the cylinder precise enough to actually work I took the dimensions from the cracker drawings, a flywheel from the box-o-bits and went to work.
Cylinder parts:

Beginning to look like a steam engine:

I only used stock parts from the bin.
This pillar has onve been grabbed by the mill and launched to the far corner of the workshop.
Some other parts also show their origin clearly.
As it was just a test engine, I did not clean up those marks.

Finished:


Of course, she did not run on the first try.
I had made a jig for drilling the ports as it is shown in the cracker drawings.
One hole in the jig was slightly off-centre but a jig is a jig and if this deviation is transferred to all parts, it will work, I thought.
Murphy paid a visit, I put the jig on upside down and of course the hole was in the wrong place.
I plugged the hole with 1mm brass rod soldered into the cylinder base, drilled again (right place this time) and....she runs.
I guess that is good enough to try the cracker cylinder now.
As I was not sure I could build the cylinder precise enough to actually work I took the dimensions from the cracker drawings, a flywheel from the box-o-bits and went to work.
Cylinder parts:
Beginning to look like a steam engine:
I only used stock parts from the bin.
This pillar has onve been grabbed by the mill and launched to the far corner of the workshop.
Some other parts also show their origin clearly.
As it was just a test engine, I did not clean up those marks.
Finished:
Of course, she did not run on the first try.
I had made a jig for drilling the ports as it is shown in the cracker drawings.
One hole in the jig was slightly off-centre but a jig is a jig and if this deviation is transferred to all parts, it will work, I thought.
Murphy paid a visit, I put the jig on upside down and of course the hole was in the wrong place.
I plugged the hole with 1mm brass rod soldered into the cylinder base, drilled again (right place this time) and....she runs.
I guess that is good enough to try the cracker cylinder now.
Who is online
Users browsing this forum: No registered users and 1 guest