Right, bit of a bulk update, this may be a long post, however if you have one of these it might prove very useful.
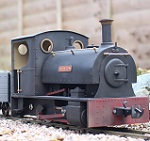
The LKM Ns2f is now finished. Quick bit of advise, unless you like fiddly, tight wiring where you have to shoehorn everything in, send this one off to a professional to do, given the choice again, I probably would. The end result is a fantastic running, great sounding little loco that I could not be happier with.
So, the parts I personally used to do this from a standard factory loco are.
Motor upgrade
LED upgrade
RC Trains (Deltang) RX65c
RC Trains TX24 (you may already have this or another type of TX, but in this instance this is the one I used and the programming is for this setup only)
3 x 18350 batteries (eBay)
3 x 18350 battery holders (had to order direct from Germany, could not find these in the UK)
MTroniks digisound 5m(Small Diesel Tug) (MTroniks direct website)
A small speaker that fits in the front of the grill (moody teenager)
Lots of little bits of wire
Heatshrink
Charging socket
On/off switch with 3 connectors
A bucket load of patience.
All pictures at the end due to this will be a long post.
Firstly swap the motor out and remove all the wiring, switches speed controller etc.
Next the fiddly little lights. The originals will pull out intact from behind, the new ones will require the lenses removing and putting in from the fronts. lenses were glued back in using canopy glue which dries clear. All wiring will require new double sided tape to hold in place as the original has lost its tackiness. For me the anodes were joined and receive a single supply from the battery using one of the resistors in the pack. I only needed one as the lights will be directional and it will switch from front to back as it moves in that direction. The RX 65c has this built in using pads A & B which are a 0v / disconnect state depending on direction. No programming is required for this. The Cathodes go to each respect pad on the RX 65c. I used a cutup servo extension cable for the 3 way connector, so positive in the middle and the two negatives on the outside, this was I can removed the body easily.
The speaker was salvaged from my sons Xbox headset which he broke in a mood the other day, so for me a no cost option, thanks Mike

This was glued into the front of the loco with a small red JST connector, again, so this plugs onto the sound card and makes the body easily removable.
The RX65c for me is set to Low Off. this means that the direction knob controls only the direction it goes, not any speed, whereas the speed knob controls zero to full speed, to change direction, you stop, change the direction knob, the use the speed knob again for full control. This gives you more control over the loco as you have more steps doing it this way, just my preference as thats how all my steam loco's are setup and it makes sense to keep them all the same. This option can be changed using the "paperclip" changes on the RX 65c, see the Deltang website for more details. I also reprogrammed the RX 65c to use an additional channel, this has taken many conversations in the past to achieve but works well. I use channel 5 (the bind button) for the horn, this can be done with a 1k resistor from pad C directly to to the sound card. I then used pad 8 for the engine start / stop. This was reprogrammed on the RX (reprogramming can be done using a TX21 or a Prog4 card, I use a prog 4 card attached to the PC, see the Deltang website for using this). The settings given were 3,8,2,7,3. This means that type 3, on pad 8, using latching (latching is required for continuous engine running until pressed again) using channel 7, On when channel is mid. Again, see the Deltang website for details of the massive programming options available. The RX65c was held in place against the motor using double sided tape. The antenna was placed downwards with a small hole drilled into the base of the chassis so the antenna comes out underneath the loco. Motor connectors direct to the motor, using only a cm to a couple of cm of cable.
The TX 24 I have added another usable channel to. This was done using an additional single button like the bind button. The wiring for this is complicated and I won't go into it on this thread as it deserves a thread of it's own. Message me if you want to go down this route, it is not the only option available, Rik on here has lots of details in his blog site about doing this.
The batteries did not exactly fit the holders, well they did but the positive side was too large to touch the connectors, so I soldered a "blob" of solder onto the positive connectors to extend them so the touched. I then wired the double holder to the single holder, giving me a fully charged voltage of 12.6v between the 3 batteries. This I put on a red JST connector in case I needed to remove the batteries. The batteries are simply held in with strong double sided tape (same as what is used for car number plates), they really can't go far anyway.
The sound card. pretty straight forward using the instructions supplied, I ditched the large connector it comes with a went for individual connectors, using small JST internals and shrink wrap, this just saved a little space and every mm/thou counts on this one. Power taken directly after the switch, same as the RX. two wires to the motor. Two wires to the RX pads as mentioned above. Speaker on a JST connector as mentioned above. Sound card was placed on it's side and again held in with double sided tape, you really don't need anything else as nothing can move anyway.
Charging play and switch were then installed. The original switch hole was drill out slightly and moved over to the side slightly to allow space for the charging socket to fit. These are wired as standard and have a resetting fuse inline of the batteries for protection.
Simply screw it back together and enjoy. If you are tackling one of these, please feel free to ask me anything along the way and, good luck
Note that my wiring is usually a bit tidier than this, but space was a bit of a premium and it's not the neatest finish, that's an awful lot of wires in a very small space!

With the picture below, the red JST connector was eventually swapped for a 3 pin servo extension as it was better suited to the job.