Page 1 of 4
Building the RVLR
Posted: Sat Mar 02, 2013 4:59 pm
by SapperAnt
So, now that the good weather is here it's time to make a start.
I've discussed various schemes with "he who must be obeyed", who despite having said "yes" to having a patio based "shelf railway" has decided "no" to that one.
So back around the waterlogged lower lawn/flower bed area.
I intend to lay a basic oval with a passing loop using Peco SM32 track.
Im going to support the track on 1ft 2inch square posts and build the track bed from 1.5 inch treated boards or exterior grade ply and cut the curves from ply.
I have ruled out a ground level railway due to the waterlogged status of the site.
I know it's not going to look pretty or blend in, but, the very lowest end of the garden is during winter a complete quagmire with poor drainage. There is often standing water...which isnt good. Hence raising the track well away from that.
Thoughts please????
Posted: Sat Mar 02, 2013 5:20 pm
by tom_tom_go
Raised lines are kind to your back and neck, you will not regret your decision!
Posted: Sat Mar 02, 2013 5:24 pm
by Peter Butler
Your ground conditions sound very similar to mine... I am on a gentle slope with water draining from the top of the field to the lowest point, which is where I propose to build my railway.
My idea is to level the ground as much as possible so that the back of the loop is at ground level while the front is raised to about waist height.
My track will also be on treated planks and timber pegs in the ground. I thought about building embankments up to track level so that reality, of sorts, is maintained. This will keep the track above any standing water too.
I'm pleased to hear someone else has come up with a similar solution to the problem.
Posted: Sat Mar 02, 2013 5:57 pm
by SapperAnt
Yeah. easier on the back...especially so as I have manual locomotives.
The "lower" end of the garden is at the bottom of the slope (it then, beyond the fence, leads into the Railway Cutting. We had a Black Five go past the other day. No idea where it was going but I'm glad I didnt have my washing out lol). The lawn area has been dug out about a foot to make a sunken lawn which in winter becomes a Carp Pond.....
To tidy up the raised track bed I might nail on some log roll. Maybe. ish.
Would treated timber with nail gunned on roofing felt would be sufficient weather proofing for the track bed???
I'm currently feeling a bit lost and in need of lots of guidance on this.
Posted: Sat Mar 02, 2013 6:05 pm
by tom_tom_go
Check out my railway for inspiration (see signature)
Posted: Sat Mar 02, 2013 6:12 pm
by SapperAnt
I've been following the thread with interest! :-)
What timber did you use for your "shelf"? My local DIY place only seems to do treated timber 10cm wide which really isnt wide enough. Realistically I want double that....
What radius points are those? Ive noticed Peco now do a 30" radius set. Alas Peco SM32 isnt quite setrack is it? lol.
Posted: Sat Mar 02, 2013 7:19 pm
by Peter Butler
My local family run timber merchants do treated timbers in a range of sizes. My favorite is 1" thick and 6" wide and comes in lengths up to about 6m.
I have used 'miles' of this stuff and found it last for years.
The DIY stores only stock timber for 'general' use but garden centres or 'out of town' stockists who provide for farms or smallholders are your best option.
Posted: Sat Mar 02, 2013 8:51 pm
by tom_tom_go
SapperAnt:80753 wrote:I've been following the thread with interest! :-)
What timber did you use for your "shelf"? My local DIY place only seems to do treated timber 10cm wide which really isnt wide enough. Realistically I want double that....
I used Wickes wooden gravel boards which are at least 15cm wide.
What radius points are those? Ive noticed Peco now do a 30" radius set. Alas Peco SM32 isnt quite setrack is it? lol.
I have used both. The new tight radius points are great for us owners of small gardens

Posted: Sat Mar 02, 2013 10:58 pm
by SapperAnt
Thanks both of you!
The Good Shed at the station literally at the bottom of my garden (well, down the embankment) is now a timber yard but I'm not sure what they sell or to whom. I shall investigate. (the Goods Shed is actually an interesting Midland building, the station house being long gone but the platform shelters are still there; the Midland foot bridge and all sorts of infrastructure from the days of yore)
Posted: Sat Jul 27, 2013 5:24 pm
by SapperAnt
TRACK HAS BEEN LAID
4.5 yards of track has been laid on the RVLR (temporarily) and a train has been run!!!
I'm putting in an order for a further six yards of track and also need to utilise the little grey cells how to make what is U shaped line an oval.
It feels like a proper railway now, rather than a loop of track on the patio. And so so so much easier on the back!
Pics to follow

Progress pics
Posted: Sat Jul 27, 2013 9:44 pm
by SapperAnt
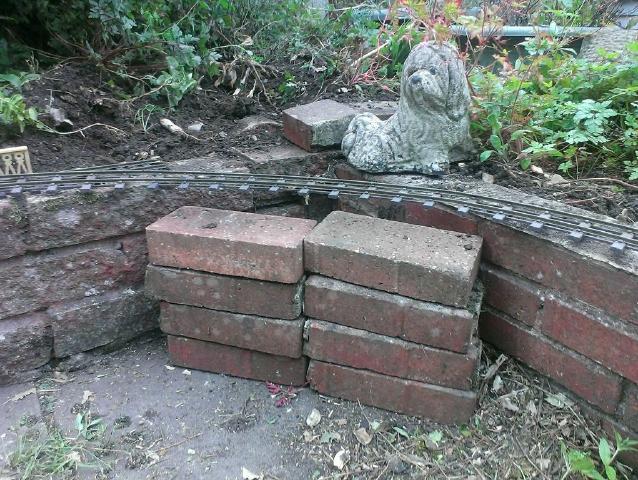
Result of todays hard work
 Click to see full size image
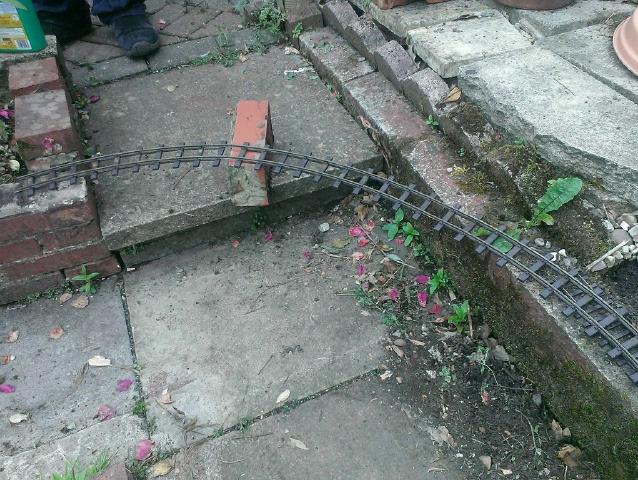
Note the track hanging in the air....how to bridge this gap?
 Click to see full size image
 Click to see full size image
Posted: Sun Jul 28, 2013 8:19 am
by LnBmad
Why not build a curved bridge for the corners that overhang?
Posted: Sun Jul 28, 2013 2:26 pm
by SapperAnt
This is my plan. Either have the track running onto the wall as it is now, or have a free standing curved timber bridge......
My wood working skills are minimal, hence asking for advice :-)
By the by what would members preferred method of securing the track be? Im thinking mortar with coarse sand in it....
Posted: Mon Jul 29, 2013 9:12 am
by hussra
SapperAnt:86394 wrote:This is my plan. Either have the track running onto the wall as it is now, or have a free standing curved timber bridge......
Looking really good. In the corner with the paving bricks underneath I'd see about moving the wall outwards or building a new small wall to support this stretch. The other corner (single brick holding track up) does look like a bridge may be indicated.
What I found in a similar situation was that you will need to be very careful of cross-levels where the bridge joins the wall on the right - at least, I did, since my bridge is removable. I ended up cutting back the track on both sides and having a short removable section of track that drops into place once the bridge is in position. This removable section has a reinforcing length of rail soldered across the rails underneath, joiners soldered on at one end, and joiners fitted with short handles of brass rod at the other end to facilitate fitting and removal.
Posted: Thu Aug 08, 2013 11:09 pm
by SapperAnt
Hmph!
So I need to really iron out some of the gradients. It doesnt look that steep with a clinometre and a spirit level, but the way my Ragelth struggles (even with the safety blowing off) to draw just one WD bogey wagon, they must be!
I thought Id had cured most of the worst gradients....but obviously not.
I think I will plod on, secure the track and see if the engine can do a complete circuit at a moderate speed....and take it from there.......
Learning curve is vertical!
Posted: Fri Aug 09, 2013 5:28 am
by IrishPeter
My Accucraft 'Ruby' which is a locomotive of lesser capacity than a Ragleth will manage two bogie coaches and a couple of wagons on a 1 in 25 (4%) gradient, a little more when the valve gear is absolutely right. However, even though a lot of my inspiration comes from the Schll and Skibbereen Railway, my steepest gradients tend to be on fairly straight sections of the line. My worst is a gentle 'S' bend on a section of 1 in 36. If you have got a sharp curves on a steep grade that will make life very difficult for any locomotive.
BTW, my wood butchering skills have improed enormously messing around with model railways in the garden.
Peter in AZ
Posted: Fri Aug 09, 2013 7:31 am
by LnBmad
I know that feeling! Constant minor adjustment is the way to deal with gradient
Posted: Sat Aug 10, 2013 10:59 am
by SapperAnt
Yeah......
The flower bed walls the track is on, on the right hand side is failry straight and true, but on the left, due to root and frost action has....sunk by about an inch or two and is leaning at an angle of a few degrees (1 or 2). I am tempted to use some marine ply to level up that side even more than I have with mortar fillets.....
Watch and wait with baited breath.
Posted: Sun Aug 25, 2013 3:15 pm
by SapperAnt
Right...so RVLR Mark 2.
In order to "iron out" the gradients I propose to use Decking plank type timber to form a new track bed on which the track will be fixed. The decking timber will be laid on top of the existing rather wibbly wobbly walls and mortar (or equivalent) used to level things up.
It will also make crossing the two chasms on the return of the oval much, much easier!
Thoughts please chaps and chapesses?
Posted: Sun Aug 25, 2013 4:07 pm
by dougrail
I'd say sounds okay. Good luck.