The Charnwood Forest Light Railway

A place for the discussion of garden railways and any garden style/scale portable and/or indoor layouts
Post Reply
User avatar
Soar Valley Light
Driver
Driver
Posts: 1451
Joined: Sun Dec 08, 2013 5:18 pm
Location: North West Leicestershire

Post by Soar Valley Light » Mon Jul 18, 2016 7:54 pm

Thanks guys.

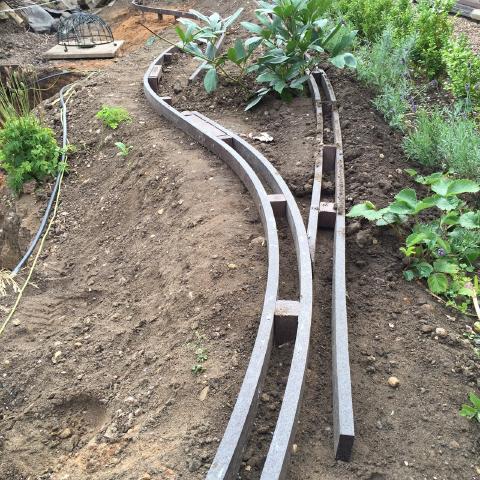
There has been progress but nothing significant enough to make any visible changes worthy of a picture. I measured and marked 1m chainages along the Filcris base on Saturday and levelled them to the intended 1 in 50 gradient with a laser level. When I saw the result I nearly phoned Alton Towers (Grant and Dwayne, that's one of our larger theme parks and only about forty miles away). The thing looked like a roller coaster!

My laser level is a cheap model intended for indoor construction work, to be able to see the beam outside I have to do my surveying on night shifts! As a result I had been thoroughly munched on by gnats and midges  and didn't relish a repeat last night. There was no alternative though and I relevelled the route. Annoyingly the result was the same - roller coaster railway and multiple (more) insect bites! :evil:  Reviewing the situation in the very warm light of dawn this morning the obvious cause struck me squarely between the eyes. The 1m chainage marks don't coincide with the support posts. Filcris cannot be described as a stiff material, in fact it flexes and deforms very easily, as a result it is partly sagging and partly see-sawing betwen the posts.

I have now measuerd out the distances between the posts and worked out the required fall between each. I will now have to relevel the job- again. :roll: Maybe not tonight though, I spent a couple of hours late this afternoon adjusting the alignment slightly to avoid the clash I mentioned earlier with the main circuit. It dawned on me that, by a minor adjustment to the line of the infant lavendar hedge and pushing the branch right up against it (careful pruning will be needed in future years), then I could avoid any redesign of the main circuit. I also built up the core of the embankments around the Filcris on the branch and extended the earth core of the main circuit (started some 18 months ago now). By the time I'd finished I was sweating like a turkey in a plucking shed!

Now the bank core reaches the level of the filcris runners I'm hoping that, with the posts set to level, I shall be able to use a straight edge to pack the runners up to level between the posts and achieve a constant gradient. The amount of horizontal buckling in the Filcris runners between the posts in todays extreme heat was quite suprising. Once the banks are fully constructed there will be enough mass to shield the plastic from most of the heat and to resist the buckling forces, keeping things on the straight and narrow - so to speak. ;)

I'll let you know how I get on.

Andrew :?
"Smith! Why do you only come to work four days a week?
"'cause I can't manage on three gaffer!"

User avatar
LNR
Driver
Driver
Posts: 1542
Joined: Sat Feb 27, 2016 5:26 am
Location: Australia

Post by LNR » Tue Jul 19, 2016 12:02 am

Oh! the pain and discomfort we go through for our railways. I could relate to many of your experiences Andrew. It will be worth much enjoyment in the end.
Grant.

User avatar
IanC
Trainee Driver
Trainee Driver
Posts: 798
Joined: Mon Feb 15, 2016 9:15 am
Location: Nr. Warrington, Cheshire

Post by IanC » Tue Jul 19, 2016 12:56 pm

If I ever get round to constructing my line it will be on blocks. I considered the filcris option, but all the reports of it flexing, expanding and contracting, not to mention the expense put me off a little. I suspect I'll still get unintended gradients though.

Your line is looking good. Keep the reports coming.

Ian

User avatar
Soar Valley Light
Driver
Driver
Posts: 1451
Joined: Sun Dec 08, 2013 5:18 pm
Location: North West Leicestershire

Post by Soar Valley Light » Sun Jul 24, 2016 9:01 pm

Well, it's been quite a positive weekend on the Charnwood Forest Railway in tems of construction.

The surveyors have been out again re-establishing the setting out information. This enabled the first sections of Filcris for the main circuit to be installed on Saturday. This was the section where the first construction works started all those months ago as rough earthworks. The levels caught me out a little, I thought I'd got things closer to where they needed to be! :shock:


Image


Image

I'm installing the Filcris posts with just one runner attached to begin with, once everything is levelled and lined up I intend to secure the second side. I'm filling in around the posts and up to the underside of the runners as I go. Once the second runner is fixed I intend to fill in between the runners with pea gravel and then overlay them with geotextile to keep the weeds out whilst allowing free drainage. The track will them be fixed on top of that. At some stage in the process I shall fill up to the outside edge of the runners with soil to form the final embankments. This will extend for an inch or two outside the runners before the slope falls away. It looks like a good deal of the line will be on embankments. The ground alongside the small sections that will be in cuttings will almost certainly start life lower than the railway and be built up afterwards. This will be achieved in much the same way as the embanked sections, just in reverse!


Image
Tipping spoin up to the bottom of the runners on the main circuit


Image

More work on the main circuit today.


Image

The final work of the day was to concrete in the Filcris on the branch where it sqeezes between the path and the honeysuckle root beside the arch. There is VERY little room to play with here and clearances are at their tightest. Rather than risk the posts moving over time I decided this section needed to be trapped firmly in place. It will also aid drainage and give some solid support and rigidity to the slabs lining the cutting walls.

Once the weather cools and the Filcris stops behaving like unclipped CWR I shall be able to make a start on fixing the second runners.

Part of todays work which wasn't photographed was filling up the embankment on the first section of the main circuit in the first pictures of this post. This took a HUGE about of soil and resulted in some serious excavation of the path area. It isn't going to come back up to the level of the rest of the garden quite as quickly as I had imagined it might! The spin off benefit is that the railway will be at a much more accessible level relative to the path.

We'll see what the week brings!

Andrew
"Smith! Why do you only come to work four days a week?
"'cause I can't manage on three gaffer!"

User avatar
Peter Butler
Driver
Driver
Posts: 5245
Joined: Sun Sep 09, 2012 10:33 pm
Location: West Wales

Post by Peter Butler » Sun Jul 24, 2016 9:46 pm

You really have something to show for your considerable efforts now. The time spent planning and preparing has been worthwhile.
Impressive ground-works!
The best things in life are free.... so why am I doing this?

User avatar
LNR
Driver
Driver
Posts: 1542
Joined: Sat Feb 27, 2016 5:26 am
Location: Australia

Post by LNR » Mon Jul 25, 2016 12:26 am

Hi! Andrew, as Peter has said, starting to see the final picture now. Keep at it.
Grant.

User avatar
Dwayne
Trainee Driver
Trainee Driver
Posts: 681
Joined: Mon Jul 04, 2011 12:15 am
Location: Oklahoma City

Post by Dwayne » Mon Jul 25, 2016 3:37 am

Andrew, it's looking like a garden railway! :D

jim@NAL
Driver
Driver
Posts: 1115
Joined: Sun Sep 23, 2012 11:01 am
Location: haverhill suffok

Post by jim@NAL » Mon Jul 25, 2016 10:20 pm

looking great this is going to be a big and impressive line .lazer levels are never that good unless you buy a very expensive one being a carpenter I use a level a lot you may find it easier using a decent quality level and a long straight edge or buy or make a water level

User avatar
ge_rik
Administrator
Administrator
Posts: 6580
Joined: Sun Oct 25, 2009 10:20 pm
Location: Cheshire
Contact:

Post by ge_rik » Tue Jul 26, 2016 8:14 am

Really great progress, Andrew. I can visualise a mixed goods train snaking around those curves already!

Rik
------------------------
Peckforton Light Railway - Blog Facebook Youtube

User avatar
pippindoo
Trainee Fireman
Trainee Fireman
Posts: 144
Joined: Sun Nov 14, 2010 9:01 pm
Location: Leeds
Contact:

Post by pippindoo » Tue Jul 26, 2016 9:33 pm

Looking great Andrew!! Isnt it good when things start coming together all of a sudden!? I presume, with your obvious interest and knowledge of all things Pway, that when setting up curves, youll be setting each outside filcris rail slightly higher than each inside rail to give an element of super elevation....... ooooh, theres posh!!! A millimetre or so should be ample. :lol:

User avatar
Soar Valley Light
Driver
Driver
Posts: 1451
Joined: Sun Dec 08, 2013 5:18 pm
Location: North West Leicestershire

Post by Soar Valley Light » Fri Jul 29, 2016 9:11 pm

Hello All,

Thanks for the continual encouragement, it really helps.

Jim makes a good point about levels. I've reverted to the careful use of a 1m spirit level  for the main circuit, which is (in theory at least) dead level.

Pip has guessed correctly that I'm attempting to introduce some cant as I secure the second runners. To be honest the construction is still quite flexible at this stage and I'm expecting to have to make further efforts in this direction as and when I begin to fasten down sleepers.

Work has continued this week (as have the insect bites! :evil: ). More pictures are included below but progress is a little further ahead than shown. The second runner is now on over the 99% of the current construction. Only the overlaps for 'next step' remain single for the time being. I've also filled in some more around the high section shown in the 'Road to nowhere' shot below. I've made a start filling between the runners with pea gravel too. Finally I moved some of the top soil dump into place to form a semblance of the finished landscape on part of the garden between the main circuit and the branch.

Having struggled to work with all the soil stockpiles confining my working space up to now I suddenly find myself becoming concerned about whether I will have enough soil to form the embankments and flower beds.  :? One of the causes is that the main circuit is about 2" higher than I anticipated. Not a big amount but it all adds up. I now anticipate much more excavation on the construction of the central path to generate some additional fill material.This is not a problem in itself but the washing line is becoming impossibly high. I can't lower it as the washing will drag on the ground, especially as it's almost over the railway which is about 12" higher than the ground was before I started - and sheets and blankets were perilously close to the ground even then! :shock:

The alignment on the wall side, on the current design, comes well into the centre of the garden. This will require even more fill material, not to mention resulting in the biggest flower bed being in the shadiest part of the garden. I now intend to replot the course closer to the wall. This will allow me an even larger area to excavate for spoil and create a bigger flower bed where the sun catches the garden more. It wouldn't be a civil engineering project if there wasn't a need for on site adjustements to the design during the construction works! ;)

Tomorrow is going to be my only chance to move the project forward this weekend; I'm rostered to work Swithland Sidings signal box on Sunday. I'll keep you posted on how I get on, meanwhile, here are the laterst pictures.

Main circuit - photo 3
Image

Main circuit - photo 4
Image

The Branch junction (one runner still to fix on the branch - once I've sorted the angle of the turnout!)
Image

And finally ......... the road to nowhere. Much construction material needs to move to make way for the route of the railway - and MUCH filling up of the ground required to bring it up to level.
Image

Cheers,

Andrew
"Smith! Why do you only come to work four days a week?
"'cause I can't manage on three gaffer!"

User avatar
Soar Valley Light
Driver
Driver
Posts: 1451
Joined: Sun Dec 08, 2013 5:18 pm
Location: North West Leicestershire

Post by Soar Valley Light » Mon Aug 01, 2016 10:00 pm

I managed some more work on Saturday. Shifting some of the stockpiled materials had to be high on the priority list so I decided to start on the 'ballast mountain' - over a ton of soil contaminated pea gravel. Some is destined for path construction, some as infill between the Filcris but Saturdays job was to produce material to fill up under the Filcris runners at the terminus station.....

The ballast mountain - partly buried under other materials.
Image

Before use the soil needs washing out of it. Take one paint bucket, poke holes in the bottom, fill with dirty gravel. Dig a hole in a suitable out of the way corner, fill with water, dunk bucket and shake, repeat, finally rinse through with garden hose. Tip clean stone into place - simples! But oh boy, don't it make the fingers numb!

Image

An here it is, clean stone tipped and Filcris levelled up. All on top of geotextile so it should be free draining and stable.

Image

I managed an hour late this afternoon before the rain struck. This time I opted to continue the retaining wall construction started at the begining of the year. I spent a long time considering this on Saturday and got some stone and foundation concrete down. it's only a couple of feet long but it will be a big step forward. No pictures I'm afraid - rain stopped play.  :evil:
"Smith! Why do you only come to work four days a week?
"'cause I can't manage on three gaffer!"

User avatar
Peter Butler
Driver
Driver
Posts: 5245
Joined: Sun Sep 09, 2012 10:33 pm
Location: West Wales

Post by Peter Butler » Mon Aug 01, 2016 11:26 pm

Rained all day here so you had a better opportunity to move on, and you have certainly done so, this is really taking shape now.
It is so satisfying to see what you have achieved so far, you must be well pleased with the result.
The best things in life are free.... so why am I doing this?

User avatar
ge_rik
Administrator
Administrator
Posts: 6580
Joined: Sun Oct 25, 2009 10:20 pm
Location: Cheshire
Contact:

Post by ge_rik » Tue Aug 02, 2016 6:26 am

Great progress, Andrew. That day when the first train runs is growing ever closer ........ :D

Rik
------------------------
Peckforton Light Railway - Blog Facebook Youtube

jim@NAL
Driver
Driver
Posts: 1115
Joined: Sun Sep 23, 2012 11:01 am
Location: haverhill suffok

Post by jim@NAL » Wed Aug 03, 2016 10:07 pm

this is some very serous ground works going on here its all looking great though

User avatar
Soar Valley Light
Driver
Driver
Posts: 1451
Joined: Sun Dec 08, 2013 5:18 pm
Location: North West Leicestershire

Post by Soar Valley Light » Fri Aug 12, 2016 8:17 pm

Evening all,

I haven't posted much because there hasn't been much railway progress. I'm back to enabling works at present. Two days away working Kingscote signal box also slowed things up.

You remember I said that I'd moved the materials stockpile for the last time - famous last words! NEVER say never! Having redesigned the track alignment to make sure the flower beds were in the sunniest parts of the garden and to make sure that the washing line will be reachable from the path, I had to move things again! I also realised I had a little bit of stacking space I hadn't considered. There is a corner near the top of the path at the back of the existing brick shed, where I intend to build a lean-to wooden shed - eventually. In the meatime it is a good area for storage.

The other major job at present is washing the massive pile of pea gravel, it's choked with soil and I need it clean for use as path surfacing. It's a huge task and makes my fingers numb after about half an hour, so I'm not getting through the mountain very fast! None of this activity is worthy of a photo. I hope to crack on a bit this weekend, with any luck there might be something more deserving of having a camera pointed at it after my efforts.

Andrew
"Smith! Why do you only come to work four days a week?
"'cause I can't manage on three gaffer!"

User avatar
LNR
Driver
Driver
Posts: 1542
Joined: Sat Feb 27, 2016 5:26 am
Location: Australia

Post by LNR » Fri Aug 12, 2016 11:45 pm

Trains by Christmas then! Keep up the good work Andrew.
Grant.

Big Jim
Moderator
Moderator
Posts: 2694
Joined: Sat Jul 06, 2013 5:28 pm
Location: Near Llanelli

Post by Big Jim » Sat Aug 13, 2016 9:28 am

Keep going, the end is in sight.
Try sticking the gravel in a large bucket and jamming the hose in it, leave the hose on for ten minutes, have a cuppa. Then a couple of quick shakes and voila.

User avatar
pippindoo
Trainee Fireman
Trainee Fireman
Posts: 144
Joined: Sun Nov 14, 2010 9:01 pm
Location: Leeds
Contact:

Post by pippindoo » Sat Aug 13, 2016 2:27 pm

Cheap plastic laundry basket, fill it with gravel.....hmmm, looks like it might rain! We're very thrifty in Yorkshire!

User avatar
Peter Butler
Driver
Driver
Posts: 5245
Joined: Sun Sep 09, 2012 10:33 pm
Location: West Wales

Post by Peter Butler » Sat Aug 13, 2016 3:54 pm

I agree with your method, Pip. We're on a water meter here so just to let the hose run would not be a welcome solution.
The best things in life are free.... so why am I doing this?

Post Reply

Who is online

Users browsing this forum: No registered users and 6 guests