Page 1 of 1
Toddler powered
Posted: Wed Jan 14, 2015 8:19 pm
by pskipper
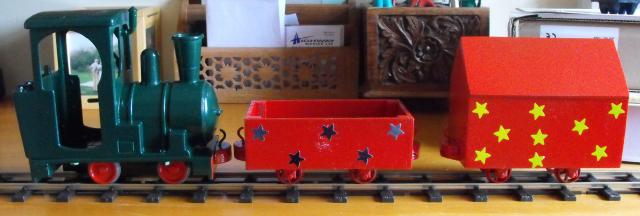
Our eldest (3yo in a week) wants a train he can BRUM for the garden railway when the track goes down. Several hours later of chopping up a cheap postman pat Greendale Rocket we have this...

An original next to it for comparrison

side view
Posted: Wed Jan 14, 2015 11:53 pm
by MDLR
That looks quite reasonable, and quite a bit cheaper than what I would have suggested - a HGLW battery loco kit!
Posted: Thu Jan 15, 2015 7:15 am
by Big Jim
Brilliant. I am all for stuff to keep grumpers amused. It allows me to get on with my own modelling!
Posted: Thu Jan 15, 2015 7:10 pm
by sstjc
Very good. I wonder if an HGLW power chaissis would fit under that body.
Posted: Fri Jan 16, 2015 11:13 am
by ge_rik
Coincidentally, I was in a B&M shop yesterday and was tempted by an offer they had on a set which included the loco, a coach and a post van.
http://www.bmstores.co.uk/products/post ... ket-271330
I was thinking it might make an interesting bash. In some ways it was a good job I didn't see this thread until today - I already have about half a dozen unfinished projects on the go........

Rik
Posted: Fri Jan 16, 2015 8:39 pm
by pskipper
I've got the post van and coach to convert next. The post van is getting extended into a guards van. Oh and repairing the centre buffer and buffer beam which snapped due to some excessively excited play!
An HGLW chassis probably would fit (the boiler is pretty hollow) but finding somewhere to put a battery pack might be a challenge. As it was I didn't need to worry as I was under orders by the little one to make it a push along train so some re-gauged LGB wheels I picked up at the Lincoln show made it very easy.
Posted: Sat Jan 17, 2015 6:12 pm
by DaveWatkins
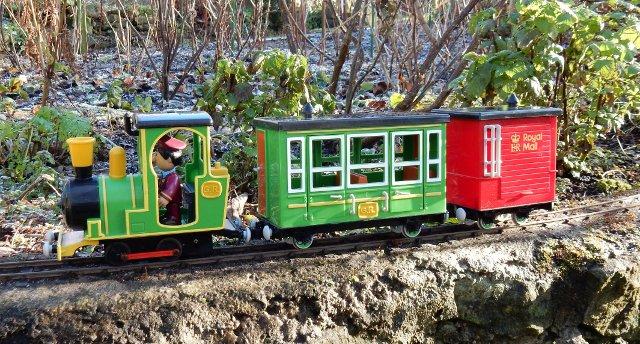
I got a Greendale Rocket from B & M just before Christmas and have been converting the coaches and then the loco to 32mm gauge.
I used a spare Novo/Big Big train chassis. The photo was taken before I wired the chassis up. I have used the original battery box hacked out from the loco fames. It fits in the back of the cab.
It ran ok for a while but the batteries that came with the loco were almost flat before it had made a circuit of the line.
Posted: Sat Jan 17, 2015 8:34 pm
by sstjc
Wheres the like button...
Posted: Sun Jan 18, 2015 8:38 am
by ge_rik
sstjc:107487 wrote:Wheres the like button...
Ditto - Would love to see a video of it in action.

Rik
Posted: Mon Jan 19, 2015 2:36 pm
by DaveWatkins
Posted: Mon Jan 19, 2015 3:01 pm
by Superbiker_uk
That's brilliant!!! I love it

Posted: Mon Jan 19, 2015 3:19 pm
by Peter Butler
I'm sure grown-ups, (well adults!) will enjoy it even more than the kids.
Posted: Mon Jan 19, 2015 3:37 pm
by ge_rik
Blimey! That really is a rocket!
Thanks for posting. I was wondering how the long wheelbase of the coach would cope with curves but it doesn't seem to have a problem.
Rik
Posted: Mon Jan 19, 2015 4:57 pm
by Howardws
sstjc:107447 wrote:Very good. I wonder if an HGLW power chaissis would fit under that body.
I've just bought the friction drive version and have an HGLW chassis to hand as I'm building one of his diesels. If someone could tell me how to separate the chassis from the body without breaking something I'll answer that question!
Posted: Tue Jan 20, 2015 9:51 am
by DaveWatkins
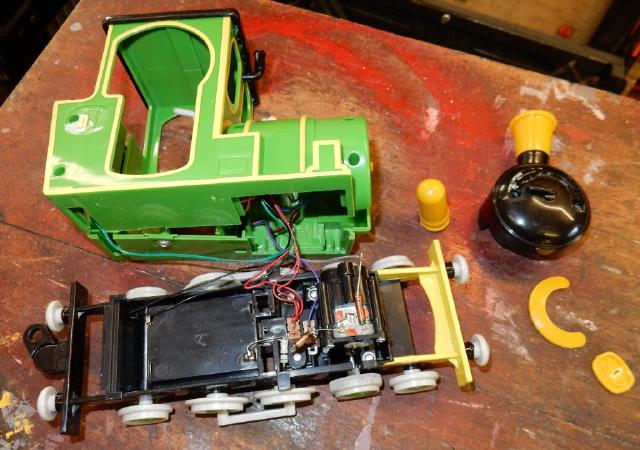
The body is held together by screws. Three are obvious. One more is hidden behind the GR plate on the right hand side. Two hold the smokebox and are hidden behind the curved Greendale Rocket plate. Taking the smokebox off reveals yet another two screws.
At this stage you find that the cab roof is glued on but you can now ease the two halves of the body apart sufficiently to take the chassis out.
The photo shows the version with motor powered wheels and sound. The friction drive version is similar.
Posted: Tue Jan 20, 2015 10:43 am
by philipy
That is brilliant!
With first grandchildren due to make an appearance in the next few weeks, I'm wondering if I should accumulate now, for the future!
Posted: Tue Jan 20, 2015 12:37 pm
by Howardws
Thanks DaveWatkins, I'm not sure I would have been brave enough without help!
As you will see the chassis fits, sort of, either with the motor in the boiler and possibly the batteries in the cab roof or the motor in the cab and the batteries in the boiler.


Posted: Wed Jan 21, 2015 10:55 am
by pskipper
I had been considering the HGLW chassis with a pony truck to balance it out, that might happen in the future when push along becomes less fun
All look very good and I'm impressed at the people who have managed to get the plastic bits off without breaking them, mine was pre-loved and they had been epoxy'd back on at some point hence the filler job to get rid of the gaps
.
HGLW Chassis
Posted: Tue Feb 17, 2015 1:47 am
by dhippey
Just a follow up to the HGLW chassis. As standard we supply a 2 cell AA battery holder, but if you want we can supply a 2 cell AAA battery holder in its place. Just let us know when you place an order.
We have both sizes in stock.
Regards,
David H.
Posted: Tue Apr 07, 2015 7:46 am
by Howardws
I decided on an IP Engineering budget chassis in the end - seeing how simple it was has decided me to make my own in the future. The wagons have been made bomb proof (hopefully) as my grandson is only 28 months old. Colour scheme of the wagons suggested by his 5 year old cousin! The battery is going to have to go on the floor of the cab.