A place for the discussion of garden railways and any garden style/scale portable and/or indoor layouts
-
btiratsoo
- Cleaner

- Posts: 47
- Joined: Tue Jul 01, 2014 12:47 pm
- Location: Hampshire
Post
by btiratsoo » Sat Jul 12, 2014 9:10 pm
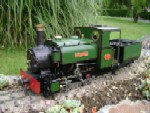
Well after my introduction post I best show what I have been up to. Construction started on Friday afternoon and the first track was laid on Saturday afternoon.
I ran our loco this evening and even if I say so myself the track worked! It is a bit lumpy and bumpy but the bricks support me walking on them and at 100kg I think it should be ok.
The only real issue is that there is a reasonable gradient straight after the points! It will make it quite fun I'm sure! If it doesn't work I'll simply dig it up and start again. The rough plan is to extend for another 40 metres but for now the line will loop back once it reaches the trees at the back of the picture. A passing loop will be added before the ballon loop and maybe a siding to a turn table.
Anyway here are some pictures.


As I say it is a start and also my first attempt.
Ben
-
steamie1
- Trainee Driver

- Posts: 685
- Joined: Tue Nov 13, 2012 11:04 pm
Post
by steamie1 » Sat Jul 12, 2014 9:20 pm
Magic stuff. Half the fun is the building. When you have the road right a foundation strip of ballast/cement under the bricks could help level it and stop sinking later on. If it was wide it would help hold back the greenery. Only ideas, but the best way is to do it and learn your way.
-
btiratsoo
- Cleaner
- Posts: 47
- Joined: Tue Jul 01, 2014 12:47 pm
- Location: Hampshire
Post
by btiratsoo » Sat Jul 12, 2014 9:24 pm
Thanks steamie. Bricks are on compact soil, then a watered sharp sand cement mix in a trench. As I said this is the first attempt. If it survives a year I'll be happy! Gotta learn somehow hey!
-
steamie1
- Trainee Driver
- Posts: 685
- Joined: Tue Nov 13, 2012 11:04 pm
Post
by steamie1 » Sat Jul 12, 2014 9:31 pm
I reckon you be fine because your doing it. So many wish think but don't do. At least the way your doing it you can change it. I built house like foundations and want bigger radiuses on my curves. No way now. If you did get a sink section you can easily raise it next year. Well done you..Keep the shots coming.
-
btiratsoo
- Cleaner
- Posts: 47
- Joined: Tue Jul 01, 2014 12:47 pm
- Location: Hampshire
Post
by btiratsoo » Sun Jul 13, 2014 5:16 pm
Some progress from this afternoon. Added two more bits of track. My brick laying skills are already improving. I need to order some more points, probably peco tight radius ones. I might also order some set track curves to help with the return loop.
If all of this survives I'll be amazed, if not it will be lessons learnt for when I need to rebuild it. Has anyone had any experience with using only rowlands mix to hold down the track? I'm using screws through the sleepers into the brickwork at the moment.
Here are the pictures:


-
TonyW
- Driver

- Posts: 1357
- Joined: Fri May 16, 2008 9:25 am
- Location: North Wales
-
Contact:
Post
by TonyW » Sun Jul 13, 2014 5:18 pm
btiratsoo:102608 wrote:Has anyone had any experience with using only rowlands mix to hold down the track?
Yes, it doesn't work. Well, not for very long.
-
btiratsoo
- Cleaner
- Posts: 47
- Joined: Tue Jul 01, 2014 12:47 pm
- Location: Hampshire
Post
by btiratsoo » Sun Jul 13, 2014 5:22 pm
Thanks Tony. I guess it is more of a cosmetic thing than an actual track fixing method. I'll stick with the screws and then add the mix after.
Ben
-
TonyW
- Driver
- Posts: 1357
- Joined: Fri May 16, 2008 9:25 am
- Location: North Wales
-
Contact:
Post
by TonyW » Sun Jul 13, 2014 5:34 pm
btiratsoo:102610 wrote:Thanks Tony. I guess it is more of a cosmetic thing than an actual track fixing method. I'll stick with the screws and then add the mix after.
That's exactly what I did. I also found that using sharp sand, rather than just "builder's sand", made the mix stronger and less susceptible to frost damage. However, it also slows down considerably the growing of moss. I used to have a mossy railway, but I found it did affect the running of trains so I keep it to a minimum now.
-
steamie1
- Trainee Driver
- Posts: 685
- Joined: Tue Nov 13, 2012 11:04 pm
Post
by steamie1 » Sun Jul 13, 2014 6:03 pm
Make sure you get the largest radius as you WILL regret paying good money for tight stuff that slows the loco to a stop. Think that long term others may come and run. ALSO simple accucraft 4 wheel IOM coaches etc will hate very tight bends...
-
btiratsoo
- Cleaner
- Posts: 47
- Joined: Tue Jul 01, 2014 12:47 pm
- Location: Hampshire
Post
by btiratsoo » Sun Jul 13, 2014 6:07 pm
Brilliant. Thanks again steamie. I'll go for the larger radius ones. I hope the curves that are in already aren't going to be too tight. Hopefully I'll run the loco again tomorrow and check. I really should buy a battery diesel to help with this but it's more fun with steam!
-
kandnwlr
- Trainee Driver
- Posts: 998
- Joined: Fri Dec 02, 2011 3:14 pm
- Location: Alsace, France
Post
by kandnwlr » Sun Jul 13, 2014 8:57 pm
Looks as though you´re going to have fun this summer

-
steamie1
- Trainee Driver
- Posts: 685
- Joined: Tue Nov 13, 2012 11:04 pm
Post
by steamie1 » Sun Jul 13, 2014 9:28 pm
If your ordering set curves Peco St-607 is better than 605. I'm slowly changing mine to 607
-
Maple
- Trainee Fireman

- Posts: 175
- Joined: Sat Jun 29, 2013 3:17 pm
- Location: Bournemouth
Post
by Maple » Mon Jul 14, 2014 12:19 am
looks really good , il ove the wandering nature of the line. cant wait to see it finished
'Professional Bodge artist '
-
btiratsoo
- Cleaner
- Posts: 47
- Joined: Tue Jul 01, 2014 12:47 pm
- Location: Hampshire
Post
by btiratsoo » Mon Jul 14, 2014 9:19 pm
A little bit more progress today. Not much track laying was managed but I have taught myself how to make a concrete plinth for the steam up area in one of the sidings. Note to self, maybe make the whole yard area concrete next time......
A trip to b&q was required for some more sand and cement and some non peat based compost to attempt ballasting!
And a couple of pictures as we all love pictures.


Some more track and points should arrive tomorrow along with something special. I went for steamie's advice and ordered the bigger radius points and curves.
Ben
-
steamie1
- Trainee Driver
- Posts: 685
- Joined: Tue Nov 13, 2012 11:04 pm
Post
by steamie1 » Mon Jul 14, 2014 9:40 pm
Phew! Glad about the better curves. I'm in the process of reordering my curves and scratching my head about how I'm going to break up the concrete to get the old tighter ones out. I have replaced one whole semi circle but keep looking at the others. Grrr! Mamods don't notice but my Lawley did. A Countess we had visit hated my 605's as did the IOM 4 wheel coaches. Even Tom Rolt had to have his pony truck brought forward a tad.
I wish Peco did an even lager 5 ft set curve, anyone else wish they did?
Your layout looks great and makes me want to extend mine now.
-
btiratsoo
- Cleaner
- Posts: 47
- Joined: Tue Jul 01, 2014 12:47 pm
- Location: Hampshire
Post
by btiratsoo » Wed Jul 16, 2014 11:04 pm
Unfortunately after a test run the gradient from the points into the left hander was far too severe. The civil engineering department have been sacked and the manage nth have gone back to the drawing board. Hopefully an actual plan will be laid down before just throwing bricks and mortar into a shallow trench with no idea where to go!
First lesson learnt. Hopefully construction will begin again in mid august as it's back to sea for me now.
Thanks for all the advice so far. I love this and can't wait to get started again.
Ben
-
IrishPeter
- Driver
- Posts: 1400
- Joined: Wed Feb 23, 2011 3:24 am
- Location: 'Boro, VA
Post
by IrishPeter » Thu Jul 31, 2014 3:57 pm
Lack of a 5' radius curve is one reason I did not go for PECO track. I knew I was going to get lumbered with steep gradients, so sharp curves were out from the get-go. I bought into the idea that one can have sharp curves or steep grade, but not both together from the start. I do have one or two very short segments where the curvature is sharper than 5' but (a) they are on the flat, and (b) it is just a foot or so where there is a bit of difficulty clinging to the shelf the line is built on.
Peter in AZ
Traffic Pattern? What pattern? Spuds out; grain in, but cattle, sheep and passengers are a lot less predictable.
-
Andrew
- Moderator

- Posts: 3276
- Joined: Tue Jul 03, 2012 1:33 pm
- Location: Bristol, UK
-
Contact:
Post
by Andrew » Thu Jul 31, 2014 4:04 pm
In my little garden I've ended us with very sharp (3'6") curves AND steep gradients - it's not without its problems... I had an interesteing conversation with a Gauge O garden modeller the other day though - his engine shed is full of Great Western 4-6-0s built for him by his father, another garden railwayman. Apparently these beasties require 12' radius curves to run well, so that's what he's building. I expressed envy at the thought of such generous curves - and he replied that he'd love to be able to use 3'6" ones so that his line could curve in and out of the flowerbeds! The grass is always greener eh?
Cheers,
Andrew.
-
Soar Valley Light
- Driver
- Posts: 1451
- Joined: Sun Dec 08, 2013 5:18 pm
- Location: North West Leicestershire
Post
by Soar Valley Light » Sat Aug 02, 2014 9:45 pm
I must admit, I thought four foot radius curves would be considered generous when I got into this garden railway malarkey about 18 months ago. I'm really surprised to find that they are exactly the opposite in many peoples estimation. More worryingly, your average terraced house garden doesn't exactly lend itself to anything much above four foot! (At least to get from one side to the other with a reverse loop and room fro a garden path as well)
Having read the foregoing contributions I did a few calculations. If my mental arithmetic is right (don't waste your money on any bets!) then a four foot radius curve equates in 16mm scale to 76 foot or 2 1/3 chains radius.
Having reached this point it suddenly dawned on me that I have no idea of the sort of radii that narrow gauge railways were/are built to. Time for more research I think!
"Smith! Why do you only come to work four days a week?
"'cause I can't manage on three gaffer!"
-
btiratsoo
- Cleaner
- Posts: 47
- Joined: Tue Jul 01, 2014 12:47 pm
- Location: Hampshire
Post
by btiratsoo » Sat Aug 09, 2014 2:06 am
Well after a few weeks away at sea for work I'm into the last few days and the excitement is brewing for the second attempt at a railway. I think that the next incarnation will be raised up slightly. I'm thinking boards on posts. Probably 2ft in height or the height of the brick wall in the back of the pictures.
Having spent the months cowering this forum and taking inspiration from many threads, especially this one (
http://gardenrails.myfreeforum.org/ftop ... sc-120.php) I think it should be possible build something that will look good and be at a sensible height for the older family members to use as well, if you catch my drift.
Eventually I'll be able to continue my plans to run further back down the garden a lot easier if the railway is raised slightly.
The shopping list for materials is growing!
Who is online
Users browsing this forum: No registered users and 5 guests