Another March build

Discussion of Rolling Stock related topics should go here
User avatar
Peter Butler
Driver
Driver
Posts: 5712
Joined: Sun Sep 09, 2012 10:33 pm
Location: West Wales

Another March build

Post by Peter Butler » Sun Mar 30, 2014 10:31 pm

Last Friday I spent most of the day away from home with time to think about my next project.
By the time I returned a plan had become drawn in my mind. I find anything put on paper invariably stays there and never gets made.
As with the previous March build, I found a part in the spares box which formed the beginning of the construction. Not everyone would start this way I'm sure, but for me it works!
The part in question is a roof taken from the same train set as shown in the previous build and so gave me the dimensions to work to.
Image
It is going to be a guard's van, as I don't have one as yet!
By the end of Friday evening I had reached this stage:
Image
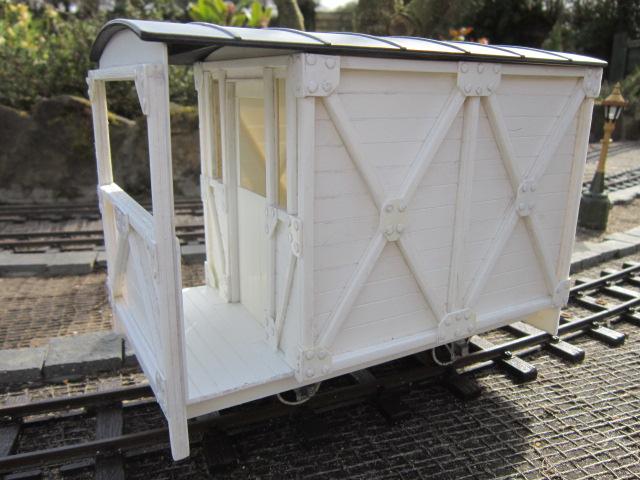
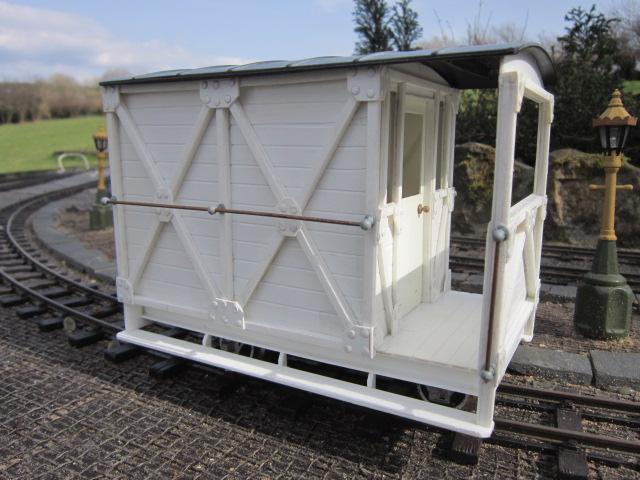
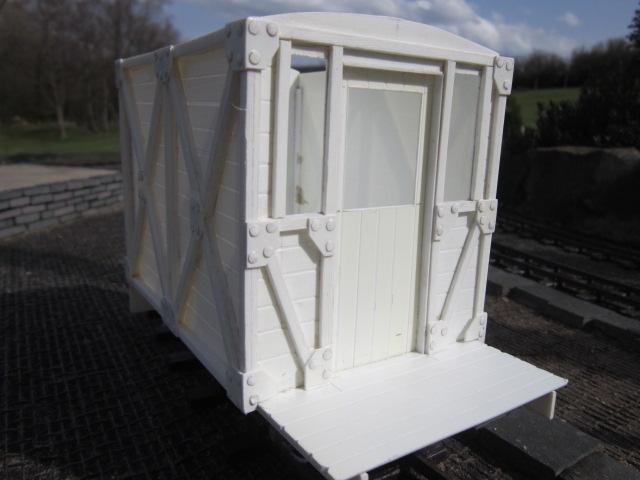
On Saturday I set about making and fitting bracing timbers to the outside. I used the W&L guard's van as inspiration and managed to achieve a fair amount during the afternoon before visiting Big Jim (of this Forum) to check out his new shed. Most impressed!
Image
Image
Image
Image
This morning (Sunday), when I eventually surfaced to face the day (I hate mornings!), the weather was beautiful, and has stayed that way all day. Having walked the dogs, I applied all of the rivet heads, fitted handrail and knobs and full length steps, then gave the first of many spray coats. By mid afternoon I was able to paint the wooden balcony floor and steps....
Image
Image
Image
Image
Image
Image
Image
Since taking the final photograph I have glazed the windows, fitted the chimney from the stove and cut a piece of lead sheet to fit inside to add weight low down for better running.
At last I have a guards van! However, I think it will be my last project for March.

Big Jim

Post by Big Jim » Sun Mar 30, 2014 10:43 pm

Nice job Peter.
It was great to see you on Saturday.
Are you sure there won't be any more projects for March? There is at least another 25 1/4 hrs to go before April arrives.

User avatar
Snailrail
Trainee Fireman
Trainee Fireman
Posts: 156
Joined: Thu Dec 05, 2013 5:49 pm
Location: Essex

Post by Snailrail » Sun Mar 30, 2014 10:47 pm

That's a novel technique - start on the roof and work down !
Lovely model though, very impressive.

Brian

User avatar
Dr. Bond of the DVLR
Retired Director
Retired Director
Posts: 4529
Joined: Tue Jun 09, 2009 9:43 pm
Location: Suffolk
Contact:

Post by Dr. Bond of the DVLR » Sun Mar 30, 2014 11:07 pm

Fantastic Van - pointed out a few things that need doing to mine!
Image
The railway which people forgot
(to build)

DickH

Post by DickH » Sun Mar 30, 2014 11:19 pm

Yet another stunning model Peter.

User avatar
Peter Butler
Driver
Driver
Posts: 5712
Joined: Sun Sep 09, 2012 10:33 pm
Location: West Wales

Post by Peter Butler » Sun Mar 30, 2014 11:29 pm

Thank you guys.... I'm pleased you approve!
It's not finished yet. I will put lettering on the sides, lamp brackets at the ends, maybe even lamps although I have no idea what message they might be sending? Buffers are on order to complete this, and previous March wagon, (and many more for stock!)
Already there is an April....(something!) in the production line, but it must wait for a special occasion, so watch this (and other) spaces for more announcements.

MDLR

Post by MDLR » Mon Mar 31, 2014 12:31 am

Peter Butler:98632 wrote:It's not finished yet.   I will put lettering on the sides, lamp brackets at the ends, maybe even lamps although I have no idea what message they might be sending?
They send the message that the train is complete! You might care to look at: http://www.mdlr.co.uk/pluginlamp.html to see how I did my lamps.......................

User avatar
andymctractor
Trainee Driver
Trainee Driver
Posts: 712
Joined: Fri Feb 01, 2013 12:03 am
Location: Suffolk, UK
Contact:

Post by andymctractor » Mon Mar 31, 2014 10:13 am

There is something very appealing and aesthetic about this van.
It is really good.
Regards
Andy McMahon

If it moves, salute it.  If it doesn't move, paint it. (RN sailors basic skills course 1968)

BIGNY

Post by BIGNY » Mon Mar 31, 2014 11:34 am

Wonderful as usual ! :D :D :D

User avatar
Dannypenguin
Trainee Driver
Trainee Driver
Posts: 632
Joined: Tue Feb 26, 2013 9:57 am
Location: Forest of Dean, UK
Contact:

Post by Dannypenguin » Mon Mar 31, 2014 11:40 am

You have shamed me! My brake van is a kit and has been under construction for a few months now - you've built a far superior one in a few days!  ;)
Dan

Visit the PFLR website - http://poultonfarmlightrailway.webs.com/
Dean Forest Railway Society website - http://dfrsociety.org/

jim@NAL
Driver
Driver
Posts: 1142
Joined: Sun Sep 23, 2012 11:01 am
Location: haverhill suffok

Post by jim@NAL » Mon Mar 31, 2014 6:12 pm

very good peter I like it a lot .a few questions what do u use to glue your plastic card what thinkness do you use and any tips on cutting it please

User avatar
Peter Butler
Driver
Driver
Posts: 5712
Joined: Sun Sep 09, 2012 10:33 pm
Location: West Wales

Post by Peter Butler » Mon Mar 31, 2014 7:00 pm

MDLR:98639 wrote:
Peter Butler:98632 wrote:It's not finished yet I may be fitting lamps although I have no idea what message they might be sending?
They send the message that the train is complete! You might care to look at: http://www.mdlr.co.uk/pluginlamp.html to see how I did my lamps.......................
Thank you for the reply Brian... As I frequently prove to this Forum, I have little knowledge of real railway operation so my remark about 'message' given by the positioning of lighting came about by information concerning lights attached to the front of locos, which apparently tell those who know, what the purpose of the train is!
(I'm probably wrong about that too!)
However, I watched the link about your working light system and have decided, as simple as it is, I will not be fitting it to my van as it would have so little use as to make it not worth the effort.

User avatar
Soar Valley Light
Driver
Driver
Posts: 1490
Joined: Sun Dec 08, 2013 5:18 pm
Location: North West Leicestershire

Post by Soar Valley Light » Mon Mar 31, 2014 9:47 pm

Hi Peter,

Brian is right, tail lamps are 'train complete' indicators. In their earliest days (Baskets of live coals on the Stockton & Darlington!)  they were intended to increase the visibility of the trains rear end to the footplate crew of any following train. It has to be remembered that until the Regulation of Railways act in 1879(?) trains were effectively 'driven on site', any form of signalling was there only as a guide to Drivers, not as absolute control.

Headlamps were intended to indicate to the policemen and later the signalmen, the class of the train and in some circumstances the route it was intended for. This was invaluable for the regulation of slower trains out of the way of faster ones and for reducing the risk of a train being 'wrong roaded'. (It still happened but not half as much as it might have done otherwise).

All this, of course, was on the busy lines of the standard gauge companies where processions of coal and general freight trains were being interwoven inbetween express freights all of which was running on the same lines as the express passenger trains which in turn were being kept running by the correct regulation of the local and branch freight traffic. All this must have been a sight to behold.

But what about the sleepy little narrow gauge lines? There were very few where more than One Engine in Steam Working was necessary to deal with the traffic offering. What matter then which train was approaching - it was THE train. And who was there to observe it's headlamps? There were incredibly few permanently manned signal boxes on narrow gauge lines (outside of Ireland perhaps). Indeed there were very few places where routing was an option and almost certainly none at all where regulating was required. In these circumstances there was little need for headlamps, other than maybe one to indicate to platelayers and others that a train was approaching in the dark. Much the same could be said for tail lamps. I'm not an expert but I would not be surprised at all to find that most narrow gauge railways didn't bother with either.

The point of all this rambling is that everyone's railway is there own. They decide what rules and practices their lines operate to and that is absolutely how it should be. There is little historical precedent for headlamp codes or possibly even tail lamps, just as there is little precedent for forests of signals to control trains but if that's what we choose for our railways, that's fine. The important thing is that we should never be slaves to conventions and in this case there is no convention to follow.

Andrew
"Smith! Why do you only come to work four days a week?
"'cause I can't manage on three gaffer!"

User avatar
Peter Butler
Driver
Driver
Posts: 5712
Joined: Sun Sep 09, 2012 10:33 pm
Location: West Wales

Post by Peter Butler » Mon Mar 31, 2014 10:13 pm

jim@NAL:98660 wrote:very good peter I like it a lot .a few questions what do u use to glue your plastic card what thinkness do you use and any tips on cutting it please
Thanks Jim, as you can see I am a big fan of Plasticard and use it for all of my builds.
The 'glue' I use doesn't stick the pieces together, it welds them as it is a solvent. it is Dichloromethane and is available on-line if you enter the name in ebay. It is the best I have ever used and is applied with a small paintbrush. It evaporates quickly so keep the lid on the bottle. Also read the instructions as it can be hazardous, as can any solvent!
The Plasticard I use is anything suitable for the purpose. Thick card is tough and stable and ideal for floor sections. It is very difficult to cut through and make intricate shapes though. Thinner sheet is also stable and easier to cut openings. All large sections benefit from bracing, as with the guards van, where I bonded two strips together to make a square section forming the framework.
Very thin sheet can be used to add detail but in large sections can distort if too much solvent is used as it obviously can melt.
Tools I use are a fixed blade Stanley knife with 1991 blades (normal duty), a metal rule to cut against, small metal set square, sandpaper to take off burr edges, a fine tooth razor saw to score woodgrain effects, various files and drills.
Use a cutting mat to lessen blade wear.
I also keep a large selection of plastic sections... square and round, and brass rod and tube.
I do appreciate it is easy to just say these things and have 50 years experience in using the material, so the only way for someone else to achieve satisfactory results is to practise. I do recommend that you give it a try as it is satisfying, quick and easy to alter if not right first time!
Good luck and show us your models....

User avatar
Peter Butler
Driver
Driver
Posts: 5712
Joined: Sun Sep 09, 2012 10:33 pm
Location: West Wales

Post by Peter Butler » Mon Mar 31, 2014 10:26 pm

Thank you Andrew, that explains everything I need to know (and more!) and makes me more comfortable with the 'shall I, shan't I?' situation.
I can feel a power surge of authority over my miniature world so able to decide on how each item should be fitted as the occasion arises.
I must admit to fitting a rear lamp (non working) on my guards van this evening, along with more paint detailing. Due to wet paint and dark nights I have no picture to offer until tomorrow!

jim@NAL
Driver
Driver
Posts: 1142
Joined: Sun Sep 23, 2012 11:01 am
Location: haverhill suffok

Post by jim@NAL » Mon Mar 31, 2014 11:02 pm

thank you very much very helpful iv only used it once on a loco I built but got some rolling stock iv got to build so going to buy some and give it another go many thanks

User avatar
Peter Butler
Driver
Driver
Posts: 5712
Joined: Sun Sep 09, 2012 10:33 pm
Location: West Wales

Post by Peter Butler » Tue Apr 01, 2014 11:03 pm

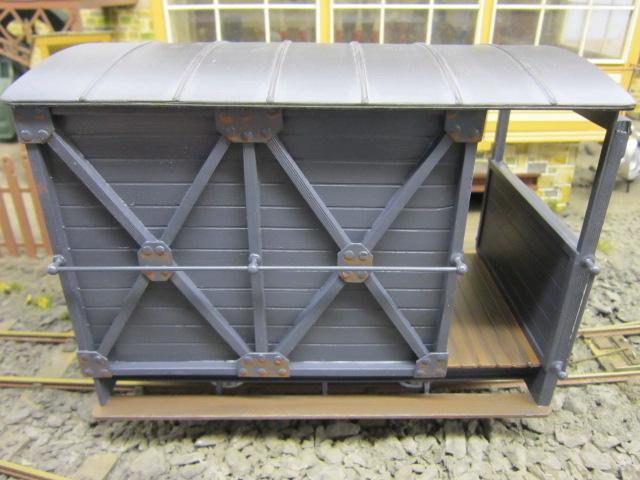
Apart from buffers (which haven't arrived yet), roof vents (still to be ordered) and lettering which I will be searching for tomorrow, I think we are there!
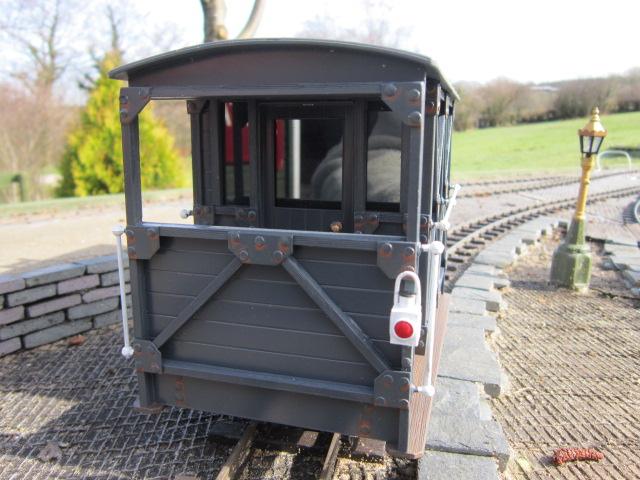
I have painted the handrails white which makes them more prominent against the grey sides of the van. Also, the rear lamp is fitted but not intended to work. The stove chimney is a bit quirky but I think it suits the vehicle.
Overall I am really pleased with the finished article.
Image
Image
Image

bazzer42

Post by bazzer42 » Wed Apr 02, 2014 7:38 am

Nice one Peter. Lush, just like Barry Island.

I always thought I would go wood with wagons but these plastic marvels make me wonder. It is a nice medium to work with.

User avatar
Soar Valley Light
Driver
Driver
Posts: 1490
Joined: Sun Dec 08, 2013 5:18 pm
Location: North West Leicestershire

Post by Soar Valley Light » Wed Apr 02, 2014 7:22 pm

Thanks for the pictures Peter. It certainly is a beautiful van. One to be proud of and a fine example to those of us who fancy having ago at our own self builds.

What running gear is it sitting on?

Andrew
"Smith! Why do you only come to work four days a week?
"'cause I can't manage on three gaffer!"

User avatar
Andrew
Moderator
Moderator
Posts: 3422
Joined: Tue Jul 03, 2012 1:33 pm
Location: Bristol, UK
Contact:

Post by Andrew » Wed Apr 02, 2014 9:38 pm

Soar Valley Light:98770 wrote:... It certainly is a beautiful van. One to be proud of ...
Absolutely, it's lovely. Don't let those cows get too close...

Post Reply

Who is online

Users browsing this forum: No registered users and 4 guests