SVLR Rolling Stock
-
tegfan railway
- Trainee Fireman

- Posts: 133
- Joined: Sun Dec 12, 2010 12:28 pm
- Location: 222
SVLR Rolling Stock
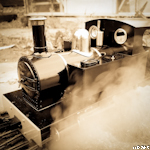
Being on 'light duties' I have been working on some rolling stock. I have just recently completed a pair of swift sixteen tubs, I plan to make six of these as a means to transport material from a quarry on my line, I went for these to go behind my Busted Bricks (now HGLW) loco or one of my Mamods. I am in the process of weathering them at the moment but have been thinking of loads. Now the QUESTION. Do I fully load them with rocks or add a spacer of some sort and only have a cosmetic load to keep weight down?

Dunno but i'd like to see pictures of them behind your BB Loco.
Having said which I rather think you would do well to put in a false bottom (ooh'er) to keep the weight down... Just my opinion though and i'll be interested in what others have to say because I am in the process of making an HGLW steeple cab... Very nice kits if I may say so which are going together commendably well. How they do it at the price I don't know but i'm glad they do. Very impressed !
Having said which I rather think you would do well to put in a false bottom (ooh'er) to keep the weight down... Just my opinion though and i'll be interested in what others have to say because I am in the process of making an HGLW steeple cab... Very nice kits if I may say so which are going together commendably well. How they do it at the price I don't know but i'm glad they do. Very impressed !

Number of considerations needed. What curve radius are you running. How many wagons do you want to pull? What do the wagons already weigh?
If it can be made full scale it can be made 16mm
My line: http://gardenrails.myfreeforum.org/about7200.html
My line: http://gardenrails.myfreeforum.org/about7200.html
-
MDLR

- Driver

- Posts: 4027
- Joined: Thu Jan 15, 2009 10:38 pm
- Location: Near Ripley, Derbyshire, UK
- Contact:
One easy solution is to get some squirty foam insulation and some clingfilm. fit the latter inside each wagon and squirt a SMALL amount of the former (coz it expands like crazy) into each one. The result? Removable load "slugs" which are light and can be "sceniced" on their trimmed top surfaces with whatever you are supposed to be carrying.
Brian, not just a pretty face.... 
If it can be made full scale it can be made 16mm
My line: http://gardenrails.myfreeforum.org/about7200.html
My line: http://gardenrails.myfreeforum.org/about7200.html
-
tegfan railway
- Trainee Fireman
- Posts: 133
- Joined: Sun Dec 12, 2010 12:28 pm
- Location: 222
Thanks for the advice. Took under an hour to assemble and give first coat of red oxide, next job a bit of weathering and load making, like the PU foam idea as spacer! Might try that. Started the build of the little loco, only problem is that I have lost the wheel bearings, might have to get in touch with HGLW.
 [/img]
 [/img]
[/img][/img]-
tegfan railway
- Trainee Fireman
- Posts: 133
- Joined: Sun Dec 12, 2010 12:28 pm
- Location: 222
 [/img]
-
tegfan railway
- Trainee Fireman
- Posts: 133
- Joined: Sun Dec 12, 2010 12:28 pm
- Location: 222
 [/img]
-
tegfan railway
- Trainee Fireman
- Posts: 133
- Joined: Sun Dec 12, 2010 12:28 pm
- Location: 222
-
Dr. Bond of the DVLR

- Retired Director

- Posts: 4485
- Joined: Tue Jun 09, 2009 9:43 pm
- Location: Suffolk
- Contact:

-
tegfan railway
- Trainee Fireman
- Posts: 133
- Joined: Sun Dec 12, 2010 12:28 pm
- Location: 222
Mr. Bond of the DVLR:95710 wrote:Ahhh, 2D design... What a wonderful program. I never made any acrylic rolling stock with the LASER as I was worried it would be too brittle and difficult to paint.
TBH I hate 2D Design with a passion but its the only 2D CADD I have on this laptop. We use it in school as our entry level CADD system, being using it for a while. We used to use Autosketch which I think is a much better package. I have made a couple of laser cut acrylic buildings in the past so though I would give the coaches a go. I have some resin axle boxes in the spares box that I will use. I will be recutting the correct sides today hopefully! They sould paint up well with Halfords car sprays.
-
tegfan railway
- Trainee Fireman
- Posts: 133
- Joined: Sun Dec 12, 2010 12:28 pm
- Location: 222
 [/img]
Painted the side with errors today, just a few squirts of primer. I am quite pleased with the outcome as this is the first time I have used acrylic to make rolling stock. Laser si quite busy today will hopefully get a chance to cut the corrected sides tonight or tomorrow. Need to follow the old adage of check/measure twice cut once!!!
It's looking good, acrylic can be a pain to work with, I've used it on both the router and the laser cutter.
I use Vectric V-Carve Pro, not specifically designed for general 2D CAD but it's very easy to work with and very competitively priced.TBH I hate 2D Design with a passion
Mike
Wood Valley Works
http://www.woodvalleyworks.co.uk
Wood Valley Light Railway
http://www.wvlr.co.uk
Wood Valley Works
http://www.woodvalleyworks.co.uk
Wood Valley Light Railway
http://www.wvlr.co.uk


I just go into my garageWhat do you two do, to have such easy access to a suitable laser cutter?
Mike
Wood Valley Works
http://www.woodvalleyworks.co.uk
Wood Valley Light Railway
http://www.wvlr.co.uk
Wood Valley Works
http://www.woodvalleyworks.co.uk
Wood Valley Light Railway
http://www.wvlr.co.uk

My brother-in-law knocks up his own CAD drawings which he then takes to a kind of community laser cutter somewhere in Birmingham, I think the fee is £25/hour. Sounds like a great idea to me - I may go along and have a look next time I'm there, and then maybe try to learn CAD - he's hada little training in the past but now uses free software to make some wonderful stuff.philipy:95758 wrote:Looks really good and relatively quick and simple to produce an excellent result. What do you two do, to have such easy access to a suitable laser cutter?
I've got full blown AutoCAD which I use routinely, but no laser unfortunately!
Nice looking carriage by the way!
Cheers,
Andrew.
-
tegfan railway
- Trainee Fireman
- Posts: 133
- Joined: Sun Dec 12, 2010 12:28 pm
- Location: 222
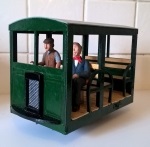
Progress report:
Cut the sides out of 2mm scrap clear acrylic. The sides are in 2 layers, inner layer has the windows cut and panel planking engraved, the outer layer simulates the framing. I have part cut the doors and also engraved hinges. The sides were then glued with solvent cement. The ends were cut from 3mm with engraved planking, a floor and floor spacer was also cut from 3mm.
 [/img]
As you can see assembly is quite straight forward, parts assembled dry then solvent applied using a syringe. Weights and try squares are used but no clamps.
 [/img]
the assembled coach was then giving a few coats of grey primer.
 [/img]
 [/img]
I plan to paint a further couple of coats of white primer then all over cream before masking the lower half and painting red (maybe??) I am going to laser cut some seats for the interior. Need to work out how to do roof next.
Cut the sides out of 2mm scrap clear acrylic. The sides are in 2 layers, inner layer has the windows cut and panel planking engraved, the outer layer simulates the framing. I have part cut the doors and also engraved hinges. The sides were then glued with solvent cement. The ends were cut from 3mm with engraved planking, a floor and floor spacer was also cut from 3mm.
[/img]As you can see assembly is quite straight forward, parts assembled dry then solvent applied using a syringe. Weights and try squares are used but no clamps.
[/img]the assembled coach was then giving a few coats of grey primer.
[/img][/img]I plan to paint a further couple of coats of white primer then all over cream before masking the lower half and painting red (maybe??) I am going to laser cut some seats for the interior. Need to work out how to do roof next.
-
tegfan railway
- Trainee Fireman
- Posts: 133
- Joined: Sun Dec 12, 2010 12:28 pm
- Location: 222
Sprayed up the coach today, after much thought decided a red and cream BR type colour scheme would look good behind my mix of black and green locos. I used the guide to paint in the useful files section. Paints used were from the Halfords range.
 [/img]
The question now is how to build the roof, bent styrene or laminated balsa or ply. I plan to solartes the roof before painting to simulate the fabric. Also wondering about the inside, I might paint it (what colour) or laser cut some thin birch ply or veneer and varnish. It would be interesting to hear what others have done.
[/img]The question now is how to build the roof, bent styrene or laminated balsa or ply. I plan to solartes the roof before painting to simulate the fabric. Also wondering about the inside, I might paint it (what colour) or laser cut some thin birch ply or veneer and varnish. It would be interesting to hear what others have done.
Who is online
Users browsing this forum: No registered users and 2 guests