Discussion of Rolling Stock related topics should go here
-
Gremlin
- Trainee Driver

- Posts: 695
- Joined: Sun Feb 08, 2009 2:46 pm
- Location: Kent
Post
by Gremlin » Thu Dec 26, 2013 1:36 pm
Saw a bit of sunshine today so got a few pics of my recently finished swiftsixteen 7/8ths tub wagons.
They are not quite so bright as this, that's the sun for you.
I'm in two minds whether to leave them rather unloved and rusty or introduce some worn colour.

-
tom_tom_go
- Driver

- Posts: 4824
- Joined: Wed Feb 23, 2011 3:08 am
- Location: Kent, UK
-
Contact:
Post
by tom_tom_go » Thu Dec 26, 2013 1:51 pm
They look spot on David leave them as they are

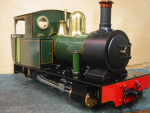
Look forward to seeing them running with your Hunslet soon.
-
Andrew
- Moderator

- Posts: 3309
- Joined: Tue Jul 03, 2012 1:33 pm
- Location: Bristol, UK
-
Contact:
Post
by Andrew » Fri Dec 27, 2013 1:06 pm
Very nice indeed!
I can see why you'd be tempted to try and adding something to replicate very work paint though, just to see if it's poossible - maybe you could try on just one? Can't think how you'd do it, very difficult to improve on the look you've got there. Did you use iron filing-type rusting powder?
Andrew
-
LnBmad
- Trainee Driver
- Posts: 884
- Joined: Fri May 31, 2013 10:17 pm
- Location: North Devon
Post
by LnBmad » Fri Dec 27, 2013 1:16 pm
If you wanted to add traces of old paint use a sponge and dab the paint on. If I were you I'd be adding some dirt on the insides of the wagons but leave the outside as they are.
-
Whosk
- Cleaner

- Posts: 27
- Joined: Sat Aug 11, 2012 6:04 am
- Location: South Australia
Post
by Whosk » Sat Dec 28, 2013 4:06 am
The latest American "Model Railroader" had a story about weathering a loco in 7 minutes using 'pan pastel's' and a foam wedge applicator, looks interesting and would suit your task of any more weathering nicely. not that I have tried them.
Wayne
-
jay1976
- Fireman

- Posts: 326
- Joined: Mon Apr 29, 2013 4:32 pm
Post
by jay1976 » Sat Dec 28, 2013 8:25 am
Could also do just 1 wheel as well so it looks like a recent replacement..
and agree just do 1 wagon to start with as you could always redo the rusty look.. maybe a dent or 2
-
Soar Valley Light
- Driver
- Posts: 1454
- Joined: Sun Dec 08, 2013 5:18 pm
- Location: North West Leicestershire
Post
by Soar Valley Light » Sat Dec 28, 2013 7:15 pm
They look absolutely fantastic!
They remind me of many of the tubs and minecars that we used to have around the collieries. Whilst some were painted others were certainly not. I don't believe that some of them had ever been painted, especially the ones knocked up locally in the fitting shops.
I hope I can come somewhere near the standard you have achieved once I start building my own stock. Thanks for the inspiration
Andrew
"Smith! Why do you only come to work four days a week?
"'cause I can't manage on three gaffer!"
-
Gremlin
- Trainee Driver
- Posts: 695
- Joined: Sun Feb 08, 2009 2:46 pm
- Location: Kent
Post
by Gremlin » Sun Dec 29, 2013 4:55 pm
Thanks guys, might try a bit of colour on one, can always paint it over if it goes wrong.
The finish is just with paint, three colours of artist acrylics, mixed splodged and stippled on. Good fun and really not hard to do.
I have given some denting but the resin is quite thick and hard to distort.
Must find a suitable load of rocks perhaps to give a nice weight.
-
SapperAnt
- Fireman
- Posts: 464
- Joined: Wed Nov 23, 2011 11:20 pm
Post
by SapperAnt » Sun Dec 29, 2013 6:06 pm
Those look fantastic
-
Gremlin
- Trainee Driver
- Posts: 695
- Joined: Sun Feb 08, 2009 2:46 pm
- Location: Kent
Post
by Gremlin » Mon Dec 30, 2013 6:39 pm
Had another tinker with these today and this is the end result.
Managed to get a picture that is very true to the real colour, sunlight or the camera flash change it too much.

-
MDLR
- Driver
- Posts: 4027
- Joined: Thu Jan 15, 2009 10:38 pm
- Location: Near Ripley, Derbyshire, UK
-
Contact:
Post
by MDLR » Mon Dec 30, 2013 7:04 pm
They look absolutely fine - you have to put quite a lot of heat into the resin to get it to distort! (so I'm told)
-
laalratty
- Retired Director

- Posts: 3887
- Joined: Wed Jan 16, 2008 5:35 pm
- Location: Morecambe
Post
by laalratty » Mon Dec 30, 2013 9:04 pm
They look fantastic, nice work!
"What the hell is that?"
"It's a model icebreaker sir."
"It's a bit big isn't it?"
"It's a full scale model sir....."
-
Bill/Rubery
- Trainee Fireman

- Posts: 110
- Joined: Mon Dec 14, 2009 8:41 pm
- Location: North Worcestershire.
-
Contact:
Post
by Bill/Rubery » Fri Feb 14, 2014 12:26 am
Hello, Maybe you should 'mucky up' the spokes and wheels as they look too clean for a industrial wagon....just a though!
-
jim@NAL
- Driver
- Posts: 1120
- Joined: Sun Sep 23, 2012 11:01 am
- Location: haverhill suffok
Post
by jim@NAL » Fri Feb 14, 2014 6:24 pm
there bloody lovly look spot on well done .you could paint on some faded numbers etc
-
Gremlin
- Trainee Driver
- Posts: 695
- Joined: Sun Feb 08, 2009 2:46 pm
- Location: Kent
Post
by Gremlin » Fri Feb 14, 2014 9:11 pm
like the idea of faded numbering. Yes should dirty the wheels, though I did leave the running part unpainted as I thought it would come off anyway. Really nicely cast kits these.
Who is online
Users browsing this forum: No registered users and 1 guest