Electric chassis

Announcements on new models and reviews should be posted here
User avatar
Busted Bricks
Trainee Driver
Trainee Driver
Posts: 750
Joined: Sat Jan 22, 2011 9:16 pm
Location: Denmark
Contact:

Electric chassis

Post by Busted Bricks » Sat Mar 02, 2013 7:55 pm

This is the chassis that is used in my upcoming loco kit. The chassis will be available on its own for £15.75. A switch and battery clip for 2xAA cells is included as is a couple of spare worm gears.

Because the wheels are attached with Loctite the spur gear cannot be replaced. Therefore I have decided to fit a brass spur gear. Combined with plastic worms, the gear will hardly suffer any wear. The worms do wear out with time but can be replaced in a minute and only cost £0.25.

The chassis is 120mm long and measures 56mm over the beams. Initially it will only be available in 32mm but a 45mm version is in preparation.

Michael

Image


Image


Image

User avatar
Steven.T
Fireman
Fireman
Posts: 410
Joined: Sun Mar 13, 2011 5:56 pm
Location: Stockton

Post by Steven.T » Sat Mar 02, 2013 8:53 pm

Nice work! I think I'll be having a chassis at some point for the loco bodies I bought a while ago off you!

User avatar
MDLR
Driver
Driver
Posts: 4027
Joined: Thu Jan 15, 2009 10:38 pm
Location: Near Ripley, Derbyshire, UK
Contact:

Post by MDLR » Sat Mar 02, 2013 9:36 pm

Looks good, and will give IP Engineering a run for their money!
Brian L Dominic
Managing Director
Flagg Fluorspar Co
www.mdlr.co.uk/ff.html

User avatar
Superbiker_uk
Fireman
Fireman
Posts: 371
Joined: Wed Apr 01, 2009 7:36 am

Post by Superbiker_uk » Sun Mar 03, 2013 8:43 am

WOW - that is a fantastic looking kit and real value for money but without any compromise on quality! Very well done on that - expect a first order from me for one (or two :) ) of these when ready. Good luck with the sales!

User avatar
Busted Bricks
Trainee Driver
Trainee Driver
Posts: 750
Joined: Sat Jan 22, 2011 9:16 pm
Location: Denmark
Contact:

Post by Busted Bricks » Sun Mar 03, 2013 12:37 pm

I know that MDF is not to everyones taste. However I find it perfectly adequate if given a coat of polyurethane varnish or similar to seal it. Most people will want to paint it anyways. Grey automotive primer is great. I use the primer and paint from Halfords.

In terms of laser cutting, MDF is a great material. The sheets are flat, don't buckle as they are being cut and the charring does not rub off and make a mess like it does on some plywood.

User avatar
Spule 4
Trainee Driver
Trainee Driver
Posts: 574
Joined: Fri Dec 28, 2007 9:32 pm
Location: Tennessee, USA

Post by Spule 4 » Sun Mar 03, 2013 2:49 pm

Very nice bit of engineering there.

As far as the MDF, will painting it help seal it. The fear I have (and maybe it is unjustified) would be swelling with humidity or if accidentally caught in a rainstorm.
Garrett

"Some say that Mamods have problems.  Whatever. I view them as opportunities for improvement."

User avatar
Catweasel
Fireman
Fireman
Posts: 367
Joined: Tue Jan 17, 2012 5:58 pm
Location: Basingstoke

Electric chassis

Post by Catweasel » Sun Mar 03, 2013 3:57 pm

That does look a good bit of kit. Can 4 w/d be fitted easily I wonder. And what is the gear ratio? As for MDF, I think it's a better material than ply as it has a smooth surface.If "painted" first with waterproof PVA it should be OK outside.
Last edited by Catweasel on Tue Mar 19, 2013 2:12 pm, edited 1 time in total.
Lead me not into temptation,for I can find my own way.

User avatar
Dr. Bond of the DVLR
Retired Director
Retired Director
Posts: 4485
Joined: Tue Jun 09, 2009 9:43 pm
Location: Suffolk
Contact:

Post by Dr. Bond of the DVLR » Sun Mar 03, 2013 4:56 pm

I'll be getting one, might go rather well with a locolines body me thinks?
Image
The railway which people forgot
(to build)

Si
Trainee Fireman
Trainee Fireman
Posts: 116
Joined: Mon Sep 03, 2012 10:26 am

Post by Si » Mon Mar 04, 2013 10:32 am

Looks great VFM....when will it be available?

Following the comments about not being able to remove the spur gear due to the wheels being stuck on, I'm guessing that fitting 4wd is tricky?

User avatar
Busted Bricks
Trainee Driver
Trainee Driver
Posts: 750
Joined: Sat Jan 22, 2011 9:16 pm
Location: Denmark
Contact:

Post by Busted Bricks » Mon Mar 04, 2013 12:40 pm

Si:80838 wrote:Looks great VFM....when will it be available?

Following the comments about not being able to remove the spur gear due to the wheels being stuck on,  I'm guessing that fitting 4wd is tricky?
I had hoped to have it ready this week but projects are piling up and I have a lot of instructions to write so realistically not until around 15/3.

Wheels are attached to the axles with Loctite so retrofitting 4WD would not be possible.

Yesterday I experimented with 4wd using HTD timing belts and delrin sprockets cut on the laser. Unfortunately the stiffness of the belt robs too much power. We are actually "cheating" a bit by running these motors on 3V and using a worm gear to give a fairly low gear ratio (40:1, 30:1). It works as long as the load is light. However the motor should really be running on 6V and use a higher ratio gearbox (200:1) which would give much more torque. However that also pushes the price up. There is also very little room for motor and batteries on a 32mm scale model. I'm contemplating a 7/8ths version on 45mm track which would be able to house a much more powerful drivetrain.

This is intende to be a low cost option that will pull a couple of flatbeds or a small rake of skips. If you need more power there are a selection of chassis available albeit at a higher cost.
Last edited by Busted Bricks on Mon Mar 18, 2013 5:39 pm, edited 1 time in total.

User avatar
Busted Bricks
Trainee Driver
Trainee Driver
Posts: 750
Joined: Sat Jan 22, 2011 9:16 pm
Location: Denmark
Contact:

Post by Busted Bricks » Mon Mar 18, 2013 5:36 pm

Instructions should be completed tonight so I can get the kits added to the webshop.

Is there a preference for battery clip and switch being included or should I list those separately?

The loco design is completed and now awaits instructions. I'm doing a smaller flatbed to suit the loco.

Enginehouse
Trainee Fireman
Trainee Fireman
Posts: 199
Joined: Sun Oct 21, 2012 5:16 pm
Location: Peterborough

Post by Enginehouse » Mon Mar 18, 2013 6:32 pm

[quote="Busted Bricks:80839"][quote="Si:80838"]
There is also very little room for motor and batteries on a 32mm scale model. I'm contemplating a 7/8ths version on 45mm track which would be able to house a much more powerful drivetrain.

I would be interested in a couple of these.

Incidentally as a model boat builder who has used MDF for no end of purposes out on the water, a very simple way of completely waterproofing it is a quick (and I do mean quick) coat of fibreglass resin of the type usually used with fine glass for car repairs, scrubbed into the MDF with a firm brush. Works beautifully. Just don't miss any spots. Then just paint and forget. Works well with model buildings too.
Cheers

Roy H

User avatar
Chris Cairns
Driver
Driver
Posts: 2366
Joined: Mon Oct 29, 2007 7:25 pm
Location: Glasgow, Scotland

Post by Chris Cairns » Mon Mar 18, 2013 6:37 pm

Michael,

I would suggest offering the battery clip & switch as an optional extra allowing builders to do their own thing as appropriate.

With regards to a 4WD option why not offer an option of un-assembled axles, allowing a builder to fit 4WD and then make up their own axles. After all that is what IP Engineering did with their Lollypop Railcar.

Chris Cairns.

User avatar
Busted Bricks
Trainee Driver
Trainee Driver
Posts: 750
Joined: Sat Jan 22, 2011 9:16 pm
Location: Denmark
Contact:

Post by Busted Bricks » Tue Mar 19, 2013 1:46 am

The kit has now been added to the webshop:

http://www.bustedbricks.com/garden-rail ... s-11-c.asp

I have decided to include battery clip and switch by default but will include an option to take those out and save a bit.

Please note the instructions are not complete - a wiring diagram is still to be included.

Peter L
Trainee Fireman
Trainee Fireman
Posts: 139
Joined: Sun Dec 02, 2012 4:56 pm
Location: Westchester, New York

Post by Peter L » Tue Mar 19, 2013 2:09 pm

At that price you'd have to be crazy not to buy one! What's the shipping to the US?

Si
Trainee Fireman
Trainee Fireman
Posts: 116
Joined: Mon Sep 03, 2012 10:26 am

Post by Si » Tue Mar 19, 2013 3:28 pm

Order sent, waiting expectantly :D

User avatar
Busted Bricks
Trainee Driver
Trainee Driver
Posts: 750
Joined: Sat Jan 22, 2011 9:16 pm
Location: Denmark
Contact:

Post by Busted Bricks » Tue Mar 19, 2013 11:03 pm

Peter L:81381 wrote:At that price you'd have to be crazy not to buy one! What's the shipping to the US?
£5.29. However you don't pay the VAT so the kit is £13.13.

Si
Trainee Fireman
Trainee Fireman
Posts: 116
Joined: Mon Sep 03, 2012 10:26 am

Post by Si » Tue Mar 26, 2013 10:06 am

Mine came today....well packed and sent via the RM so I could pop down the sorting office and pick it up rather than having to stay in for couriers.

Looks like a nice neat little kit...will report back when I've started building it.

Si
Trainee Fireman
Trainee Fireman
Posts: 116
Joined: Mon Sep 03, 2012 10:26 am

Post by Si » Tue Mar 26, 2013 3:11 pm

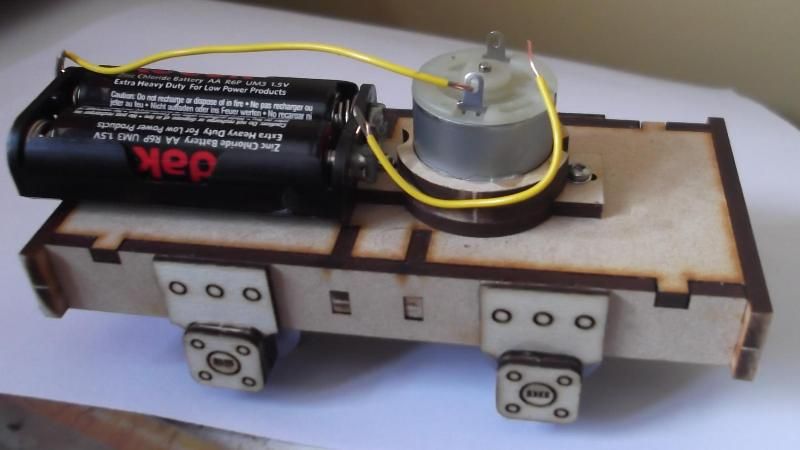
Chassis is now built and test run.

Not done one of these laser cut MDF jobbies before so wasn't sure what to expect.

Have to say that the only sort of complaint that I really have about it is that it was too easy to build!  Compared to the brass kits I've donerecently, this one just sort of went together with no bother at all in about 20mins.

Everything came out the the frets nice and easily.  Just needed a tad of sanding where the lumps from the joins were.

The central cross members would also benefit from a smidge of sanding on the shoulder as they are ever so slightly too wide - but this is very easily sorted.

Followed the clear instructions (available on-line but not with the kit - to keep costs down).  Stuck most of it together with Glue-n-Glaze which I find is like PVA but dries  bit faster (hence the 20min built time - could have halved this with super glue but wasn't sure if you are meant to use super glue with MDF?).  
Apart from the central cross members (as mentioned) everything fitted perfectly.  Mounting the motor was really easy too.  

I didn't have the optional switch and batclip as I've already got these.  Initially I've just wired it with a single AA for testing.  It trundles along happily at a modest speed (which is what I want because I like shunting).  

I was eager to test its pulling ability being only two wheel drive with no option for four wheel drive (the wheels are glued to the axles preventing retro fitting) so I hitched up four of my moderately light wagons - smidge of wheel spin initially but once moving it had no trouble with the wagons on the flat.  I put a couple of extra batteries over the drive axle just to add a bit of weight and this cured the wheel spin when starting.  Haven't tried on inclines yet.

At £17.58 inc UK p&p I have to say that I'm very happy with it.

Perhaps I would think about having the buffers as an optional extra as I don't intend to use them because the body that I'm building for it is a tad longer.

Image
Last edited by Si on Wed Mar 27, 2013 8:44 am, edited 1 time in total.

User avatar
Busted Bricks
Trainee Driver
Trainee Driver
Posts: 750
Joined: Sat Jan 22, 2011 9:16 pm
Location: Denmark
Contact:

Post by Busted Bricks » Tue Mar 26, 2013 8:14 pm

Thanks for posting the review. With regards to 4-wheel drive I have just received some plastic pulleys. They have 2mm bores so will need to be bored out to 2.9mm. They should work well with polyurethane belting.

Post Reply

Who is online

Users browsing this forum: No registered users and 1 guest