Scrap the paint away around the offending ferrule/insert and roughen up the surface. Apply some flux. Heat the flux up then gently melt in a small bead of soft solder around the ferrule/insert. Let everything cool down plenty then see if your adaptor will come out.
I had problems with a leaking whistle on my SL3 and eventually the insert went loose on that boiler. Turned out that the whistle and insert had not been cut accurately at 1/4" x 26BSF so I now have a 1/4" x 26BSF Tap in my tool box to clean out any offending inserts.
Chris Cairns.
Mamod SL2 / SL3 Refurb/Restoration

Hi
Thanks for the advice.
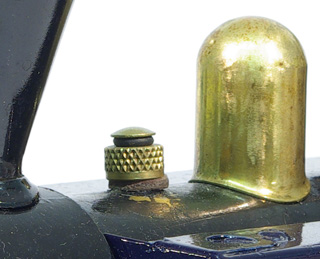
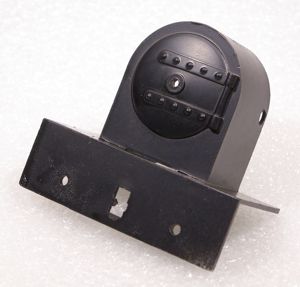
I think the front connection may have been stressed a little already. If you look at the close up of the safety valve in place you can see that it isn't sitting straight compared to the steam dome.
I carefully put a 5/16" BSF tap down each of the small ferrules to make sure they were clean and they seemed OK. It may be that my die is cutting a bit oversize but I was only using light finger pressure when inserting the adapter.
Just out of interest what size is the steam dome thread? It looks to me like 12mm x 1mm.
Regards
Will
Thanks for the advice.
I think the front connection may have been stressed a little already. If you look at the close up of the safety valve in place you can see that it isn't sitting straight compared to the steam dome.
I carefully put a 5/16" BSF tap down each of the small ferrules to make sure they were clean and they seemed OK. It may be that my die is cutting a bit oversize but I was only using light finger pressure when inserting the adapter.
Just out of interest what size is the steam dome thread? It looks to me like 12mm x 1mm.
Regards
Will
-
Chris Cairns

- Driver

- Posts: 2366
- Joined: Mon Oct 29, 2007 7:25 pm
- Location: Glasgow, Scotland
Will,
Yes it looks like your front boiler insert has been bent out of place at some point. Once you get your adaptor sorted out a little bit of heat and pulling there will help set it back again.
I do not know the correct thread size for the steam dome insert but I've just posted the question over on the 16mm NGM Yahoo group so I'll keep you advised.
Chris Cairns.
-
Chris Cairns
- Driver
- Posts: 2366
- Joined: Mon Oct 29, 2007 7:25 pm
- Location: Glasgow, Scotland
Sounds like a late 1970s US built Chevrolet or AMC!Chris Cairns:79440 wrote:Will,
Finally got the answer from the 16mm NGM Yahoo group, and you are right - it is M12 x 1.
Seems strange to use different standards for thread sizes - BSF & Metric.
Chris Cairns.
Garrett
"Some say that Mamods have problems. Whatever. I view them as opportunities for improvement."
"Some say that Mamods have problems. Whatever. I view them as opportunities for improvement."
Chris
Thanks for confirming the thread size. I was wondering about the size in case I wanted to make a modified steam dome. I’ve got a M12 x 1 tap but obviously couldn’t screw it into the boiler fitting with the internal pipe in place.
I think Ian (spooner) is right about the new/old mix of parts. I’ve been making some CAD drawings of the loco components while it’s in pieces and it’s all metric so far, but it makes sense of Mamod to keep the safety valve and whistle compatible with their other steam products.
Boiler Update:
I managed to re-solder the ferrule and get my part-finished adapter out. I tightened up the 1/4” BSF split die and ran it down the thread again and now it’s a looser fit in the boiler. I will finish the adapter and the pressure gauge connection when it’s a bit warmer in the garage – it’s only a few degrees above freezing in there and it’s still snowing outside.
I will probably have another go at soldering the front connection. Any suggestions on how you stop the ferrule dropping in to the boiler when the solder melts? I did the temporary repair with the boiler on end but it would be easier to work on with it in its normal orientation.
Regards
Will
Still too cold to do much restoration work in the garage, but I have been sorting through the very nice selection of goodies that Greg (Narrow Minded) put together for me at a very reasonable price.
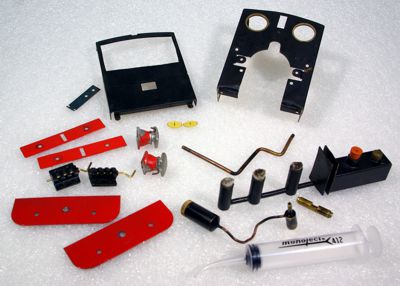
This has provided me with a number of items that were missing/broken on my original loco purchase:
Cab back and retaining spring
Meths burner
Selection of buffer plates and assorted buffer/couplings
Additional items include:
Dead leg displacement lubricator, steam pipe, curved tip syringe
Spare cab front
Small oval brass '1' number plates
I had been trying to decide on whether to go with a meths burner or try a gas one, but speaking as someone who's parents had the foresight to buy me a Mamod/Meccano stationary engine while I was still at junior school, the great smell of meths, oil and steam should bring back some pleasant memories!
I am very impressed with the support I have received from the forum members in the short time I have been here. You are a great source of knowledge and inspiration.
Many thanks
Will
-
Chris Cairns
- Driver
- Posts: 2366
- Joined: Mon Oct 29, 2007 7:25 pm
- Location: Glasgow, Scotland
Will,
I find using wood stove fire rope makes great wick material for meths burners. It has a ceramic content which means once it has burnt a few times the ceramic part tends to seal around the top of the burner tubes which means no meths leaking when the loco falls over. Works well in my runaway Bowman locomotives.
Not many Forum members use the Dead leg lubricator, with many changing these for Displacement lubricators instead (not sure if this is just for looks). As long as you prime the steam pipe that enters the dead leg lubricator every time that you fill the lubricator then I find they work every time - I use a syringe to push steam oil into the steam pipe. However how much oil is used per run does vary from loco to loco. I've recently found some good info on the dead leg lubricator from Mike Chaney (the original designer of the Mamod one, which IP Eng & Dream Steam have copied) which I need to edit. You will also need to solder the steam pipe into the dead leg lubricator to get the best steam tight seal.
Chris Cairns.
-
DolwyddelanLightRail

- Driver
- Posts: 2579
- Joined: Tue Sep 29, 2009 7:27 pm
- Location: Lost
Dead leg's seem to be a black art. Britomarts one has always worked since the first time it was steamed with it, I haven't had to prime the steam pipe every time like you have mentioned above though. The only thing I have noticed recently is that it has been going through oil a lot more than it used to.

-
Lner fan Sam

- Fireman

- Posts: 491
- Joined: Sun Nov 25, 2012 7:57 pm
- Location: Sunderland, north east of England
-
Chris Cairns
- Driver
- Posts: 2366
- Joined: Mon Oct 29, 2007 7:25 pm
- Location: Glasgow, Scotland
A valid question Chris.Chris Cairns:79671 wrote:Why not a Dead Leg Lubricator then? Cost, Looks, Practicality or Operation?Spule 4 wrote:but if I were to buy a new one I would get a RH or RWM inline one.
One advantage I find with my dead leg lubricators is they use a lot less oil than the in-line displacement types.
Chris Cairns.
Pluses to the inline ones:
They seem to use more oil,
Easy to drain and fill with the bottom drain (some deadlegs have, some don't),
Less chance of steam leaks (either from the lines themselves and clearance issue with the cylinder screws)
They cost GBP 10-12 less than the deadleg. (GBP 25 Vs 13-15).
The appearance does not bother me so much, I have become used to the one hanging on the smokebox of Maj. Hitchcock.
It works fine for now (screw shortened and nub on lubricator filed), but if the Maj. ever gets a proper boiler (it is starting to suffer from zinc rot) it and the Finescale regulator will be going elsewhere.
Garrett
"Some say that Mamods have problems. Whatever. I view them as opportunities for improvement."
"Some say that Mamods have problems. Whatever. I view them as opportunities for improvement."
Hi
Interesting stuff about the two types of lubricators.
I can see pros and cons with each type.
With the dead leg one I would guess steam that condenses in the connecting pipe will just drain back into the steam pipe and get sent off to the cylinders. Only steam that reaches the body of the unit will condense and displace the oil.
Possibly the in-line version can dispense more oil but I'm not sure if I like the idea of the steam/oil mix getting reheated under the boiler on its way from the cab to the cylinders. Has anyone tried installing an in-line unit at the smokebox end?
I'll try installing the dead leg one when I get to that stage and see how it works out.
-
Lner fan Sam
- Fireman
- Posts: 491
- Joined: Sun Nov 25, 2012 7:57 pm
- Location: Sunderland, north east of England
-
laurence703

- Trainee Driver

- Posts: 804
- Joined: Fri Nov 25, 2011 1:49 pm
- Location: Lost
-
Chris Cairns
- Driver
- Posts: 2366
- Joined: Mon Oct 29, 2007 7:25 pm
- Location: Glasgow, Scotland
Chris Cairns.Roundhouse Engineering wrote:The change of oil was brought about a few years after Roundhouse adopted internal gas firing and a small number of engines were experiencing blocked super heater pipes after prolonged use. The blockages were caused by carbonised oil, though this had never been a problem with the earlier externally fired models.
Update from the engine shed:
The cab front and side tanks have been completely stripped back to bare metal. Minor dents have been knocked out and the parts of the side tanks that form the cab floor have been folded back down to their original position alongside the main frames.
The parts have received a couple of coats of grey primer and I am tempted to leave them like this until the loco has had a couple of test runs after which a partial strip for final painting can take place.
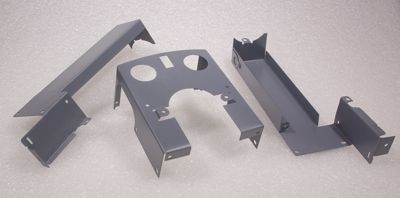
The smokebox has received a coat of satin black BBQ paint which gives it quite a pleasing finish.
Still plenty more work to do but at least it's a bit warmer in the workshop now.
The cab front and side tanks have been completely stripped back to bare metal. Minor dents have been knocked out and the parts of the side tanks that form the cab floor have been folded back down to their original position alongside the main frames.
The parts have received a couple of coats of grey primer and I am tempted to leave them like this until the loco has had a couple of test runs after which a partial strip for final painting can take place.
The smokebox has received a coat of satin black BBQ paint which gives it quite a pleasing finish.
Still plenty more work to do but at least it's a bit warmer in the workshop now.
Who is online
Users browsing this forum: No registered users and 1 guest