(WH)WHR Rolling Stock
-
Narrow Minded
- Driver

- Posts: 4650
- Joined: Wed Dec 30, 2009 2:27 pm
- Location: Forgotten Realms
- Contact:
-
Dr. Bond of the DVLR

- Retired Director

- Posts: 4485
- Joined: Tue Jun 09, 2009 9:43 pm
- Location: Suffolk
- Contact:


Hello again,
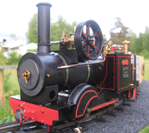
Glad you like it chaps. I gave it a test run earlier in the week and it seems a little more sensitive than my other vehicles. It kept derailing on one curve, but I the track there if only very roughly laid so far, so I think I can cure that with a little work with a spirit level and some packing. I was concerned that it might suffer from buffer locking because the bogies are quite a distance in from the ends (and not as per IP's instructions) - I wonder whether that could effect its road-holding ability?
Mr B, the vacuum pipes and standards use my usual method of Wilkinsons garden wire for the pipe and a length of curtain wire (the springy stuff for net curtains) for the hose. Mine don't connect and the garden wire runs right through the sprung bit, but I pinched the idea from working (well, not in the DVLR sense) ones featured in SMT about 20 years ago.
I generally add a little ring of biro inner near the top of the standard to give the impression of a bit more detail and add just a little chunkiness. The garden wire is slightly underscale I think, should be a little thicker, but it bends to shape beautifully enabling me to recreate prototypical pipe-runs. It's difficult to make it completely straight, but to me that's a good thing as real pipework often seems to feature little kinks here and there. There seem to be varying thicknessess of curtain wire available, not all will fit over the wire... Where necessary I fix the whole thing to the carriage body with little split pins (mine came from Screwfix) - you can see one near the bottom of the bufferbeam doing a reasonable job of looking like it's supposed to be there. The best bit about all of this is the cost - with this method you could do an entire carriage fleet for roughly the cost of a single pair of ready made pipes.
Cheers,
Andrew.
Hello!
I decided to give myself a break from carriage-building and make a pair of slate wagons:

Yes, I know that's only one - I lost the bits for the other one and so completion will have to wait until I find them again... There's nothing terribly remarkable about it, it's just a standard Binnie kit, but I was very pleased to discover the delights of lead fishing weights. The lead is so soft and malleable that the weights (which cost just 50p each) can be bashed into shape with a club hammer and sawn with a hacksaw. I used two weights to fill the space beneath the floor - the completed model is surprisingly heavy as a result.

In 25 years of garden railway-ing it's never felt quite right that I've not owned a slate wagon (even if my previous line was set in Kent!) - I intend that there'll be many more to follow this one...
All the best,
Andrew.
I decided to give myself a break from carriage-building and make a pair of slate wagons:
Yes, I know that's only one - I lost the bits for the other one and so completion will have to wait until I find them again... There's nothing terribly remarkable about it, it's just a standard Binnie kit, but I was very pleased to discover the delights of lead fishing weights. The lead is so soft and malleable that the weights (which cost just 50p each) can be bashed into shape with a club hammer and sawn with a hacksaw. I used two weights to fill the space beneath the floor - the completed model is surprisingly heavy as a result.
In 25 years of garden railway-ing it's never felt quite right that I've not owned a slate wagon (even if my previous line was set in Kent!) - I intend that there'll be many more to follow this one...
All the best,
Andrew.
Good morning,
My Ffestified IP carriage is moving forwards slowly, with the exterior almost complete. Here it is sitting in the sunshine this morning... Transfers, light weathering and varnish next, then glazing and the interior, although with the recently improved weather that'll all take a back seat to extending the railway...
Cheers,
Andrew.
-
Narrow Minded
- Driver
- Posts: 4650
- Joined: Wed Dec 30, 2009 2:27 pm
- Location: Forgotten Realms
- Contact:
Very nice Andrew 
that's going to be a cracker when it's finished!
I somehow missed your slate wagon - sometimes the little "alerts" to the left of new thread entries don't work properly
Anyhow, at first I thought you'd scratchbuilt it, so eagerly dived into the description (I'm looking for a tip for making the "bobbins"!! ).
).
Obviously I was a little disappointed to find that it was a Binnie kit, but at the same time, that's a compliment to your build since at first glance it doesn't LOOK like a Binnie kit!
Nice one
that's going to be a cracker when it's finished!
I somehow missed your slate wagon - sometimes the little "alerts" to the left of new thread entries don't work properly
Anyhow, at first I thought you'd scratchbuilt it, so eagerly dived into the description (I'm looking for a tip for making the "bobbins"!!
Obviously I was a little disappointed to find that it was a Binnie kit, but at the same time, that's a compliment to your build since at first glance it doesn't LOOK like a Binnie kit!
Nice one

Hello again,Narrow Minded:84281 wrote:
I somehow missed your slate wagon - sometimes the little "alerts" to the left of new thread entries don't work properly
Anyhow, at first I thought you'd scratchbuilt it, so eagerly dived into the description (I'm looking for a tip for making the "bobbins"!!
Obviously I was a little disappointed to find that it was a Binnie kit, but at the same time, that's a compliment to your build since at first glance it doesn't LOOK like a Binnie kit!
Nice one
Ah, sorry to disappoint re it not being a scratchbuild, I thought it would probably take forever... How about making bobbins from various little beads of the sort they sell in craft shops for necklace making? If you drilled the ends of the slats they could could be held in place with thin rods running down through both bobbins and slats into the floor. Thinking about it I may end up doing that myself because I've somehow lost the upper body parts for my second wagon. Of course they'll turn up as soon as I've finished building replacements...
I guess scratchbuilding the smaller typers of slate wagon is essential when you're on 45mm? It occurred to me recently that it might be worth their while for one of the resin kit companies to produce a version of the Ffestiniog 3 steel ton slate wagon. They were wider than the 2 ton ones which the Coopercraft and Binnie kits are based on, so they could be made to run on 45mm as well as 32mm, could be quite a market for them I should think...
Good luck with your bobbins (?!!),
Andrew.
Having waited three years for a decent summer so I could do some serious tracklaying it went and got far too hot to be digging holes and mixing concrete. So I retreated indoors and got stuck into a model of the WHR Gladstone Car that I've been working on for a while now.
It's a "scrimpbuild" - part scratchbuilt, part old Imp kit. I acquired the latter at a very good price but found that actually I wanted to change quite a lot about it - lowering the ride height so the coupling sat in the right place, changing sides and ends so that it could be individually matchboarded to match my other WHR/FR vehicles, replacing the interior screens with new ones that didn't look they'd been chewed out of a sheet of ply by a small child etc etc.
So here's where I'm at so far...

It's not quite as accurate or elegant as I'd like, somewhat chunkier than the real thing in places, but it'll do. The red oxide is just a primer, but it's not too far from the top coat I plan to use, a slightly more sober version of the "vermilion" (orange-red, like bufferbeams) that Boyd describes. That comes next, then just a little weathering and some varnish, and then I'll have to tackle the interior. Possibly including a ghostly version of Gladstone himself...
Cheers,
Andrew.
It's a "scrimpbuild" - part scratchbuilt, part old Imp kit. I acquired the latter at a very good price but found that actually I wanted to change quite a lot about it - lowering the ride height so the coupling sat in the right place, changing sides and ends so that it could be individually matchboarded to match my other WHR/FR vehicles, replacing the interior screens with new ones that didn't look they'd been chewed out of a sheet of ply by a small child etc etc.
So here's where I'm at so far...
It's not quite as accurate or elegant as I'd like, somewhat chunkier than the real thing in places, but it'll do. The red oxide is just a primer, but it's not too far from the top coat I plan to use, a slightly more sober version of the "vermilion" (orange-red, like bufferbeams) that Boyd describes. That comes next, then just a little weathering and some varnish, and then I'll have to tackle the interior. Possibly including a ghostly version of Gladstone himself...
Cheers,
Andrew.
Hello,
Recent weeks have seen some progress with the (WH)WHR slate wagon fleet - it's quadrupled in size to a magnificent, errr, four!
The initial Binnie wagon has been joined by a second and I've also purchased and constructed two of Mat Peacock's pvmr 3D-printed kits for the FR 3 ton wagon.
So here's the current rake, awaiting a load:

Cheers,
Andrew
Recent weeks have seen some progress with the (WH)WHR slate wagon fleet - it's quadrupled in size to a magnificent, errr, four!
The initial Binnie wagon has been joined by a second and I've also purchased and constructed two of Mat Peacock's pvmr 3D-printed kits for the FR 3 ton wagon.
So here's the current rake, awaiting a load:
Cheers,
Andrew

Hello again,
Glad you like the slate trucks laalratty.
I've almost finished "Number 14", my Ffestified IP coach. The interior's complete now, just the roof to go, should be finished soon...
Here's the latest progress...

The figures used to be Star Trek and Captain Scarlet figures, not perfect 20s passengers (that's a very 70s haircut that young woman's sporting!) but since the carriage's whole complement of 4 people cost less tan one commercial 16mm figure I'm not complaining - and you can't see much through a compartment window anyway...
Cheers,
Andrew.
Glad you like the slate trucks laalratty.
I've almost finished "Number 14", my Ffestified IP coach. The interior's complete now, just the roof to go, should be finished soon...
Here's the latest progress...
The figures used to be Star Trek and Captain Scarlet figures, not perfect 20s passengers (that's a very 70s haircut that young woman's sporting!) but since the carriage's whole complement of 4 people cost less tan one commercial 16mm figure I'm not complaining - and you can't see much through a compartment window anyway...
Cheers,
Andrew.
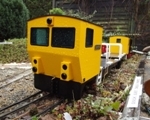
While the (WH)WHR's Permanent Way team were testing the latest extension yesterday the Carriage and Wagon staff were putting the finishing touches to Carriage 14. Or, more accurately, while I was in the garden playing trains, the new carriage was wrapped in a pair of tights I'd pinched from my daughter, an attempt to clamp the roof in place while the glue dried... Once I'd unwrapped it again it looked like this:

As mentioned further up the thread, this IP kit has had various modifications to enable it to stand in for the familiar FfR bogie composites in my Ffestiniog rake. "Number 14" was actually a 4-wheeler, but in my alternate history it was built before numbers 15-20 as a prototype. One day, when I'm fabulously wealthy and have a huge garden to match my spectacular bank balance, I'll build a "proper" model (or six), but for now this will do. I think it gives the right sort of impression, particularly from this angle:

Must dig out the lamp-tops that are lost in the depths of my "train cupboard" to finish the job properly...
Cheers all,
Andrew.
As mentioned further up the thread, this IP kit has had various modifications to enable it to stand in for the familiar FfR bogie composites in my Ffestiniog rake. "Number 14" was actually a 4-wheeler, but in my alternate history it was built before numbers 15-20 as a prototype. One day, when I'm fabulously wealthy and have a huge garden to match my spectacular bank balance, I'll build a "proper" model (or six), but for now this will do. I think it gives the right sort of impression, particularly from this angle:
Must dig out the lamp-tops that are lost in the depths of my "train cupboard" to finish the job properly...
Cheers all,
Andrew.
Last edited by Andrew on Wed May 28, 2014 10:16 pm, edited 1 time in total.
-
Peter Butler

- Driver
- Posts: 5253
- Joined: Sun Sep 09, 2012 10:33 pm
- Location: West Wales

-
St.Michael
- Fireman

- Posts: 343
- Joined: Tue May 08, 2012 9:13 pm
- Location: Norway
Ah, if only... Actually, I'm kind of hoping that Roundhouse or whoever DON'T produce an England 'cos I'd probably end up selling some vital organs or something to pay for it.laalratty:91926 wrote:You've done an excellent job on that coach, and the whole rake looks very nice indeed. Would look superb with an England loco on the front...
Thanks for the kind comments chaps, very much appreciated.
Andrew.
Look at these little beauties!

I was concerned about how I would make decent seats for the Gladstone Car's balconies. The ones in the original IMP kit weren't up to much and I didn't fancy cutting out 22 curved seat ends by hand. WVLR of this forum came to the rescue, laser cutting these beautiful parts to my design at a very reasonable cost - many thanks Mike, they're fantastic! I'll assemble these seat frames over the coming days and then prime and paint them before adding varnished slats.
Cheers,
Andrew.
Very nice, for my Gladstone Car I bashed up my own frames from square wood section, but those look much better. You will still have a bit of masochistical modelling with the slats though I expect!
"What the hell is that?"
"It's a model icebreaker sir."
"It's a bit big isn't it?"
"It's a full scale model sir....."
"It's a model icebreaker sir."
"It's a bit big isn't it?"
"It's a full scale model sir....."
Who is online
Users browsing this forum: No registered users and 1 guest