

Glad you like 'em folks, thanks. Once Christmas is out of the way I hope to spend some time getting these into a more finished state and then go back to the laser cutter for parts for more. The NWNGR had three, all long gone by the time the WHR - and so too the (WH)WHR - came along, but I plan to re-write history just a little so I can run a train of five...
Andrew.
(WH)WHR Rolling Stock
Hello again,
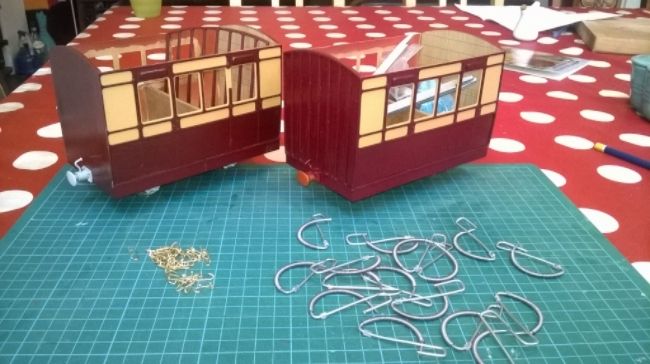
A quieter spell after Christmas has seen some more progress on the 4-wheelers. The second one now has running and coupling gear - it doesn't quite sit squarely on its wheels, I think the axleguard castings were a little wonky, but I'm hoping it'll be OK. If not I'll have to replace them, but that won't be easy because I stuck 'em on with Araldite...
Most of the beading's on too, but I'll have to replace a few broken bits before touching up the paintwork. This morning I made enough grab rails and vacuum pipe details to complete all the proposed carriages, a pleasantly therapeutic way to spend an hour or too before heading back to work...
Cheers,
Andrew
-
Peter Butler

- Driver

- Posts: 5245
- Joined: Sun Sep 09, 2012 10:33 pm
- Location: West Wales
OK, as promised, here's "Brake Pipes the Easy Way"...
Before I start I should acknowledge that as well as many advantages, the method does have its drawbacks - here are the pros and cons that I can think of:
Advantages:
* They're quick and easy to make, and incredibly cheap - you can equip a whole carriage fleet for the cost of a single pair of white-metal pipes.
*It's easy to recreate prototypical pipe runs.
*They're pretty strong - useful considering how vulnerable they are.
Disadvantages:
*It's an impression, rather than being 100% accurate - I wouldn't like a guard or shunter to look too closely!
* The pipes are probably a little thinner than they ought to be.
* It's hard to create dead straight pipes - but I rather like the slightly bodged and battered effect.
* The galvanised wire doesn't take paint brilliantly, which is a particular problem because they stick out and so are a bit prone to being chipped. I'm going to try etch primer on the next lot to see if that helps.
OK, on with the show:
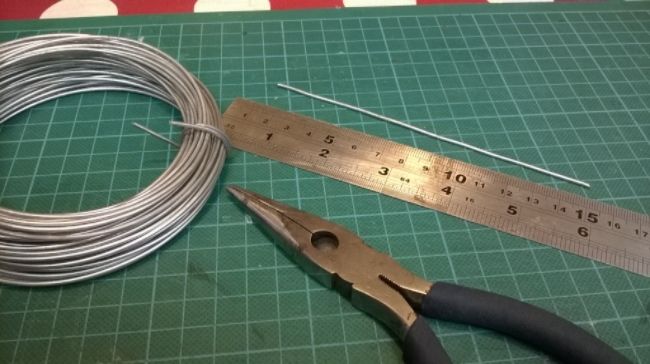
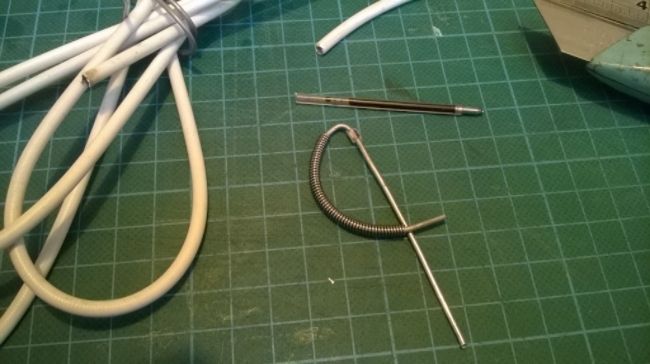
1) Cut and straighten an appropriate length of galvanised garden wire - I get mine from Wilkinsons. About 15cm will do for a simple pipe which sits next to the buffer and disappears straight under the bufferbeam, but I've made runs that are over half a metre long too, for Welsh Highland carriages where the pipes were tacked on to the bottom of the carriage sides on conversion from air to vacuum braking.
I mostly use pliers to straighten the wire, and do it largely by eye, but I have also tried rolling wire between boards, hammering it, stretching it, and possibly other methods too...
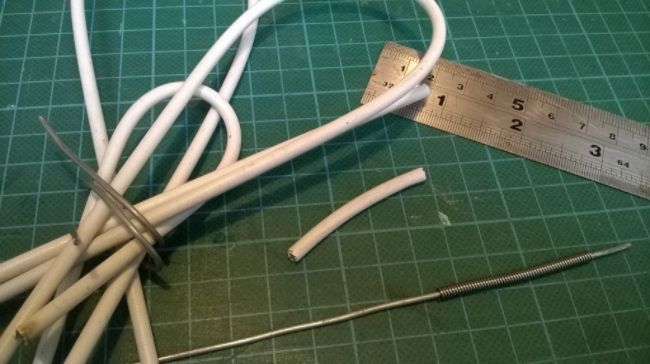
2) Cut a length of springy net curtain wire to represent the hose - about 4.5cm seems about right. I think my net curtain wire came from Wilko too, but I could be wrong - not all varieties are wide enough to slide over the garden wire.
Strip the outer coating off the curtain wire and slide it onto the garden wire, leaving about 1cm sticking out the end:
3) Make a nice bend - using a paint tinlet seems to work well. Some pipes are offset and need bending by eye, but putting the curtain wire on first helps keep the curves nice and smooth.
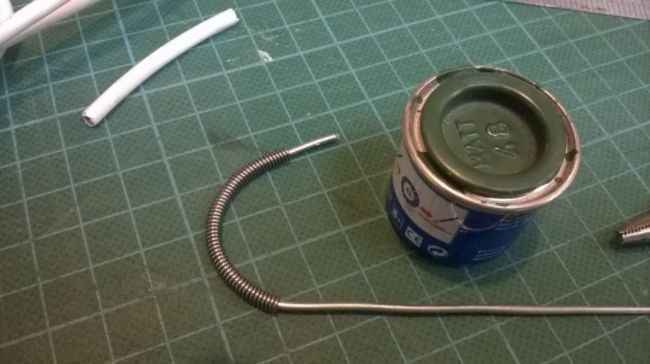
4) Bend the long bit of the wire downwards, and the shorter part so that it crosses the other at about 90 degrees - this bit will secure the whole thing in place by passing through a hole drilled in the carriage end and being araldited in place inside, usually under a carriage seat.
I usually add a sort of collar to the top of the pipe (made from an old biro tube) to bulk it up a bit and give an impression of additional detail!
And that's about it. More complex shapes (which often result in more spring in the wire to overcome) can be held in place with split pins, as modelled below by my dual-braked van - again, probably not quite right, but they give the right sort of impression I think:

And that's it. It suits me, but it's not perfect - any suggestions for improvement gratefully received!
All the best,
Andrew.
Before I start I should acknowledge that as well as many advantages, the method does have its drawbacks - here are the pros and cons that I can think of:
Advantages:
* They're quick and easy to make, and incredibly cheap - you can equip a whole carriage fleet for the cost of a single pair of white-metal pipes.
*It's easy to recreate prototypical pipe runs.
*They're pretty strong - useful considering how vulnerable they are.
Disadvantages:
*It's an impression, rather than being 100% accurate - I wouldn't like a guard or shunter to look too closely!
* The pipes are probably a little thinner than they ought to be.
* It's hard to create dead straight pipes - but I rather like the slightly bodged and battered effect.
* The galvanised wire doesn't take paint brilliantly, which is a particular problem because they stick out and so are a bit prone to being chipped. I'm going to try etch primer on the next lot to see if that helps.
OK, on with the show:
1) Cut and straighten an appropriate length of galvanised garden wire - I get mine from Wilkinsons. About 15cm will do for a simple pipe which sits next to the buffer and disappears straight under the bufferbeam, but I've made runs that are over half a metre long too, for Welsh Highland carriages where the pipes were tacked on to the bottom of the carriage sides on conversion from air to vacuum braking.
I mostly use pliers to straighten the wire, and do it largely by eye, but I have also tried rolling wire between boards, hammering it, stretching it, and possibly other methods too...
2) Cut a length of springy net curtain wire to represent the hose - about 4.5cm seems about right. I think my net curtain wire came from Wilko too, but I could be wrong - not all varieties are wide enough to slide over the garden wire.
Strip the outer coating off the curtain wire and slide it onto the garden wire, leaving about 1cm sticking out the end:
3) Make a nice bend - using a paint tinlet seems to work well. Some pipes are offset and need bending by eye, but putting the curtain wire on first helps keep the curves nice and smooth.
4) Bend the long bit of the wire downwards, and the shorter part so that it crosses the other at about 90 degrees - this bit will secure the whole thing in place by passing through a hole drilled in the carriage end and being araldited in place inside, usually under a carriage seat.
I usually add a sort of collar to the top of the pipe (made from an old biro tube) to bulk it up a bit and give an impression of additional detail!
And that's about it. More complex shapes (which often result in more spring in the wire to overcome) can be held in place with split pins, as modelled below by my dual-braked van - again, probably not quite right, but they give the right sort of impression I think:
And that's it. It suits me, but it's not perfect - any suggestions for improvement gratefully received!
All the best,
Andrew.
-
Peter Butler
- Driver
- Posts: 5245
- Joined: Sun Sep 09, 2012 10:33 pm
- Location: West Wales
Thank you Andrew, very well presented and described.
I think they look just fine and are almost certainly stronger than any whitemetal ones, as well as considerably cheaper.
I have galvanised wire and springy curtain wire in stock so I will give it a try.
I think they look just fine and are almost certainly stronger than any whitemetal ones, as well as considerably cheaper.
I have galvanised wire and springy curtain wire in stock so I will give it a try.
The best things in life are free.... so why am I doing this?
-
Soar Valley Light

- Driver
- Posts: 1451
- Joined: Sun Dec 08, 2013 5:18 pm
- Location: North West Leicestershire
Hi Andrew
Speaking as someone with experience of wrestling vacuum bags, they look pretty realistic to me. I hesitate to make any comment at all on something so good but it occurs to be that s second and smaller piece of biro tube on the outer end might give an acceptable representation of the hose coupling.
As Peter says, it's a great idea and very well presented. Thanks for sharing it with us. Another one to commit to the memory files for 'when the time comes'!
All the best,
Andrew
"Smith! Why do you only come to work four days a week?
"'cause I can't manage on three gaffer!"
"'cause I can't manage on three gaffer!"


Very impressive. I have made some of the brandbright ones and have taken the same approach of painting first and gluing overlays on afterwards. What glue have you used for this as i have always struggled. Last efforts was araldite applied v carefully with a cocktail stick to the overlay?Andrew:114718 wrote:Here's the latest on my NWNGR 4 wheelers...
I've started painting, and the first one is now up on its wheels, the first time I've used IP running gear and couplings, so I wanted to make sure they worked well before buying any more. The lower part of the line was cleared of fallen leaves and other debris and trundled a quick test train up and down - all seems well, so I'll be placing an order for the rest of the rake...
Painting has now progressed a little further, with both carriages now demonstrating why the "red oxide and custard" colour scheme is not considered a classic in British railway history...
The cream colour looks darker in a better light, approximating the "tan" of Lancashire and Yorkshire livery, to which one version of NWNGR livery was supposedly similar. I could've gone for the other option of all over maroon, probably more likely for such lowly stock, but couldn't resist a two-tone colour scheme, particularly when most of my carriages are in plain green. I might paint some in maroon when I build more, but if I do it will be fully lined, Midland style...
Cheers,
Andrew.

Hello again...
Glad that my thoughts on vac pipes are proving useful chaps, and that you like the carriages so far Ian. I used a small paintbrush to apply woodworking PVA to the back of the overlays, which worked reasonably well, although I think there must be a better way. As long as I positioned them accurately there was usually just a small overspill which I was able to remove with a knife blade. Where I positioned them incorrectly was messier, and more difficult to clean up. This morning however I rendered the question of a little bit of stray glue here and there somewhat irrelevant...
I'd been troubled by both the finish and the colours of my paint job (it was a bit patchy, and rather too bright), and the carriages needed a little "patina" to suit my fictional back-story that they'd been sitting about at Dinas for years before being dragged from the back of the shed for duty on the WHR's Clarach Branch. So, intending to kill two bird with one stone, this morning (having spent the rest of the weekend finishing the bodywork) I attacked them with a tin of dark brown Humbrol and some thinners:

Perhaps I overdid it, but they certainly look older?! I think the result suggests grime as much it does patina, but they do feel more "me" somehow, the previous finish did trouble me somewhat...
Finishing details to the outsides and roofs to do next I think, but then I'll have to wait for the weather to warm up before spray varnishing...
Cheers,
Andrew.
Glad that my thoughts on vac pipes are proving useful chaps, and that you like the carriages so far Ian. I used a small paintbrush to apply woodworking PVA to the back of the overlays, which worked reasonably well, although I think there must be a better way. As long as I positioned them accurately there was usually just a small overspill which I was able to remove with a knife blade. Where I positioned them incorrectly was messier, and more difficult to clean up. This morning however I rendered the question of a little bit of stray glue here and there somewhat irrelevant...
I'd been troubled by both the finish and the colours of my paint job (it was a bit patchy, and rather too bright), and the carriages needed a little "patina" to suit my fictional back-story that they'd been sitting about at Dinas for years before being dragged from the back of the shed for duty on the WHR's Clarach Branch. So, intending to kill two bird with one stone, this morning (having spent the rest of the weekend finishing the bodywork) I attacked them with a tin of dark brown Humbrol and some thinners:
Perhaps I overdid it, but they certainly look older?! I think the result suggests grime as much it does patina, but they do feel more "me" somehow, the previous finish did trouble me somewhat...
Finishing details to the outsides and roofs to do next I think, but then I'll have to wait for the weather to warm up before spray varnishing...
Cheers,
Andrew.

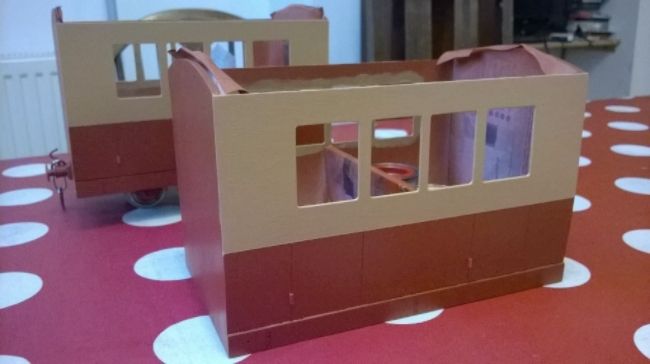
A little more progress - and a good illustration of the possibilities afforded by laser cutting:
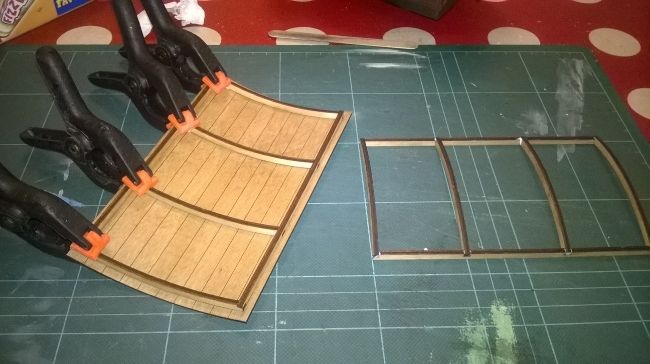
These are the two carriage roofs under construction. I generally put off doing roofs as long as possible, they're such a nuisance to get right, but this has been dead easy - I lack the skill to cut parts this accurately myself, but was able to knock up the necessary drawings to get the laser to do it for me. They'll be able to lift off too, which will be nice...
Cheers,
Andrew.
I'm not entirely sure yet... I used a local company, Bristol Design Forge, and found that the cheapest way to do it was to hire the machine (under supervision, after a free induction) and to pay for 6 hours - that brings the cost down to £22 per hour. It took two and a half hours to cut the parts for the two carriages I'm working on now, but the cutting was slowed by some flaws in my drawing which meant that some lines cut two or three times. I'll edit those (and some other unnecessary lines) out before my next session, so I'm hoping that will bring the cutting time down. The company I used sell ply at a very good rate too...JMORG:116149 wrote:If you don't mind me asking Andrew, how much does it come to for each carriage?
Sorry, just realised I'm recreating my GCSE maths exam here (extra marks for showing my workings!), so I'll cut to the chase and say I reckon the woodwork for each carriage is costing me about £30. So I guess by the time I've added IP wheels, axleguards and couplings and Swift Sixteen door handles it must be about £50 per carriage. Not especially cheap, but I think the quality is closer to Brandbright than IP - interior detail, nice thin ply etc.
Work's slowed down on the carriages lately - Apart from painting the roof and droplights the next thing is to spray varnish, and I'm waiting for warmer weather for that...
Cheers,
Andrew.
Hello again,
With the weather looking up a little today I risked some spray priming and the two current projects both edged a little close to completion...
Like most of my carriages the NWNGR 4 wheelers have separate droplights, but I decided to paint them rather than varnish as I usually do - here they are awaiting the spray can:
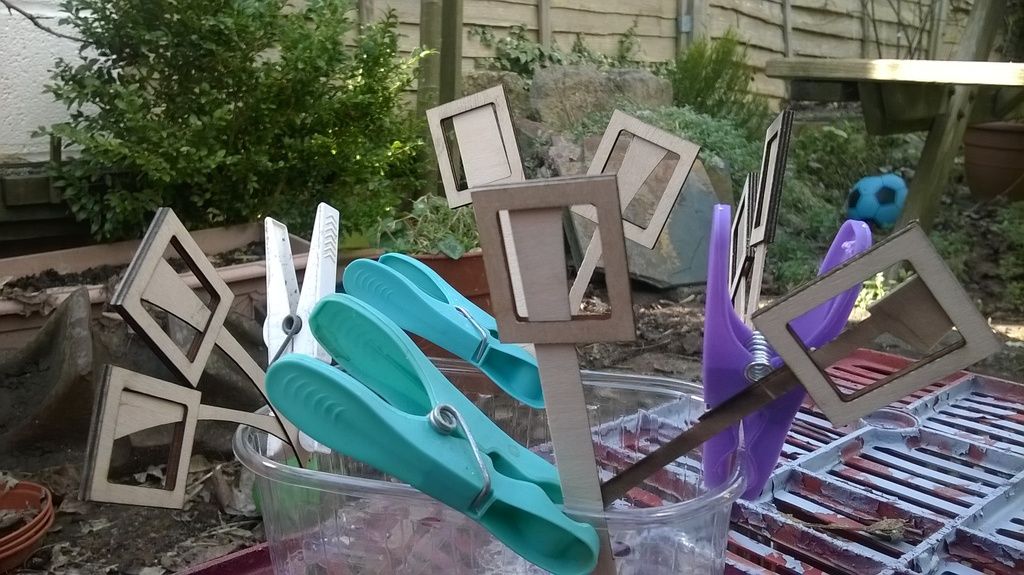
...which reminded me of Cornelia Parker's exploding shed at the Tate - http://www.tate.org.uk/art/artworks/par ... iew-t06949
Progress was also made on the Summer Car. I've been slowly bodging together a complement of passengers for it from the usual assortment of charity shop and Poundland figures. Having chopped, glued and filled 'em I primed them for painting:
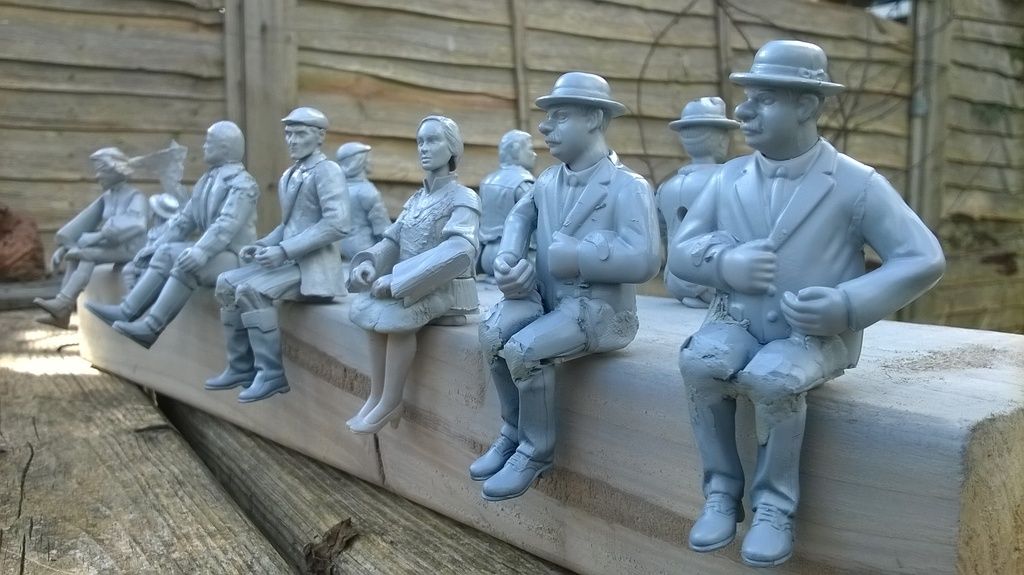
The priming's showed up a need for a little more sanding on some, but I think they'll look fine. My wife says the above photo reminds her of those ones of skyscraper construction workers eating lunch on girders high above Manhatten or wherever...
More photos once I've made some more progress...
Cheers,
Andrew.
With the weather looking up a little today I risked some spray priming and the two current projects both edged a little close to completion...
Like most of my carriages the NWNGR 4 wheelers have separate droplights, but I decided to paint them rather than varnish as I usually do - here they are awaiting the spray can:
...which reminded me of Cornelia Parker's exploding shed at the Tate - http://www.tate.org.uk/art/artworks/par ... iew-t06949
Progress was also made on the Summer Car. I've been slowly bodging together a complement of passengers for it from the usual assortment of charity shop and Poundland figures. Having chopped, glued and filled 'em I primed them for painting:
The priming's showed up a need for a little more sanding on some, but I think they'll look fine. My wife says the above photo reminds her of those ones of skyscraper construction workers eating lunch on girders high above Manhatten or wherever...
More photos once I've made some more progress...
Cheers,
Andrew.
Hello again...
This week I've been painting the figures for the WHR Summer Car. I've done loads of these before, but I'm still surprised how long it takes...
Here's a pleasingly surreal view of work in progress. The plate and knife in the foreground are not the remains of my dinner (I'm lazy, but not that lazy!), they've been used for mixing paint...
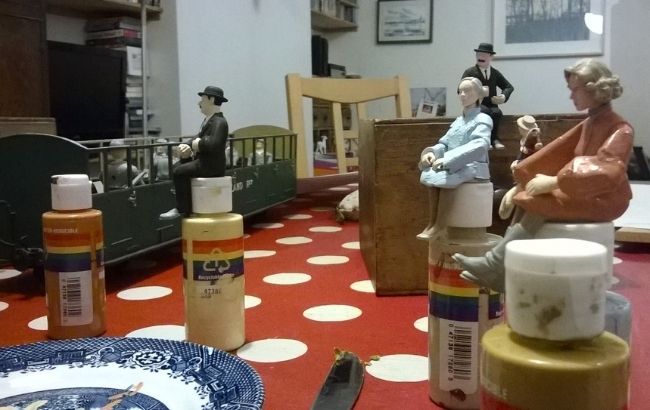
Last night I got them all glued into place:
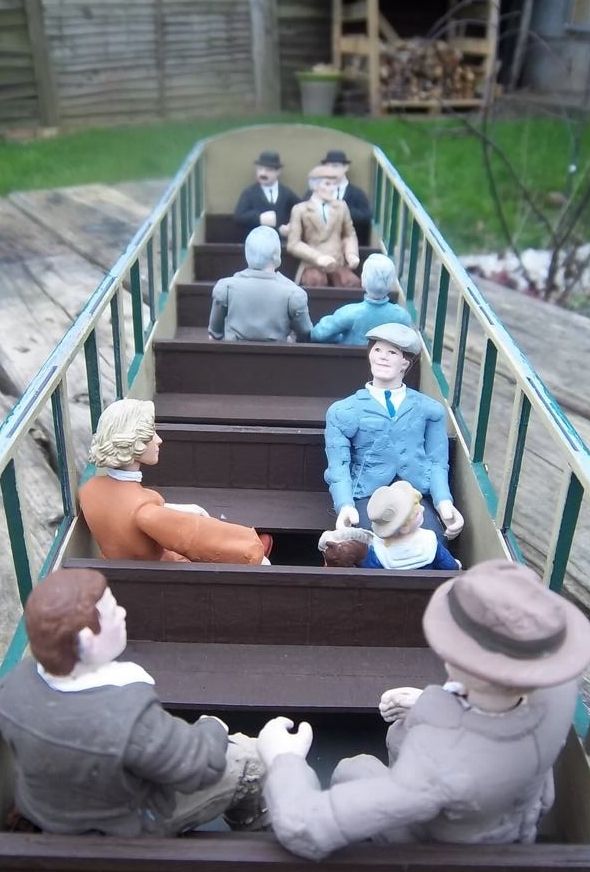
Alas, the garden hasn't doubled in size as the background suggests, we've just taken more of the battered old fence down in readiness for putting up a new one in a couple of weeks' time - I must run some trains to make the most of the photographic opportunities...
Anyway, I wondered whether you might like to meet some of the Summer Car's passengers? Or, to put it more accurately, having spent so long creating little people that will barely be visible when the roof goes on, I'm going to share them with you anyway!
These two you'll recognise, and are carved up McDonalds toys:
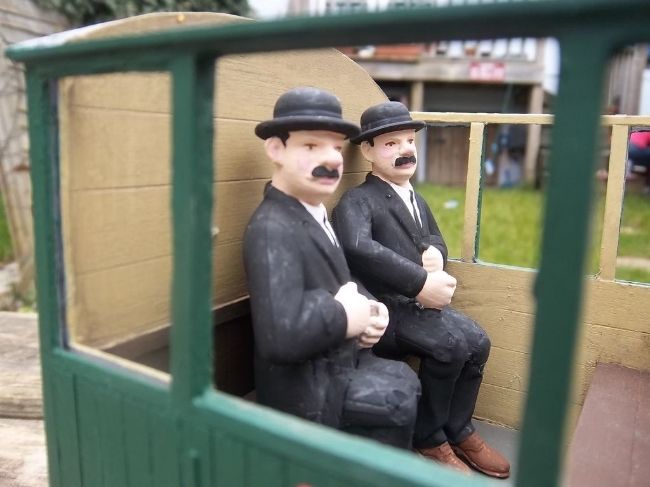
I don't possess a black suit, but if I did I don't think I'd wear it with brown shoes. Maybe it's a Belgian thing? Like mayo on chips?
This chap used to spend his days running the Death Star for Darth Vader, but has seemingly retired to the Welsh Countryside to see out his days as some sort of farmer:

The change of scene doesn't appear to be suiting him - as a university friend used to say, "he's got a face like a bulldog licking p*ss off a thistle". This eloquent phrase would appear to apply equally well to the bulldog itself...
Perhaps the reason they're looking so narked is that, having boarded the 2:15 from Beddgelert and settled back to enjoy the view, they've found themselves sitting opposite these two:
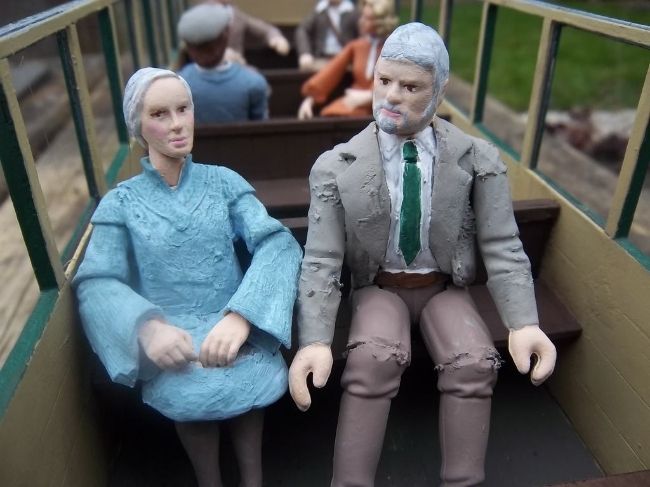
Whilst they might look innocent enough (the one on the right bears a resemblance to my Grandpa in his church-going tweed jacket), in fact the woman is none other than chief Death Star blower-upper Mon Mothma, and I think her other half has leanings in that direction too. My children can't look at her without quoting her memorable (well, to them) phrase "many Bothans died to bring us this information" - it's unclear whether that information related to weaknesses in the Death Star's defences or simply the fact that the 2:15 is runing 20 minutes late because of sheep on the line at Pont Croesor...
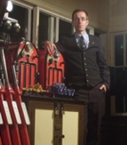
Finally, you might like to meet these two, Hubert Wheeller and Bill Minion:
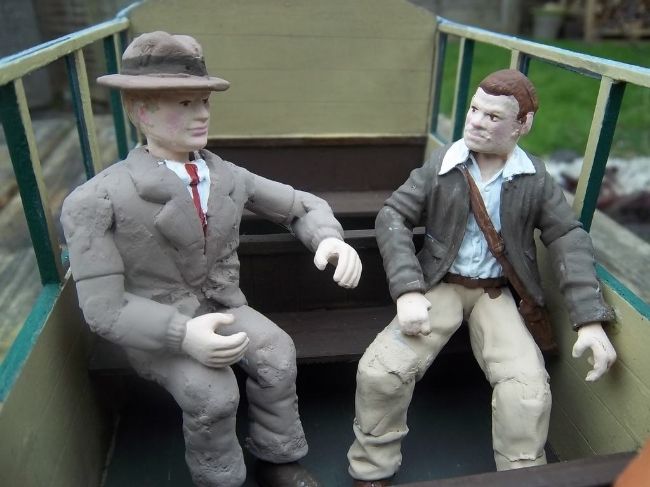
Their presence on the train means that it must be the 8th August 1935, when the pair of them rode and photographed the line, as recorded in Peter Liddell's excellent book "Wheeller's Day", published by the Welsh Highland Heritage Group.
Here's what Minnion and Wheeller actually looked like, in a photo copied from the book:
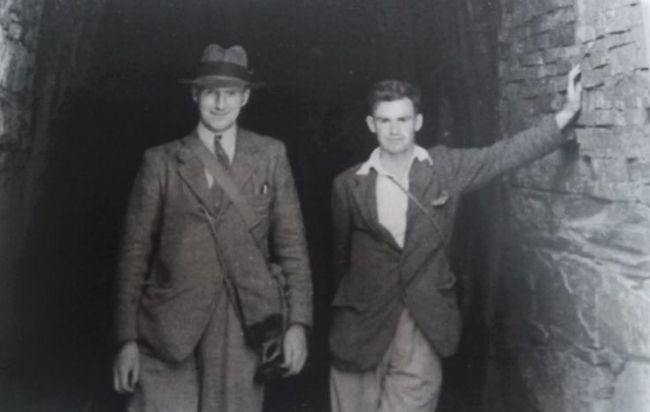
You'll see that my figures are hardly an exact likeness, but they pay homage to two friends' adventure all those years ago...
That's all for now. The Summer Car's almost complete, just varnishing, glazing, and the roof to go...
Cheers,
Andrew.
This week I've been painting the figures for the WHR Summer Car. I've done loads of these before, but I'm still surprised how long it takes...
Here's a pleasingly surreal view of work in progress. The plate and knife in the foreground are not the remains of my dinner (I'm lazy, but not that lazy!), they've been used for mixing paint...
Last night I got them all glued into place:
Alas, the garden hasn't doubled in size as the background suggests, we've just taken more of the battered old fence down in readiness for putting up a new one in a couple of weeks' time - I must run some trains to make the most of the photographic opportunities...
Anyway, I wondered whether you might like to meet some of the Summer Car's passengers? Or, to put it more accurately, having spent so long creating little people that will barely be visible when the roof goes on, I'm going to share them with you anyway!
These two you'll recognise, and are carved up McDonalds toys:
I don't possess a black suit, but if I did I don't think I'd wear it with brown shoes. Maybe it's a Belgian thing? Like mayo on chips?
This chap used to spend his days running the Death Star for Darth Vader, but has seemingly retired to the Welsh Countryside to see out his days as some sort of farmer:
The change of scene doesn't appear to be suiting him - as a university friend used to say, "he's got a face like a bulldog licking p*ss off a thistle". This eloquent phrase would appear to apply equally well to the bulldog itself...
Perhaps the reason they're looking so narked is that, having boarded the 2:15 from Beddgelert and settled back to enjoy the view, they've found themselves sitting opposite these two:
Whilst they might look innocent enough (the one on the right bears a resemblance to my Grandpa in his church-going tweed jacket), in fact the woman is none other than chief Death Star blower-upper Mon Mothma, and I think her other half has leanings in that direction too. My children can't look at her without quoting her memorable (well, to them) phrase "many Bothans died to bring us this information" - it's unclear whether that information related to weaknesses in the Death Star's defences or simply the fact that the 2:15 is runing 20 minutes late because of sheep on the line at Pont Croesor...
Finally, you might like to meet these two, Hubert Wheeller and Bill Minion:
Their presence on the train means that it must be the 8th August 1935, when the pair of them rode and photographed the line, as recorded in Peter Liddell's excellent book "Wheeller's Day", published by the Welsh Highland Heritage Group.
Here's what Minnion and Wheeller actually looked like, in a photo copied from the book:
You'll see that my figures are hardly an exact likeness, but they pay homage to two friends' adventure all those years ago...
That's all for now. The Summer Car's almost complete, just varnishing, glazing, and the roof to go...
Cheers,
Andrew.
-
Peter Butler
- Driver
- Posts: 5245
- Joined: Sun Sep 09, 2012 10:33 pm
- Location: West Wales
Lovely... back stories too!
Today I was at a Toy and Train Fair and asked a stall holder for heads. No problem, she said, 'We get all sorts of figures delivered in various forms of destruction and when we see you next (two weeks) we will bring some for you'. So all I need to do is add, or modify, bodies.
The things you do in the name of a hobby!
The best things in life are free.... so why am I doing this?
-
Soar Valley Light
- Driver
- Posts: 1451
- Joined: Sun Dec 08, 2013 5:18 pm
- Location: North West Leicestershire
Peter/Andrew,
I'm sure Dr Frankenstein would be proud of you both!
Andrew's efforts look very good and stand up well to the close scrutiny of the camera lense. Like Peter, I love the back stories, it's details like this that make a railway for me.
Well done and keep up the good work (and the pictures of it!)
Andrew
"Smith! Why do you only come to work four days a week?
"'cause I can't manage on three gaffer!"
"'cause I can't manage on three gaffer!"
Hello!
Glad you like my efforts! I feel I ought to clarify that the back stories you've been enjoying relate to the original figures - I've not been crafting strange science fiction epics linking the goings on a long time ago in a galaxy far, far away with those of inter-war Snowdonia. Although I am reading Kurt Vonnegut at the moment, so maybe it wouldn't be entirely surprising...
Back when I started in 16mm there weren't many commercially available 16mm figures, and Star Wars toys hadn't become crazily collectible, so those were what folk used. I didn't question it and have collected squillions of them and their ilk over the years - but now I find that they're actually probably a little on the large side. They'd mostly be 6 footers, with very broad shoulders, so you'd only fit 3 abreast in a WHR carriage (which is what they reckon on now, but it was 4 originally, with a summer carriage carrying 56) and they'd all bump their heads. Nevermind, better overscale than under I think...
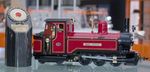
Like you Peter I spend a lot of time trawling for figures - the charity shops have yielded a lot of McDonalds TinTin figures in recent years, and (strange arm positions aside) those are great. I was delighted when, at the recent West Somerset Railway gala, a train rolled into the platform driven by a bearded chap dressed just like my Captain Haddock figure, with a big sweater under his jacket. "Russell" will be gaining a driver very shortly...
And yes, Dr Frankenstein's pretty accurate. There's been an awful lot on cutting, gluing and filling - Bill Minion features Indiana Jones's body with Lando Calrisian's head, with his distinctively prominent ears added in Milliput!
He and Hubert Wheeller are the only ones with a real back story of course, joining Tom Rolt in the buffet car and Gladstone in "his" carriage. I'm running out of "real" WHR characters, but might add Welsh costumed Miriam Jones at one of the stations, and perhaps research some of the train crew a little... There's a nice photo of a little boy with a toy engine waiting for a train at Nantmor, so he and his family might end up riding in a future carriage too...
All the best,
Andrew.
Glad you like my efforts! I feel I ought to clarify that the back stories you've been enjoying relate to the original figures - I've not been crafting strange science fiction epics linking the goings on a long time ago in a galaxy far, far away with those of inter-war Snowdonia. Although I am reading Kurt Vonnegut at the moment, so maybe it wouldn't be entirely surprising...
Back when I started in 16mm there weren't many commercially available 16mm figures, and Star Wars toys hadn't become crazily collectible, so those were what folk used. I didn't question it and have collected squillions of them and their ilk over the years - but now I find that they're actually probably a little on the large side. They'd mostly be 6 footers, with very broad shoulders, so you'd only fit 3 abreast in a WHR carriage (which is what they reckon on now, but it was 4 originally, with a summer carriage carrying 56) and they'd all bump their heads. Nevermind, better overscale than under I think...
Like you Peter I spend a lot of time trawling for figures - the charity shops have yielded a lot of McDonalds TinTin figures in recent years, and (strange arm positions aside) those are great. I was delighted when, at the recent West Somerset Railway gala, a train rolled into the platform driven by a bearded chap dressed just like my Captain Haddock figure, with a big sweater under his jacket. "Russell" will be gaining a driver very shortly...
And yes, Dr Frankenstein's pretty accurate. There's been an awful lot on cutting, gluing and filling - Bill Minion features Indiana Jones's body with Lando Calrisian's head, with his distinctively prominent ears added in Milliput!
He and Hubert Wheeller are the only ones with a real back story of course, joining Tom Rolt in the buffet car and Gladstone in "his" carriage. I'm running out of "real" WHR characters, but might add Welsh costumed Miriam Jones at one of the stations, and perhaps research some of the train crew a little... There's a nice photo of a little boy with a toy engine waiting for a train at Nantmor, so he and his family might end up riding in a future carriage too...
All the best,
Andrew.
Hello again,
With plenty of work to do bringing the railway up to scratch I thought the Permanent Way Department could do with some assistance. I quite like building a quick kit between lengthy scratchbuilds too, so over the last week or two I put this Swift Sixteen kit together:
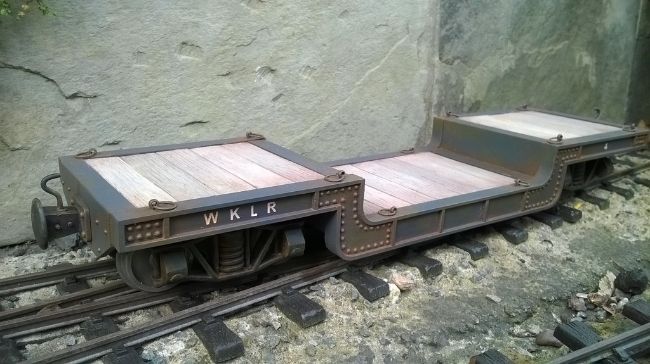
The old Welsh Highland didn't own anything like this beastie, so it's been allocated to the current line's predecessor the West Kent Light Railway, which lingers on as an excuse for all sorts of frivolity...
It needed a load, and I plan to make several including something that might look good in a works train, but for now it's carrying this dodgy looking cargo:
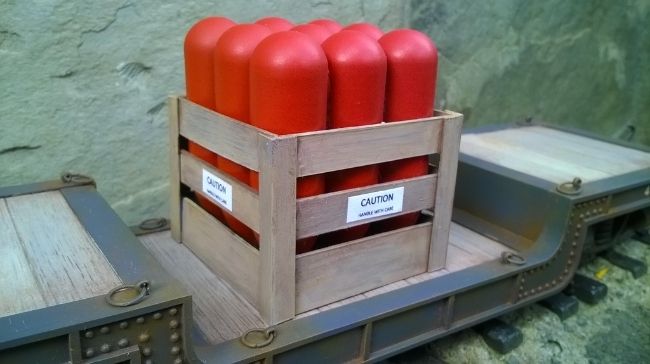
It's actually a crate of those little canisters of nitrous oxide that teenagers leave all over the street, so I hope that no disastrous derailments befall the train or the entire population of Beddgelert might die laughing...
Cheers,
Andrew.
With plenty of work to do bringing the railway up to scratch I thought the Permanent Way Department could do with some assistance. I quite like building a quick kit between lengthy scratchbuilds too, so over the last week or two I put this Swift Sixteen kit together:
The old Welsh Highland didn't own anything like this beastie, so it's been allocated to the current line's predecessor the West Kent Light Railway, which lingers on as an excuse for all sorts of frivolity...
It needed a load, and I plan to make several including something that might look good in a works train, but for now it's carrying this dodgy looking cargo:
It's actually a crate of those little canisters of nitrous oxide that teenagers leave all over the street, so I hope that no disastrous derailments befall the train or the entire population of Beddgelert might die laughing...
Cheers,
Andrew.
Last edited by Andrew on Thu Apr 14, 2016 10:23 pm, edited 1 time in total.
Who is online
Users browsing this forum: No registered users and 3 guests