I said at the time that I fancied something continental to pull my new P-Way train (see
http://gardenrails.myfreeforum.org/abou ... highlight= ), and after some thought and looking at pics on the Internet, I chose a LKM class Ns2 diesel locomotive. These 6 ton locomotives were produced between 1950 and 1952, and only a handful would appear to have survived into preservation. The model was succeed by the class Ns2f, which had external rods, but retained many other details. The Ns2f was produced from 1953 to 1960, and quite a few of these have survived, many in near original condition.
Although I had seen pictures of models of the Ns2 at various scales, I don’t think I have seen one at 16mm/ft, and the fact it is a 4wDM (i.e. not having external rods) would make it easier for me to model.
Prototype drawings and pictures were available on the net, and I wanted to use the radio control equipment recovered from the unsuccessful attempt to fit to it our locomotive “BLUE”.
First was to mock up the general shape in Google Sketchup and then in card to get a general idea of the shape and size and make sure that all the bits could be fitted in.

- sketch 1.jpg (54.8 KiB) Viewed 5044 times
The Sketchup draft
Once I was satisfied that it should all be possible, I made the frame. Now-a-days I use Plasicard for just about everything, so there was no thought given to using anything else.

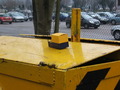
- DSCF2280.jpg (110.38 KiB) Viewed 5044 times
Main Frame – the filled round hole was from my first thought of mounting the motor vertically, but it will now be fitted horizontally. It is likely that some more holes will have to be formed as I progress, and possibly some form of catches for the removable bonnet.
JOhn