TVT Goods Trucks

Discussion of Rolling Stock related topics should go here
Post Reply
User avatar
GTB
Driver
Driver
Posts: 1710
Joined: Sat Mar 05, 2011 2:46 pm
Location: Australia

TVT Goods Trucks

Post by GTB » Sun Sep 30, 2012 7:13 pm

Spring has sprung, the grass has riz..... etc. etc.

Now that the sun has returned to this neck of the woods, it has been warm and dry enough to paint the goods rolling stock that I built during winter and the TVT is no longer a tramway with more locos than wagons. The garage is now warm enough that there is little risk of frostbite, so now these are painted I'm back into loco building.

These are based on VR broad gauge practice, but built to the same size as the trucks on the 3' gauge Powelltown Tramway.

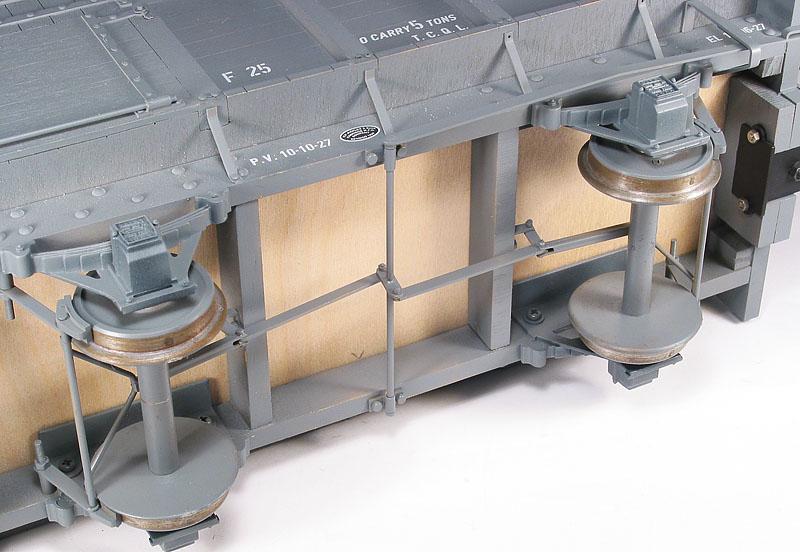
The models all use the same jig built wooden underframe, although the brake design was changed to an easier to build arrangement partway through the build program.

Early on in this exercise I decided that I needed an easier way to cut wood to scale sizes than using a bandsaw and a sanding block. So I invested in a Proxxon miniature table saw. Best tool I've added to the workshop for a long time.......

4-wheel Underframe

Image

I've standardised on Accucraft W&L couplers and axleboxes, but I make my own wheels, brake parts and saw the wood to size. The 'rivets' are brass escutcheon pins and the 'hex bolts/nuts' are white metal castings. The westinghouse brake hoses are from Ozark Miniatures, but aren't fitted to the underframe until the body is in place.

Drop-side Trucks

Image

These are basically just a 2.5mm ply box, with planks scribed in and strapping, hinge detail, etc. added. White bits are 0.5mm polystyrene sheet and the brass 'bolts' are miniature lag screws, #0 x 3/16" from memory. Assembling the basic body only takes a couple of hours, but as always the devil is in the detail and adding the surface detail takes several days.

Image

I built these as a batch of three, but need to build more.

Cattle Trucks

Image

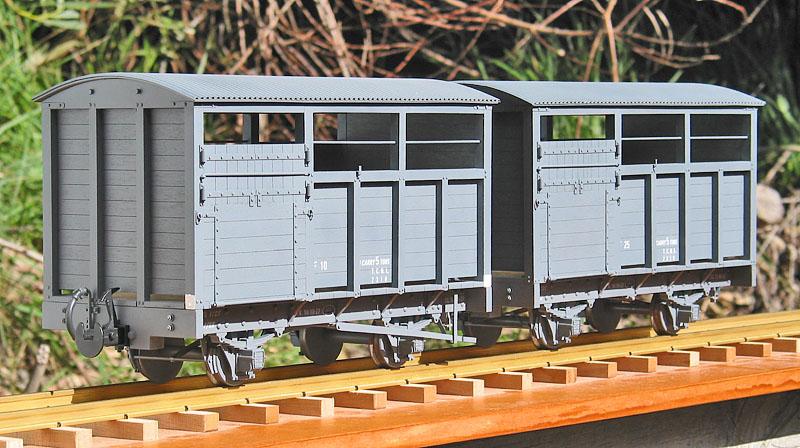
These are based on early VR broad gauge cattle truck designs and the bodies are built from wood strip and scribed ply. The roof is made from corrugated card over polystyrene, to simulate a double roof.
Image

Insulated Van

Image

This has a body built from polystyrene sheet, with the same roof construction as the cattle trucks. It isn't easy to take a photo of a white model, but the matchboarding is simulated by scribing the polystyrene sheet with an Olfa P-cutter. Basically a 4 wheel version of the VR narrow gauge bogie insulated van.

Image

Louvre Van

Image

This is built up from machined wooden louvres with stripwood frames and a polystyrene roof. Again, basically a 4 wheel version of the VR narrow gauge bogie louvre van used for carrying perishables.

Image

Goods Guards Van

I think this one has it's own more detailed thread somewhere....

Image

Also built from a scribed polystyrene body and roof. The sides are built in three layers, 0.5mm layer scribed to represent match boards, 0.5mm layer with smaller openings to represent the window sashes and finally a 1mm inner layer with larger openings to provide a recess for the perspex windows. The side lookouts were built up in a similar manner and fitted over a large opening in the side.

This is based on the VR broad gauge guards vans, but is fitted with side lookouts, rather than a roof cupola.

Image


TVT History

The TVT is located in Eastern Victoria and the area is a gateway to the High Country, with the Dargo High Plains to the west, the Snowy Mountains to the north and the Snowy River to the east. This is basically 'Man from Snowy River' country, although the film was shot on the western side of the High Country.

The VR did consider building a narrow gauge line into the region both before and after the Great War, but this didn't happen and the TVT is a 3' gauge line operated by a group of local councils, rather than a govt. owned VR 2' 6" line.

TVT rolling stock was built in Victoria by a company that had previously built broad gauge rolling stock for the VR and therefore based the TVT stock on VR designs.

There had been a gold rush in the area long before the TVT was built, but in the period modelled the area was agricultural, mostly grazing, with some timber cutting.

The TVT goods stock reflects this sort of traffic, with cattle vans for livestock (cattle and horses) and drop side wagons for bulk materials such as sawn timber, hay, etc. A few louvre vans and insulated vans are in use for perishables, which would be mainly meat and dairy products in this part of Victoria.

Regards,
Graeme

LMS-Jools

Post by LMS-Jools » Sun Sep 30, 2012 8:26 pm

Beautiful workmanship. 8)

User avatar
90733
Driver
Driver
Posts: 1955
Joined: Wed Dec 16, 2009 6:17 pm
Location: West Yorkshire
Contact:

Post by 90733 » Sun Sep 30, 2012 8:48 pm

Your modelling is brilliant, an inspiration.
Thanks
Jack

User avatar
Keith S
Driver
Driver
Posts: 1668
Joined: Thu Feb 24, 2011 11:44 pm
Location: Canada

Post by Keith S » Sun Sep 30, 2012 11:45 pm

Graeme, those models are very nice! It's almost a shame to paint them.

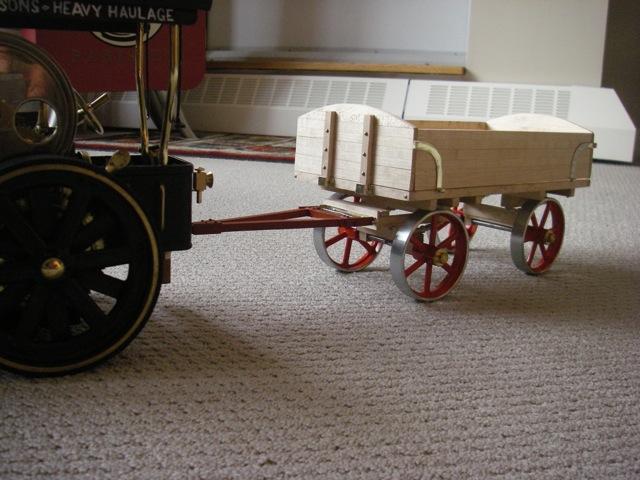
I built something similar, although not as complicated once to go with a model steam tractor, sort of a "semi scale" Fowler traction wagon
;
Image

I haven't gotten around to making any railway wagons to go with my locomotive other than the IP engineering ones. Yours are much nicer.

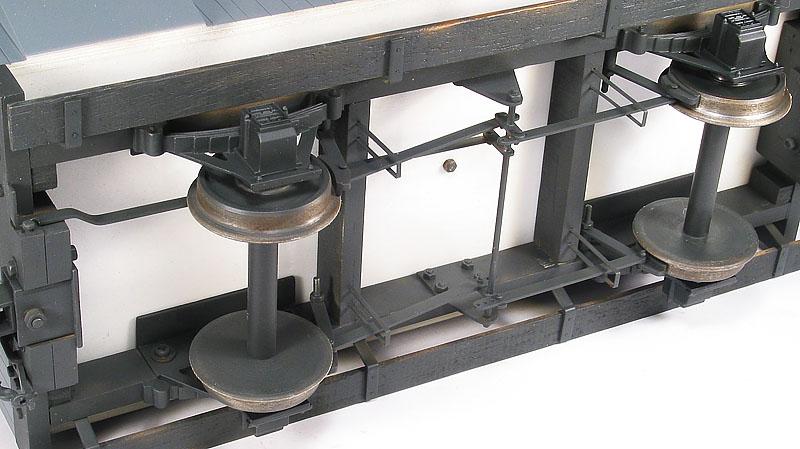
I notice you have realistic brake detail on your wagons. I would like to make some brake detail on my IP brake van, but I have no idea what the brake gear looks like on a brake van as opposed to a regular goods van. Do you have any information on this? How does cranking a brake handle activate the brakes? I would be grateful if you had a picture of the bottom of your brake van so I could copy it.

Annie

Post by Annie » Mon Oct 01, 2012 3:20 am

Brilliant craftsmanship Graeme. Not wanting to sound critical, but it's wonderful to see good old fashioned scratchbuilding instead of rolling stock made from kits. I always find Australian narrow gauge prototypes fascinating and while I have got drawings for various Ozzie goods vehicles, perhaps it's time I had a dig about in my 'archives' and found more of the drawings I've got for New Zealand tramway rolling stock.

I am sooooo envious of your miniature table saw. You are going to laugh, but my own wooden tramway rolling stock is largely made from pine offcuts that I saw up with a razor saw to make the individual parts for my models. This works Ok for one-off rolling stock that would've built as needed in a timber tramway workshop as the saw marks look completely prototypical, but sometimes I do wish I owned some kind of sawing machine.

An example of my own building style can be found here....... http://gardenrails.myfreeforum.org/about6142.html

IrishPeter

Post by IrishPeter » Mon Oct 01, 2012 7:25 am

Absolutely smashing vehicles! Wow! Like as in Wow!

Peter in AZ

User avatar
GTB
Driver
Driver
Posts: 1710
Joined: Sat Mar 05, 2011 2:46 pm
Location: Australia

Post by GTB » Mon Oct 01, 2012 11:59 am

Keith S:75361 wrote: I would like to make some brake detail on my IP brake van, but I have no idea what the brake gear looks like on a brake van as opposed to a regular goods van. Do you have any information on this? How does cranking a brake handle activate the brakes? I would be grateful if you had a picture of the bottom of your brake van so I could copy it.
The main difference is that brake vans have a brake standard/wheel inside to operate the handbrakes and all wheels have at least one brake block, which was not always the case with an ordinary wagon, especially in Britain. There were probably as many designs as there were railways........

Image

This photo shows what is under my TVT guards van. This is the sort of thing that you'd find under a van with handbrake only. Since the van is closed and I wanted a working yard brake, you'll see a pull rod running off to the buffer beam at one end. This has a notch that fits over a small screw and latches the brakes on. There's a bend on the end that gives enough finger purchase to apply and release the brakes. The TVT is an air brake line, but I haven't bothered fitting the cylinder, air reservoir, etc., or the slotted lever that would allow the handbrake and the auto brake to be applied independently. You can't see most of it in normal use.

Image

This sketch is the sort of thing you'd find inside the van if the brake wheel was located in the middle of the van. It could have a spoked wheel, or a handle like the sketch.

If the brake wheel was fitted at one end of the van, you'd also need an intermediate shaft and a crank with a pull rod to the crank on the central cross shaft. The pivoted nut and double pull rods are to clear the screw shaft and to make sure nothing binds as the nut moves up and down. Real ones had a square thread, but a BA or similar thread is fine in this scale. You also need a collar somewhere on the shaft inside the standard to stop the brake wheel just lifting out of the standard as the handle is turned, instead of applying the brake.

Image

The last photo is the brake arrangement under most of my wagons, which I've now standardised for future construction. On a real wagon this would be a combined air/handbrake and there would be a cam on the brake handle to separate the operation of each brake. When the VR started fitting air brakes to everything in the 1880's, this was the arrangement used to replace old handbrakes that had just a single wooden brakeblock. My open wagons were built before I changed the design and they have separate yard and air brakes, which was a much later VR design.

Have fun,
Graeme

User avatar
GTB
Driver
Driver
Posts: 1710
Joined: Sat Mar 05, 2011 2:46 pm
Location: Australia

Post by GTB » Mon Oct 01, 2012 1:41 pm

Annie:75365 wrote: I am sooooo envious of your miniature table saw.  You are going to laugh, but my own wooden tramway rolling stock is largely made from pine offcuts that I saw up with a razor saw to make the individual parts for my models.  This works Ok for one-off rolling stock that would've built as needed in a timber tramway workshop as the saw marks look completely prototypical, but sometimes I do wish I owned some kind of sawing machine.
I don't laugh at how people do things, as I have too many of my own idiosyncrasies. Rather you than me though..........

If I had to cut wooden strip by hand, I'd probably get myself a Japanese style saw. They cut on the pull stroke and don't have a back spine, so have a very narrow kerf and cut straight.

I still have my old Unimat lathe and in the past made a simple attachment to use that as a table saw, but the Proxxon works better and is a bit safer.

Graeme

Annie

Post by Annie » Mon Oct 01, 2012 1:55 pm

Yes I had been considering getting one of those Japanese saws Graeme. The razor saw I have is very good and makes very nice accurate cuts, but it is limited by its small size and the depth of the back spine it's fitted with. I have a good quality cabinet makers saw as well which is essentially an oversized razor saw, but it tends to be a bit unwieldy for some jobs.

User avatar
Keith S
Driver
Driver
Posts: 1668
Joined: Thu Feb 24, 2011 11:44 pm
Location: Canada

Post by Keith S » Mon Oct 01, 2012 2:51 pm

Thanks for the great information and pictures, Graeme. I don't always bother to apply a lot of detail to models, but I really think brake vans look funny running around with no brakes! You've given me some good ideas for the brakes on the IP van now. I've put the dummy brake standard on the end balcony so all the works should be quite visible by the buffer beam. Thanks again!

User avatar
Andrew
Moderator
Moderator
Posts: 3422
Joined: Tue Jul 03, 2012 1:33 pm
Location: Bristol, UK
Contact:

Post by Andrew » Wed Oct 03, 2012 12:57 pm

What lovely wagons, congratulations! Love the louvre and brake vans, and I always like to see unpainted interiors on opens too...

I've been carriage-building for a while now but your photos might be the inspiration I need to get cracking on some wagons. Thanks for the photos of the brakes too, I was wondering about what they should look like...

I'm planning to build some old (as in ex-NWNGR) Welsh Highland wagons so the brakes will be much less sophisticated. I'm considering trying to learn to cast in resin to repicate the ironwork and build them in batches...

All the best,

Andrew.

Si

Post by Si » Wed Oct 03, 2012 1:08 pm

If I could built wagons as beautiful in their 'raw' state as those in the OP, I don't think that I could bring myself to paint them...they are excellent!

Post Reply

Who is online

Users browsing this forum: pandsrowe and 1 guest