Stackton Tressel Light Railway

A place for the discussion of garden railways and any garden style/scale portable and/or indoor layouts
Post Reply
User avatar
AFGadd
Trainee Fireman
Trainee Fireman
Posts: 138
Joined: Sun Apr 17, 2011 6:31 pm
Location: Oxfordshire
Contact:

Stackton Tressel Light Railway

Post by AFGadd » Sun Jul 29, 2012 5:49 pm

I've finally made a start on my railway and I thought I would try and keep a photographic diary of construction.


Initially a few images of the area where the line will run.
The line will run along the trellis on my workshop side, at either end of this image the line will dive into the garden on the left where two balloon loops will return the route back to itself.

Image

Image


So to enable the line to cross the Arbour, I need to build a "Level Crossing", first I set a level chord (only to discover that the garden is far less flat than I thought) from one side of the garden to the other.

The next step is to lift the slab under the Arbour, I had not intended to lift this much but in order to avoid a lengthy cutting in a boggy area of the garden I've lifted the line height a couple of inches.

Image


A second slab (actually two slabs) is now laid leaving a gap through which the line will run.
Next is the first of two embankments either side of the Arbour & slabs.

Image


The second embankment is laid.

Image


Next I disappeared into the workshop for two hours and construct a four foot length of track from nickel rail and brass sleepers to lay into the gap.
Unfortunately I neglected to take a photo of the track, sorry.

Then the track is laid into place together with two points to support the track in place, then the gap is back filled with a good strength mortar. After much cleaning of the rails (especially between the rail and check rail a round house Jack was pushed across the Crossing to check all was good.

Image


On order are ten bags of Gritstone for ballast.
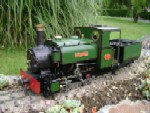
I saw this on one of the forums recently and bought a test sample, which I tried in the image below.
The Gritstone is terrific, I think that due to it's irregular size the cement used to glue it all together worked really well. I used a mix of two parts Gritstone to one cement. The staining is from something else entirely...

Image


More as soon as it happens...
Andrew

Image

benchmark
Fireman
Fireman
Posts: 360
Joined: Sat Feb 11, 2012 1:43 am
Location: Denmark
Contact:

Post by benchmark » Sun Jul 29, 2012 7:23 pm

Great work, i love your attention to perfection shown with the string line you put to get a perfect straight. When i laid my own track i just looked at it crouching down with a beer in one hand and thought, ''that looks about right to me'' :lol:

User avatar
tom_tom_go
Driver
Driver
Posts: 4824
Joined: Wed Feb 23, 2011 3:08 am
Location: Kent, UK
Contact:

Post by tom_tom_go » Mon Jul 30, 2012 5:36 am

The ballast looks great Andrew.

Look forward to more updates.

Cheers,

Tom

User avatar
AFGadd
Trainee Fireman
Trainee Fireman
Posts: 138
Joined: Sun Apr 17, 2011 6:31 pm
Location: Oxfordshire
Contact:

Post by AFGadd » Thu Aug 02, 2012 8:57 pm

Thanks for the comment guys.

A quick update,

IMPORTANT:- I love narrow gauge railways that squeeze through narrow spaces, to me this is the most important aspect that makes a narrow gauge railway unique against other lines.

I've now built the rest of the embankment in front of my workshop. This was cast in two batches, and I've laid some track on the first part. Various locos have been on “Gauging Trials”, the most important of which was my Rheidol. I think if the Rheidol don't fit then nothing will...

Image


The points on the line are from “Garden Railway Specialists” and while I was in the shop, I picked up a Tenmile Point Lever. A little messing around and I've found a real simple way to get them to operate the point. Again some “Gauging” tests.

Image

Image
Andrew

Image

User avatar
AFGadd
Trainee Fireman
Trainee Fireman
Posts: 138
Joined: Sun Apr 17, 2011 6:31 pm
Location: Oxfordshire
Contact:

Post by AFGadd » Fri Aug 03, 2012 8:55 pm

Another quick shot, this time of a Penrhyn Hunslet.
This view is from my workshop door, as I use the workshop on a daily basis to earn a living I can know say I have a steam railway next to my place of work...

Image
Andrew

Image

User avatar
Keith S
Driver
Driver
Posts: 1627
Joined: Thu Feb 24, 2011 11:44 pm
Location: Canada

Post by Keith S » Sat Aug 04, 2012 12:50 am

That has to be some of the best-looking model ballast I've ever seen.

User avatar
TonyW
Driver
Driver
Posts: 1357
Joined: Fri May 16, 2008 9:25 am
Location: North Wales
Contact:

Re: Stackton Tressel Light Railway

Post by TonyW » Sat Aug 04, 2012 10:24 am

AFGadd:73348 wrote:After much cleaning of the rails (especially between the rail and check rail a round house Jack was pushed across the Crossing to check all was good.
A length of string placed in each flangeway before you apply the mortar saves a lot of fiddling about later!
Tony Willmore
Rhos Helyg Locomotive Works: http://www.rhoshelyg.me.uk
Facebook: https://www.facebook.com/RhosHelygLocoWorks

User avatar
AFGadd
Trainee Fireman
Trainee Fireman
Posts: 138
Joined: Sun Apr 17, 2011 6:31 pm
Location: Oxfordshire
Contact:

Post by AFGadd » Sat Aug 04, 2012 5:26 pm

tom_tom_go:73370 wrote:The ballast looks great Andrew.

Look forward to more updates.

Cheers,

Tom
Tom, I've just realized that I found the "Gritstone" from a post of yours, in your "RWLR Begins" Thread, HERE.

So many thanks for the heads up on this.

The mix of 2 parts Gritstone, 1 part fine sand & 1 part cement seems to be working really well.
In some places I've used the ballast mix up to 1" thick to level up the track. It seems to have set totally solid, but only time will tell.

PS. It looks like I could end up with LOTS of this Gritstone left...
Anyone live in Oxfordshire???
TonyW:73503 wrote:
AFGadd:73348 wrote:After much cleaning of the rails (especially between the rail and check rail a round house Jack was pushed across the Crossing to check all was good.
A length of string placed in each flangeway before you apply the mortar saves a lot of fiddling about later!
Thanks for that Tony, I'm not totally sure I'm done with level crossings yet...
Andrew

Image

User avatar
AFGadd
Trainee Fireman
Trainee Fireman
Posts: 138
Joined: Sun Apr 17, 2011 6:31 pm
Location: Oxfordshire
Contact:

Post by AFGadd » Sun Aug 05, 2012 10:34 am

Spent a few minutes with AnyRail to create a track plan.

The plan is not 100% to scale as I'm using trackwork not in the AnyRail library.

Of note on the plan are:

How much I've been "ALLOWED" to squeeze into such a small area!

Use of the new Peco 38" radius curves, these are used (45 deg) as transition curves in the balloon loops to the Peco 30" radius curves.

The use of 2'6" radius points from GRS, including a 2'6" Y.

The section completed is the top righthand section of the plan.

Image


Incidentally, I've found yet another benefit of being a Scout Leader...
The use of the Scout Hut to layout the track and make various measurements...

Image
Andrew

Image

User avatar
AFGadd
Trainee Fireman
Trainee Fireman
Posts: 138
Joined: Sun Apr 17, 2011 6:31 pm
Location: Oxfordshire
Contact:

Post by AFGadd » Wed Aug 29, 2012 8:34 am

Slight variation to the track plan, now includes a turntable at the terminus.
This allows me to move the two right-hand points and create another passing-loop/station on the right-hand balloon-loop.

The only problem being, I'll need to build a turntable...
However, in view of some of the locos I want to operate (more on this shortly) a turntable will be desirable.

Image
Andrew

Image

User avatar
AFGadd
Trainee Fireman
Trainee Fireman
Posts: 138
Joined: Sun Apr 17, 2011 6:31 pm
Location: Oxfordshire
Contact:

Post by AFGadd » Fri Jan 24, 2014 10:00 pm

I started this post on 29 July 2012 and I finished my railway exactly one year later on 29 July 2013...
I know it's some months on, but I've nothing to do for twenty minutes.

I never did keep a running diary of construction but thanks to my mobile phone I did take a few photos of the line as it progressed.

Below are just a few of these images to give some idea of the build and finished line.

Image

Image

Image

Image

Image

Image

Image
Andrew

Image

User avatar
Soar Valley Light
Driver
Driver
Posts: 1451
Joined: Sun Dec 08, 2013 5:18 pm
Location: North West Leicestershire

Post by Soar Valley Light » Sat Jan 25, 2014 7:02 pm

Hi Andrew,

Thanks for this update. Your line looks really smart. Very neat and tidy track. How do you fix it down and are your bricks founded on anything?

I'm in the early stages of planning my own line and am very interested in formation construction techniques.

What make are your turnouts?

Sorry for asking so many questions!

All the best,

Andrew
"Smith! Why do you only come to work four days a week?
"'cause I can't manage on three gaffer!"

User avatar
Dr. Bond of the DVLR
Retired Director
Retired Director
Posts: 4485
Joined: Tue Jun 09, 2009 9:43 pm
Location: Suffolk
Contact:

Post by Dr. Bond of the DVLR » Sat Jan 25, 2014 7:05 pm

Looking very smart and prim - that pot plant would make a great scale tree if set into the ground near the railway.
Image
The railway which people forgot
(to build)

LnBmad
Trainee Driver
Trainee Driver
Posts: 884
Joined: Fri May 31, 2013 10:17 pm
Location: North Devon

Post by LnBmad » Sat Jan 25, 2014 8:28 pm

A great line! Looks really well built aswell! I recall watching a video of this line on fb resently.
If it can be made full scale it can be made 16mm

My line: http://gardenrails.myfreeforum.org/about7200.html

jim@NAL
Driver
Driver
Posts: 1115
Joined: Sun Sep 23, 2012 11:01 am
Location: haverhill suffok

Post by jim@NAL » Sat Jan 25, 2014 9:04 pm

well done looking very good

DLRdan
Driver
Driver
Posts: 1083
Joined: Wed Nov 12, 2008 12:05 am
Location: Blyth
Contact:

Post by DLRdan » Sat Jan 25, 2014 9:25 pm

That really is a very neat line. Will you be adding any buildings ?
Dan,

James: "Dan, can you use your hearing and tell me if that trains coming ?"
DLR
www.freewebs.com/dlrail

steamyjim
Retired Director
Retired Director
Posts: 1210
Joined: Tue Oct 16, 2007 9:19 pm

Post by steamyjim » Sun Jan 26, 2014 8:13 pm

A very nice line! Can you give me the measurements of the return loops please? What is the radius of the curves? What can you get around them?

Have you any details of the locomotive in your profile picture?
Check out my steam and engineering youtube channel at...

https://www.youtube.com/channel/UC8vX4P ... _PnvhldjjA

User avatar
AFGadd
Trainee Fireman
Trainee Fireman
Posts: 138
Joined: Sun Apr 17, 2011 6:31 pm
Location: Oxfordshire
Contact:

Post by AFGadd » Sun Jan 26, 2014 8:50 pm

Soar Valley Light:96036 wrote:Hi Andrew,

Thanks for this update. Your line looks really smart. Very neat and tidy track. How do you fix it down and are your bricks founded on anything?

I'm in the early stages of planning my own line and am very interested in formation construction techniques.

What make are your turnouts?

Sorry for asking so many questions!

All the best,

Andrew
Hi Andrew,

The construction is based on a method my father used some 45 years ago and is still as sound now as the day he built it...

I've place the bricks on a 6 inch foundation of hardcore (broken bricks) held together with a mortar mix and onto which the bricks were laid.

I've used lengths of old brass rail I found to hold the foundations together at crucial points.

All the curves are peco set track sections, 2'6" at the tightest (on the inner sections of the balloons but with the new 38" curves leading into the 2'6" curves.

The track was all laid onto ballast and the ballast then built up to level and camber the track. Once I was happy with the track and ballast it was all liberally soaked with a 50/50 waterproof PVA mix.

Experiments showed that the cement & ballast mix did not hold up very well over winter. The 50/50 PVA mix was after experimenting with weaker mixes.

There are two different point makes:
1, 2'6" radius turnouts from GRS (these were bought before peco introduced the 38" turnouts)
2, 38" radius turnouts from peco (there are three of these on the spur in the last image)

Hope that helps a bit?
Andrew

Image

User avatar
Soar Valley Light
Driver
Driver
Posts: 1451
Joined: Sun Dec 08, 2013 5:18 pm
Location: North West Leicestershire

Post by Soar Valley Light » Mon Jan 27, 2014 10:08 pm

Thanks Andrew,

That's very useful information. Keep up the good work and keep us posted. It's all very interesting.

All the best,

Andrew
"Smith! Why do you only come to work four days a week?
"'cause I can't manage on three gaffer!"

Post Reply

Who is online

Users browsing this forum: No registered users and 3 guests