Page 1 of 1
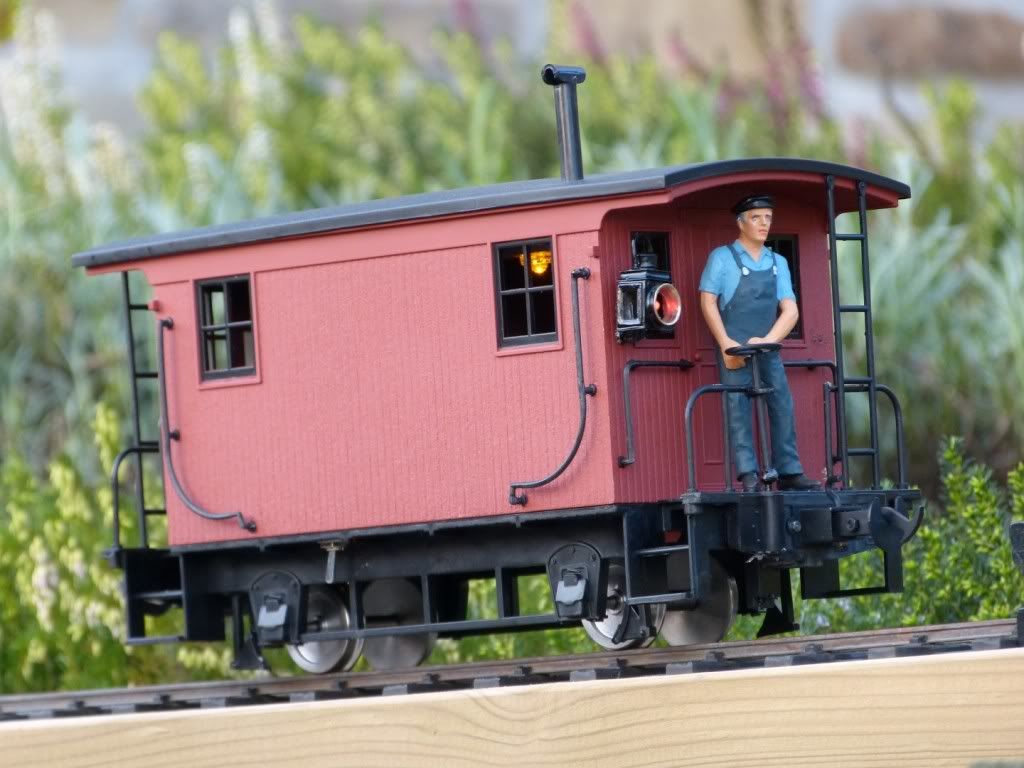
Isle of Man Coaches Interior & tail lights - test.
Posted: Sun Nov 27, 2011 9:20 am
by bluewater1150
Am trying our some of my photos - if it's not right - bear with me.

Elliot
8500
Northumberland
Posted: Sun Nov 27, 2011 9:31 am
by bluewater1150
Posted: Sun Nov 27, 2011 10:03 am
by bluewater1150
My IT tutor is keeping me right ...

[/img]


[/img]


[/img]


Got it... ( I think)
Elliot
8500
Northumberland
[/img]
Posted: Sun Nov 27, 2011 10:10 am
by tom_tom_go
Who says the youngsters can't teach you old boys anything

I think you doubled-up on the IMG tags though Elliot which is why you can see them in the text.
Anyway, the lights look great!
Cheers,
Tom
Posted: Sun Nov 27, 2011 11:07 am
by sstjc
Thats an interesting track contruction. I'd be interested to know what the baseborads are ?
Barry
www.5inchrail.com
Posted: Sun Nov 27, 2011 11:32 am
by Pretoria
Posted: Sun Nov 27, 2011 12:25 pm
by bluewater1150
Who says the youngsters can't teach you old boys anything
I think you doubled-up on the IMG tags though Elliot which is why you can see them in the text.
Anyway, the lights look great!
Cheers,
Tom
Yes, on Photobucket I put in IMG/Link/IMG then two returns. So only IMG/link - no need for IMG at the end of each photo.
Thanks again
Elliot
Posted: Sun Nov 27, 2011 12:36 pm
by bluewater1150
Thats an interesting track contruction. I'd be interested to know what the baseborads are ?
Barry
www.5inchrail.com
Barry - the boards are 6" x 2" Scandinavian kiln dried pine which s then been then tanalised.
The local timber yard recommended them for the trackbed, saying the local stuff is so green it would probably start growing leaves. Evidentally the softwoods (pine) from northern latitudes completely shut down during their winter months and permenant freezing temperatures - where as ours keeps growing, due to the constant rise and fall in temperatures in our winter months. The result is a much denser wood than our home grown pine - in weight alone it is nearly half as heavy again.
It has only been down one year - so too early to tell - but so far, it's looking good with no opening up at the screw holes or ends..
It's supported on beech stumps (the elevated section) and on 6" x 6" paving blocks (at ground level) - so it is getting lots of air around it all the time.
Elliot
Posted: Sun Nov 27, 2011 5:40 pm
by bluewater1150
Another short test
Posted: Tue Nov 29, 2011 6:25 pm
by MDLR
Like the pictures (eventually)

and you've discovered the secret to getting good pictures of lights on a garden railway - keep taking pictures every 5 minutes or so as darkness falls, having disabled the "flash" mode on your camera. Eventually, you'll get the result that you want!
Posted: Tue Nov 29, 2011 10:10 pm
by bluewater1150
[quote]Like the pictures (eventually) and you've discovered the secret to getting good pictures of lights on a garden railway - keep taking pictures every 5 minutes or so as darkness falls, having disabled the "flash" mode on your camera. Eventually, you'll get the result that you want!
Yes, what also helped a lot was the new camera - I was not getting great photos, once the light started to go, with the sony cyber-shot compact camera. These ones were taken with my new toy (Lumix) - and the definition - until almost dark, was fantastic, had I used a tripod they would have been better. The multi-angled - swivel viewfinder is also a big bonus, you spend a lot time on your knees!
Elliot
Posted: Tue Nov 29, 2011 10:38 pm
by MDLR
bluewater1150:62117 wrote:These ones were taken with my new toy (Lumix) - and the definition - until almost dark, was fantastic, had I used a tripod they would have been better. The multi-angled - swivel viewfinder is also a big bonus, you spend a lot time on your knees!
Tell me about it! A tripod is a MUST - particularly when (as my camera does) it says "STORING" when you've pressed the button......... I also find the "delay" option is useful as I'm not touching the camera when it takes the image.
Posted: Sun Dec 11, 2011 11:02 pm
by George
ooo i like those lights who sells them? or did you do it yourself?
Posted: Mon Dec 12, 2011 5:47 pm
by bluewater1150
T&M Models sell the interior coach lights - here with link
http://www.tmmodels.net/Lighting%20Page ... _Page.html
The tail light I illuminated by drilling out the base of a standard white metal cast lamp and fitting an red led. It's powered from batteries inside the coach.
Posted: Mon Dec 12, 2011 7:57 pm
by IrishPeter
Nice lighting job!
I always have a bit of a giggle at the expense of the Accucraft IMR four wheelers as they insist on painting them in the post-1946 red and cream livery. By that time the four-wheeler bodies had all been on bogie underframes for 20 years. Also the bulk of the four-wheelers had been close coupled into 'pairs' since the late-1880s. In their four-wheel days they ran painted green and lined yellow, with the firsts having off-white upper panels. Then when close coupled they were chocolate brown and off-white like the bogies.
In short you have some work to do if you are modelling the IMR, but for the Ruleight Railway they are just fine.
Peter in AZ
Posted: Thu Dec 15, 2011 6:05 pm
by George
bluewater1150:63028 wrote:T&M Models sell the interior coach lights - here with link
http://www.tmmodels.net/Lighting%20Page ... _Page.html
The tail light I illuminated by drilling out the base of a standard white metal cast lamp and fitting an red led. It's powered from batteries inside the coach.
thanks


 Is that what they call Log-Log Scale ??

