1st Addition
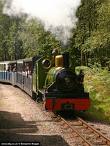
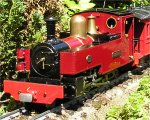
Meet Ginny, a Samson Locomotives modified Mamod from 1988.


This was a Buy It Now or Best Offer on ebay in January this year. I sent an e-mail to the seller asking some questions about the modifications, as they were not clear in his listing. Being satisfied with the response I made an Offer, and this was accepted. Never done this before, but the Offer that was declined was for the same amount that I offered?
It is fitted with a replacement boiler (I assume silver soldered), which has a blanking plug, uprated safety valve & push to operate whistle fitted on the top (interestingly they had no washers fitted, so I've used Mamod rubber washers until I can get a supply of fibre washers). There is no sight glass window or tube, but the back plate is fitted with a clack valve. I thought this was connected to a tank at the rear of the cab, but it is just an Enots valve which has been surrounded by some body work.

It has a ceramic gas burner with a small gas tank, an inline lubricator, pressure gauge, and a cab regulator. Probably 'O' ring pistons as well, and a much modified reverser valve up front.

A lot of body work upgrades including stove pipe chimney, smoke box overlay and cylinder covers, hinged cab roof, and additional weights under side tanks, which make this one very heavy Mamod lookalike. It also has proper steel loco wheels, although not obvious from my quick photos.


It also has sprung centre buffers, so I'll need to make a converter wagon from a Mamod flat bed wagon, with Mamod coupling on one end, and centre coupling on the other.
I've run it a few times, but it seems to need quite a bit of regulator to get it started, and there is not much more movement required before it achieves derailing speeds. By setting the front reverser valve to half open it is a bit better under control. When time permits I will dismantle the regulator housing to clear up any blockage, change seals, etc. to hopefully improve this regulator control.
Chris Cairns.