Some notes on making simple inexpensive battery chassis.

A place for discussing battery-electric locomotives, whether they're diesel, steam or even electric outline
User avatar
Tony Bird
Trainee Driver
Trainee Driver
Posts: 570
Joined: Thu Jul 29, 2010 8:25 am
Location: Cardiff, South Wales, UK.

Some notes on making simple inexpensive battery chassis.

Post by Tony Bird » Thu Jan 27, 2011 6:11 pm

Hi,
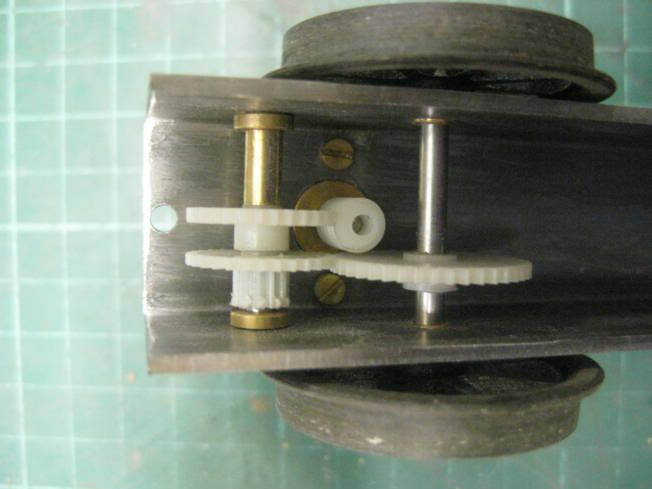
Over the years I have made quite a few battery powered 16mm scale locomotives. As I am about to start on another one I thought the forum might be interested to see some of my previous efforts. All have them have used inexpensive 1.5/3 volt 'Can' electric motors with a plastic worm and wheel drive to the axles.
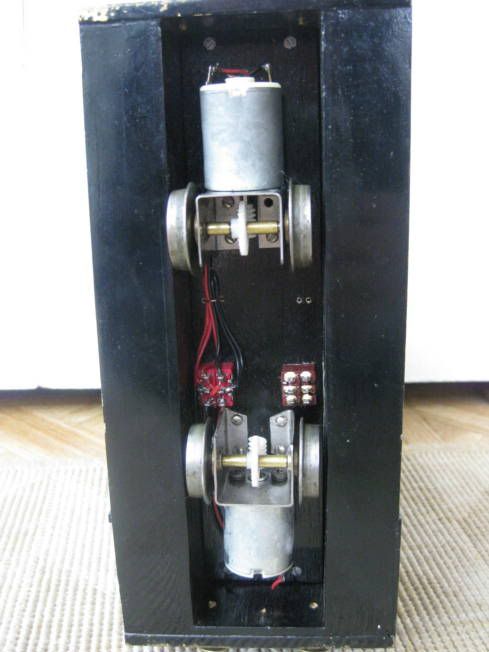
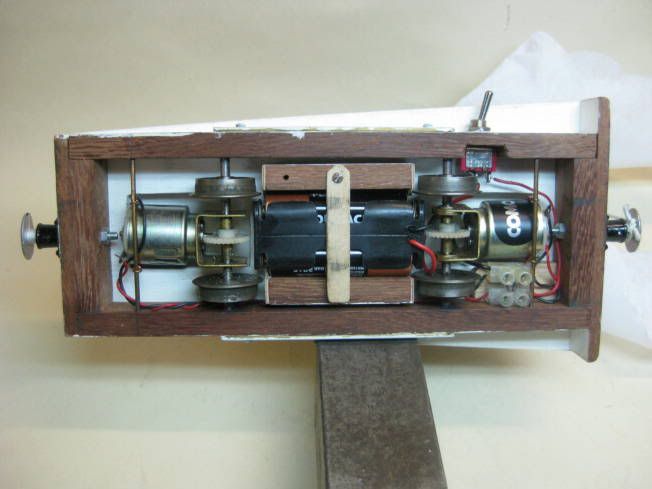
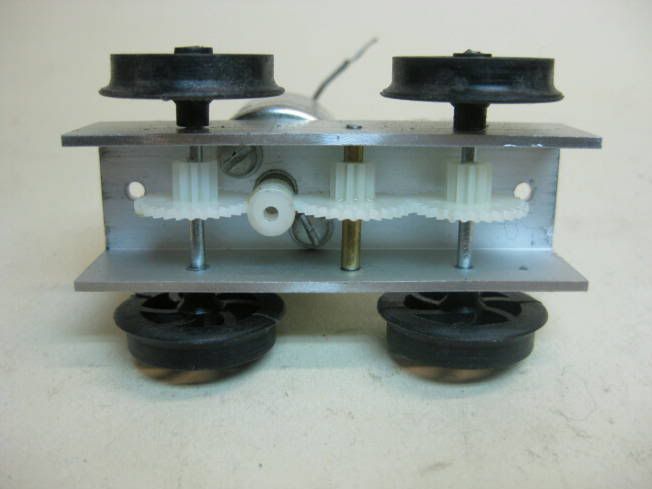
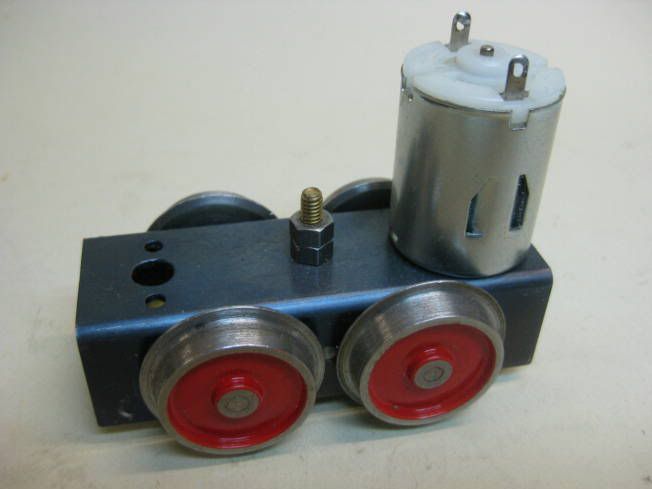
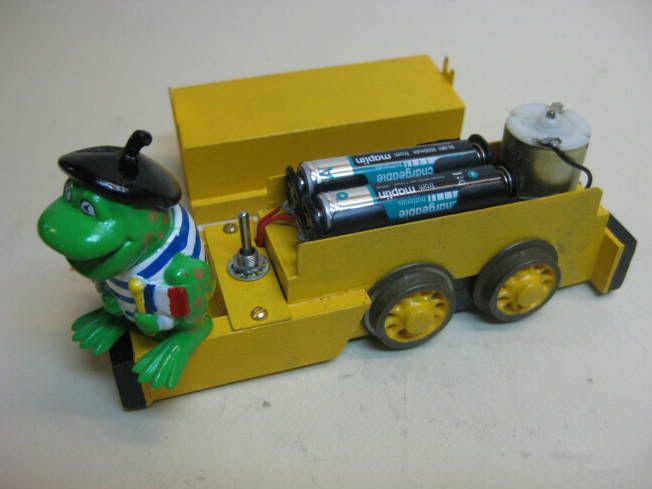
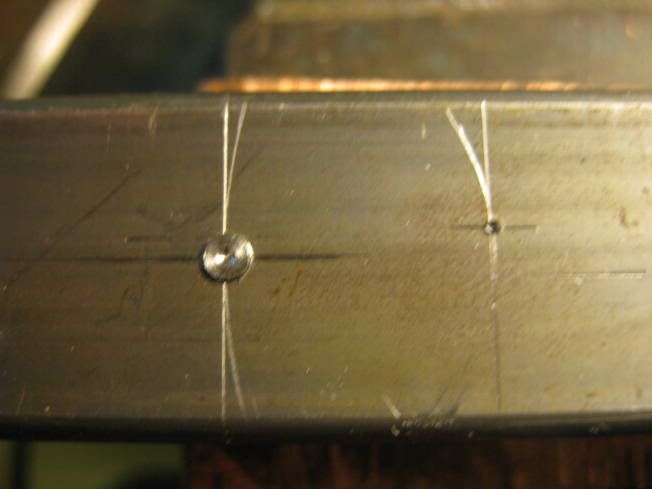
The first used brass or tin sheet bent up to hold the motor gears and axle. With K&S brass tube as gear spacers and Brandbright 1/8" steped bushes. This is a twin motor design where the motors can be run either in series or parallel as a simple speed control
Image
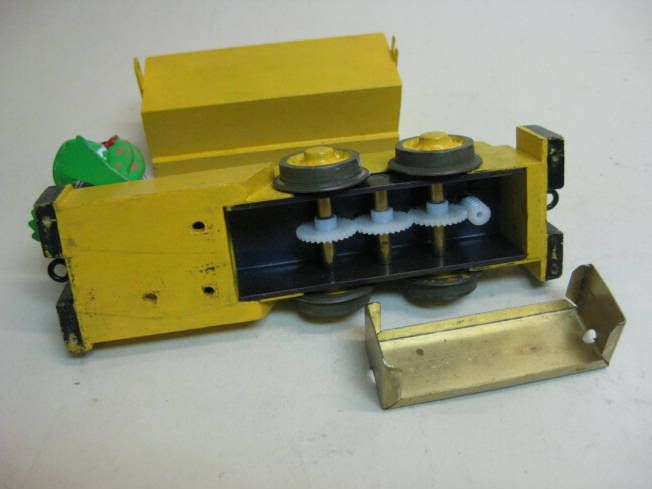
This chassis is similar but has outside bearing so the motors are axle hung.
Image
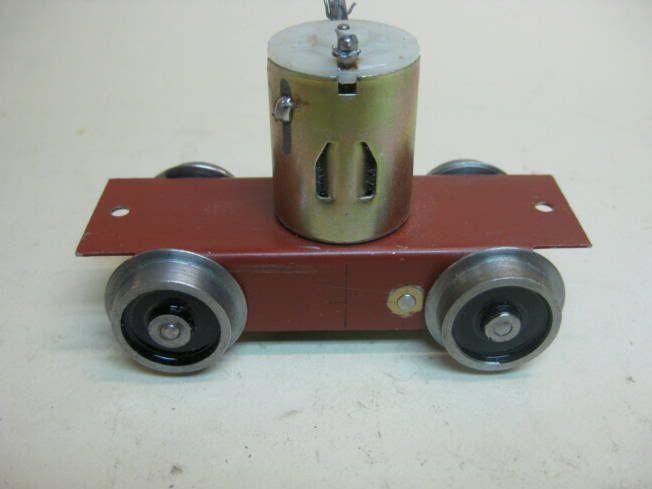
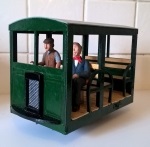
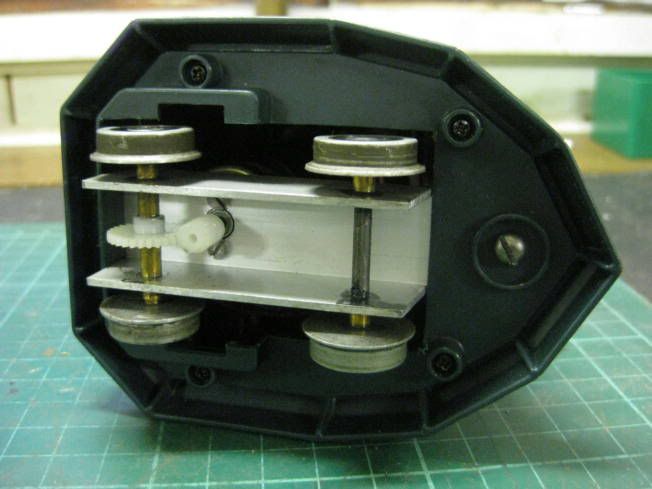
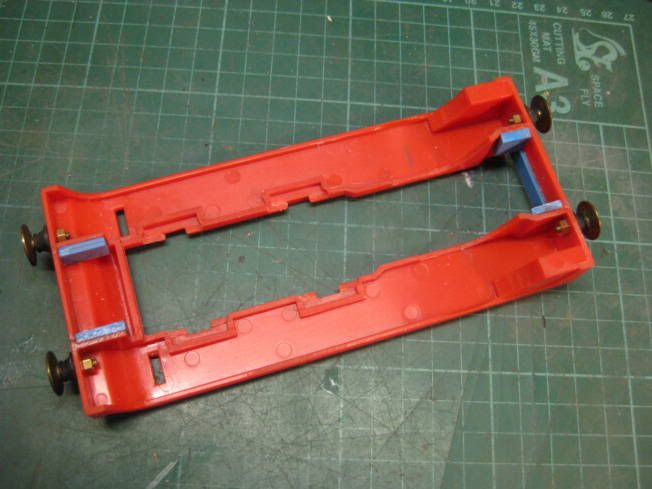
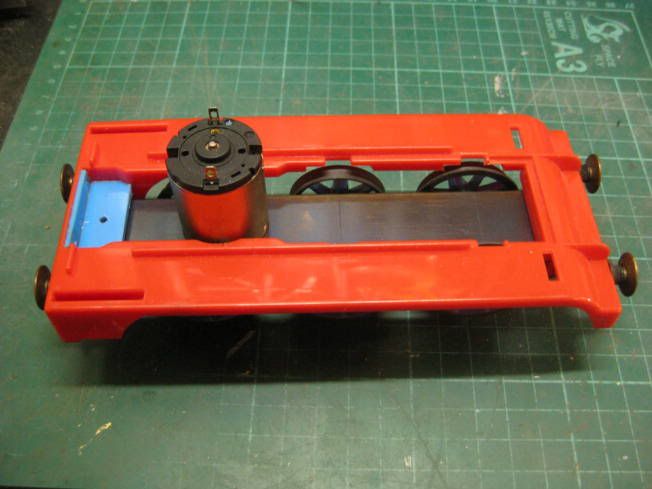
When IPE moved factories a few years ago a lot of their bits and pieces were sold off at the Llanfair show and along with other stuff a couple of their battery electric chassis were bought. The photograph shows one that was used on their Simplex 'Caravan' locomotive which has had brass bearings fitted which was part of the bits included in the stuff purchased.
Image
Image
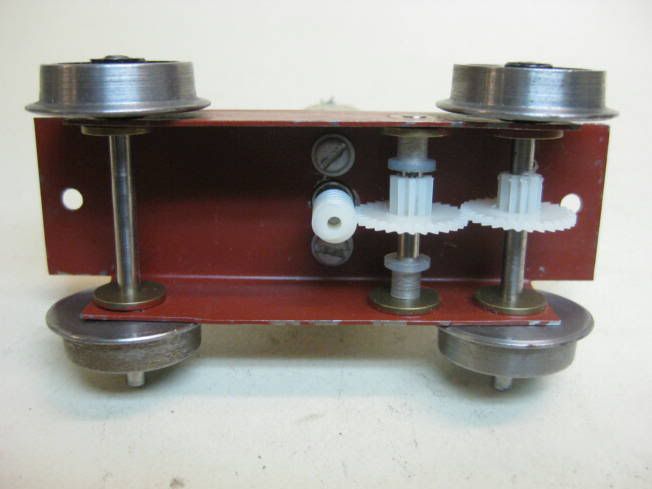
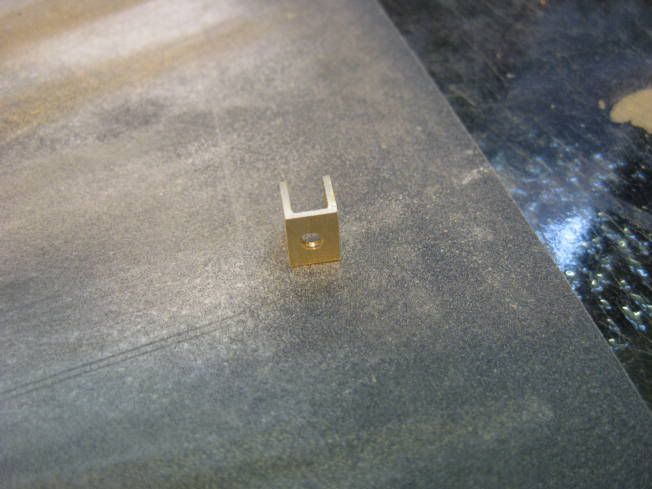
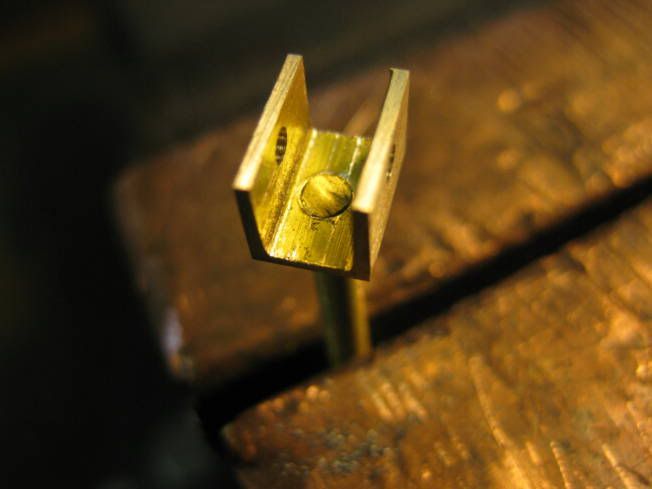
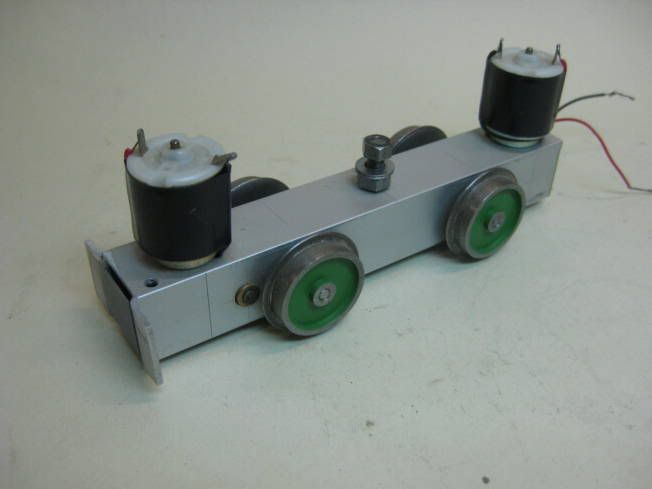
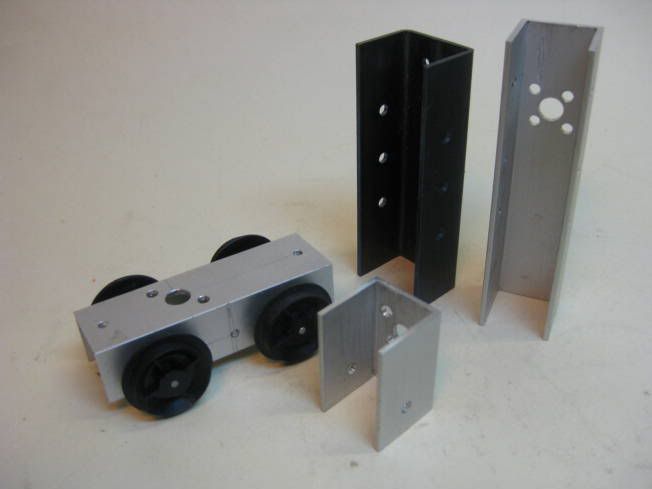
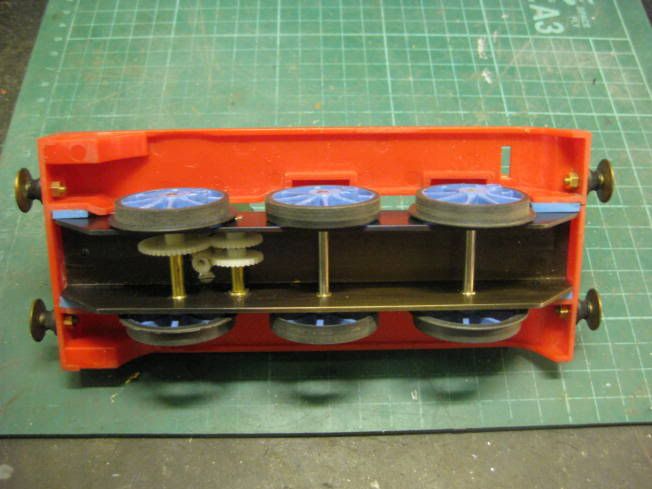
Having seen Ivan's neat construction further battery electric chassis made used his channel section idea. The channel used was either 20mm aluminium or 25mm square tube section steel which was made into channel. Both the aluminium and the steel were bought at B&Q. One of the first chassis made was very similar to IPE's product but 4WD and used aluminuim channel.
Image
Image
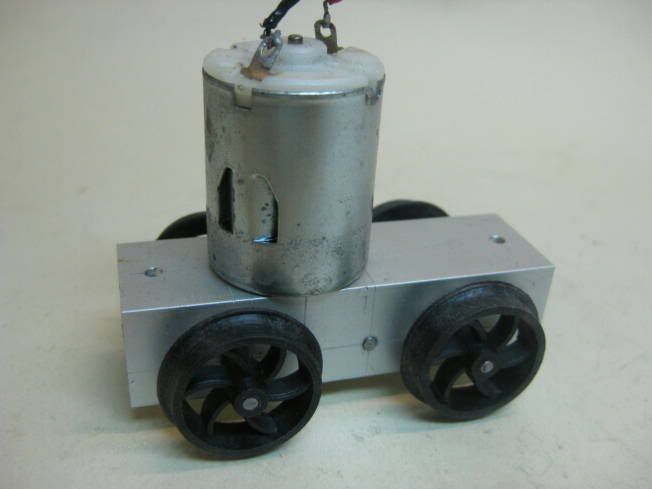
Another twin motor one using aluminium channel.
Image
Image
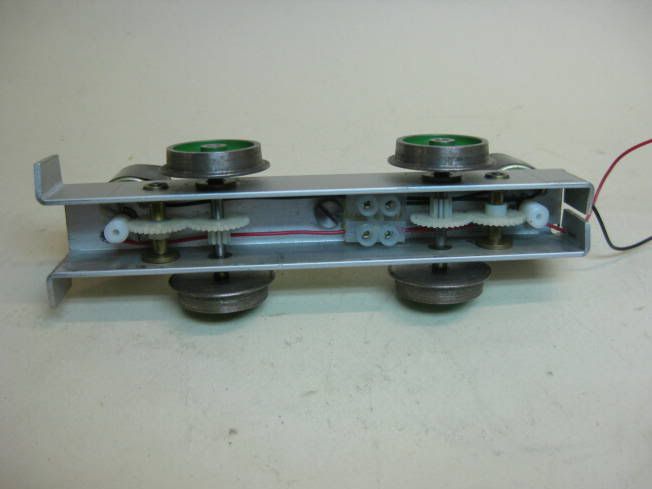
Another aluminium channel chassis using a sprokets and chain to give 4WD
Image
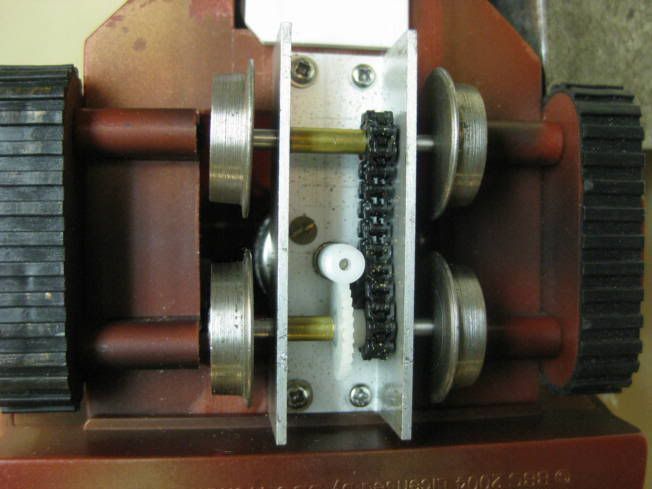
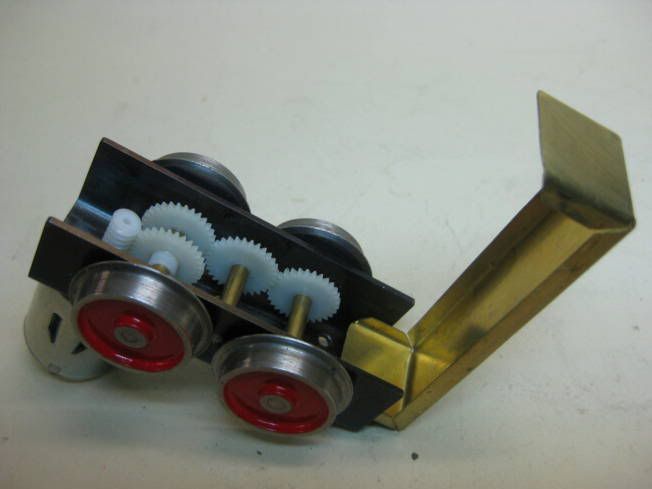
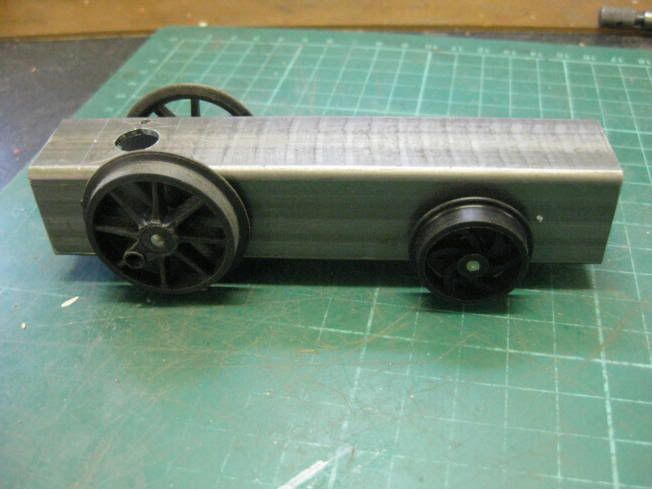
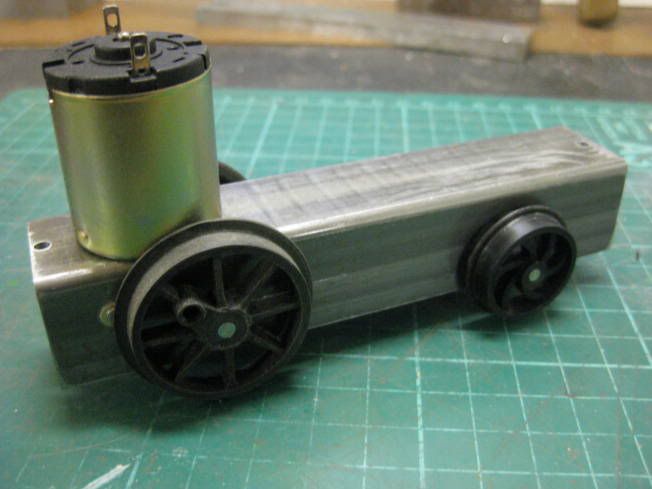
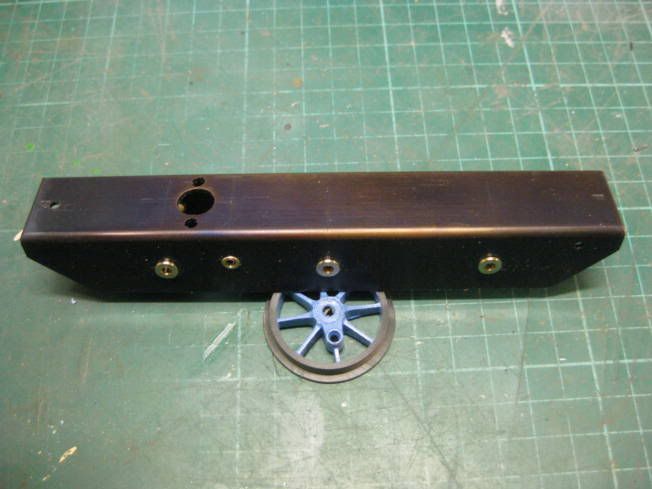
When a heavier more robust chassis was needed the 25mm steel square section tube is used. The photograph shows a power bogie that can be fitted with either one or two motors. This single motor version has 4WD and protection for the gears.
Image
Image
After many hours of running it has been found that the aluminium channel doesn't really need brass bearings fitted. A 25mm aluminium channel which was about 2mm thick would be ideal for making chassis. If the forum is interested I could take some photographs of the construction of the chassis just started and post them.
Regards Tony.

User avatar
Busted Bricks
Trainee Driver
Trainee Driver
Posts: 750
Joined: Sat Jan 22, 2011 9:16 pm
Location: Denmark
Contact:

Post by Busted Bricks » Thu Jan 27, 2011 6:23 pm

Very nice stuff Tony. I'm working on a very cheap battery loco kit that I can cut on my laser. My ambition is to make one that looks decent and cost around £15-£20.

BTW, check your inbox - I sent you a PM some days ago.

Michael

User avatar
sstjc
Fireman
Fireman
Posts: 442
Joined: Mon Dec 22, 2008 10:47 am
Location: Faversham Kent
Contact:

Post by sstjc » Thu Jan 27, 2011 6:27 pm

Very interested. Please do post more pictures.

User avatar
90733
Driver
Driver
Posts: 1952
Joined: Wed Dec 16, 2009 6:17 pm
Location: West Yorkshire
Contact:

Post by 90733 » Thu Jan 27, 2011 6:43 pm

WOW, brilliant, more piccies please :D
Also can we see some pics of the actual locos, some look interesting :D
Thanks
Jack

spooner
Fireman
Fireman
Posts: 358
Joined: Sat May 01, 2010 12:21 pm
Location: Woodston,Peterborough

Post by spooner » Thu Jan 27, 2011 9:41 pm

Have you thought of using a wooden chassis?

User avatar
Tony Bird
Trainee Driver
Trainee Driver
Posts: 570
Joined: Thu Jul 29, 2010 8:25 am
Location: Cardiff, South Wales, UK.

Post by Tony Bird » Fri Jan 28, 2011 9:07 am

Hi,

I will try and post some more photographs later today.

Answer to queries.

The plastic gears stand up to wear very well but they have to be at the correct centre distance and inline. It is a good idea to keep the gear wheel mating with the worm wheel on its centre line, they tend to creep so K&S tube on the axle keeps them in the right place. Its the motor brushes that wear so it is a good idea to make the motors easy to replace.

Wooden chassis. Look at the second photograph down it has a wooden chassis and uses K&S tubes in the wood as bearings. I have made many of them they work well and are quick to build.

Regards Tony.

spooner
Fireman
Fireman
Posts: 358
Joined: Sat May 01, 2010 12:21 pm
Location: Woodston,Peterborough

Post by spooner » Fri Jan 28, 2011 9:46 am

That will teach me LOOK AT PHOTOS CRERFULEY.
Keep up the good work.

User avatar
Hancockshire
Driver
Driver
Posts: 1204
Joined: Tue Apr 14, 2009 11:06 am
Location: Stranraer
Contact:

Post by Hancockshire » Fri Jan 28, 2011 6:38 pm

I have a VERY cheap method. Two pieces of strip wood with holes made in it so the axles can go through but it's best to make it outside framed in my opinion seeing as it's more pleasing to the eye. It's also easier to keep oiling as you can get to where it needs to be oiled easier. The wood only costs about three quid for a great long length & it doesn't need machining. I drilled the holes with a small screwdriver & ran a small file through it. You get a very rigid & strong chassis from it. Plus, you are basically making a Morgan as well. I used the chassis design on Pete & have had no problems with it. The only troubles I had was that the motor kept slipping on the gear but that's sorted now with PVA glue to keep the motor in place. I shall have to see about making a wagon using my design. Cheep, easy & fun to make. Sounds good to me :lol:
Image

User avatar
Tony Bird
Trainee Driver
Trainee Driver
Posts: 570
Joined: Thu Jul 29, 2010 8:25 am
Location: Cardiff, South Wales, UK.

Post by Tony Bird » Fri Jan 28, 2011 6:44 pm

Hi,
As promise some more photographs.
Image
Some aluminium and steel channel chassis.
Image

Image

Image

Image

Image

Image
VIDEO
Image
The mine locomotive runs for 2 hours plus pulling the two slate wagons powered by two AAA 1.2V cells wired in parallel.

I belong to Cardiff MES who have a GR. The club opens to the public for 12 days during a year and most of the electric models shown here are to amuse the visiting children.

The Thomas locomotive was recently bought from a charity shop and will be converted to a battery electic running on gauge '0' track for the coming season. I will post post photographs of its alterations if the forum is interested.

Regards Tony,

Image

Image

User avatar
90733
Driver
Driver
Posts: 1952
Joined: Wed Dec 16, 2009 6:17 pm
Location: West Yorkshire
Contact:

Post by 90733 » Fri Jan 28, 2011 6:52 pm

WOW, there different :D
And cool :D
Thanks
Jack

User avatar
Hancockshire
Driver
Driver
Posts: 1204
Joined: Tue Apr 14, 2009 11:06 am
Location: Stranraer
Contact:

Post by Hancockshire » Fri Jan 28, 2011 7:07 pm

I've got one of those dalek figures. Wrong scale of course but still, I don't understand why the claw & gun have been swapped but it's still very nice
Image

User avatar
Tony Bird
Trainee Driver
Trainee Driver
Posts: 570
Joined: Thu Jul 29, 2010 8:25 am
Location: Cardiff, South Wales, UK.

Post by Tony Bird » Fri Jan 28, 2011 9:42 pm

I've got one of those dalek figures. Wrong scale of course but still, I don't understand why the claw & gun have been swapped but it's still very nice.

A left handed Darlek?

Regards Tony.

Dave
Cleaner
Cleaner
Posts: 87
Joined: Fri Sep 11, 2009 3:05 pm
Location: HANTS

Post by Dave » Fri Jan 28, 2011 10:17 pm

Hi Tony

Your models look great how do you measure and mark out for drilling , in order to get a good gear mesh. Is it just trial and error, do you use a pillar drill .Also do you drill the holes out in the gears to match the axles if so how do you keep the hole straight

Dave :D
Not Another One

User avatar
Tony Bird
Trainee Driver
Trainee Driver
Posts: 570
Joined: Thu Jul 29, 2010 8:25 am
Location: Cardiff, South Wales, UK.

Post by Tony Bird » Sat Jan 29, 2011 9:42 am

Hi Dave,
Yes I do use a pillar drill and lathe in making the chassis however they are not necessary they just make it easier.

First the gears. For those who might not know. All of the plastic gears I have used have a module of 0.50mm. If a gear with this module is said to have a diameter of 15mm it will be a little less than 16mm in diameter when measured over its teeth. So if two gears of said 15mm diameter have to be meshed their centre distance of their axles will be 15mm i.e. half their said diameters added together. For a wheel of 15mm (16mm over teeth) to mesh with a wheel of 20 mm (21mm over teeth) will have a axle center distance of 7.5mm + 10mm =17.5mm. Gears need to be the same module to mesh correctly together.

Marking out. I use a very narrow pointed scriber and a engineering set square to do this along with a modifed drawing dividers to mark out the measurements.
Image
The crossing lines are then 'pop marked' using a fine point center punch and hammer positioned with the aid of an eye glass. Then the mark left by the centre punch is opened up a bit using a small drill held in a pin vice. Doing this allows one to see if the mark is in the correct position if not the mark can be drifted a bit by using the drill at an angle to push the hole in the right direction. The holes are then drilled with a small drill to provide a guide for the larger drill to be used. Doing this reduces the chances of the larger drill wandering.

Image

If a pillar drill isn't available it really requires two people to drill the holes square using a hand held electric drill. Hold the work piece in a vice so it can be drilled horizontaly The guy holding the drill sights down on the drill to keep it sqaure and the other guy sights the drill in the other plane adjusting the drillers hand up or down to keep the drill square to the work piece.

Enlarging the holes in plastic gear wheels is possible without using a lathe. One way is to hold an electric drill in a vice (Workmate) with the boss of the gear to be drilled held in its chuck. Another drill which doesn't have to work it could be a hand brace is used to hold the drill bit. The electric drill is started and the drill bit presented to the hole to be enlarged. Again it is helpful if two people are available to sight and keep the drills square to one another.

I hope this is helpful and makes scence. I will add some photographs of fitting an electric chassis to Thomas either later today or tomorrow.

Regards Tony.

Dave
Cleaner
Cleaner
Posts: 87
Joined: Fri Sep 11, 2009 3:05 pm
Location: HANTS

Post by Dave » Sat Jan 29, 2011 10:52 am

Hi Tony

Yes very helpful thankyou , i look forward to more pictures

You should do an write up in the SMT as we never seem to get an item on making a small cheap battery loco, just steam items that may be to expensive or difficult to build for people like me

Regards Dave :lol:
Not Another One

User avatar
Tony Bird
Trainee Driver
Trainee Driver
Posts: 570
Joined: Thu Jul 29, 2010 8:25 am
Location: Cardiff, South Wales, UK.

Post by Tony Bird » Sun Jan 30, 2011 9:24 am

Hello again,
Progress so far on fitting a battery electric chassis to a childs toy.
Photograph of the Thomas the Tank Engine bought for £1.90 from a charity shop. It is a bolt together toy with an electric drive which worked. A piece of B&Q 25mm square section steel tube. I had eight of the late Colin Binnie's plastic driving wheels and some Mamod buffers.
Image
Toy taken apart.
Image
First the footplate was cut away to accomodate the steel tube.
Image
Image
Then the steel tube was marked out for the axle centres which were then drilled.
Image
The wheels were fitted to check clearances.
Image
With body fitted.
Image
A this point it was decided to fit a larger 3/6volt electric motor of a type that hadn't been used before, because of this and having to work out a gear ratio it was decided to build a prototype chassis to check things out.
Image
Image
Gear set up used after doing some sums.
Image
A test with a 3 volt supply was done. A series/parallel system will be used giving 3 or 6volts. The results were adaquet for its lower speed.
VIDEO
Image
Happy with the results a start was made in fitting an electric motor to the toy's chassis. A false axle with a centre was used to start the marking out.
Image
Plastic packing was glued to the footplate to take up spaces so the chassis could be fitted.
Image
The toy's chassis axle holes were opened up to accomodate 8 of Brandbrights brass bushes. The ends of the frames were cut, securing holes were drilled and tapped and the steel blued to reduce rusting.
Image
Wheels, gears and motor were then fitted.
Image
Image
And with the body on which is as far as I have got so far.
Image
Regards Tony.

User avatar
Sir Clothem Cap
Driver
Driver
Posts: 1707
Joined: Sun Sep 26, 2010 8:45 pm
Location: Hampshire
Contact:

Post by Sir Clothem Cap » Sun Jan 30, 2011 11:11 am

Hi Tony, Thanks for doing this informative post which will be an inspiration for many.

User avatar
Tony Bird
Trainee Driver
Trainee Driver
Posts: 570
Joined: Thu Jul 29, 2010 8:25 am
Location: Cardiff, South Wales, UK.

Post by Tony Bird » Mon Jan 31, 2011 5:02 pm

Hi,
Image.
A Off/Forward/Reverse switch and some temporary wiring has been fitted to the chassis. Having made the bits that hold the body to the footplate using the original holes made for this job a start was made on the cover for the gears which is made from thin brass sheet. The photographs I hope will explain its construction.
Image

Image

Image

Image

Image

Image

The holes in the cover are to help remove it from the chassis.

Regards Tony.

made-in-england
Trainee Driver
Trainee Driver
Posts: 826
Joined: Tue May 13, 2008 4:22 pm

Post by made-in-england » Mon Jan 31, 2011 8:38 pm

Cracking stuff as ever tony!
Passengers are reminded not to tease the engines

User avatar
Tony Bird
Trainee Driver
Trainee Driver
Posts: 570
Joined: Thu Jul 29, 2010 8:25 am
Location: Cardiff, South Wales, UK.

Post by Tony Bird » Tue Feb 01, 2011 8:11 am

Hi,
Did a bit more work on Thomas yesterday but didn't have time to post all of it.
Couplings.
Thomas has a very narrow buffer beam so it was decided to fit small couplings that I usually fit to small wagons which I make. A lot are made at a time but I was down to one. Must have lost one as pairs are usually made. The coupling are made from brass channel and a 6BA screw. A jig has been made to support the channel while it is marked out, centre punched, drilled cut and filed to size.
Image
The above photograph shows the simple jig used along with a finished coupling and the channel in various stages of being worked on. The following photographs show the coupling construction. Work is done on both ends of several pieces of channel at the same time as they are usually made in quanties. Though a lathe was used to face the ends of the channel they could have just been filed.

Image
Marking out.
Image
Drilling for 6BA thread.
Image
Drilling for coupling pin.
Image
Tapping thread.
Image
Cutting to length.
Image
Filing to length.
Image

Image
Both above machining to length.
Image
Finishing on wet & dry paper on a flat surface (glass)
Image
Cutting head off screw. Cut as close to head as possible leaving some not fully former thread which will jam in the channel when screwed in.
Image
To be soldered.
Well not actually making an electric chassis but I hope it is found interesting.
Regards Tony.

Post Reply

Who is online

Users browsing this forum: No registered users and 2 guests