Pimp my Ragleth *** Now finished! ***
-
Sir Clothem Cap

- Driver

- Posts: 1707
- Joined: Sun Sep 26, 2010 8:45 pm
- Location: Hampshire
- Contact:

tried it in the bottom left.. not sure i like it though:

however, in the top left looks quite tasty - and i placed everything back together to check how it looks and that resulted in me moving the name plate down quite a bit. it looked really high once i'd put the body back on the chasis:

I think I am going to stick with the trimline - it looks a lot better than i imagined and i don't want to potentially ruin it with a bad paint lining job. Will practice with the lining pen some more for a later date!
however, in the top left looks quite tasty - and i placed everything back together to check how it looks and that resulted in me moving the name plate down quite a bit. it looked really high once i'd put the body back on the chasis:
I think I am going to stick with the trimline - it looks a lot better than i imagined and i don't want to potentially ruin it with a bad paint lining job. Will practice with the lining pen some more for a later date!


-
Sir Clothem Cap
- Driver
- Posts: 1707
- Joined: Sun Sep 26, 2010 8:45 pm
- Location: Hampshire
- Contact:
-
taliesin001

- Driver
- Posts: 1594
- Joined: Mon Feb 08, 2010 8:04 pm
- Location: Hampton Hargate, Peterborough
I used clear varnish, but over the nwhole lot. It's not noticeable because it's only a thin layer. This is beacause I was scsred it would move when polishing, but probably not neccessarymhlr:45545 wrote: If your other half has any clear nail varnish, you can use a dab of that on the corners if you don't have any matching paint, to hold it inplace.

yeah there is an issue. Anything like meths will fetch it off. cool soapy water shouldnt affect it though. trim line is just fine car pin striping trap which is really a type of electrical insulation tape. not really designed for hot oily places but saying that with the right care and application will last.
Well, I've been a bit quiet since the xmas holidays as work has prevented me from doing much more with the loco so far this year... but this weekend I'm planning to finish up all the spray painting and start putting everything back together!
So a quick update:
- Smoke box and chimney have been taken apart and wet'n'dried ready for spraying the same mat black that I sprayed the boiler (car exhaust high temp stuff)
- I finally got my working lamp from Chuffed-2-Bits after a quick visit to collect it. I've reshaped the lamp bracket on the smoke box and shortened it a bit ready to spray. (The original lamp had gone astray in the post before xmas - a replacement was kindly provided)
- I've prepared one more boiler band ready for acid etch (i was originally going to use 3, but 4 seems like a better idea now)
- steam dome has had the surface taken off with wet'n'dry and this will be getting acid etched and then sprayed green to match the boiler.
- all the boiler bands will get their coat of precision paints GWR green to match the boiler, as will two small lamp brackets that i've prepared to go on the back of the loco
I've also decided that i'm going to paint he lines on rather than stick with the tape. Having left the loco to rest for a few weeks since putting the tape on some of it has shrunk slightly leaving unsightly gaps at the joins in the corners. So i figure I might as well use the lining pen seeing as i already paid for it I will be practicing on some spare platicard this weekend and will post the results!
So a quick update:
- Smoke box and chimney have been taken apart and wet'n'dried ready for spraying the same mat black that I sprayed the boiler (car exhaust high temp stuff)
- I finally got my working lamp from Chuffed-2-Bits after a quick visit to collect it. I've reshaped the lamp bracket on the smoke box and shortened it a bit ready to spray. (The original lamp had gone astray in the post before xmas - a replacement was kindly provided)
- I've prepared one more boiler band ready for acid etch (i was originally going to use 3, but 4 seems like a better idea now)
- steam dome has had the surface taken off with wet'n'dry and this will be getting acid etched and then sprayed green to match the boiler.
- all the boiler bands will get their coat of precision paints GWR green to match the boiler, as will two small lamp brackets that i've prepared to go on the back of the loco
I've also decided that i'm going to paint he lines on rather than stick with the tape. Having left the loco to rest for a few weeks since putting the tape on some of it has shrunk slightly leaving unsightly gaps at the joins in the corners. So i figure I might as well use the lining pen seeing as i already paid for it
well, spraying is all done I had a few issues - this was the first time I've used gloss spray paint - and they behaved very differently to the acid etch and high heat mat black I used previously.
The green from phoenix precision paints seemed to have a much more uneven spray and tended to form blobs very easily. I ended up doing two coats on the boiler bands and steam dome and I think I might end up rubbing down the dome again with some wet and dry and do a third coat as there are two small patches on it that i'm still not happy with... but that can wait for a while - I wanna get on with putting everything back together now!
So, overall a good learning experience. I suspect that I had the spray booth a little too warm for the gloss on the first coat, second coat I turned the heater down and it went much smoother. I also have a couple of spots on the mat black smoke box that appear to be glossy. Around two of the rivets and near one of the seams. I suspect that despite cleaning with meths before painting I left some oily residue in those spots. It's probably only something I'd notice (especially after a bit of use of the loco! ) but i think next time I paint I'll be much more thorough in my cleaning and might even strip all the old paint before spraying.
Pictures to follow!
The green from phoenix precision paints seemed to have a much more uneven spray and tended to form blobs very easily. I ended up doing two coats on the boiler bands and steam dome and I think I might end up rubbing down the dome again with some wet and dry and do a third coat as there are two small patches on it that i'm still not happy with... but that can wait for a while - I wanna get on with putting everything back together now!
So, overall a good learning experience. I suspect that I had the spray booth a little too warm for the gloss on the first coat, second coat I turned the heater down and it went much smoother. I also have a couple of spots on the mat black smoke box that appear to be glossy. Around two of the rivets and near one of the seams. I suspect that despite cleaning with meths before painting I left some oily residue in those spots. It's probably only something I'd notice (especially after a bit of use of the loco!
Pictures to follow!
The painted steam dome:

Boiler bands (just need some longer bolts - turns out the 1/2" 10BA ones I have are not quite large enough to secure these roundhouse boiler bands around the Ragleth boiler):

Two lamp brackets bent and sprayed to make hooks for the read of the cab to hold bucket and shovel etc:

The mat black smoke box - just needs everything fixing firmly in place:

And a bonus pic of my chuffed-2-bits working light - its ace

Boiler bands (just need some longer bolts - turns out the 1/2" 10BA ones I have are not quite large enough to secure these roundhouse boiler bands around the Ragleth boiler):
Two lamp brackets bent and sprayed to make hooks for the read of the cab to hold bucket and shovel etc:
The mat black smoke box - just needs everything fixing firmly in place:
And a bonus pic of my chuffed-2-bits working light - its ace
Sadly, work (and studying) has been getting in the way of me finishing this again.. but here are some more photos to show progress!
Steam dome and boiler-bands fitted! I painted the bolts and folded tabs on the boiler-bands black to better disguise them once the boiler is in place:

I drilled the buffer beams and fitted the safety chains - secured in place with a spot of super-glue on the back and then painted over. I also painted the backs of the buffer beams at the same time. At some point in the future I'd like to add more rivet details to the buffer beams - ideas welcome!


Steam dome and boiler-bands fitted! I painted the bolts and folded tabs on the boiler-bands black to better disguise them once the boiler is in place:
I drilled the buffer beams and fitted the safety chains - secured in place with a spot of super-glue on the back and then painted over. I also painted the backs of the buffer beams at the same time. At some point in the future I'd like to add more rivet details to the buffer beams - ideas welcome!
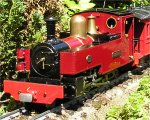
And here is everything put back together (swapped for a better pic after posting):


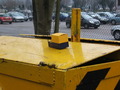
I also made a small wooden tool box using dolls-house hinges on the back, some bent brass rod for handles on the front, and two of my magnetic couplings glued inside as a means to keep it shut. I've drilled a hole in the bottom of it that exactly matches up with the gas tank fill valve and then glued the toolbox in place on top of the tank:


These images makes the colour-match on the boiler bands and steam dome look really bad. It's much closer "in the flesh" but I'm still a little disappointed having bought the colour that was recommended to match accucraft green (from pheonix precision paints - someone else's recommendation, not theirs i hasten to add!) perhaps if i do another coat I will look for a closer colour match - again, suggestions welcomed!
Here is the open box:

Just need to paint the inside of the cab cream, buy and fit some spectacle glass, fit my new Swift-Sixteen safety valve cover (how should i do that?) paint the controls in the cab, finish the lining and properly attach the name and works plates
Will be test steaming her again next week to make sure I've not totally knackered anything while i did all of this work!
Here's a quick look inside the new pimped-out cab:

I also made a small wooden tool box using dolls-house hinges on the back, some bent brass rod for handles on the front, and two of my magnetic couplings glued inside as a means to keep it shut. I've drilled a hole in the bottom of it that exactly matches up with the gas tank fill valve and then glued the toolbox in place on top of the tank:
These images makes the colour-match on the boiler bands and steam dome look really bad. It's much closer "in the flesh" but I'm still a little disappointed having bought the colour that was recommended to match accucraft green (from pheonix precision paints - someone else's recommendation, not theirs i hasten to add!) perhaps if i do another coat I will look for a closer colour match - again, suggestions welcomed!
Here is the open box:
Just need to paint the inside of the cab cream, buy and fit some spectacle glass, fit my new Swift-Sixteen safety valve cover (how should i do that?) paint the controls in the cab, finish the lining and properly attach the name and works plates
Will be test steaming her again next week to make sure I've not totally knackered anything while i did all of this work!
Here's a quick look inside the new pimped-out cab:
Last edited by ninge on Thu Mar 03, 2011 1:06 pm, edited 1 time in total.
-
Pendo Pilot

- Driver
- Posts: 1897
- Joined: Sun Apr 04, 2010 12:24 am
- Location: South Staffordshire UK
- Contact:
Thats looking lovely now, really like the colour & that tool box is really good.
Are the safety chains from Brandbright? I've been meaning to fit some myself.
The magnetic couplings, how well do they work? Is there a limit to how much stock you can pull before they let go?
Are the safety chains from Brandbright? I've been meaning to fit some myself.
The magnetic couplings, how well do they work? Is there a limit to how much stock you can pull before they let go?
Tommy Dodd may have an ARS key but I have a TASS button & a Rope Ladder, just like pirates, except the TASS button bit.
No idea about the magnetic couplings yet - I've had mixed reports (all good before i bought them, a bit pants since!) but as I only have 2 bits of rolling stock finished (two andel wagons) and no line to test on... guess i should really contact my local area group and find somewhere to play trains
the chains are from brandbright - they were quite fun to make and really easy to fit - definitely recommend!
the chains are from brandbright - they were quite fun to make and really easy to fit - definitely recommend!

I've got those little lamps too. I like them. I got a red one for the tail end too.
I've been watching this thread to get ideas for decorating "Billy". Nice work!

I expect those magnets would work fairly well, I've got some "rare earth magnets" and they will stick to the refrigerator door THROUGH my hand. They are very "sticky".
Oh, by the way about that paint, did you bake it after painting the bands and dome? If not, you might find that when you fire the engine, those parts will darken and become slightly less glossy. Take another look at it after you've steamed the engine a few times. Also try not to touch the dome the first time it gets hot until it cools off a little, when paint is baking it may get tacky again temporarily.
Anyway, I think the colour may match better after the engine has cooked it a little. As it is it still looks pretty good. I certainly wouldn't notice. I kind of like it actually. It picks out the bands slightly.
I've been watching this thread to get ideas for decorating "Billy". Nice work!
I expect those magnets would work fairly well, I've got some "rare earth magnets" and they will stick to the refrigerator door THROUGH my hand. They are very "sticky".
Oh, by the way about that paint, did you bake it after painting the bands and dome? If not, you might find that when you fire the engine, those parts will darken and become slightly less glossy. Take another look at it after you've steamed the engine a few times. Also try not to touch the dome the first time it gets hot until it cools off a little, when paint is baking it may get tacky again temporarily.
Anyway, I think the colour may match better after the engine has cooked it a little. As it is it still looks pretty good. I certainly wouldn't notice. I kind of like it actually. It picks out the bands slightly.
-
DolwyddelanLightRail
- Driver
- Posts: 2579
- Joined: Tue Sep 29, 2009 7:27 pm
- Location: Lost

Who is online
Users browsing this forum: No registered users and 0 guests