Discussion of Live Steam locomotives should be located here
-
taliesin001
- Driver

- Posts: 1594
- Joined: Mon Feb 08, 2010 8:04 pm
- Location: Hampton Hargate, Peterborough
Post
by taliesin001 » Fri Apr 30, 2010 7:43 pm
-
taliesin001
- Driver
- Posts: 1594
- Joined: Mon Feb 08, 2010 8:04 pm
- Location: Hampton Hargate, Peterborough
Post
by taliesin001 » Fri Apr 30, 2010 7:45 pm
AAAAHHH sorry, wrong section. Is there any way I can move it?
-
laalratty
- Retired Director

- Posts: 3887
- Joined: Wed Jan 16, 2008 5:35 pm
- Location: Morecambe
Post
by laalratty » Fri Apr 30, 2010 8:46 pm
Moved!
And a nice job you've made of the loco as well
"What the hell is that?"
"It's a model icebreaker sir."
"It's a bit big isn't it?"
"It's a full scale model sir....."
-
mhlr
- Retired Director
- Posts: 4336
- Joined: Sun Oct 21, 2007 8:16 pm
- Location: Shropshire, England
Post
by mhlr » Fri Apr 30, 2010 9:52 pm
Wow, looking good Lewis! Very handsome looking loco!
-
Narrow Minded
- Driver
- Posts: 4650
- Joined: Wed Dec 30, 2009 2:27 pm
- Location: Forgotten Realms
-
Contact:
Post
by Narrow Minded » Fri May 07, 2010 1:38 pm
You've done a stirling job there so far!

Looking forward to the "finished" loco when you've done the list of jobs - should be excellent!!!
-
taliesin001
- Driver
- Posts: 1594
- Joined: Mon Feb 08, 2010 8:04 pm
- Location: Hampton Hargate, Peterborough
Post
by taliesin001 » Sun Jun 06, 2010 4:52 pm
Today I have painted the numbers on the numberplates white. This is because the real ones aren't actually made from brass as the ones accucraft have supplied are. BR painted them like this along with the W in GWR to indicate western region. It has atken a long time to wor out a way of doing them. Because the engraving isn't very deep you can't paint them in the normal way. for example I wanted to spray the whole thing white, then black and rub off the black on the raised portions. Instead i have had to paint each part individually which took some time! I don't think they look too bad though and certainly stand out from the black tanks alot more. It's these small details that I think makes the difference.

Uploaded with
ImageShack.us
-
MuzTrem
- Driver
- Posts: 1122
- Joined: Sun Feb 10, 2008 6:51 pm
- Location: Buckinghamshire
-
Contact:
Post
by MuzTrem » Sun Jun 06, 2010 5:18 pm
taliesin001 wrote:BR painted them like this along with the W in GWR to indicate Western Region.
At risk of being pedantic, this wasn't always the case...although in recent years No. 822's numberplates have been painted as such, all the BR-era photos in the David & Charles W&L book show all three letters painted over in black...

Anyway, the loco is certainly looking most impressive. I saw an "Earl" at GRS last year and thought "surely no-one can add any more detail than that" - but I've been proved wrong!
-
taliesin001
- Driver
- Posts: 1594
- Joined: Mon Feb 08, 2010 8:04 pm
- Location: Hampton Hargate, Peterborough
Post
by taliesin001 » Sun Jun 06, 2010 5:25 pm
I've got the past and present welshpool and llanfair book by hugh ballantyne and there are a few photos showing the white numbers. Of course it is possible that this was changed to/from black or became dirty, especially as colour pictures show that these locos seem to have been rarely cleaned.
-
Dr. Bond of the DVLR
- Retired Director
- Posts: 4485
- Joined: Tue Jun 09, 2009 9:43 pm
- Location: Suffolk
-
Contact:
Post
by Dr. Bond of the DVLR » Sun Jun 06, 2010 5:26 pm
The loco is looking brilliant! Would look so much better without that clock face in the window....

The railway which people forgot
(to build)
-
LMS-Jools
- Driver
- Posts: 1325
- Joined: Thu Sep 25, 2008 9:24 pm
- Location: Northwest UK
Post
by LMS-Jools » Sun Jun 06, 2010 5:28 pm
Most Excellent.

-
taliesin001
- Driver
- Posts: 1594
- Joined: Mon Feb 08, 2010 8:04 pm
- Location: Hampton Hargate, Peterborough
Post
by taliesin001 » Sun Jun 06, 2010 5:29 pm
Mr. Bond of the DVLR wrote:The loco is looking brilliant! Would look so much better without that clock face in the window....
It's going to be turned around at some point, the other side has been painted black for when I get round to it.
-
taliesin001
- Driver
- Posts: 1594
- Joined: Mon Feb 08, 2010 8:04 pm
- Location: Hampton Hargate, Peterborough
Post
by taliesin001 » Mon Jun 18, 2012 4:17 pm
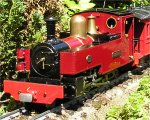
Alongside Russell I also decided to weather the earl, as it looked a bit silly alongside all the weathered wagons... although I think it still needs touching up in places

Uploaded with
ImageShack.us

Uploaded with
ImageShack.us
-
Dr. Bond of the DVLR
- Retired Director
- Posts: 4485
- Joined: Tue Jun 09, 2009 9:43 pm
- Location: Suffolk
-
Contact:
Post
by Dr. Bond of the DVLR » Mon Jun 18, 2012 5:04 pm
Could you take us through how you weather them please Lewis?
The railway which people forgot
(to build)
-
Sammmm
- Fireman

- Posts: 301
- Joined: Fri May 15, 2009 10:57 pm
- Location: Hilperton ,Trowbridge,Wilts
Post
by Sammmm » Mon Jun 18, 2012 5:48 pm
Mr. Bond of the DVLR:71953 wrote:Could you take us through how you weather them please Lewis?
Yes please do!!
Ta,
Sam

Dude where's my car!!.....Dude get a life!...Get swift cover
-
taliesin001
- Driver
- Posts: 1594
- Joined: Mon Feb 08, 2010 8:04 pm
- Location: Hampton Hargate, Peterborough
Post
by taliesin001 » Wed Jun 20, 2012 4:36 pm
Ive had another go at the earl as it still needed a bit of touching up, I am much more happy now. In particular I've worked on the still shiny dome and safety valve cover, as by the time these engines were put into storage it was pretty much black! Anyway the method i use is obviously to start by getting rid of the oil. i then use a grey and paint this on the sides. Straight away i then wipe it of, leaving the grey in all the hard to reach areas. Its important just to wipe downwards, as in real life rain would usually leave the areas exposed cleaner than those that aren't, such as under rivets for example. Streaks are achieved by lightly wiping downwards. Once this has been done I dry brush other colours such as brown, dark grey etc and dap this on. I then wipe away or fade this in until it looks right. I try to have a look at real pictures and find what you would get where, for brown dirt would accumulate on the undersides of areas and on the lower half of the loco, grey soot from the chimney would be present further up. Then you have the streaks from the water treatment when the tanks have been overflowed and run down. On the earl this doesn't happen because the sides are raised but on russell this is particularly notieable in pictures. Hope this helps.
-
Pendo Pilot
- Driver
- Posts: 1897
- Joined: Sun Apr 04, 2010 12:24 am
- Location: South Staffordshire UK
-
Contact:
Post
by Pendo Pilot » Thu Jun 21, 2012 2:01 pm
I had missed this thread somehow. Most impressive & inspirational stuff Lewis. It's looking superb now. Thanks for the idea's that I may well have to emulate as well.
Tommy Dodd may have an ARS key but I have a TASS button & a Rope Ladder, just like pirates, except the TASS button bit.
-
Sir haydn
- Driver
- Posts: 2109
- Joined: Mon Dec 07, 2009 2:51 pm
-
Contact:
Post
by Sir haydn » Thu Jun 21, 2012 5:14 pm
That is amazing Lewis. You need to do the lamp too, its like an advert for colgate at the moment
-
taliesin001
- Driver
- Posts: 1594
- Joined: Mon Feb 08, 2010 8:04 pm
- Location: Hampton Hargate, Peterborough
Post
by taliesin001 » Thu Jun 21, 2012 5:31 pm
Yes, now you mention it they do look a bit odd, the frames also stick out too, so will be next
-
Endless, Nameless
- Driver
- Posts: 1156
- Joined: Mon Sep 29, 2008 6:56 pm
- Location: Plymouth
Post
by Endless, Nameless » Thu Jun 21, 2012 5:53 pm
I tip my hat to you Sir- that's magnificent.
Matt
"The Ancient Greeks called it Pandora's box- but what they actually meant was Baldrick's Trousers"
Who is online
Users browsing this forum: No registered users and 2 guests