Simplex Yard Shunter
-
Old Man Aaron

- Trainee Driver

- Posts: 808
- Joined: Wed Oct 19, 2016 11:08 am
- Location: Sunshine Coast QLD, Australia
Re: Simplex Yard Shunter
Very interesting. Looking forward to having a gawk in person. 
Regards,
Aaron - Scum Class Works
Aaron - Scum Class Works
-
Old Man Aaron
- Trainee Driver
- Posts: 808
- Joined: Wed Oct 19, 2016 11:08 am
- Location: Sunshine Coast QLD, Australia
Re: Simplex Yard Shunter
12/03/24
A Deltang Rx63 receiver was removed from another loco and fitted to the Simplex, using some very small connectors.
Surprisingly, (even out of sight 6 meters away) the whitemetal bonnet doesn't seem to affect the signal.
The receiver (and bonnet) are held in place with blu-tac.
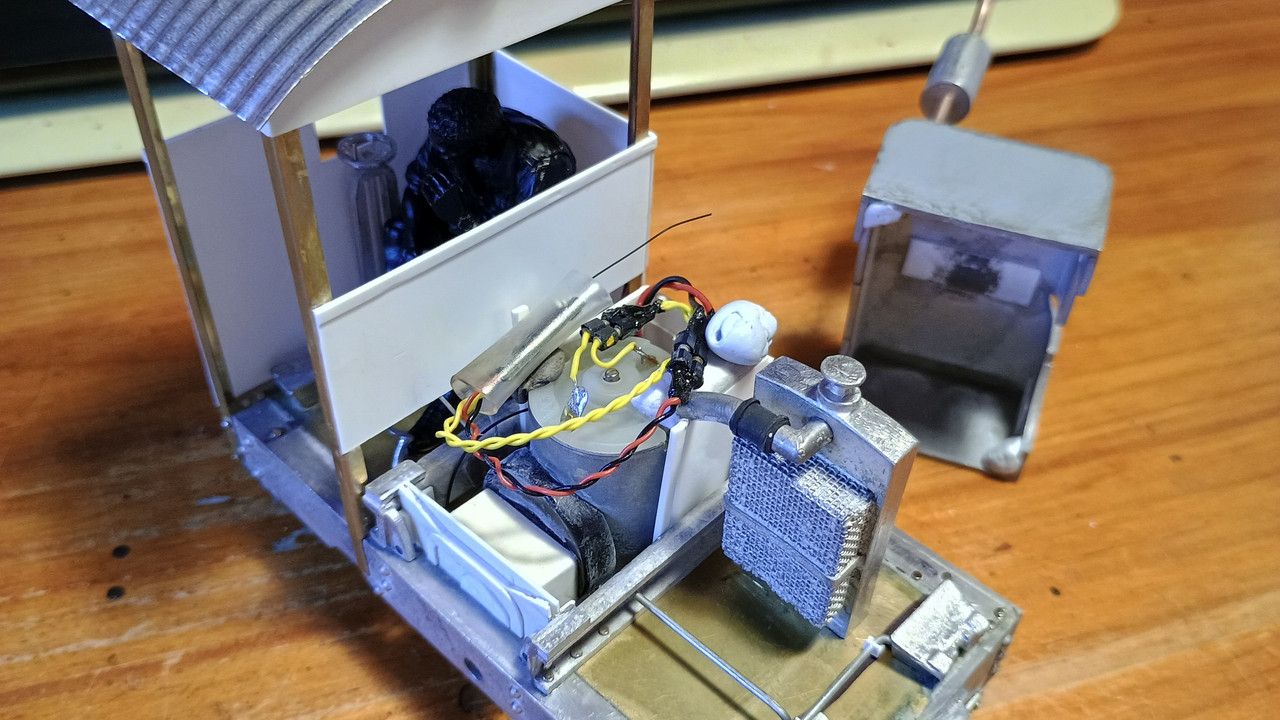
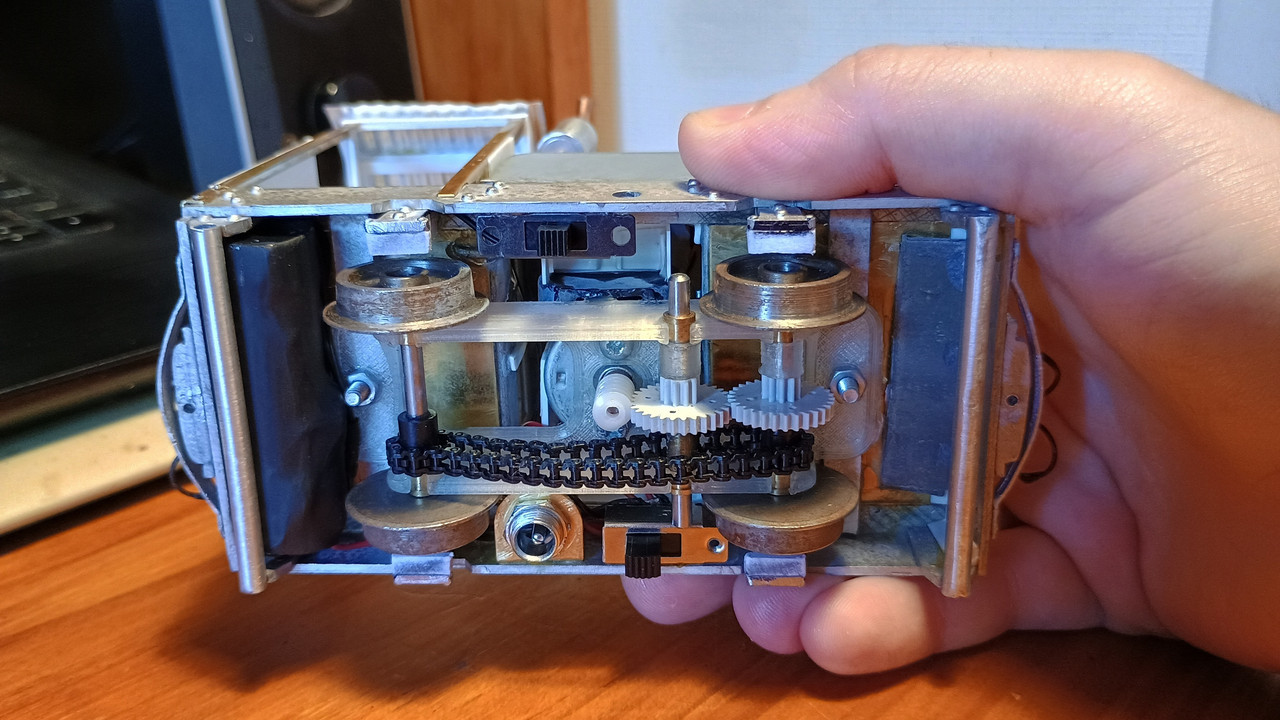
My intent was to power the loco with a pair of 14500 Li-Ion cells behind each headstock, wired in parallel.
However, after I'd used the last of my large heat shrink over each cell, I realised I'd connected them in series.
One of the cells was removed, and will find it's way into one of the many waiting projects in the cupboard..
Two cells was overkill for a loco that spends most of it's life in a mill siding, anyway. I was mainly doing it for weight distribution.
A scrap of lead was fitted at the other end.
A bracket for the charge socket was hacked up from brass, and glued to the frames (along with slide switches for power and headlights) with my preferred strong contact cement.
The low-relief axleboxes were extended with foamboard. The solid cast whitemetal derailment bars were replaced with aluminium tube.
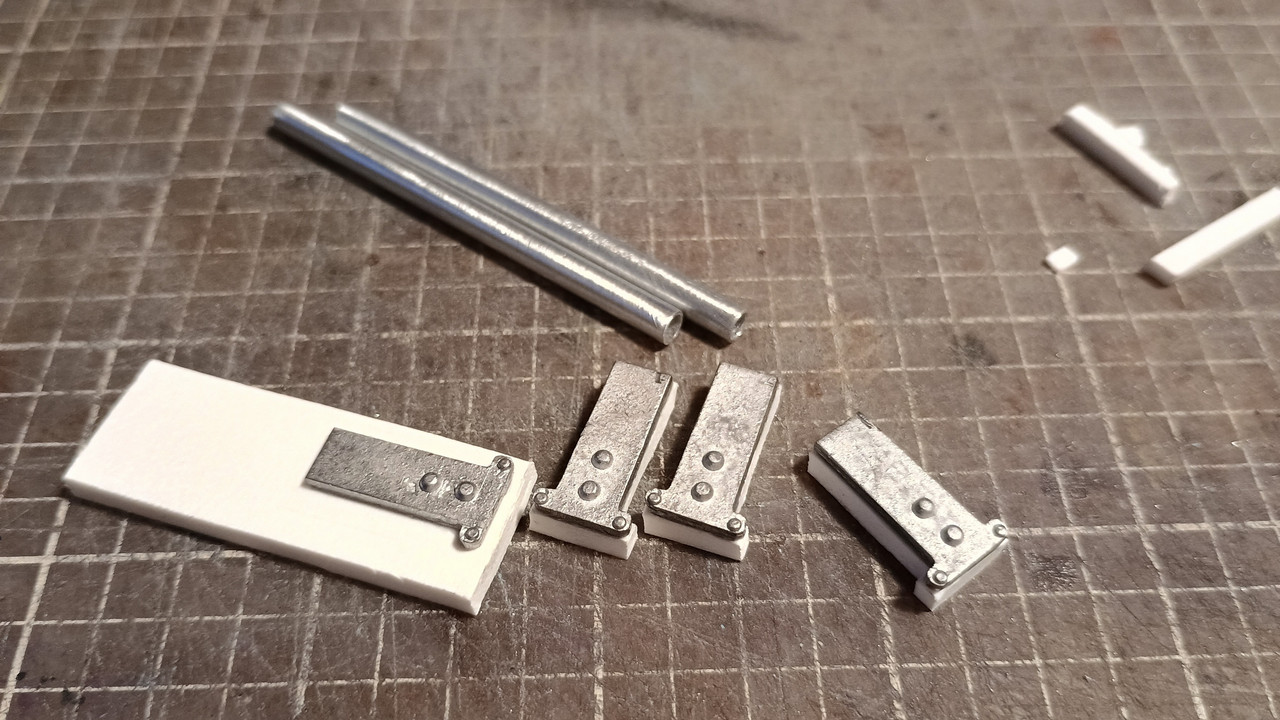
Headlights came from the batch of 1930s-style car headlights I made on the lathe for the Essel Fowler. Brackets are just some 1/4" styrene angle.
Crudely modified exhausts are a common sight on cane locos. I've fitted it crookedly, to suggest the muffler was just loosely jammed onto an extended exhaust pipe under the bonnet.
The footplate on the RH side of the radiator is - on the prototype - just a hole. I can't model this properly due to the 16mm mechanism underneath, but I can cover the area with a planked "floor" made from coffee stirrers.
The derailment bar/tube ends were treated to some controlled destruction with a hammer (the front one also slightly bent) to represent the damage often seen after a few years' service.
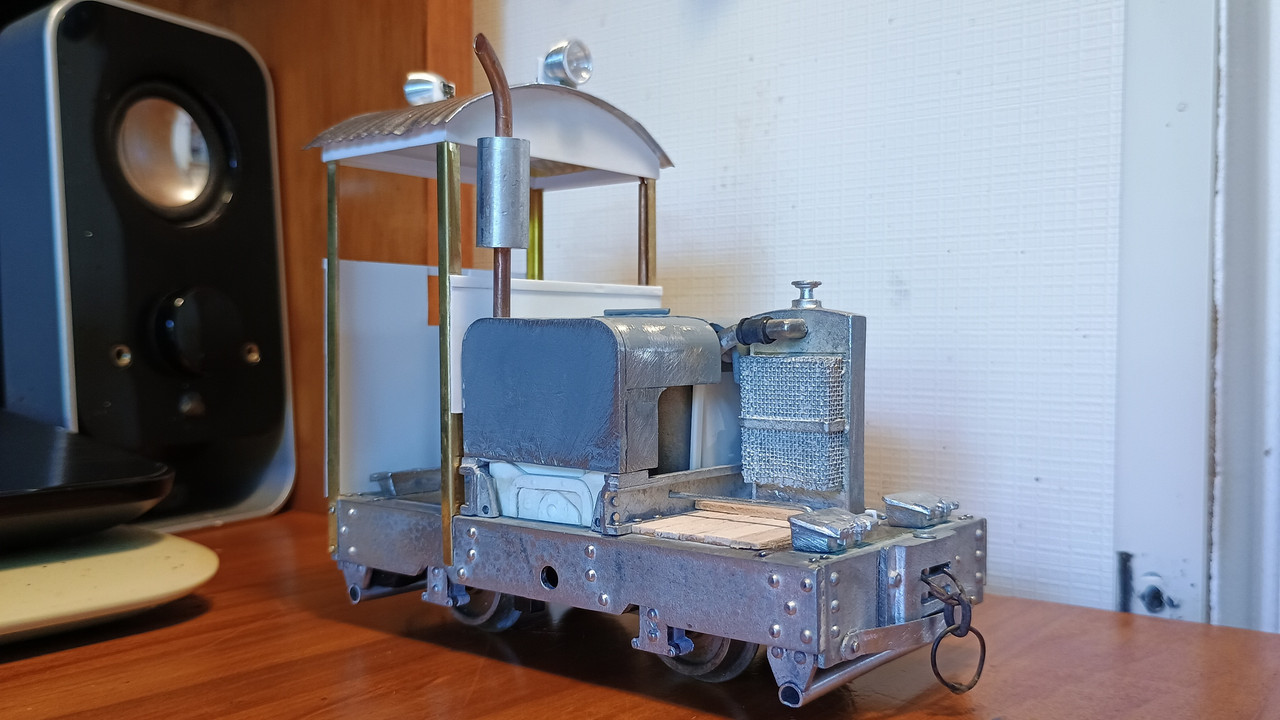
Primed the loco this morning, now I can see the few spots needing more filler before painting..
A Deltang Rx63 receiver was removed from another loco and fitted to the Simplex, using some very small connectors.
Surprisingly, (even out of sight 6 meters away) the whitemetal bonnet doesn't seem to affect the signal.
The receiver (and bonnet) are held in place with blu-tac.
My intent was to power the loco with a pair of 14500 Li-Ion cells behind each headstock, wired in parallel.
However, after I'd used the last of my large heat shrink over each cell, I realised I'd connected them in series.
One of the cells was removed, and will find it's way into one of the many waiting projects in the cupboard..
Two cells was overkill for a loco that spends most of it's life in a mill siding, anyway. I was mainly doing it for weight distribution.
A scrap of lead was fitted at the other end.
A bracket for the charge socket was hacked up from brass, and glued to the frames (along with slide switches for power and headlights) with my preferred strong contact cement.
The low-relief axleboxes were extended with foamboard. The solid cast whitemetal derailment bars were replaced with aluminium tube.
Headlights came from the batch of 1930s-style car headlights I made on the lathe for the Essel Fowler. Brackets are just some 1/4" styrene angle.
Crudely modified exhausts are a common sight on cane locos. I've fitted it crookedly, to suggest the muffler was just loosely jammed onto an extended exhaust pipe under the bonnet.
The footplate on the RH side of the radiator is - on the prototype - just a hole. I can't model this properly due to the 16mm mechanism underneath, but I can cover the area with a planked "floor" made from coffee stirrers.
The derailment bar/tube ends were treated to some controlled destruction with a hammer (the front one also slightly bent) to represent the damage often seen after a few years' service.
Primed the loco this morning, now I can see the few spots needing more filler before painting..
Last edited by Old Man Aaron on Fri Mar 22, 2024 5:27 am, edited 1 time in total.
Regards,
Aaron - Scum Class Works
Aaron - Scum Class Works


Re: Simplex Yard Shunter
Looks great, Aaron. Very neatly finished.
Rik
Rik

Re: Simplex Yard Shunter
That looks really good. It'll be interesting to see it complete with a 'weathered' appearance. 
Phil
Sporadic Garden Railer who's inconsistencies know no bounds
My Line - https://gardenrails.org/forum/viewtopic ... 41&t=11077
Sporadic Garden Railer who's inconsistencies know no bounds
My Line - https://gardenrails.org/forum/viewtopic ... 41&t=11077

-
Peter Butler

- Driver

- Posts: 5245
- Joined: Sun Sep 09, 2012 10:33 pm
- Location: West Wales
Re: Simplex Yard Shunter
I said from the start I'd be watching with interest, and I still am. This is looking great and will be even better with your weathering skills applied.
The best things in life are free.... so why am I doing this?
-
Old Man Aaron
- Trainee Driver
- Posts: 808
- Joined: Wed Oct 19, 2016 11:08 am
- Location: Sunshine Coast QLD, Australia
Re: Simplex Yard Shunter
11/04/24
Cheers gents, glad you like it. I really do.
Those of you keen to see weathering will either be intrigued, or disappointed - maybe both.
I've decided for this one, to try something new. Something a little different from my growing little fleet.
I want this one to look like a recent repaint. Not just "paint the model and call it done". But not an immaculate shed pet, either.
One of those things where absolutely everything has been painted, with smaller parts like the sandboxes being picked out in another colour.
So far I have simply painted the model. Still figuring out how to go about this effect..
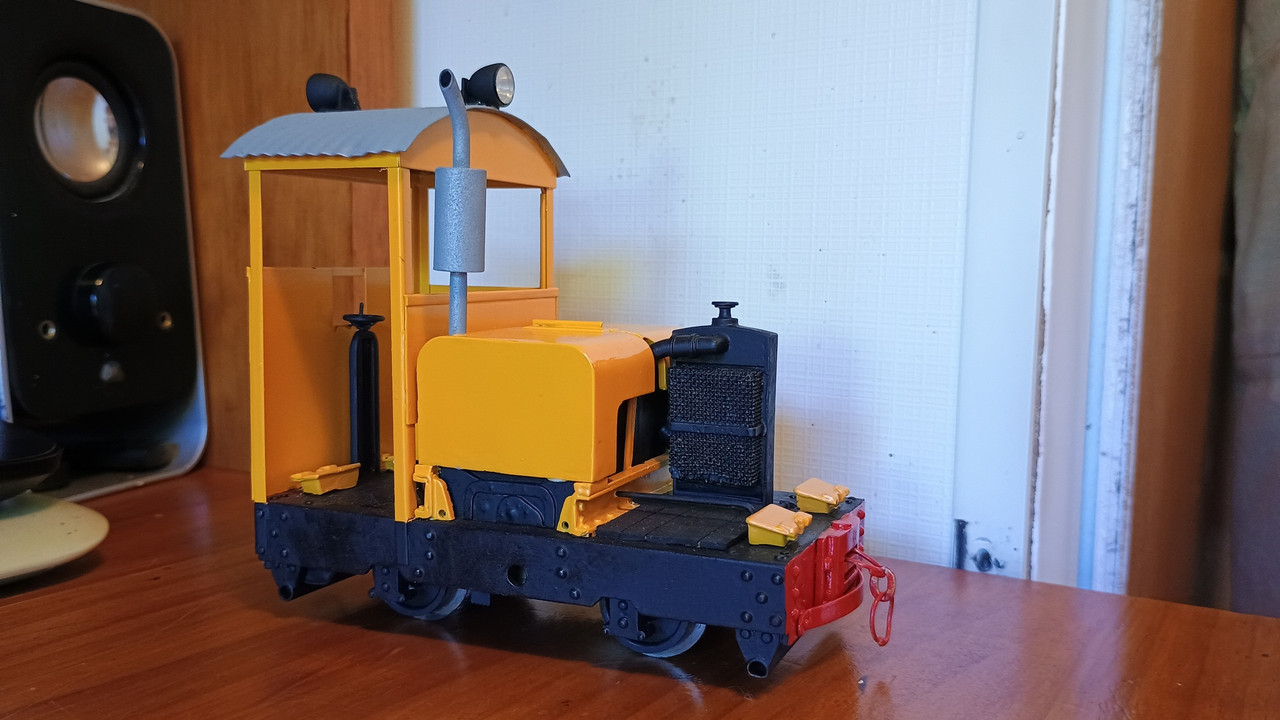
I'm thinking a few months of grime and wear. Painted-over knocks and damage. Grubby wheels, couplings, and that oil stain you see down the sides from the engine. Some rust on the exhaust, bleeding through the zinc paint. That sort of thing.
Cheers gents, glad you like it. I really do.
Those of you keen to see weathering will either be intrigued, or disappointed - maybe both.
I've decided for this one, to try something new. Something a little different from my growing little fleet.
I want this one to look like a recent repaint. Not just "paint the model and call it done". But not an immaculate shed pet, either.
One of those things where absolutely everything has been painted, with smaller parts like the sandboxes being picked out in another colour.
So far I have simply painted the model. Still figuring out how to go about this effect..
I'm thinking a few months of grime and wear. Painted-over knocks and damage. Grubby wheels, couplings, and that oil stain you see down the sides from the engine. Some rust on the exhaust, bleeding through the zinc paint. That sort of thing.
Regards,
Aaron - Scum Class Works
Aaron - Scum Class Works
-
GAP

- Trainee Driver
- Posts: 690
- Joined: Sun Dec 23, 2012 10:34 pm
- Location: Bundaberg QLD Australia
- Contact:
Re: Simplex Yard Shunter
For the chassis parts try putting the model on a sheet of timber/cardboard and then spray around it on the sheet about 50-100mm away the over-spray will give a fine coating resembling dust and dirt kicked up during use.Old Man Aaron wrote: ↑Thu Apr 11, 2024 6:32 am 11/04/24
Cheers gents, glad you like it. I really do.
Those of you keen to see weathering will either be intrigued, or disappointed - maybe both.
I've decided for this one, to try something new. Something a little different from my growing little fleet.
I want this one to look like a recent repaint. Not just "paint the model and call it done". But not an immaculate shed pet, either.
One of those things where absolutely everything has been painted, with smaller parts like the sandboxes being picked out in another colour.
So far I have simply painted the model. Still figuring out how to go about this effect..
I'm thinking a few months of grime and wear. Painted-over knocks and damage. Grubby wheels, couplings, and that oil stain you see down the sides from the engine. Some rust on the exhaust, bleeding through the zinc paint. That sort of thing.
I used this method on some HO wagons back in the day.
Graeme
From the home of the Ringbalin Light Railway
https://ringbalin-light-railway.blogspo ... -page.html
From the home of the Ringbalin Light Railway
https://ringbalin-light-railway.blogspo ... -page.html

Re: Simplex Yard Shunter
VERY nice - the yellow livery's fantastic...
Who is online
Users browsing this forum: No registered users and 0 guests