Another Fowler rebuild at Scum Class Works

A place for discussing battery-electric locomotives, whether they're diesel, steam or even electric outline
Post Reply
User avatar
Old Man Aaron
Trainee Driver
Trainee Driver
Posts: 808
Joined: Wed Oct 19, 2016 11:08 am
Location: Sunshine Coast QLD, Australia

Another Fowler rebuild at Scum Class Works

Post by Old Man Aaron » Mon Aug 21, 2023 2:22 am

Time for my third Fowler rebuild, in a row - I promise the next loco will be from another builder. :roll: :lol:

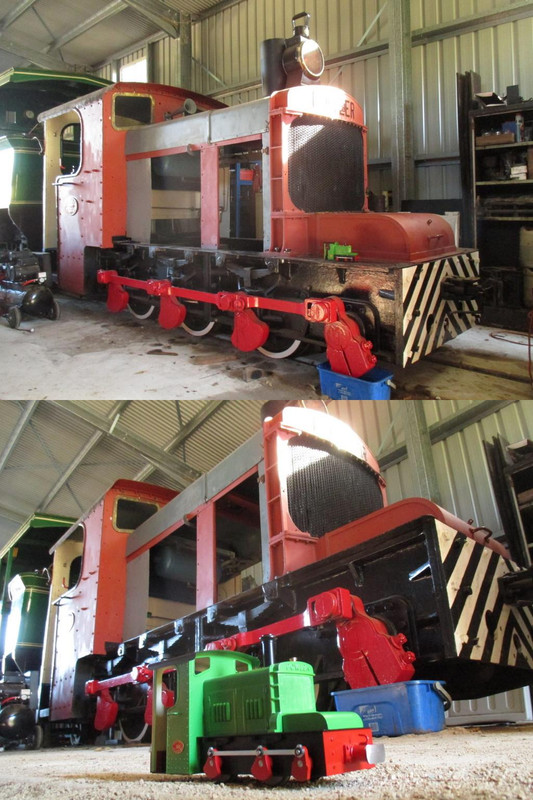
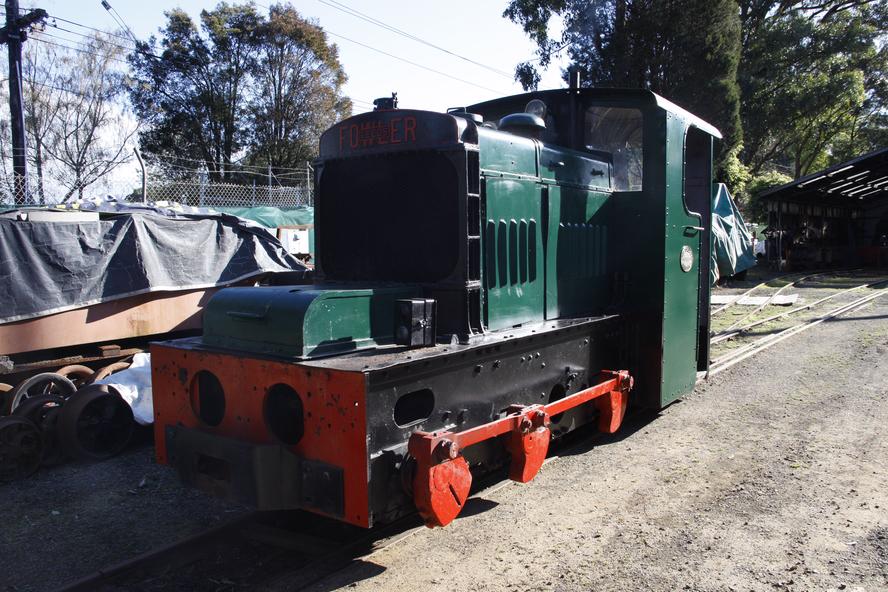
In 2019, we began restoring a 1929 John Fowler diesel locomotive at the Woodford Railway.
It's one of the first I/C locomotives to run in Australia, pre-dating mainline diesel power by almost 20 years. I say "diesel", but like many tractors of the era, it was originally started on petrol, then switched to kerosene once warmed up. Today it sports a 5-cylinder Gardener diesel, received at Goondi Mill in the 1950s.

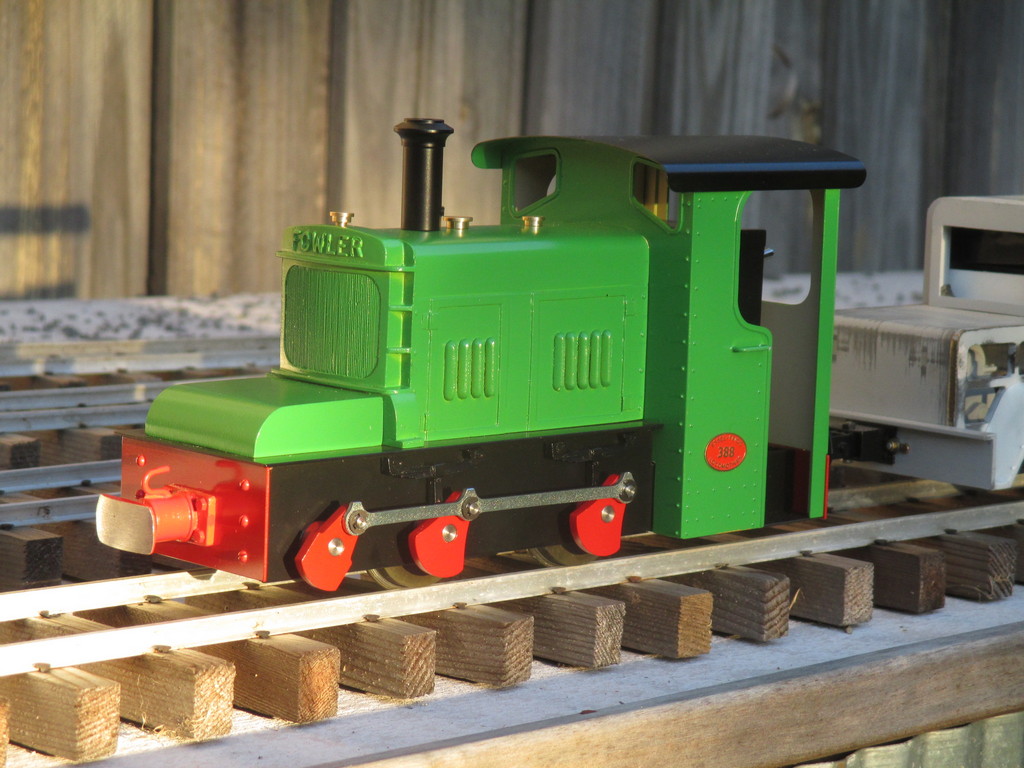
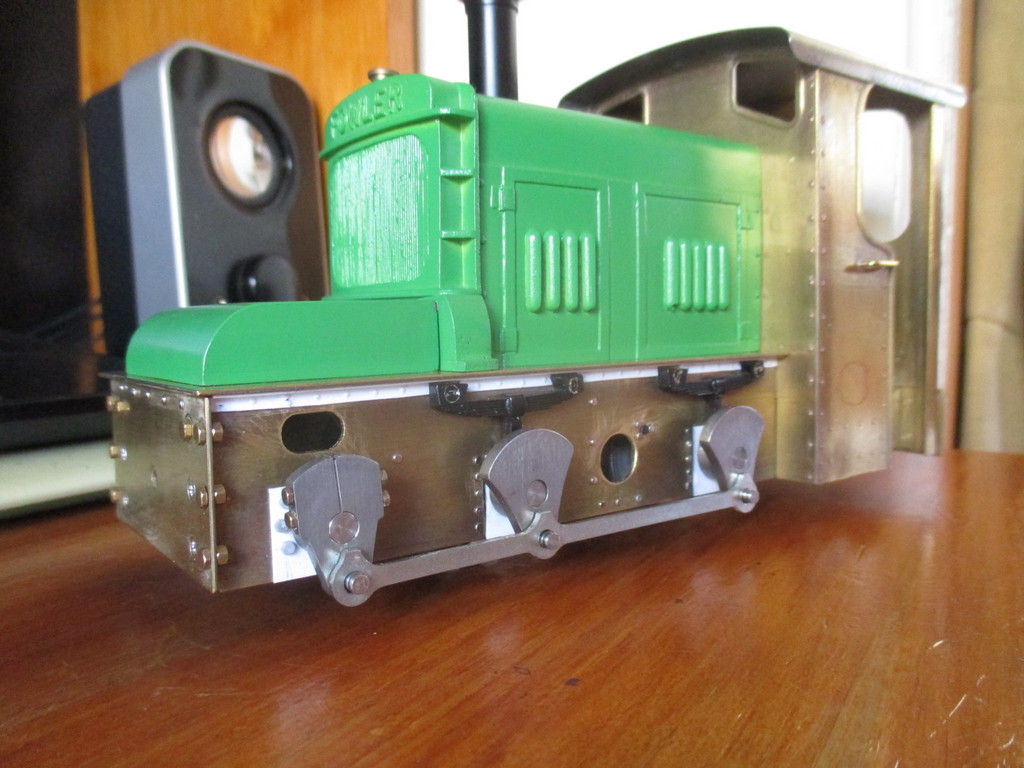
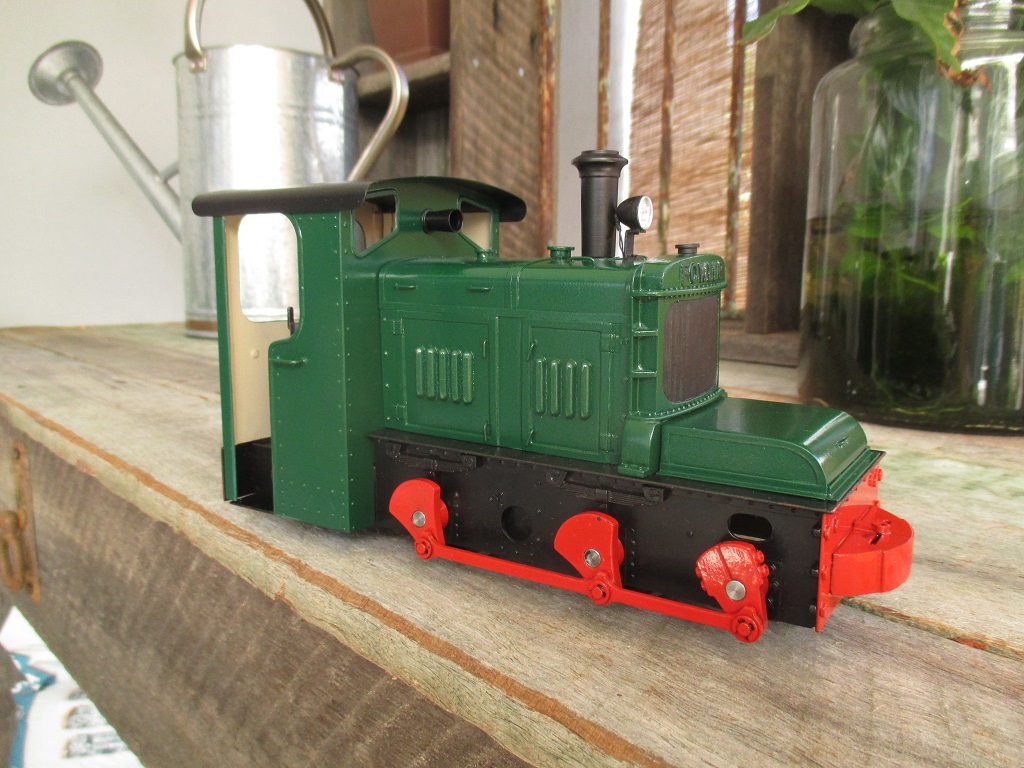
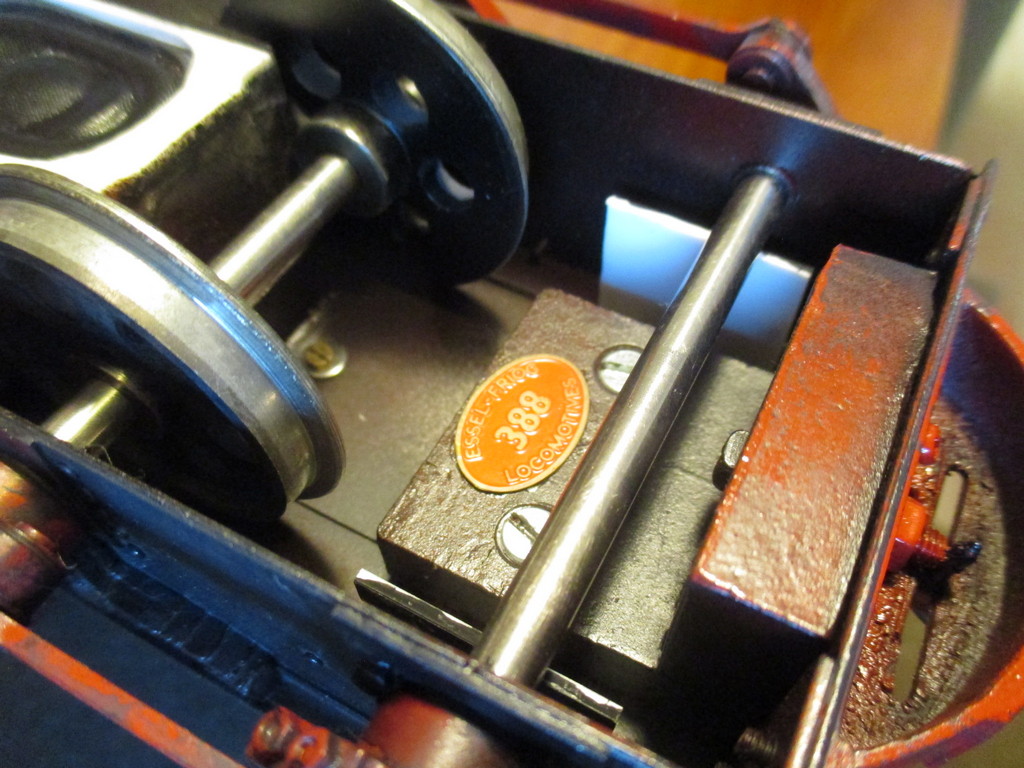
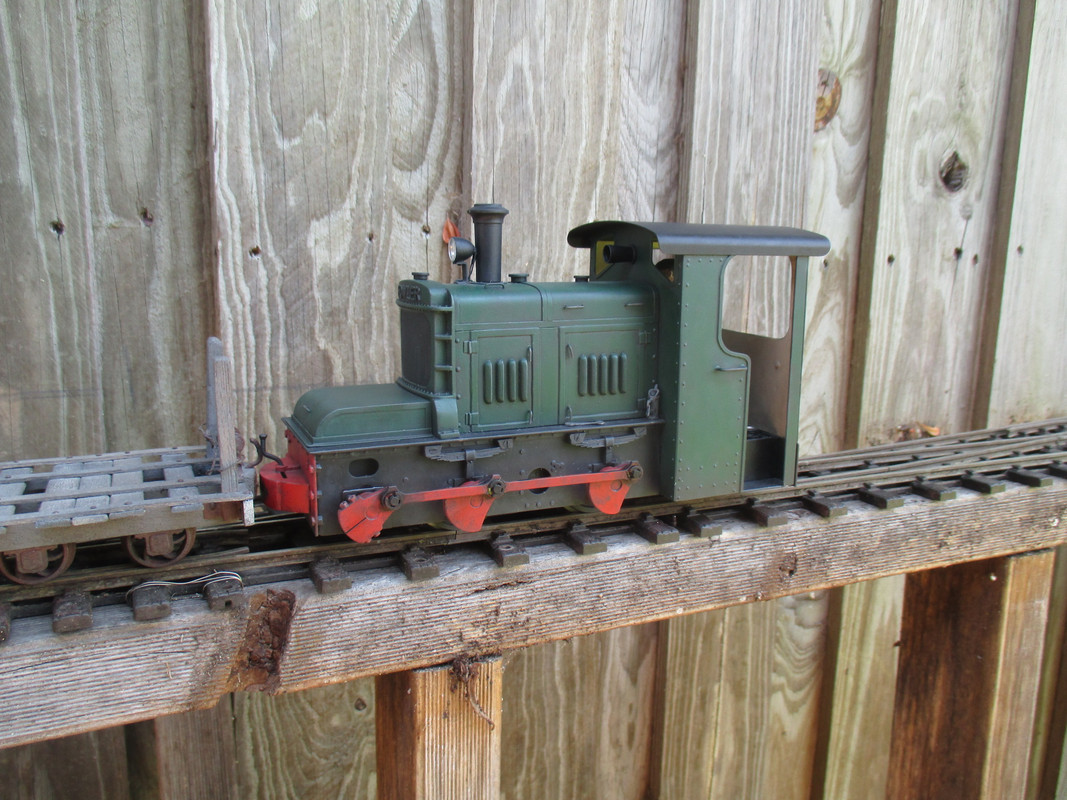
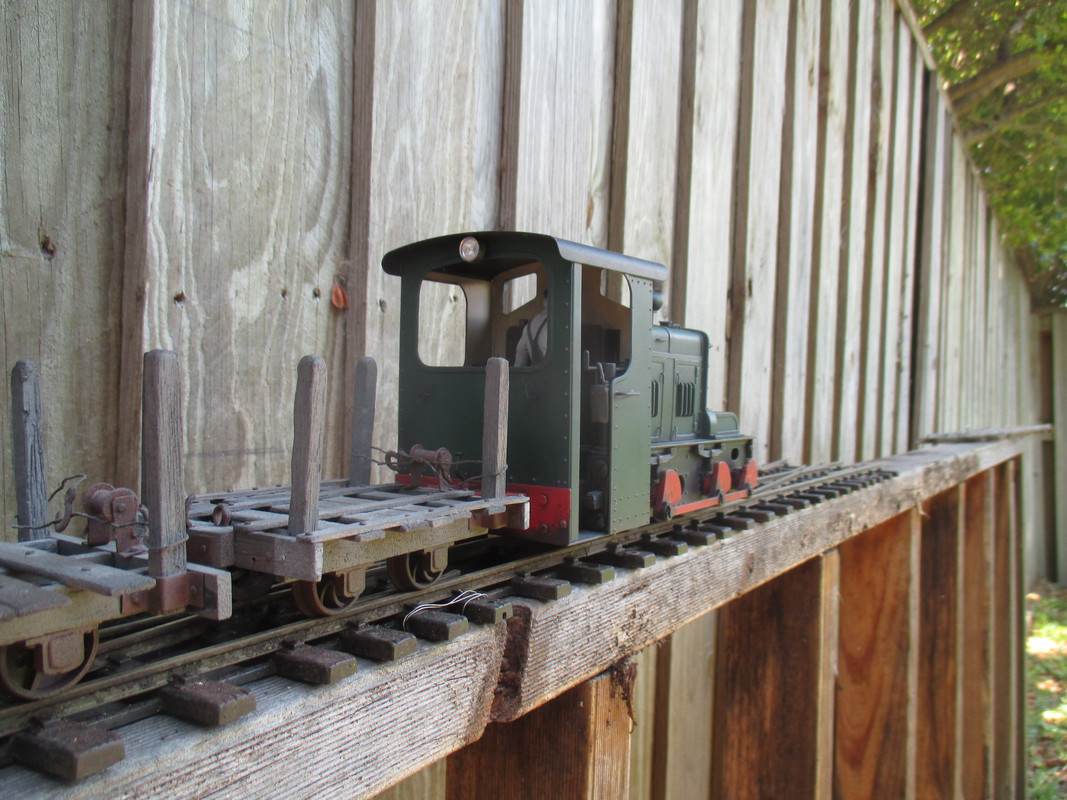
As I expected, hundreds of hours working on the real thing, very soon lead to the desire to own one in 16mm. An order was placed with Essel Engineering and 18 months later (material shortages due to plague) Essel No.388 arrived in it's spiritual home on the East coast of Queensland, in April of '21.
Image


The stock locomotive is very well made. I never tested it's haulage capacity back when I had a track to run on, but it seems plenty capable for it's size.
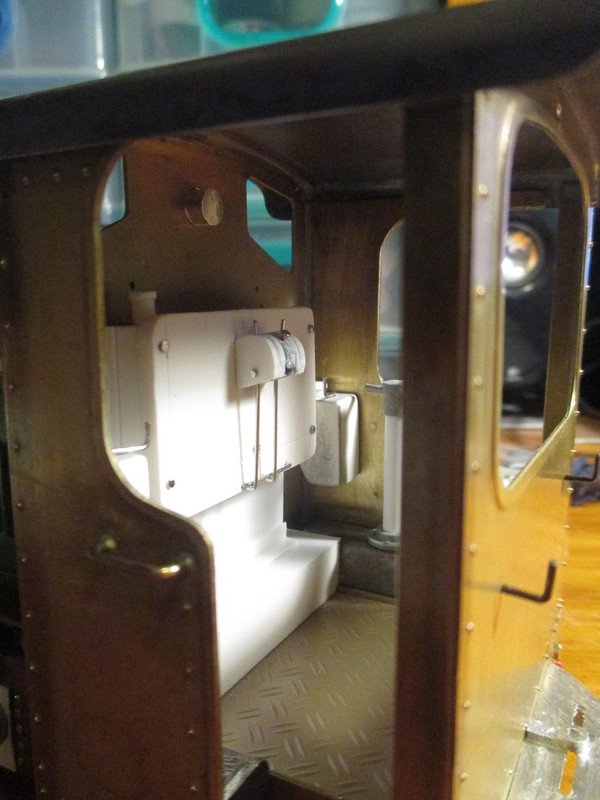
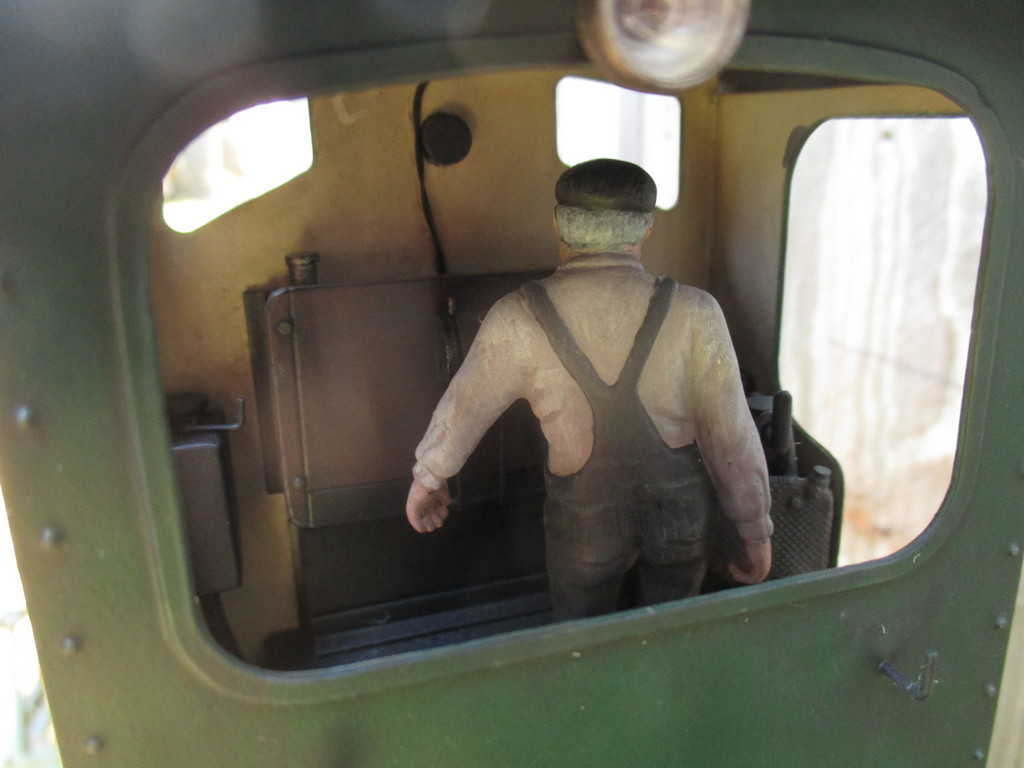
It's powered by an 8-cell AA NiMh pack, within the large black box in the cab. A charging socket and toggle switches for direction and Run/Charge respectively, are also housed in the box. Speed is controlled by twisting the chimney. Gauge can be changed in the usual manner.
Image


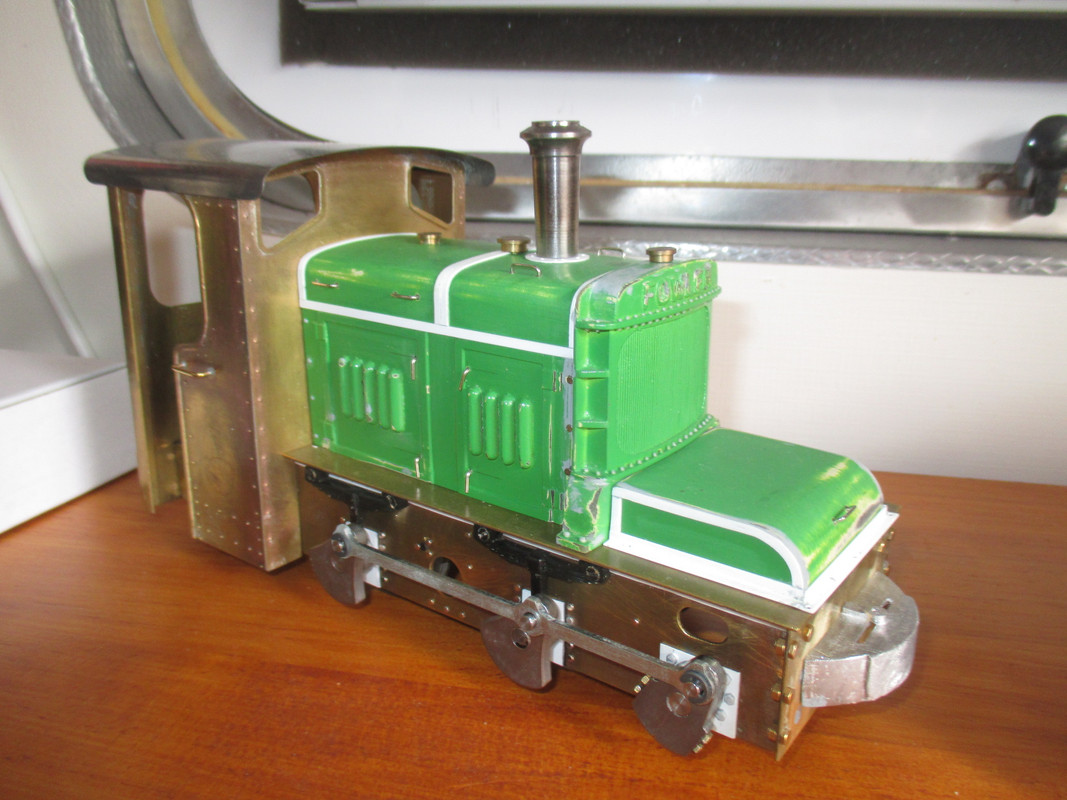
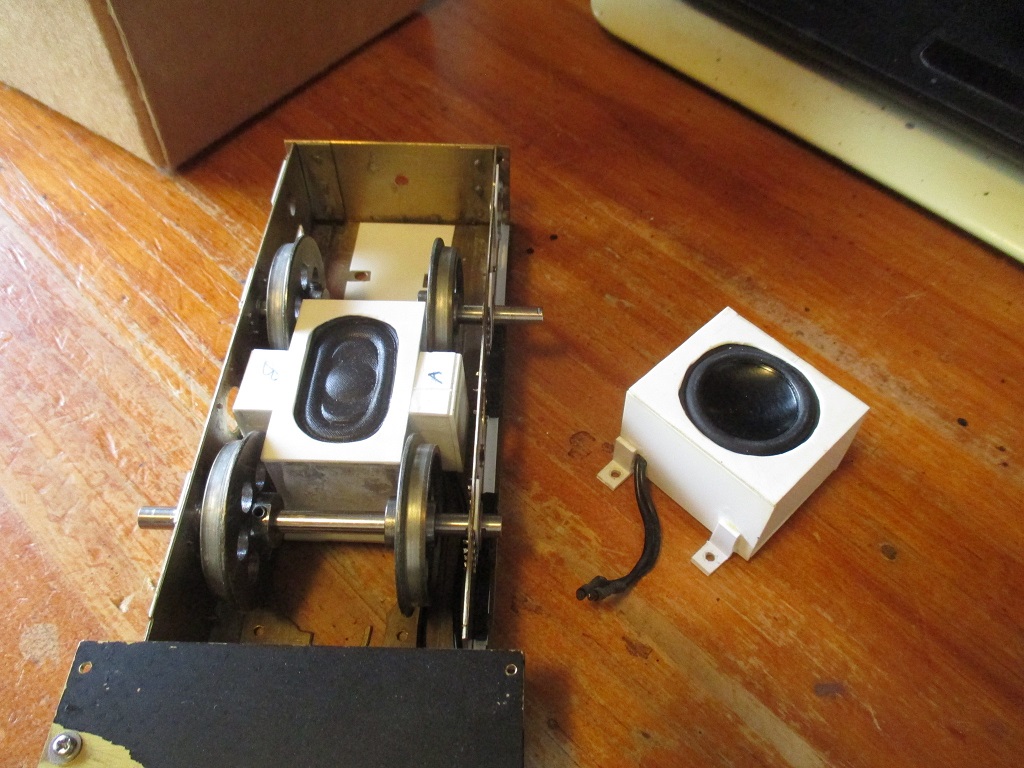
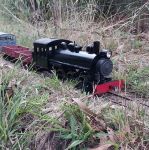
So that I could play with my new toy in the short term, the loco was immediately converted to Deltang R/C with MyLocoSound, and the bulky NiMh pack replaced with three 14500 Li-Ion cells hidden in the bonnet. Due to the thick cast resin sides and chunky aluminium top of the bonnet, the only way to fit the batteries under there was to have them pass through the footplate, resting on the styrene speaker baffle I'd made to fit and screwed beneath.


Fast forward to a fortnight ago, I decided this was the next thing to work on.
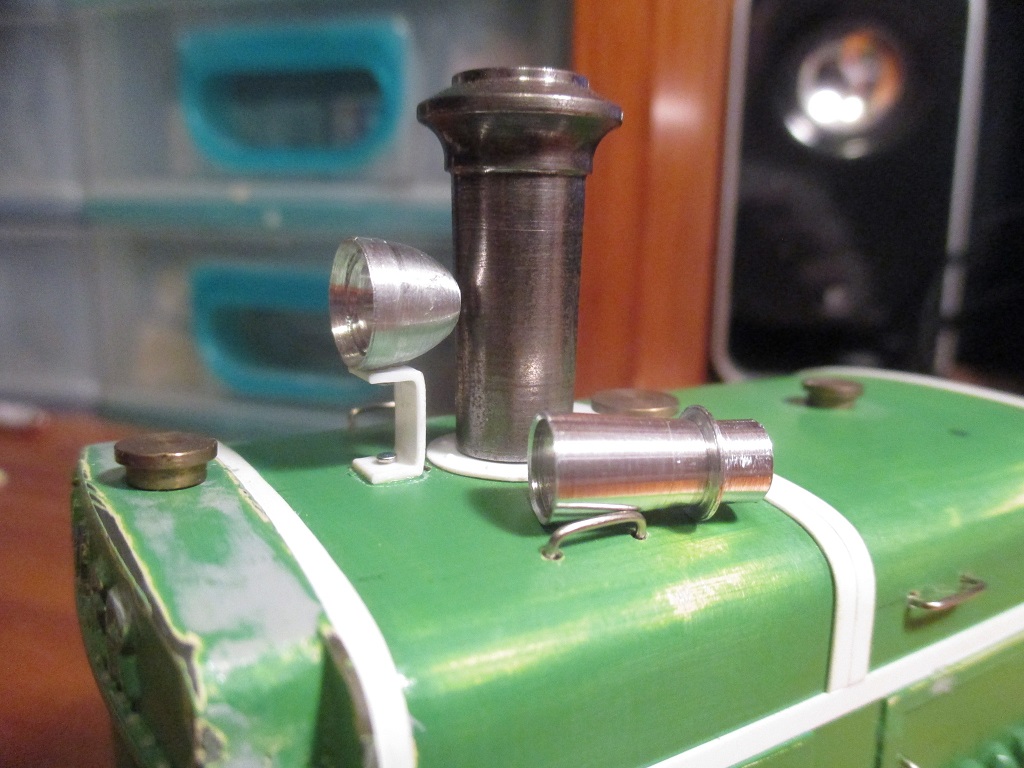
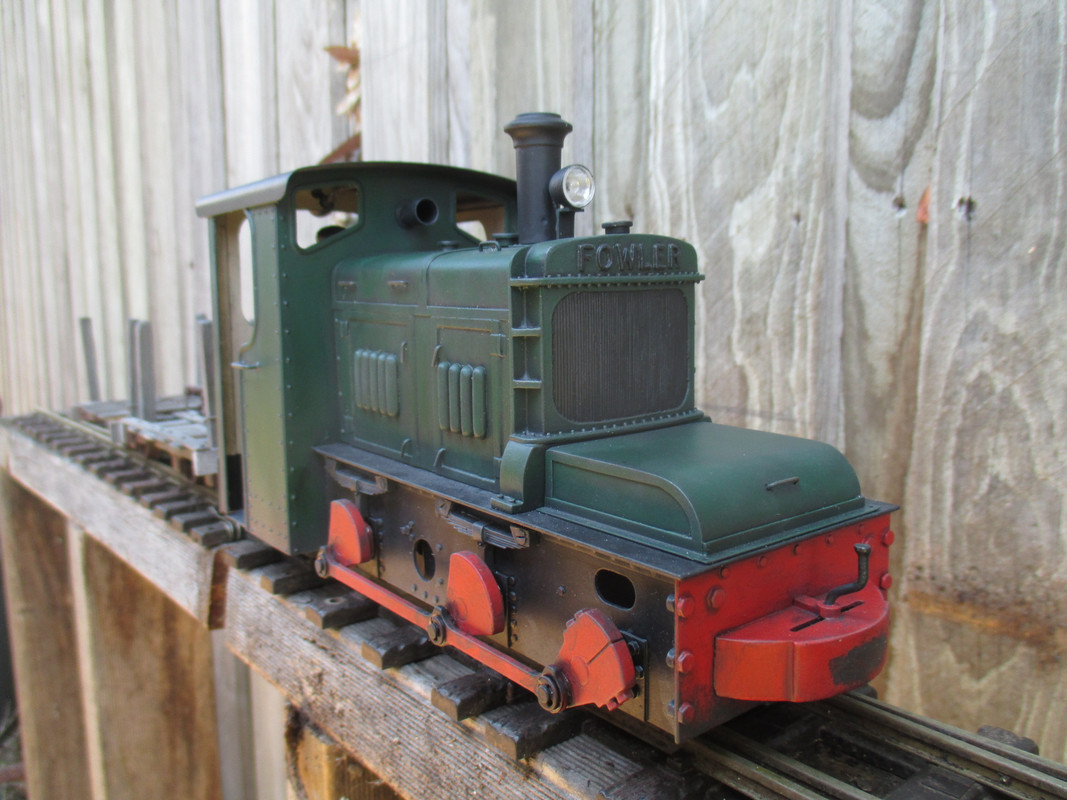
Intend to add detail, working headlights, repaint, weather and convert the gauge to 32mm.

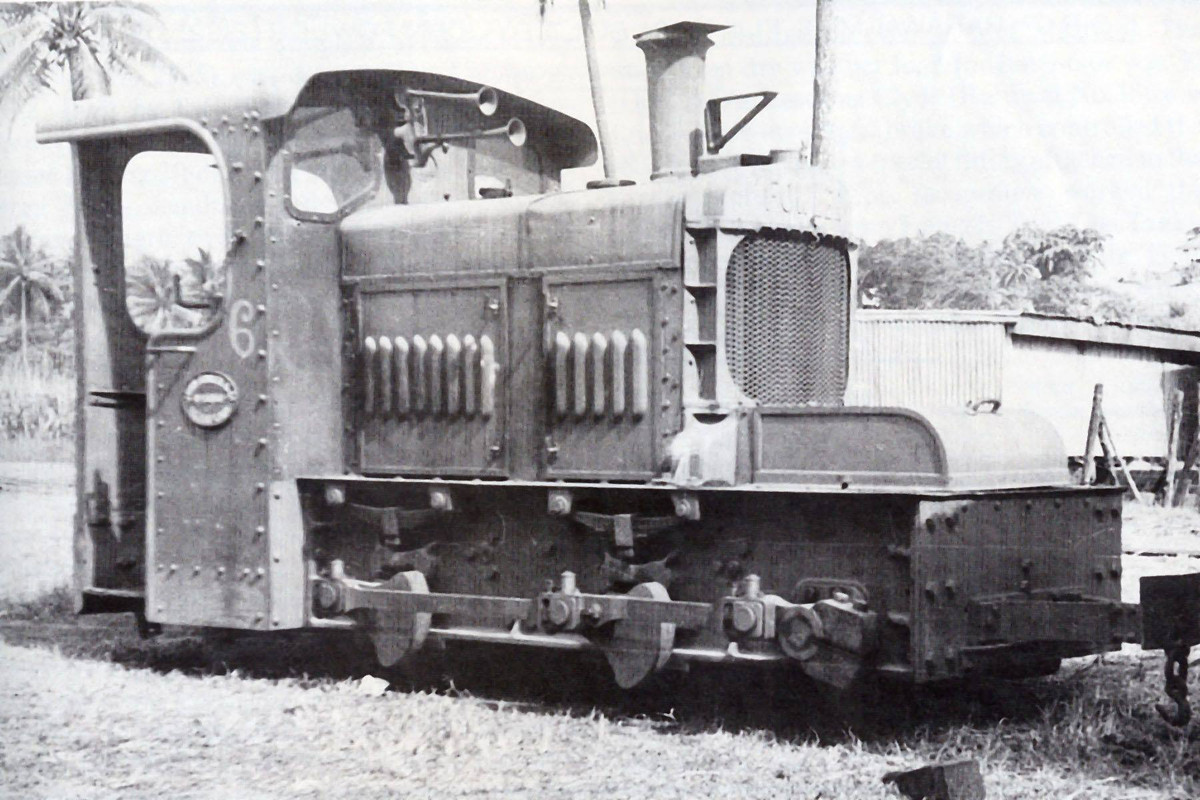
Far as detailing goes, it's mostly straightforward - The Essel model appears to be based on Labasa Mill's No.6 in Fiji.
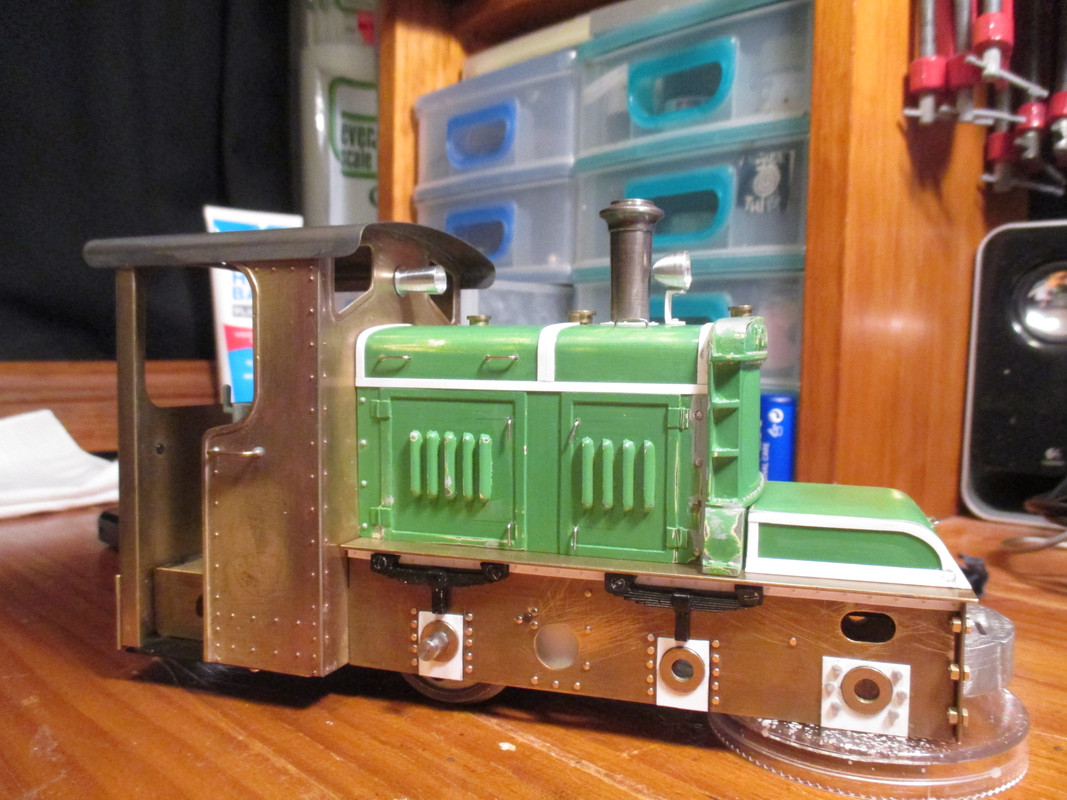
Replicating the prototype's unusual cast frame, by soldering flanges, gussets and axlebox horns to the existing plates, would be more trouble than it's worth.
The end goal being a freelance loco, I'll replicate the plate frames of the preserved Plane Creek loco instead.
Image


11/08/23
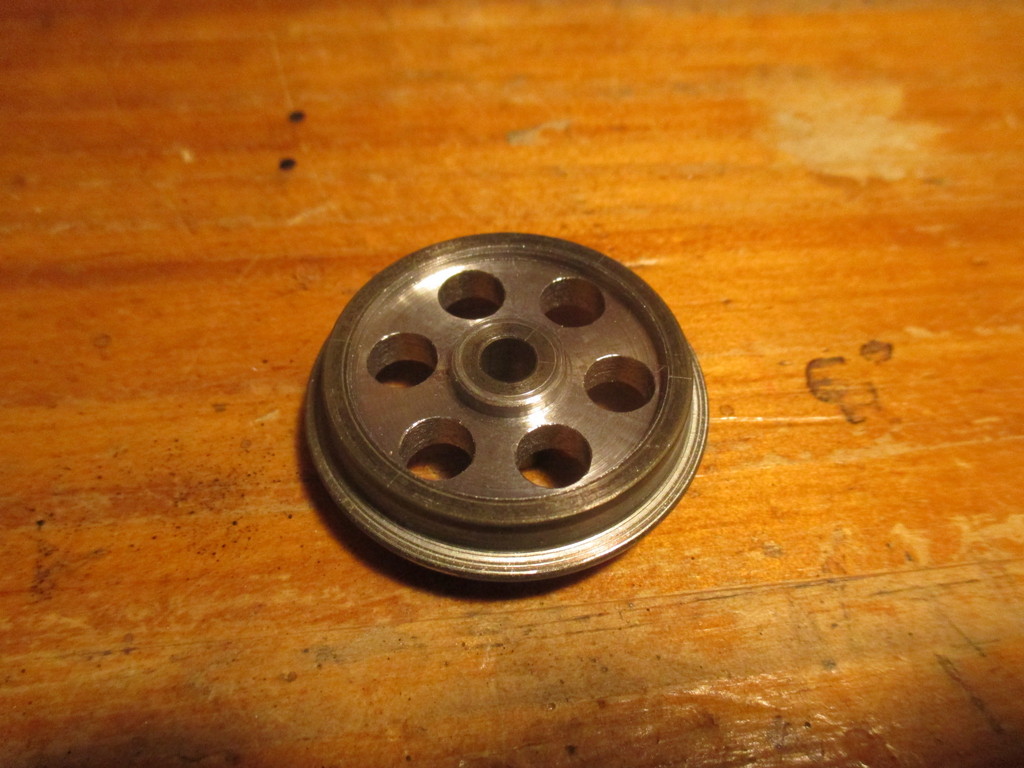
The wheels were blank disks, so a recess was machined in their outer faces to improve their appearance.
Prototype wheels are the typical spoked castings of the era. As an experiment in "sort-of" replicating this, the wheels were drilled prior to machining. Figured if I didn't like the way round holes looked behind the frames, I could always file out the sides of holes closest to the rim, to make them look more like spoke gaps.
Image


19/08/23
Frames have been detailed in the usual way, with dressmaker's pins, a pair of HO track nails, and a bit of styrene.
The dome-headed screws in the headstocks were removed, their holes re-tapped to M2, and replaced with hex bolts to better represent the prototype. Countersunk screws were needed where the IP Eng. Darjeeling buffers will overlap.
Cranks aren't quite the right shape for either prototype Fowler, but for the effort to hand file them all identically, they're good enough as-is.
The jackshaft cranks were detailed in much the same way as those on my PDF Baldwin.
You don't see much of the drilled wheels at 32mm, but I'm happy as it is. I've left the springs as they add some much-needed character.
Image


Not that I'm up to painting yet, but I didn't know what era to model it in when I ordered the loco, and I'm still undecided today.
Either green with 1930s automotive headlights, representing a period of 1930-1955 - Or - yellow, possibly no headlights, re-engined with an ugly home made exhuast to suit, and a more faded, weathered finish representing 1955-1980. Black frames and red motion either way..
Last edited by Old Man Aaron on Fri Oct 27, 2023 6:01 am, edited 1 time in total.
Regards,
Aaron - Scum Class Works

User avatar
Lonsdaler
Driver
Driver
Posts: 1229
Joined: Tue May 20, 2014 9:50 am
Location: North Yorkshire

Re: Another Fowler rebuild at Scum Class Works

Post by Lonsdaler » Tue Aug 22, 2023 10:51 pm

Looking good Aaron. I'm sure you'll make an excellent job of it whichever spec/colour you opt for, let alone the weathering opportunities.
Phil

Sporadic Garden Railer who's inconsistencies know no bounds

My Line - https://gardenrails.org/forum/viewtopic ... 41&t=11077

User avatar
Old Man Aaron
Trainee Driver
Trainee Driver
Posts: 808
Joined: Wed Oct 19, 2016 11:08 am
Location: Sunshine Coast QLD, Australia

Re: Another Fowler rebuild at Scum Class Works

Post by Old Man Aaron » Fri Oct 27, 2023 8:06 am

Cheers Phil. It's been a nice change to work on garden railway stuff, now that my car is all but finished. Very much prefer writing a forum update on this, over the car..

18/09/23
With the frames detailed, attention moved to the body. The prototype's panel reinforcements were represented with overlays of 0.4mm styrene.
Handles were bent up from the leftover shafts of dressmaker's pins.

The cast resin radiator and bonnet sides had a handful of air bubbles pock-marking the surface - these were carefully filled in with filler primer applied with a brush, and squadron putty for the bigger voids.
The "FOWLER" on the top radiator tank was by far the worst for voids, but careful surgery with filler primer, needle files and a sharp blade brought it up nicely.
Meng moulded plastic bolt heads finished the radiator.

There was a fillet of glue where the RH bonnet side met the radiator, and the cast-in rivet detail was lost when filing down this fillet.
Dressmaker's pins to the rescue yet again - they must be my favourite material or something.. :lol:

Image


24/09/23
Finding unobtrusive yet easily-accessible spots for power and headlight switches is always a challenge. It was decided to hide them just inside the cab.
A pair of steel switch housings were bent, bashed, soldered, filed and bashed some more, out of an old road sign. They're screwed to the brass plate frames, which had holes cut out for the wiring to pass through, just aft of the rear wheels.
The toggle switch is for the headlights - plan is to glue a machined extension handle over it, vaguely representing one of the prototype's gear selector levers.
Image


14/10/23
The previous styrene speaker baffle being made to fit between 45mm gauge wheels, was never going to fit on 32.
A smaller speaker was found and ordered, and a sealed baffle made to fit the space.

Being a smaller speaker, and the new baffle having little over half the old baffle's volume, made for rather poor sound. A crude pair of experimental sponsons were knocked up from scrap, to fit the space between the wheels and hopefully improve the sound quality by increasing the baffle's internal air space.
Still not quite as good as the old 45mm setup, but a great improvement and should prove adequate.
Image


24/10/23
The cab interior detailing was finally tackled. A false floor was fitted. I've noticed various Fowlers today have their floors set at different heights.
Mine is a compromise to hide the sound card beneath.

Sandboxes were made with layers of 3mm foamboard, as was the fuel tank and dashboard. Prototype Fowler dashboards are made of oak, from memory.

The cab rear was drilled for a pair of shunting rope hooks - bent from HO track nails. Above the opening was drilled for the rear headlight.
As was the cab front, for the horn.
Image


26/10/23
The chimney was lightly superglued to a mandrel (might've been a drill bit :roll:) so it could be held in the lathe, and tapered slightly to match the prototype.
A batch of ten 1930s automotive headlights was machined from aluminium, for this and future locos. A form tool for the outside shape was figured out, and a spare 7.5mm drill was re-ground to easily carve reflectors from the centre of the bar. A 3V bulb fits within. 8mm dia. glass lenses were found online.

I'm told the prototype Fowlers were delivered with a hand-cranked klaxon horn, protruding through the front of the cab from between the windows.
All photos I've seen show this hole plated up, or the horn replaced with an electric or air powered horn.
"Ahooga" klaxon horns are a favourite of mine, and the MyLocoSound Light Diesel card I'm using, happens to have one. I've machined such a horn from aluminium to go between the front windows.
Image


With that, the loco is about ready for paint. First coats are drying as I type.
Not normally so indecisive, but I was still umming and ahhing over green vs yellow right up till spraying..
Image
Last edited by Old Man Aaron on Sat Dec 02, 2023 4:23 am, edited 1 time in total.
Regards,
Aaron - Scum Class Works

User avatar
Peter Butler
Driver
Driver
Posts: 5245
Joined: Sun Sep 09, 2012 10:33 pm
Location: West Wales

Re: Another Fowler rebuild at Scum Class Works

Post by Peter Butler » Fri Oct 27, 2023 2:36 pm

Lovely job Aaron. I'm sure it will look great in any colour.
The best things in life are free.... so why am I doing this?

User avatar
Lonsdaler
Driver
Driver
Posts: 1229
Joined: Tue May 20, 2014 9:50 am
Location: North Yorkshire

Re: Another Fowler rebuild at Scum Class Works

Post by Lonsdaler » Sun Oct 29, 2023 1:47 pm

Looking superb Aaron.
Phil

Sporadic Garden Railer who's inconsistencies know no bounds

My Line - https://gardenrails.org/forum/viewtopic ... 41&t=11077

User avatar
BertieB
Fireman
Fireman
Posts: 369
Joined: Mon Nov 13, 2017 12:13 am
Location: London
Contact:

Re: Another Fowler rebuild at Scum Class Works

Post by BertieB » Tue Oct 31, 2023 8:12 am

This has been (and is) absolutely fascinating. Beautifully done (and described). I love that wheel!

User avatar
Andrew
Moderator
Moderator
Posts: 3276
Joined: Tue Jul 03, 2012 1:33 pm
Location: Bristol, UK
Contact:

Re: Another Fowler rebuild at Scum Class Works

Post by Andrew » Mon Nov 06, 2023 12:44 pm

Just catching up here - I'm very impressed by the lengths you're going to to get it right. The finished loco will look great...

User avatar
Old Man Aaron
Trainee Driver
Trainee Driver
Posts: 808
Joined: Wed Oct 19, 2016 11:08 am
Location: Sunshine Coast QLD, Australia

Re: Another Fowler rebuild at Scum Class Works

Post by Old Man Aaron » Thu Nov 09, 2023 11:05 pm

Thanks again. Quite pleased with how it's turning out.

07/11/23
Interior details painted. Sandboxes need pipes and weathering before fitting.
The "tarnished brass" effect on the control quadrant and fuel filler were done by drybrushing Tamiya Gold Leaf over flat black. The Tamiya gold particles are too coarse for this, it just looks like glitter to me. Just good enough for an interior.
The tabletop gaming suppliers sell better gold paint for this technique, will have to get some for future "outside the cab" jobs.
Drybrushed Tamiya Hull Red made a perfect match for the full scale dashboard.
Image


I nearly went for the yellow, later in life battered look - you don't see that as often, and would be more interesting.
I would however, immediately find myself doing the same as I would with a full-size neglected machine - Wonder what it would've been like to see it new and cared for. :lol:

The prototype front window frames are brass, as is the chimney cap, and I'm not quite up to replicating such visible brightwork with paint. So I've left them painted, rationalising it as a depression-era measure to hide the valuable non-ferrous bits from would-be thieves, when the loco is stabled at out-depots.
This is also why I haven't picked out the cab beading, handrails and "FOWLER" in red - many locos were painted rather plainly - if not drably, in the 1930s.
Picking out (in the canefields at least) is more of a 1950s-70s thing.
Image

The wiring is done, the loco runs. Soundcard needs further config. Only coupling hooks, a driver, some clutter and weathering, and I can scratch this one off the list.
Last edited by Old Man Aaron on Fri Mar 08, 2024 2:42 am, edited 2 times in total.
Regards,
Aaron - Scum Class Works

User avatar
Peter Butler
Driver
Driver
Posts: 5245
Joined: Sun Sep 09, 2012 10:33 pm
Location: West Wales

Re: Another Fowler rebuild at Scum Class Works

Post by Peter Butler » Thu Nov 09, 2023 11:13 pm

Superb Aaron, a wonderfully detailed model finished to a very high standard. The dashboard is particularly good, yet unlikely to attract much attention inside the cab.
The best things in life are free.... so why am I doing this?

User avatar
philipy
Moderator
Moderator
Posts: 5098
Joined: Sun Jan 30, 2011 3:00 pm
Location: South Northants

Re: Another Fowler rebuild at Scum Class Works

Post by philipy » Fri Nov 10, 2023 6:13 am

Lovely job Aaron, as usual. It's such a shame that you don't currently have a layout to run them on.
Philip

User avatar
ge_rik
Administrator
Administrator
Posts: 6580
Joined: Sun Oct 25, 2009 10:20 pm
Location: Cheshire
Contact:

Re: Another Fowler rebuild at Scum Class Works

Post by ge_rik » Fri Nov 10, 2023 8:01 am

Excellent work! I do love seeing the finer details.

Rik
------------------------
Peckforton Light Railway - Blog Facebook Youtube

User avatar
Old Man Aaron
Trainee Driver
Trainee Driver
Posts: 808
Joined: Wed Oct 19, 2016 11:08 am
Location: Sunshine Coast QLD, Australia

Re: Another Fowler rebuild at Scum Class Works

Post by Old Man Aaron » Sat Dec 02, 2023 5:27 am

Too soon to say, but the layout situation may just change in the next year or two.. 8)

15/11/23
A suitably-short driver has been painted, along with a whitemetal spanner, oil tin and the customary water bag.
Wasn't happy with the bag, some further work got it sorted.
Image


01/12/23
One of the Essel worksplates was fitted beneath the loco for posterity.
To stop you seeing daylight through the holes in the frames above the jackshaft, (the full scale gearbox goes here) small styrene baffles were made and painted black, then fitted beneath the footplate.
Image


02/12/2023
Weathering and a little lubrication completes the loco. I'm experimenting with using both acrylics and enamels together, (drying between!) and it's paying off.
The final clearcoat lent a slightly grey tinge to the loco, so I may yet apply a thin brown "filter" wash over it. Will make a decision once I've seen it running.

Needs a set of Fowler worksplates on it - I'll wait until I've figured out what plates I need for the other planned locos, then order everything in one batch.
Image


Image


The shunting rope hooks on the back of the cab will receive some rope, when I get round to ordering some model ship rigging - it's much nicer than the dyed kitchen twine I've been using. Could also use a rolled up canvas blind, now that I think of it..
Image


Another one down. Not sure what's next..
Thanks for reading.
Image
Regards,
Aaron - Scum Class Works

User avatar
Peter Butler
Driver
Driver
Posts: 5245
Joined: Sun Sep 09, 2012 10:33 pm
Location: West Wales

Re: Another Fowler rebuild at Scum Class Works

Post by Peter Butler » Sat Dec 02, 2023 9:44 am

Aaron, no need to thank me for reading.... thank you for posting! It is a wonderful result, both in construction and finish, I take my hat off to you.
The best things in life are free.... so why am I doing this?

User avatar
philipy
Moderator
Moderator
Posts: 5098
Joined: Sun Jan 30, 2011 3:00 pm
Location: South Northants

Re: Another Fowler rebuild at Scum Class Works

Post by philipy » Sat Dec 02, 2023 9:45 am

Very nice Aaron
Philip

User avatar
Tropic Blunder
Trainee Fireman
Trainee Fireman
Posts: 189
Joined: Sun Dec 06, 2015 4:02 am
Location: Australia
Contact:

Re: Another Fowler rebuild at Scum Class Works

Post by Tropic Blunder » Sun Dec 03, 2023 11:59 am

Absolutely spectacular work Aaron. You've nailed the weathered finish its not too grotty but not shiny either. Another masterpiece
Jake

Image

User avatar
-steves-
Administrator
Administrator
Posts: 2444
Joined: Thu Jul 28, 2011 1:50 pm
Location: Cambridge & Peterborough

Re: Another Fowler rebuild at Scum Class Works

Post by -steves- » Sun Dec 03, 2023 12:23 pm

Never ceases to amaze me just how much work some people put in, to give totally amazing results, very nice :thumbup:
The buck stops here .......

Ditton Meadow Light Railway (DMLR)
Member of Peterborough and District Association
http://peterborough.16mm.org.uk/

User avatar
Scrat
Trainee Fireman
Trainee Fireman
Posts: 186
Joined: Mon Jun 08, 2020 7:24 am

Re: Another Fowler rebuild at Scum Class Works

Post by Scrat » Sun Dec 03, 2023 12:57 pm

Old Man Aaron wrote: Sat Dec 02, 2023 5:27 am
Another one down. Not sure what's next..
How about the version with three axles, just like the first picture?

User avatar
Old Man Aaron
Trainee Driver
Trainee Driver
Posts: 808
Joined: Wed Oct 19, 2016 11:08 am
Location: Sunshine Coast QLD, Australia

Re: Another Fowler rebuild at Scum Class Works

Post by Old Man Aaron » Mon Dec 04, 2023 8:45 am

Scrat wrote: Sun Dec 03, 2023 12:57 pm How about the version with three axles, just like the first picture?
Can't be bothered scratchbuilding the radiator and cast frame. :lol: :lol: :lol:
Regards,
Aaron - Scum Class Works

User avatar
Mitch stack
Trainee Fireman
Trainee Fireman
Posts: 233
Joined: Tue Sep 05, 2017 9:43 am
Location: Australia

Re: Another Fowler rebuild at Scum Class Works

Post by Mitch stack » Wed Dec 13, 2023 9:41 am

Lovely Work Aaron! do like fowler diesels, especially fowler Resilent class locos like peldon, might be a idea for another project??
Mitch - Cockatoo Creek Tramway

User avatar
dudeface
Fireman
Fireman
Posts: 295
Joined: Tue Nov 14, 2023 3:35 am
Location: Dodge Co. WI
Contact:

Re: Another Fowler rebuild at Scum Class Works

Post by dudeface » Wed Dec 13, 2023 3:11 pm

Mitch stack wrote: Wed Dec 13, 2023 9:41 am Lovely Work Aaron!
What he said!! :thumbup:
https://m.youtube.com/@Dudeface167
Miles-- Trains are fun. With the exception of track power. Argh!

Post Reply

Who is online

Users browsing this forum: No registered users and 3 guests