Page 1 of 2
The WWLR Layout Begins
Posted: Fri May 12, 2023 8:07 pm
by WWLR
Up until now test runs with the Mamod loco restoration project have been on a hastily put together circle of Peco SM32 track on the patio, but now, following some repositioning of retaining walls, I am starting work on a permanent outdoor layout.
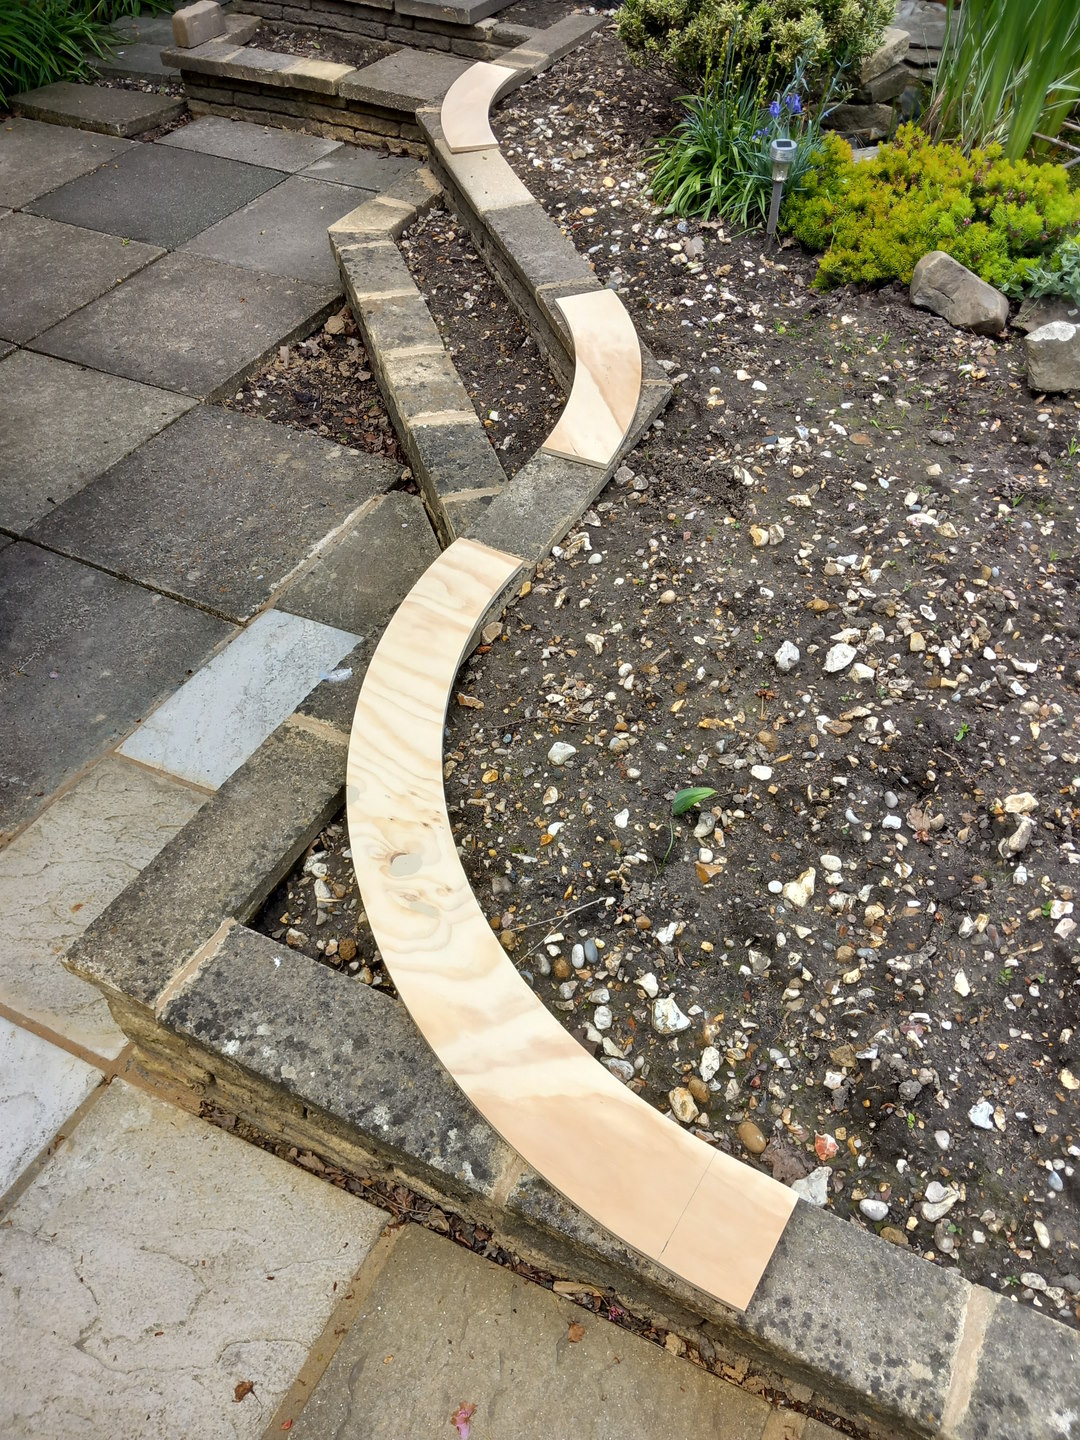
As a large section of it will be running along the top of the retaining walls I’ve decided to lay the track on a treated plywood base covered with a layer of roofing felt.
The layout will need to make use of quite tight bends to keep within its allotted space, but I’m trying to keep to a minimum 30 inch radius as per Peco’s small radius set track. I’ll be using my home made rail bender to create the curves from 3 foot flexible straights.
At the moment I’m cutting the plywood base sections and applying the wood preservative.
- Plywood_Track_Base_1.jpg (633.26 KiB) Viewed 5776 times
Re: The WWLR Layout Begins
Posted: Sat May 13, 2023 7:14 am
by ge_rik
That looks like a neat solution.
Rik
Re: The WWLR Layout Begins
Posted: Sat May 13, 2023 10:59 am
by philipy
ge_rik wrote: ↑Sat May 13, 2023 7:14 am
That looks like a neat solution.
Rik
Agreed...and a ready made need for a curved bridge!
Re: The WWLR Layout Begins
Posted: Mon May 15, 2023 9:08 pm
by WWLR
A curved bridge sounds like fun, but I've decided to keep the line away from the pond (at the moment) as I don't fancy fishing out wayward locos and rolling stock from the murky depths!
Will
Re: The WWLR Layout Begins
Posted: Fri Jun 09, 2023 10:20 pm
by WWLR
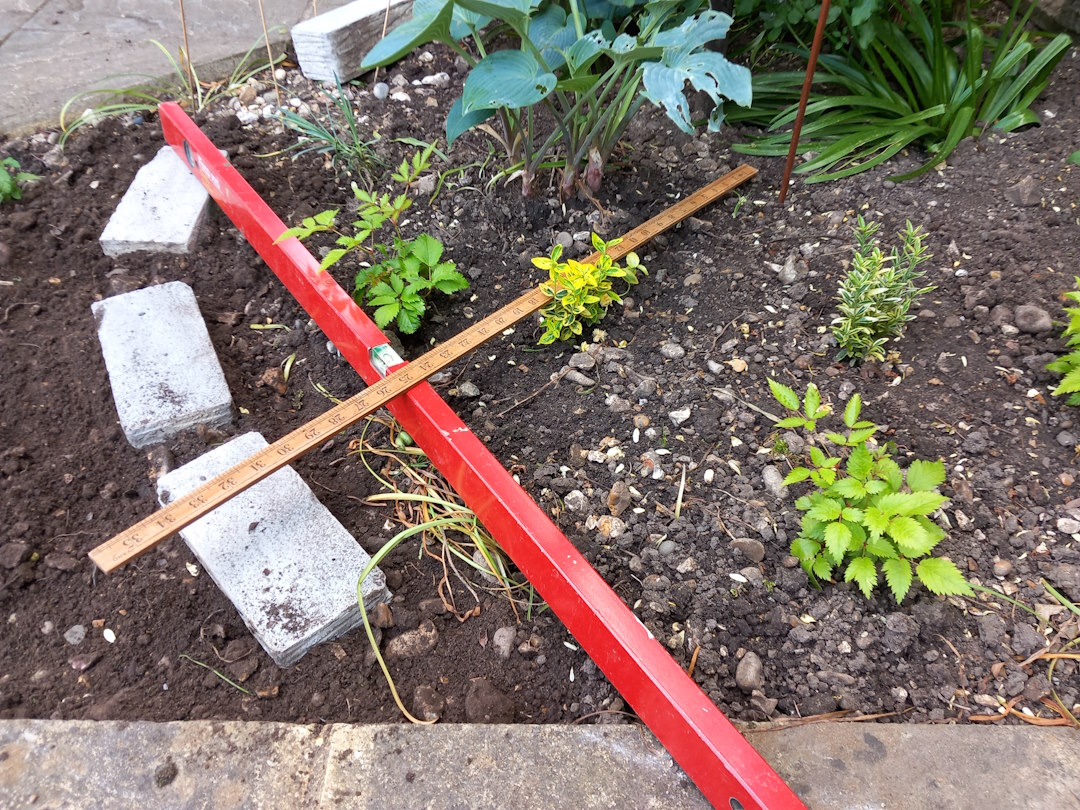
The construction continues with sections of thermal wall block about the size of a house brick where the track crosses flower beds. The plywood bases will be screwed down to these. Not the most solid base but I'm avoiding filling the flowerbeds with concrete.

- Track_Base.jpg (374.07 KiB) Viewed 5509 times
Re: The WWLR Layout Begins
Posted: Fri Jun 23, 2023 7:54 pm
by WWLR
The first of the roofing felt covered boards have been put down.
- End_Loop.jpg (363.4 KiB) Viewed 5390 times
This loops back through the flower bed to the location of the first point.

- Track_Base_2.jpg (323.18 KiB) Viewed 5390 times
With Peco points costing so much, as well as fancying having a go at making my own, the next piece of track be board is being used to plan out and construct the point before being covered in felt to form the track base.

- Point_Base.jpg (243.82 KiB) Viewed 5390 times
Re: The WWLR Layout Begins
Posted: Sun Jul 09, 2023 9:49 pm
by WWLR
First sections of Peco SM32 track have been screwed to the base boards. These are flex track sections that have had the rails removed, fed through a rail bender, and refitted to the sleepers. I found I needed to cut away a small amount of the plastic under the inner rail to allow a tighter curve than the design allowed.
- End_Loop_Track.jpg (365.52 KiB) Viewed 5245 times
Re: The WWLR Layout Begins
Posted: Mon Jul 10, 2023 6:10 am
by philipy
Looking good so far.
Earlier, you mentioned your homemade rail bender, could yu give us some info on how you made it, please?
Re: The WWLR Layout Begins
Posted: Mon Jul 10, 2023 8:44 am
by Andrew
Great progress - it's looking very neat so far!
Re: The WWLR Layout Begins
Posted: Mon Dec 18, 2023 8:24 pm
by WWLR
After a busy summer and autumn doing anything but working on the garden layout I'm determined to get my points sorted out so that track laying can continue in the spring.
Sincere apologies to philipy for not responding to his question about my diy rail bender, so very belatedly, here is a picture of my modified machine vice that I use.
- Rail_Bender.jpg (174.54 KiB) Viewed 3793 times
I have replaced the steel jaws with aluminium blocks with the bending rollers mounted on top. The Peco SM32 rail is near enough bullnose so the rollers only have a simple rectangular groove.
I've done some test soldering with a bit of rail offcut and some brass sheet and am pleased with the results using just electrical soft solder.
Re: The WWLR Layout Begins
Posted: Mon Dec 18, 2023 9:00 pm
by philipy
Re: The WWLR Layout Begins
Posted: Tue Dec 19, 2023 9:47 am
by ge_rik
Now that is a very neat and clever solution.
Rik
Re: The WWLR Layout Begins
Posted: Thu Dec 21, 2023 1:34 am
by Old Man Aaron
I've done that with a machine vice too. Nice conversion - You've clearly put more effort into it than I did.

Re: The WWLR Layout Begins
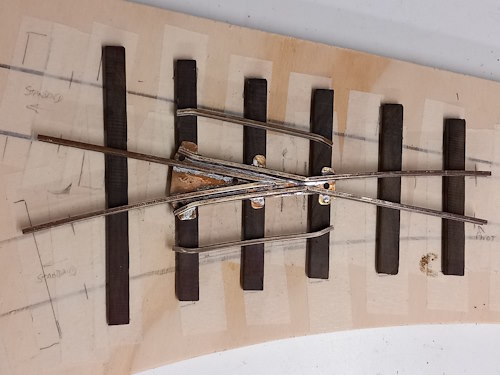
Posted: Wed Jan 24, 2024 8:24 pm
by WWLR
With the temperature rising I have returned to the garage to continue (or more accurately start) on point construction.
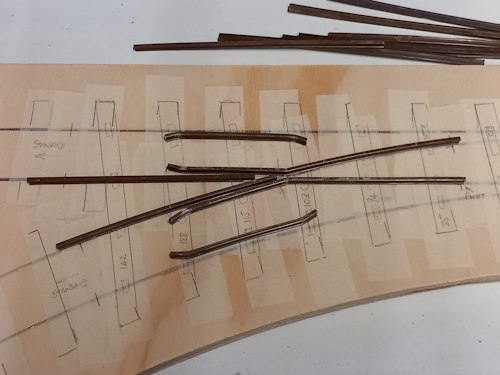
- Point_frog_components.jpg (34.02 KiB) Viewed 2428 times
I selected various bits of rail off-cuts, several of which were already suitably curved, and formed the parts for the frog and guard rails.
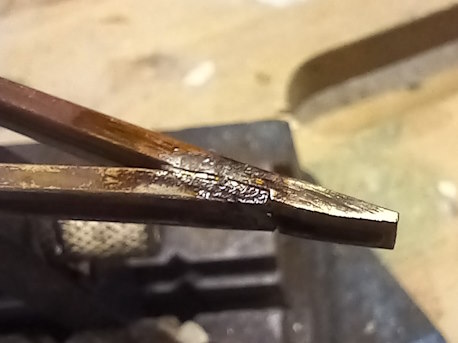
- Point_frog_nose.jpg (26.46 KiB) Viewed 2428 times
I assembled the nose joint with soft soldered before clamping it to the thin brass base plate along with the wing rails.
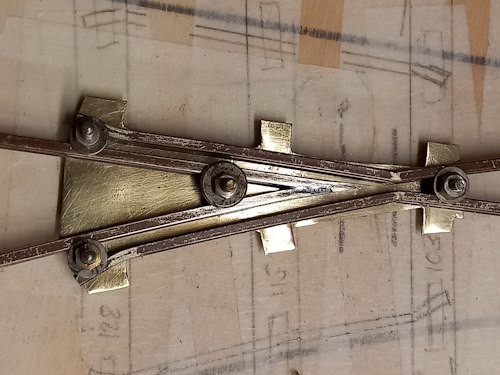
- Point_Frog_Clamped.jpg (47.94 KiB) Viewed 2428 times
After trying various clamping methods I decided to drill some holes in the base plate and use machine screws with washers to hold the parts in place ready for soldering.
- Point_Frog_Soldered.jpg (52.52 KiB) Viewed 2428 times
Having cleaned and fluxed the rail bottoms and brass base plate the whole assembly was heated with a small gas torch and the solder applied along the joins a then left to cool.
I was initially concerned that I might end up soldering the screws in place but the solder seemed to ignore them as they were not fluxed.
The next tasks will be to sort out the guard rails and cut the various length sleepers from hardwood.
Re: The WWLR Layout Begins
Posted: Wed Jan 24, 2024 9:12 pm
by philipy
Looking very good so far.
Re: The WWLR Layout Begins
Posted: Thu Jan 25, 2024 8:27 am
by Andrew
Those who make their own points are the true Gods of our hobby, in my opinion - beautiful work!
Re: The WWLR Layout Begins
Posted: Thu Jan 25, 2024 9:33 am
by Trevor Thompson
Looking very good so far!
That point is progressing well. I like the way you have made the frog unit.
Trevor
Re: The WWLR Layout Begins
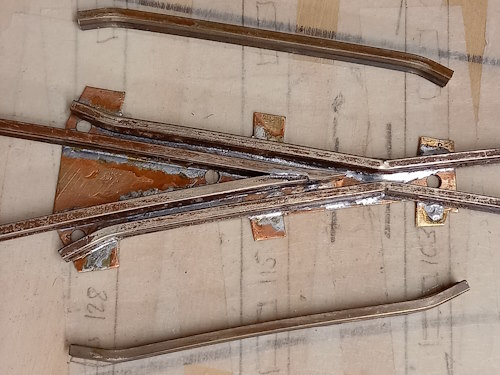
Posted: Wed Jan 31, 2024 10:13 pm
by WWLR
- Poimt_Long_Sleepers.jpg (36.92 KiB) Viewed 2152 times
Hardwood sleepers cut and treated. The wood is probably black walnut, from an old table, with some additional stain then some exterior wood treatment making a reasonable colour match with the Peco plastic sleepers.
Re: The WWLR Layout Begins
Posted: Thu Feb 01, 2024 4:12 am
by Old Man Aaron
Beautiful.

Re: The WWLR Layout Begins
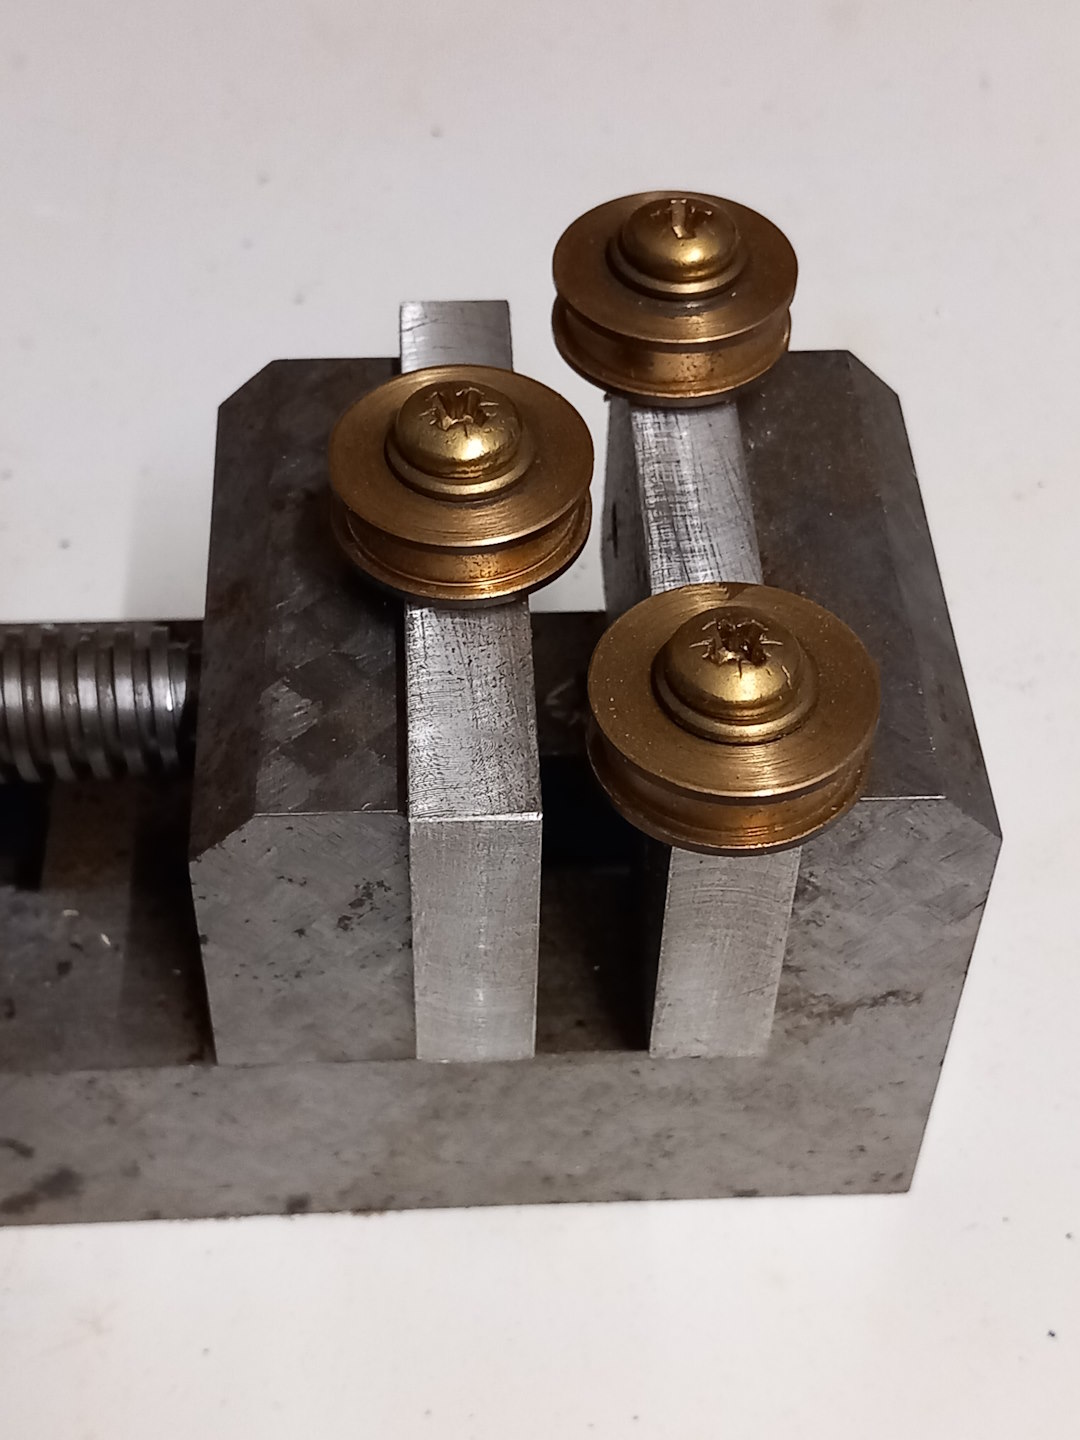
Posted: Wed Feb 14, 2024 8:15 pm
by WWLR
First, the good news.
I uncovered the lathe and turned up a pair of roller track setting gauges to continue the point construction.

- Track_setting_gauges.jpg (55.96 KiB) Viewed 1810 times
But now, the bad news.
Following an unwelcome visit by a delivery van, that demolished part of the front of out house, we have been told that we will have to move into temporary rented accommodation for at least 6 months while repairs are carried out.

Fortunately no one was injured in the bizarre incident, but it's made one hell of a mess.
The locomotives and rolling stock have been packed away along with the point components. Track building will be delayed till somewhen in the autumn if not later, so no more progress posts for the time being.