Page 1 of 2
Yet another project - sorry
Posted: Wed Mar 09, 2022 1:46 pm
by -steves-
Well, I hope the person in question does not happen to find our little site.
One of my friends had intended to buy a live steam loco but due to major car expenses this may no longer be in the running. Another one of our joint friends asked me if I could 3D print an electric kit for him, which of course, how could I refuse the challenge.

This is the CAD work so far, messy I know, but I know what's going on even if no one else can work it out, lol.

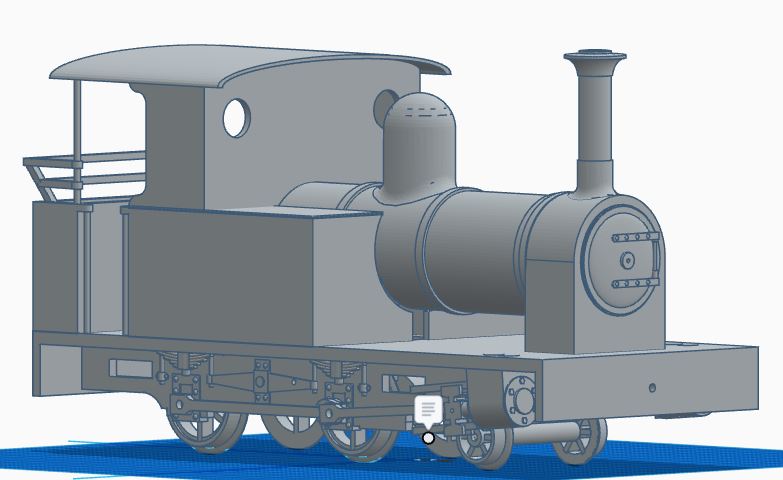
- Picture2.JPG (45.69 KiB) Viewed 8648 times
Re: Yet another project - sorry
Posted: Wed Mar 09, 2022 2:34 pm
by Peter Butler
I have no idea what it is Steve, but it is a nice looking loco. I do have reservations about the flat surfaces of tanks and cab though with the inevitable printing lines. Possibly why PDF Models have gone over to pre-cut styrene for their kits?
Re: Yet another project - sorry
Posted: Wed Mar 09, 2022 3:14 pm
by -steves-
Peter Butler wrote: ↑Wed Mar 09, 2022 2:34 pm
I have no idea what it is Steve, but it is a nice looking loco. I do have reservations about the flat surfaces of tanks and cab though with the inevitable printing lines. Possibly why PDF Models have gone over to pre-cut styrene for their kits?
That is indeed why they went over to styrene and the same reason I have an un setup laser cutter, once I set it up, it's an option. The down side to clear styrene is all the people I have spoken to hate it, lol.
The model is "supposed" to be a Bagnall Rheidol 2-4-0, but I have probably not done it justice to be recognisable

The later revision with a full roof.
Of course it is far from finished, but that's how far I have got so far in CAD form.

- Picture3.JPG (61.3 KiB) Viewed 8639 times
Re: Yet another project - sorry
Posted: Wed Mar 09, 2022 5:30 pm
by Peter Butler
-steves- wrote: ↑Wed Mar 09, 2022 3:14 pm
Peter Butler wrote: ↑Wed Mar 09, 2022 2:34 pm
I do have reservations about the flat surfaces of tanks and cab with the inevitable printing lines. Possibly why PDF Models have gone over to pre-cut styrene for their kits?
That is indeed why they went over to styrene and the same reason I have an un setup laser cutter, once I set it up, it's an option. The down side to clear styrene is all the people I have spoken to hate it, lol.
I would also be unhappy with clear styrene as an option but I'm sure the last PDF Models Hunslet kit I built had white plastic parts, which were perfect for the task.
Re: Yet another project - sorry
Posted: Wed Mar 09, 2022 5:34 pm
by -steves-
Peter Butler wrote: ↑Wed Mar 09, 2022 5:30 pm
-steves- wrote: ↑Wed Mar 09, 2022 3:14 pm
Peter Butler wrote: ↑Wed Mar 09, 2022 2:34 pm
I do have reservations about the flat surfaces of tanks and cab with the inevitable printing lines. Possibly why PDF Models have gone over to pre-cut styrene for their kits?
That is indeed why they went over to styrene and the same reason I have an un setup laser cutter, once I set it up, it's an option. The down side to clear styrene is all the people I have spoken to hate it, lol.
I would also be unhappy with clear styrene as an option but I'm sure the last PDF Models Hunslet kit I built had white plastic parts, which were perfect for the task.
Ah ha, yes that would be a much better option

Re: Yet another project - sorry
Posted: Thu Mar 10, 2022 12:21 am
by GTB
-steves- wrote: ↑Wed Mar 09, 2022 3:14 pm
That is indeed why they went over to styrene and the same reason I have an un setup laser cutter, once I set it up, it's an option. The down side to clear styrene is all the people I have spoken to hate it, lol.
The model is "supposed" to be a Bagnall Rheidol 2-4-0, but I have probably not done it justice to be recognisable
The later revision with a full roof.
I could tell from the first drawing it was a Bagnall, either Rheidol, or one of her South American relatives..... Did Rheidol ever run without a cab back, but with the later capped chimney?
I can't think why anyone would use clear polystyrene sheet for anything except glazing windows. It's almost as brittle as glass and a real pain to saw, file and glue. It can't be formulated with plasticiser, as that makes it a translucent white, so the clear sheet comes in one grade, 'brittle'.
There have been laser cut kits made from HIPS (high impact polystyrene) sheet available here in Oz off and on for years. HIPS sheet is probably better known in the UK as Plastikard thanks to Slaters, but HIPS is the trade name used by industrial suppliers. It is considerably cheaper per sq. ft. from industrial suppliers than it is from hobby shops.
If laser cut parts need to be transparent, eg. windows, then clear acrylic would be a better choice.
Acrylic sheet also comes in solid colours and is another option for laser cut kits. PDF Models instructions mention laser cut acrylic being used for some parts and Phil Sharples uses it as well. It would be a better material for the chassis for instance. Not as easy to glue together as HIPS though.
Regards,
Graeme
Re: Yet another project - sorry
Posted: Thu Mar 10, 2022 10:45 am
by Phil.P
I find glueing plastics to be a problem..
I can usually find a suitable solvent, but most are very mobile, and I have trouble keeping them where I want them!
Plastic surfaces, are normally so good, it is annoying if they get solvent on them.
Re: Yet another project - sorry
Posted: Thu Mar 10, 2022 11:31 am
by philipy
Phil.P wrote: ↑Thu Mar 10, 2022 10:45 am
most are very mobile, and I have trouble keeping them where I want them!
Not being funny, but try a smaller brush?
Slaters ( I think ) sell what they describe as a solvent brush, which is in reality a small chisel end signwriters brush. It has bristles about 25mm long and is an '03' size. Slaters charge small fortune for them, but you can get them in art shops for a lot less ( mine has "Handover series" on the handle). I had one of the Slaters ones which lasted me for many years and then I bought one from an online art shop online about 6 or 7 years ago.
Re: Yet another project - sorry
Posted: Thu Mar 10, 2022 3:08 pm
by Peter Butler
Phil.P wrote: ↑Thu Mar 10, 2022 10:45 am
I find glueing plastics to be a problem..
I can usually find a suitable solvent, but most are very mobile, and I have trouble keeping them where I want them!
Plastic surfaces, are normally so good, it is annoying if they get solvent on them.
I find it easier to bond two plastic pieces together like spot welding metals, a small amount of solvent first, just enough to tack in position, followed by a wash of solvent to cover the area. Any overspill can easily be removed by using fine grade wet and dry paper (used dry).
Re: Yet another project - sorry
Posted: Thu Mar 10, 2022 7:21 pm
by Phil.P
All 'hints and wrinkles' accepted..
I was never much good at modelling, so am an Old-Bodger starting out like a youngster.. I just don't have the youngsters energy!.
Re: Yet another project - sorry
Posted: Fri Mar 11, 2022 11:11 am
by -steves-
Re: Yet another project - sorry
Posted: Thu Mar 17, 2022 8:18 am
by -steves-
Re: Yet another project - sorry
Posted: Thu Mar 17, 2022 9:08 am
by ge_rik
That's an attractive little loco.
Have the rivets been applied after papering?
Rik
Re: Yet another project - sorry
Posted: Thu Mar 17, 2022 9:39 am
by philipy
Very nice Steve. I can see how good it will look when finished.
Re: Yet another project - sorry
Posted: Thu Mar 17, 2022 10:17 am
by Andrew
What a beauty! I like that very much...
It would suit the PLR very well, don't you think Rik?
Re: Yet another project - sorry
Posted: Thu Mar 17, 2022 11:36 am
by Lonsdaler
ge_rik wrote: ↑Thu Mar 17, 2022 9:08 am
That's an attractive little loco.
Have the rivets been applied after papering?
Rik
What Rik asked, and could you give a little more detail on the 'papering' process please? (adhesive used, paper type) It's clearly not wood chip or anaglypta

Re: Yet another project - sorry
Posted: Thu Mar 17, 2022 5:53 pm
by -steves-
Lonsdaler wrote: ↑Thu Mar 17, 2022 11:36 am
ge_rik wrote: ↑Thu Mar 17, 2022 9:08 am
That's an attractive little loco.
Have the rivets been applied after papering?
Rik
What Rik asked, and could you give a little more detail on the 'papering' process please? (adhesive used, paper type) It's clearly not wood chip or anaglypta
Papering is done with Canford craft paper, it's quite thick (
https://www.londongraphics.co.uk/daler- ... 1kEALw_wcB)
Wood Glue (PVA) is applied to the model, after a minor rub down to remove any protruding parts and the the paper is applied with a Paper Creaser Bone (
https://www.amazon.co.uk/Creaser-Folder ... 0399&psc=1). The paper is trimmed with a razor blade to ensure sharp crisp edges,
Rivets are added after primer. I currently use self adhesive nail gems, but they are rather large for scale. The ones I will be using in the future are smaller and applied with a drop of PVA every 5mm.
Then just paint as per usual, either hand painted or spray.
I think I mentioned this process in a previous post on the Secondus project.
https://gardenrails.org/forum/viewtopic ... t=secundus
Any further questions please ask away
Re: Yet another project - sorry
Posted: Fri Mar 18, 2022 11:04 am
by Lonsdaler
Ah, thank you Steve - I actually hadn't seen that thread. You'll have to stop being so prolific. And I'm ashamed to see that Philip beat me to a wallpaper joke
Re: Yet another project - sorry
Posted: Fri Mar 18, 2022 1:23 pm
by Andrew
-steves- wrote: ↑Thu Mar 17, 2022 5:53 pm
Rivets are added after primer. I currently use self adhesive nail gems, but they are rather large for scale. The ones I will be using in the future are smaller and applied with a drop of PVA every 5mm.
What are you planning to use Steve? My current nail gem supply are a little on the large side - they look fine individually, but too big when used close together to recreate prototype rivet patterns. At least I'll have something juicy to discuss at my next Rivet Counters Anonymous meeting...
Re: Yet another project - sorry
Posted: Fri Mar 18, 2022 4:35 pm
by -steves-