
We'll see but I think it's fairly well shielded from the hot bits there. There are plenty of 16mm applications where I'm sure servos get a lot hotter e.g. inside side tanks right next to the boiler. If it melts I'll have to think again - and the body will probably already be on fire
Something a bit unusual - a steam railmotor
Re: Something a bit unusual - a steam railmotor
Brian
Re: Something a bit unusual - a steam railmotor
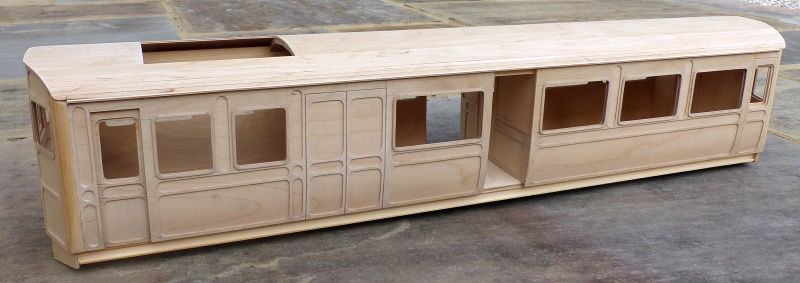
And now to start sticking it together. The box forming the rear section of the vehicle assembled :-
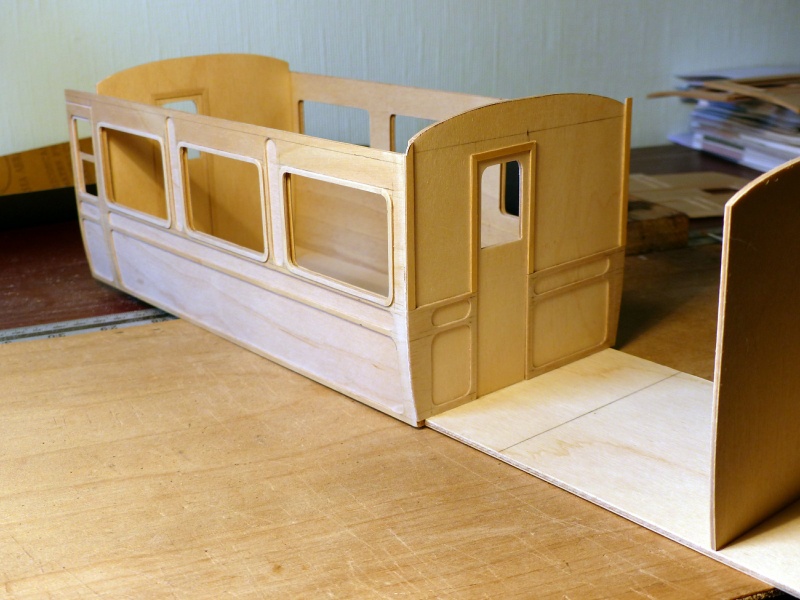
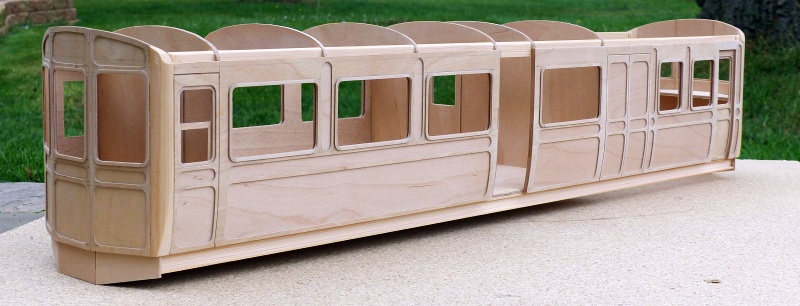
The partition door from the vestibule is offset as the larger third class compartment will have one seat on one side and two on the other. On the opposite side of the vestibule the door to the small first class compartment is centrally placed.
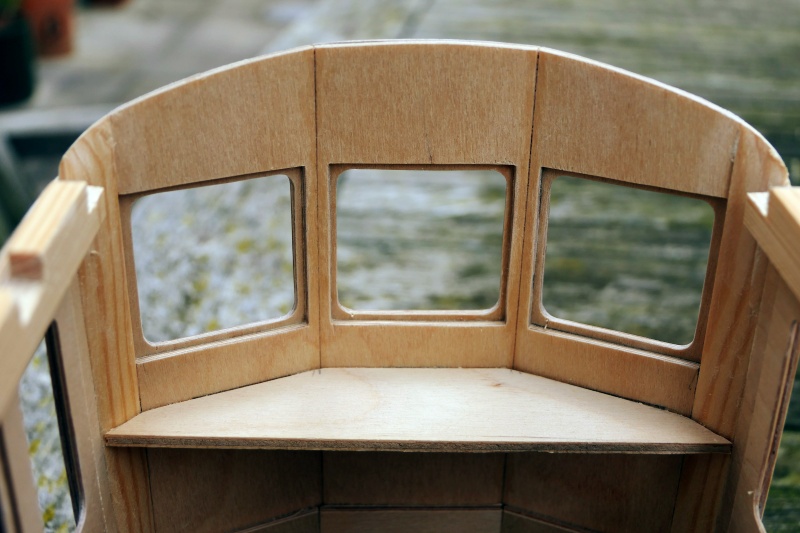
Having completed both boxes it was time to think about the ends. Although the general plan for the model was settled in my mind there were one or two areas where the fine detail of the construction wasn't decided until I actually did it. This was one of them. In some areas too the original plan evolved slightly as I went along as better ideas came to mind. Each end was constructed in much the same way as the sides, in three sections glued together at the required angles to give the shape I wanted. Getting the curve of the roof right in the process, bearing in mind the angles involved and trying to think about how I was going to join the ends to the sides was a bit tricky and I didn't get it quite right. More of that later.

The windows on the engine compartment end are smaller than those on the rear end as I intend to fit a simulated coal bunker inside that end, another feature borrowed from the GWR railmotor. This will hopefully help to shield some of the internal gubbins from view through the windows.
The partition door from the vestibule is offset as the larger third class compartment will have one seat on one side and two on the other. On the opposite side of the vestibule the door to the small first class compartment is centrally placed.
Having completed both boxes it was time to think about the ends. Although the general plan for the model was settled in my mind there were one or two areas where the fine detail of the construction wasn't decided until I actually did it. This was one of them. In some areas too the original plan evolved slightly as I went along as better ideas came to mind. Each end was constructed in much the same way as the sides, in three sections glued together at the required angles to give the shape I wanted. Getting the curve of the roof right in the process, bearing in mind the angles involved and trying to think about how I was going to join the ends to the sides was a bit tricky and I didn't get it quite right. More of that later.
The windows on the engine compartment end are smaller than those on the rear end as I intend to fit a simulated coal bunker inside that end, another feature borrowed from the GWR railmotor. This will hopefully help to shield some of the internal gubbins from view through the windows.
Brian
-
Peter Butler

- Driver

- Posts: 5254
- Joined: Sun Sep 09, 2012 10:33 pm
- Location: West Wales
Re: Something a bit unusual - a steam railmotor
I am in awe of your patience and skills with such fine cutting. This is going to be magnificent.
The best things in life are free.... so why am I doing this?


Re: Something a bit unusual - a steam railmotor
Me too! I don't think a computer controlled laser cutter could have done it any better - in fact, it probably wouldn't have been as good!Peter Butler wrote: ↑Wed Mar 10, 2021 1:35 pm I am in awe of your patience and skills with such fine cutting. This is going to be magnificent.
Rik
Re: Something a bit unusual - a steam railmotor
Thank you. I must admit it was getting a bit tedious by the time I'd finished !ge_rik wrote: ↑Wed Mar 10, 2021 2:35 pmMe too! I don't think a computer controlled laser cutter could have done it any better - in fact, it probably wouldn't have been as good!Peter Butler wrote: ↑Wed Mar 10, 2021 1:35 pm I am in awe of your patience and skills with such fine cutting. This is going to be magnificent.
Rik
Brian

Re: Something a bit unusual - a steam railmotor
Those window surrounds are phenominal ( as is the rest of it of course).
Philip

Re: Something a bit unusual - a steam railmotor
That really is fantastic! Those ends are SO railmotor!
Andrew
Andrew
Re: Something a bit unusual - a steam railmotor
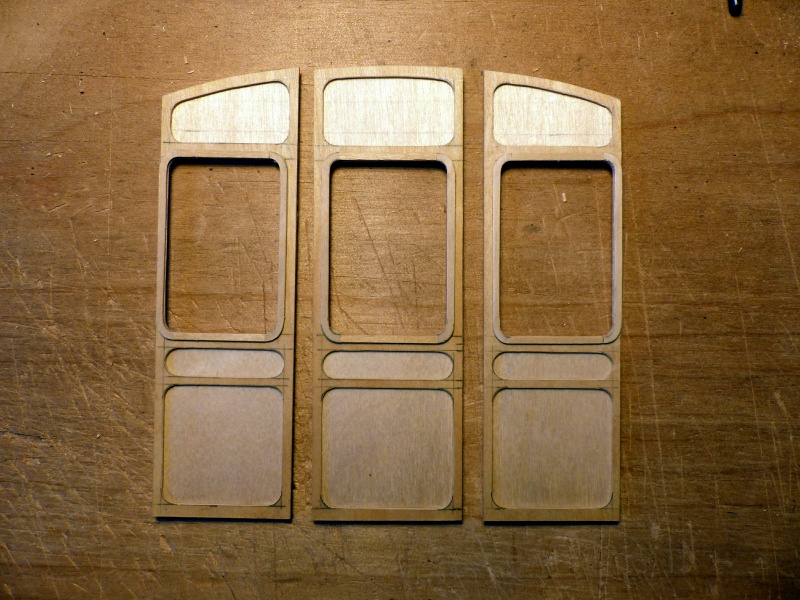
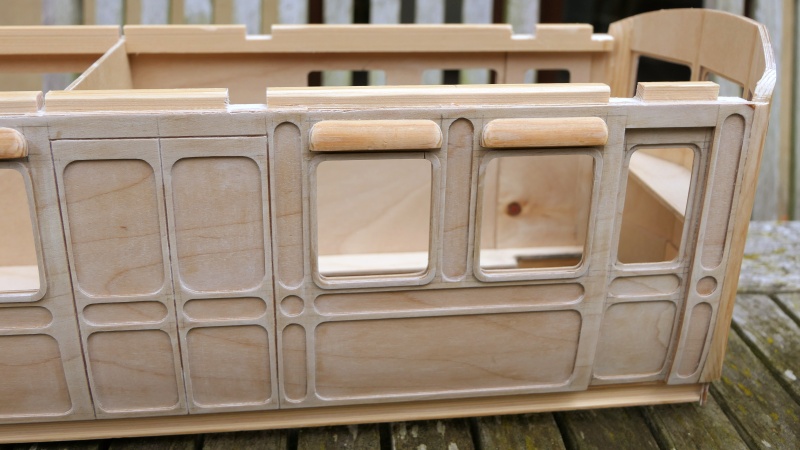
Thank you gentlemen. The window surrounds, as you can probably see, are made in four parts. Well three actually. The sides with the curved ends were made in one piece and then split top and bottom to make the two side pieces, joined together with straight horizontal pieces. A bit fiddly and time consuming considering there were 18 windows to do but I think it was worth it for the added detail. One of those "I've started so I have to carry on moments" !
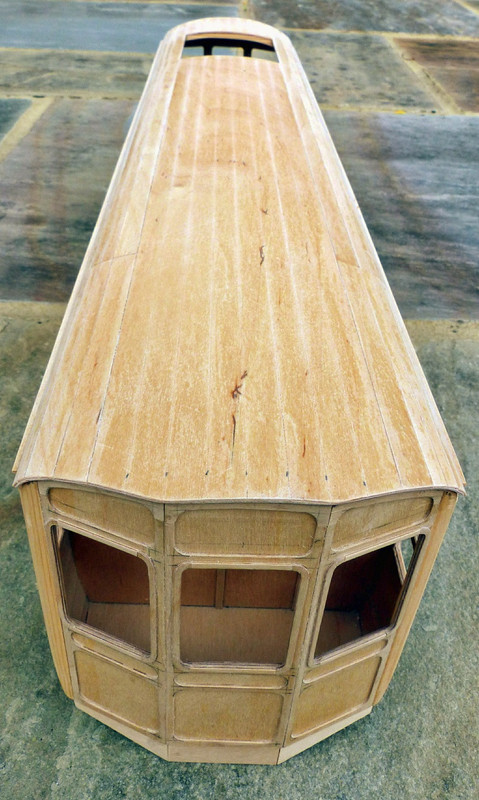
Just to finish the ends for now, it was time to attach the ends to the sides. As mentioned earlier, I wanted rounded corners. Well why do it the easy way ? To achieve this I used sections of small softwood quadrant from B & Q. With much carving, filing and sanding these were eventually made to fit where required without intruding too much into the interior. I was fairly satisfied with the result.

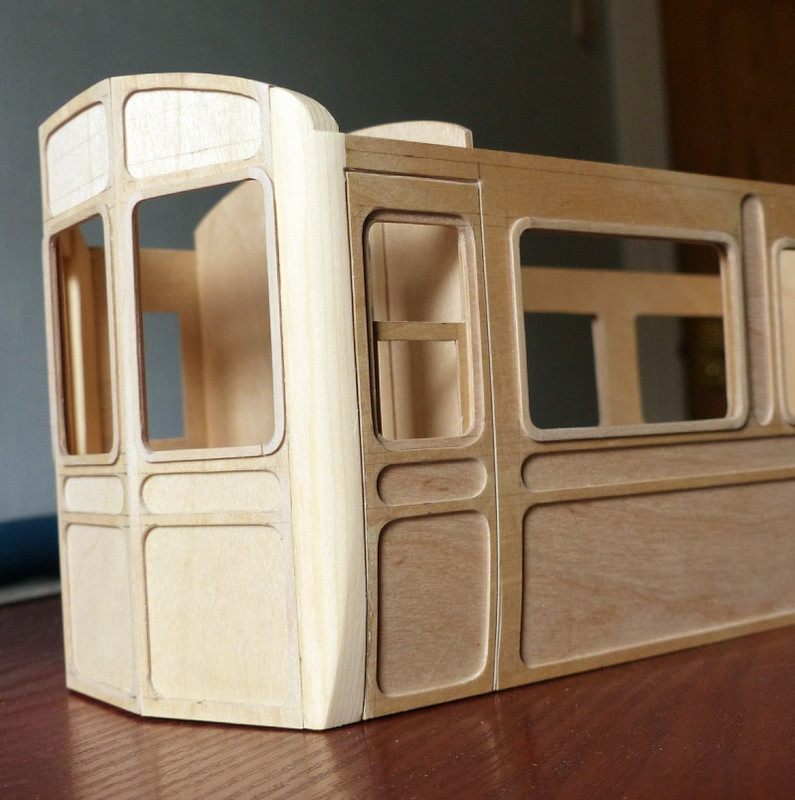

The ends are slightly different to the sides in that there are only two layers of ply with a rebate on the inside for the glazing to be glued in. The last photo shows the side window arrangement, as described previously, with the slot in the top into which the glazing will be slid at the very end.

I guess next time it will have to be the roof !
Just to finish the ends for now, it was time to attach the ends to the sides. As mentioned earlier, I wanted rounded corners. Well why do it the easy way ? To achieve this I used sections of small softwood quadrant from B & Q. With much carving, filing and sanding these were eventually made to fit where required without intruding too much into the interior. I was fairly satisfied with the result.
The ends are slightly different to the sides in that there are only two layers of ply with a rebate on the inside for the glazing to be glued in. The last photo shows the side window arrangement, as described previously, with the slot in the top into which the glazing will be slid at the very end.
I guess next time it will have to be the roof !
Brian


Re: Something a bit unusual - a steam railmotor
Just WOW !!! 

-
Old Man Aaron

- Trainee Driver

- Posts: 812
- Joined: Wed Oct 19, 2016 11:08 am
- Location: Sunshine Coast QLD, Australia
Re: Something a bit unusual - a steam railmotor
Work of art, that!
Regards,
Aaron - Scum Class Works
Aaron - Scum Class Works
-
bambuko
- Trainee Fireman

- Posts: 212
- Joined: Tue Dec 12, 2017 12:11 am
- Location: UK, England, North Devon
Re: Something a bit unusual - a steam railmotor
I am enjoying this 
Excellent
another thread to follow...
Thank you!
Excellent
another thread to follow...
Thank you!
Re: Something a bit unusual - a steam railmotor
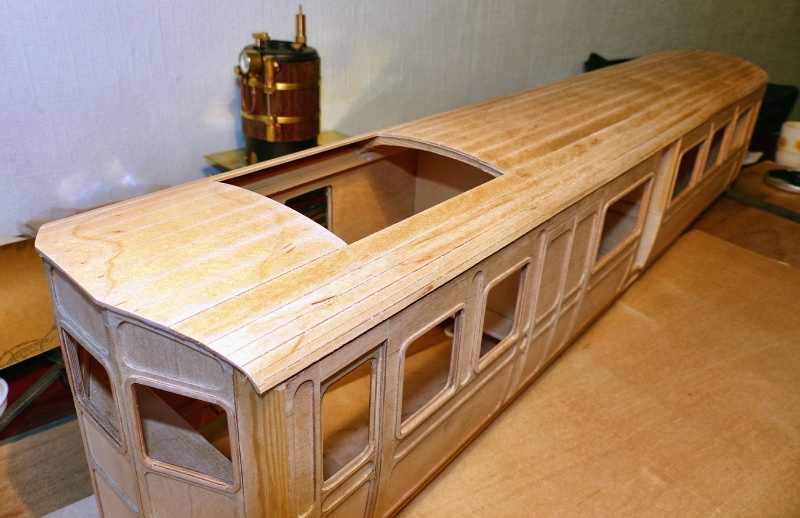
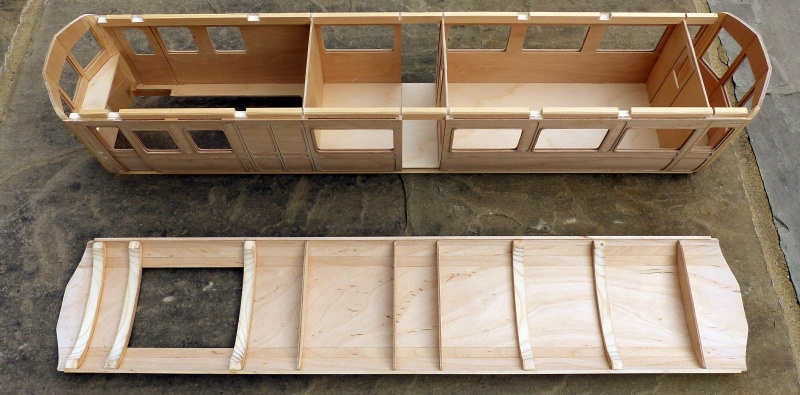
So next step was to think about the roof. But first I was aware that I needed to give the body some rigidity - at the moment it was just two boxes joined together by the plywood floor. They also needed to be connected at the top over the entrances to the centre vestibule. This was one of those make it up as you go along moments because until this point I hadn't given this important little detail much thought.
In order to achieve this and also provide some added stiffness to the whole thing I decided to glue some lengths of rectangular wood along the full length inside the top of the sides, if that makes sense. You'll see in the picture. While considering this the design of the roof structure also morphed into version 2. The internal partitions which were already in place included the roof profile. These I cut off level with the top of the sides. I then had to cut out small notches to allow the strips of wood to go down inside but only enough to allow half the depth of the wood to be glued to the sides, the top half left protruding above the sides. By doing this I could cut slots in the top allowing a semi elliptical roof former to slot in above each partition and form a base for the roof planking. Again easier to see in the picture than explain.
You will see in this picture that by this stage I had also added the underframes which also add to the strength. I hadn't been sure how I was going to achieve this effectively. In the end I used another length of rectangular stripwood. I managed to lash up something that passed for a router table and, using a small router bit, I (very carefully !) cut a groove along the length of the wood leaving what looked like quite a convincing channel section beam.
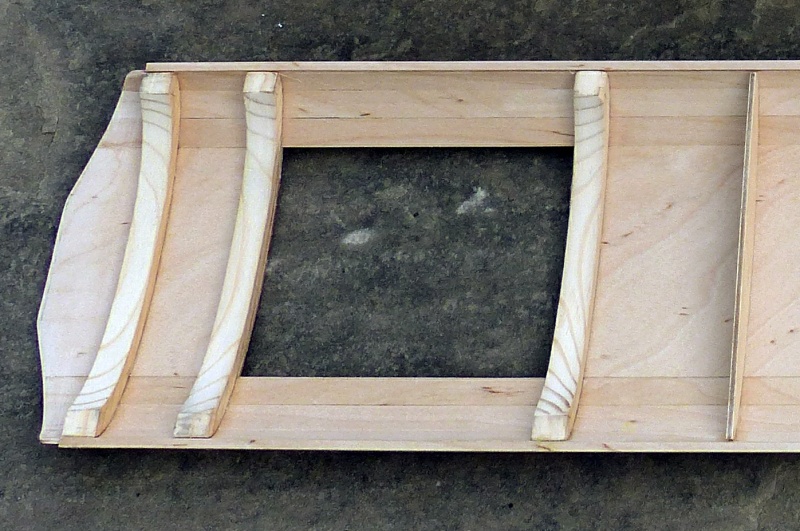
At this point the roof construction again evolved into version 3. The semi elliptical roof formers were fine where they completed a partition below but I had two extra ones in the large third class compartment and there were to be three in the boiler compartment, all where there was no partition. These ones were removed and replaced with ones shaped out of softwood section, considerably wider than the plywood ones, as you'll see in the photos. This was done for several reasons :
It would give a greater surface area to glue the roof planks to and therefore increase strength.
It would be more aesthetically pleasing when viewing the interior through the windows.
It would free up valuable headroom in the boiler compartment where it was always going to be an important factor.
It would save a great deal of unpleasantness and possible legal action from third class passengers who cracked their heads on the lower versions !


You will notice that the partition on one side of the centre vestibule is not present at this stage. I had left this out until later as I figured it would be easier to spray the vestibule ends this way and also I was still working on the hinge arrangement for the gates which would have been all but impossible to get at with it all assembled.
One more gratuitous shot of the panelling which I am very pleased with and also showing in more detail the fitting of the upper strips of wood, the underframe section, the simulated sliding door and the ventilators over the windows which were added a little bit later.
Next time, roof planking . . . .
In order to achieve this and also provide some added stiffness to the whole thing I decided to glue some lengths of rectangular wood along the full length inside the top of the sides, if that makes sense. You'll see in the picture. While considering this the design of the roof structure also morphed into version 2. The internal partitions which were already in place included the roof profile. These I cut off level with the top of the sides. I then had to cut out small notches to allow the strips of wood to go down inside but only enough to allow half the depth of the wood to be glued to the sides, the top half left protruding above the sides. By doing this I could cut slots in the top allowing a semi elliptical roof former to slot in above each partition and form a base for the roof planking. Again easier to see in the picture than explain.
You will see in this picture that by this stage I had also added the underframes which also add to the strength. I hadn't been sure how I was going to achieve this effectively. In the end I used another length of rectangular stripwood. I managed to lash up something that passed for a router table and, using a small router bit, I (very carefully !) cut a groove along the length of the wood leaving what looked like quite a convincing channel section beam.
At this point the roof construction again evolved into version 3. The semi elliptical roof formers were fine where they completed a partition below but I had two extra ones in the large third class compartment and there were to be three in the boiler compartment, all where there was no partition. These ones were removed and replaced with ones shaped out of softwood section, considerably wider than the plywood ones, as you'll see in the photos. This was done for several reasons :
It would give a greater surface area to glue the roof planks to and therefore increase strength.
It would be more aesthetically pleasing when viewing the interior through the windows.
It would free up valuable headroom in the boiler compartment where it was always going to be an important factor.
It would save a great deal of unpleasantness and possible legal action from third class passengers who cracked their heads on the lower versions !
You will notice that the partition on one side of the centre vestibule is not present at this stage. I had left this out until later as I figured it would be easier to spray the vestibule ends this way and also I was still working on the hinge arrangement for the gates which would have been all but impossible to get at with it all assembled.
One more gratuitous shot of the panelling which I am very pleased with and also showing in more detail the fitting of the upper strips of wood, the underframe section, the simulated sliding door and the ventilators over the windows which were added a little bit later.
Next time, roof planking . . . .
Brian
-
Peter Butler
- Driver
- Posts: 5254
- Joined: Sun Sep 09, 2012 10:33 pm
- Location: West Wales
Re: Something a bit unusual - a steam railmotor
Just superb Brian.... I have played with wood al of my life but could never reach that standard of excellence. Top marks!
The best things in life are free.... so why am I doing this?
-
big-ted
- Trainee Fireman
- Posts: 236
- Joined: Fri Nov 25, 2011 4:13 pm
- Location: Vancouver, BC, Canada.
Re: Something a bit unusual - a steam railmotor
That is some beautiful work.
Re: Something a bit unusual - a steam railmotor
Good Lord, that's beautiful!

Re: Something a bit unusual - a steam railmotor
As everyone has said, wonderful craftsmanship — and I think it’s a really attractive vehicle too. Love the proportions; the design of the ends; the curved sides; the recessed door....
-
georgesheppard
- Trainee Fireman
- Posts: 115
- Joined: Tue Oct 13, 2020 9:51 pm
Re: Something a bit unusual - a steam railmotor
This is brilliant! Lots of great techniques to learn for a future scratch build of my own! Can't wait to see the finished result.

Re: Something a bit unusual - a steam railmotor
I can only join everyone else in their warm and appreciative compliments. That is a very distinctive looking vehicle, and your standard of workmanship is very high. In a 'previous life' i made model boats, mostly from wood, and could only dream of achieving such a high standard of workmanship.
I'm really looking forward to seeing this progress to the finished product
I'm really looking forward to seeing this progress to the finished product
Phil
Sporadic Garden Railer who's inconsistencies know no bounds
My Line - https://gardenrails.org/forum/viewtopic ... 41&t=11077
Sporadic Garden Railer who's inconsistencies know no bounds
My Line - https://gardenrails.org/forum/viewtopic ... 41&t=11077
Re: Something a bit unusual - a steam railmotor
Once again thank you all for your kind comments. The odd couple of previous attempts I've made at scratch building my own design have not been good - they have ended up just not looking right. This is by far the most ambitious project I've tried so I am gratified that the result so far is pleasing, especially as the first design I drew full size on paper did look right and I saw no reason to change it. I have tried to explain and show what I have done as clearly as possible. I have picked up plenty of tips from others in the forum so if any of this has given anybody ideas or inspiration then it is great to give something back. To be honest I don't see any of it as very difficult, just requiring care and precision. It has been time consuming and at times a bit boring.
On to finish the roof for now. I didn't take any photos of the planking work in progress but basically it was just a case of glue the planks to the roof formers. These were deliberately made to be a nice snug fit in the slots in the side members so they weren't going to go anywhere if I was careful while I glued the planks on. So here are a few shots of the completed article.
Why is there a hole in the roof ? I decided to make a separate slightly raised section of roof over the boiler which will be made of brass to take the heat better and also incorporate holes for the chimney and safety valve and provide a little extra ventilation. This would simulate the roof doors provided in some of the full size vehicles to allow the boiler to be lifted out. This would also provide a few extra millimetres of clearance above the boiler top fittings which in turn helped to keep the main roof line as low as possible. It would also mean that I don't have to take the whole roof off to get at the boiler top up.
And here with the corners tidied up and an edging strip added. The centre section, the width of the hole where the curvature is small, is a single strip of ply, scored to represent the planks and to allow it to bend easily to the curve. From there out to the edges I used progressively narrower planks as the curvature increased, as you can see.

And the whole thing
To backtrack a bit, it was when I had all the roof formers in place that I realised, as mentioned before, that I hadn't got the shape of the ends quite right. It had been very difficult to judge as I was making them. The top edges were slightly too high so I had to bite the bullet, remove the top part of the beadings, sand the ends down to the right profile and remake the top beadings. It is fortunate that I got it wrong in the right direction and didn't need to sand some wood back on !
Finally the underside of the completed roof. It is a nice rigid structure and is held onto the vehicle fairly firmly in the slots but also lifts off fairly easily. I intend to cover the planking with fabric as others have done in due course. More on that later.
Next time the good bit - slap some paint on !
On to finish the roof for now. I didn't take any photos of the planking work in progress but basically it was just a case of glue the planks to the roof formers. These were deliberately made to be a nice snug fit in the slots in the side members so they weren't going to go anywhere if I was careful while I glued the planks on. So here are a few shots of the completed article.
Why is there a hole in the roof ? I decided to make a separate slightly raised section of roof over the boiler which will be made of brass to take the heat better and also incorporate holes for the chimney and safety valve and provide a little extra ventilation. This would simulate the roof doors provided in some of the full size vehicles to allow the boiler to be lifted out. This would also provide a few extra millimetres of clearance above the boiler top fittings which in turn helped to keep the main roof line as low as possible. It would also mean that I don't have to take the whole roof off to get at the boiler top up.
And here with the corners tidied up and an edging strip added. The centre section, the width of the hole where the curvature is small, is a single strip of ply, scored to represent the planks and to allow it to bend easily to the curve. From there out to the edges I used progressively narrower planks as the curvature increased, as you can see.
And the whole thing
To backtrack a bit, it was when I had all the roof formers in place that I realised, as mentioned before, that I hadn't got the shape of the ends quite right. It had been very difficult to judge as I was making them. The top edges were slightly too high so I had to bite the bullet, remove the top part of the beadings, sand the ends down to the right profile and remake the top beadings. It is fortunate that I got it wrong in the right direction and didn't need to sand some wood back on !
Finally the underside of the completed roof. It is a nice rigid structure and is held onto the vehicle fairly firmly in the slots but also lifts off fairly easily. I intend to cover the planking with fabric as others have done in due course. More on that later.
Next time the good bit - slap some paint on !
Brian
Who is online
Users browsing this forum: No registered users and 2 guests