Page 16 of 18
Re: The Railway in the Valley of the Mill
Posted: Tue Feb 20, 2024 9:22 am
by ge_rik
philipy wrote: ↑Tue Feb 20, 2024 6:08 am
Looking good Trevor.
I've never seen anyone actually dunk prints in Acetone before, although I have seen it suggested to suspend them in a sealed container with acetone in the the bottom. Be interesting to see how they perform in due course - I assume this is using ABS not PLA?
I was wondering if there was an equivalent to acetone for PLA so looked it up
https://www.3dprintbeast.com/best-solve ... lving-pla/
Basically they range from ineffective but safe(ish) to effective but highly toxic.

Rik
Re: The Railway in the Valley of the Mill
Posted: Tue Feb 20, 2024 10:02 am
by SimonWood
Andrew wrote: ↑Tue Feb 20, 2024 8:23 am
How long will the completed line be? And how long will it take to complete a single trip?
Depends how fast you go of course, but
back in May it took me 13 minutes to get to just this side of the steps in Trevor's photos...
ge_rik wrote: ↑Tue Feb 20, 2024 9:22 am
I was wondering if there was an equivalent to acetone for PLA so looked it up
I've been using plastic weld which contains dichloromethane to weld PLA parts together. It works but as that site you links to points out it is high risk and I'd prefer not to use it, so I have tended to make do with cyanoacrylate. My PLA prints tend to be stronger, but by following Trevor's guidance I've got better at printing with ABS, and while acetone is not exactly pleasant, it is less toxic and I feel happy brushing it on to strengthen areas where I'm worried about splitting. I haven't bathed anything in it (yet)!
philipy wrote: ↑Tue Feb 20, 2024 6:08 am
I've never seen anyone actually dunk prints in Acetone before, although I have seen it suggested to suspend them in a sealed container with acetone in the the bottom.
I had understood this technique (which I've heard called 'acetone smoothing') was to improve the finish - i.e. an alternative to sanding and filling to get a smooth (even shiny) surface. Does it also strengthen the print?
Re: The Railway in the Valley of the Mill
Posted: Tue Feb 20, 2024 12:33 pm
by philipy
Simon,
I use Plasticweld for all my plastic sticking, works well on PLA I find. Not overly bovvered abaht the 'elf 'n safety aspects as long as you use it sensibly. I've dealt with (and probabaly inhaled) far worse in my former life as a chemist.

SimonWood wrote: ↑Tue Feb 20, 2024 10:02 am
I had understood this technique (which I've heard called 'acetone smoothing') was to improve the finish - i.e. an alternative to sanding and filling to get a smooth (even shiny) surface. Does it also strengthen the print?
Yes, I believe that's what it is known as. I did try it a couple of times in my early 3d printing days but with no real success so I haven't bothered subsequently. You can also use Limone apparently, but that didn't really work for me either.

IF it worked, I imagine that it would strengthen the print to some extent. In theory it works by softening the outer filament layers of the print and allowing those layers to flow slightly, in which case they would stick to adjacent layers, and once hardened that should give a more cohesive and thus stronger outter skin.
Going back to dunking a print in acetone, personally I'd be concerned about it seeping into minute gaps in the layers , getting trapped and then slowly attacking internal structures, leading to eventual deformation from within? With small items like rail chairs with minimal or no infill, that probably isn't too big a risk, though.
Re: The Railway in the Valley of the Mill
Posted: Tue Feb 20, 2024 7:57 pm
by Trevor Thompson
ge_rik wrote: ↑Tue Feb 20, 2024 9:22 am
philipy wrote: ↑Tue Feb 20, 2024 6:08 am
Looking good Trevor.
I've never seen anyone actually dunk prints in Acetone before, although I have seen it suggested to suspend them in a sealed container with acetone in the the bottom. Be interesting to see how they perform in due course - I assume this is using ABS not PLA?
I was wondering if there was an equivalent to acetone for PLA so looked it up
https://www.3dprintbeast.com/best-solve ... lving-pla/
Basically they range from ineffective but safe(ish) to effective but highly toxic.
Rik
Yes Rik I am using ABS. I have never tried suspending them over acetone which might be a better alternative, probably because I can't see how I am actually going to organise it. Some research required I think.
Trevor
Re: The Railway in the Valley of the Mill
Posted: Tue Feb 20, 2024 8:48 pm
by philipy
Trevor Thompson wrote: ↑Tue Feb 20, 2024 7:57 pm
I have never tried suspending them over acetone which might be a better alternative, probably because I can't see how I am actually going to organise it. Some research required I think.
Get a piece of mesh of some sort, small enough that they don't drop through, put them on it with the underside actually on the mesh so any blemish wont show. Pinch a pyrex dish with a lid from the kitchen when you-know-who isn't looking...
Re: The Railway in the Valley of the Mill
Posted: Wed Feb 21, 2024 8:54 am
by Andrew
SimonWood wrote: ↑Tue Feb 20, 2024 10:02 am
Andrew wrote: ↑Tue Feb 20, 2024 8:23 am
How long will the completed line be? And how long will it take to complete a single trip?
Depends how fast you go of course, but
back in May it took me 13 minutes to get to just this side of the steps in Trevor's photos...
Ah, I'd forgotten I'd seen that, thank you! It must be great fun to run the line with multiple operators...
Re: The Railway in the Valley of the Mill
Posted: Wed Feb 21, 2024 6:39 pm
by gilfachphil
Glad to see that you are making progress again with the digging. My garden seems wet enough to plant rice.
Looks like I might need to get to making the next batch of sleepers!
Phil
Re: The Railway in the Valley of the Mill
Posted: Wed Feb 21, 2024 7:49 pm
by Trevor Thompson
I think I have enough sleepers to complete this section Phil - so no hurry for more sleepers.
I have spent most of the day in the workshop hiding from the rain - and I have almost completed the first point. It is all working so far as intended, although I have not tried to drill the rail for the chairs by the blades yet. The M2 set screws arrived today but I am still waiting for the taps. The frog is silver soldered and the wing rails attached to the frog with soft solder. Otherwise it is all in chairs:
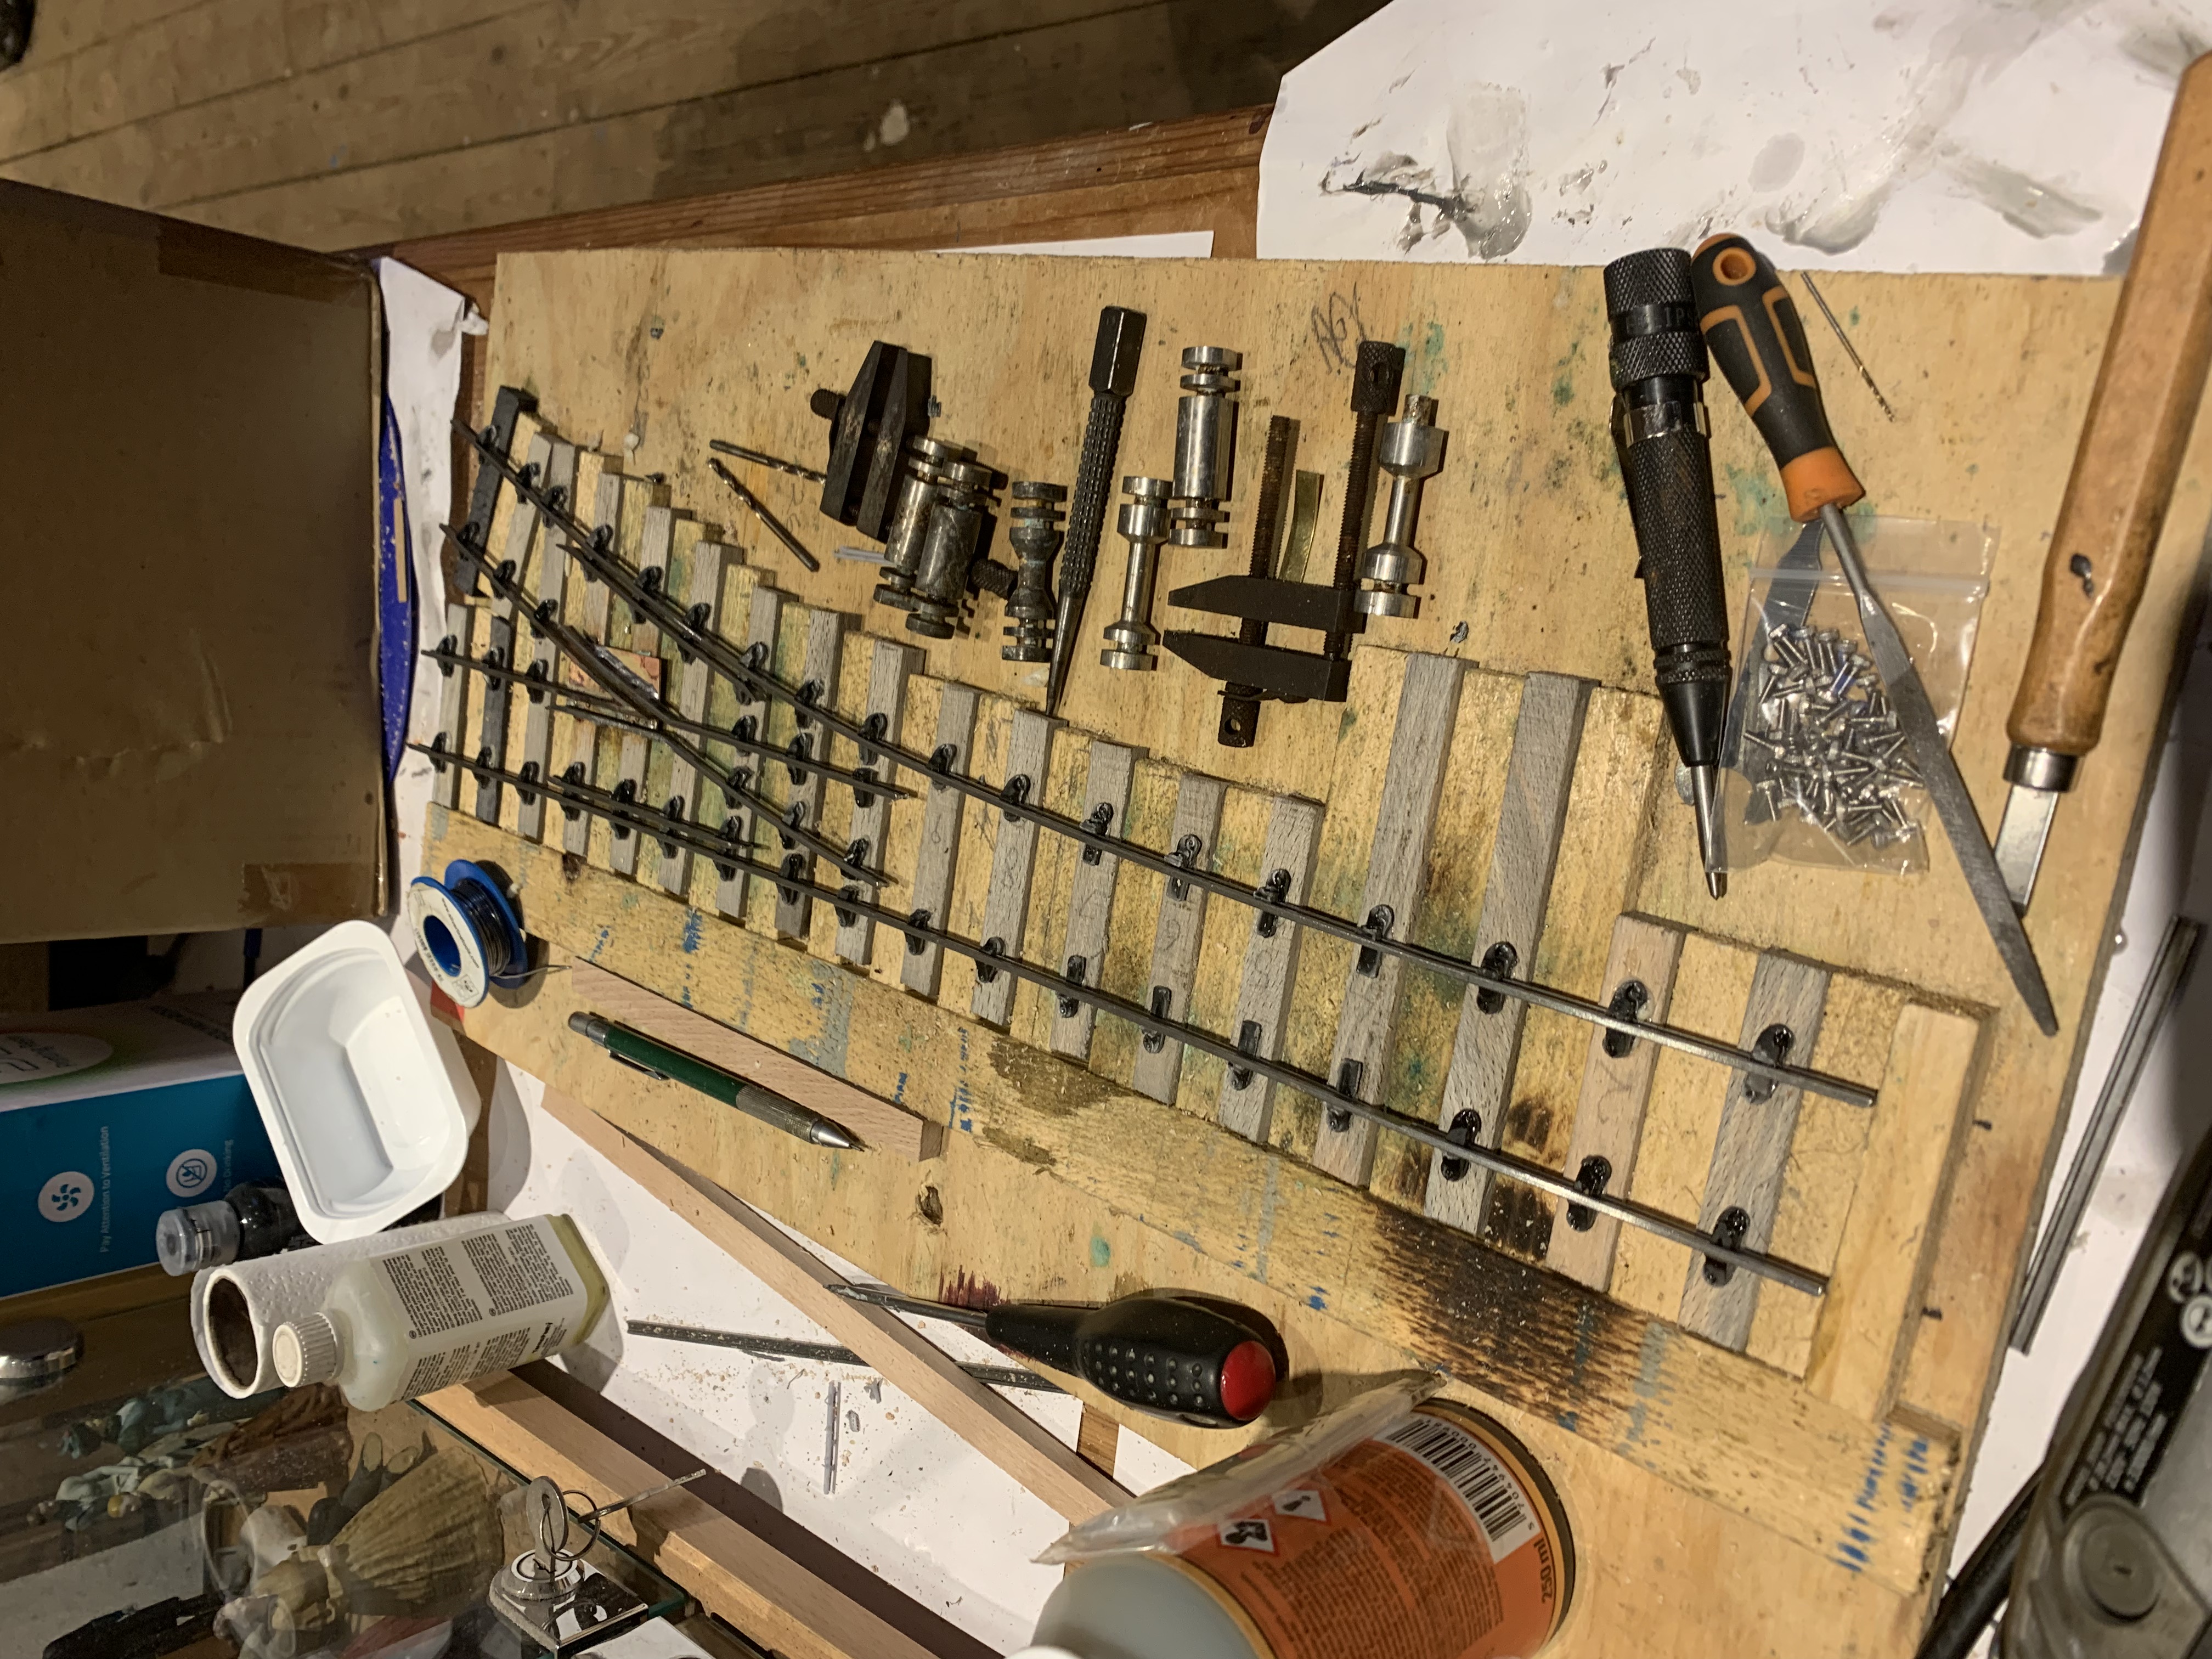
- IMG_3715.jpeg (2.62 MiB) Viewed 1398 times
Trevor
Re: The Railway in the Valley of the Mill
Posted: Sun Feb 25, 2024 1:40 pm
by Trevor Thompson
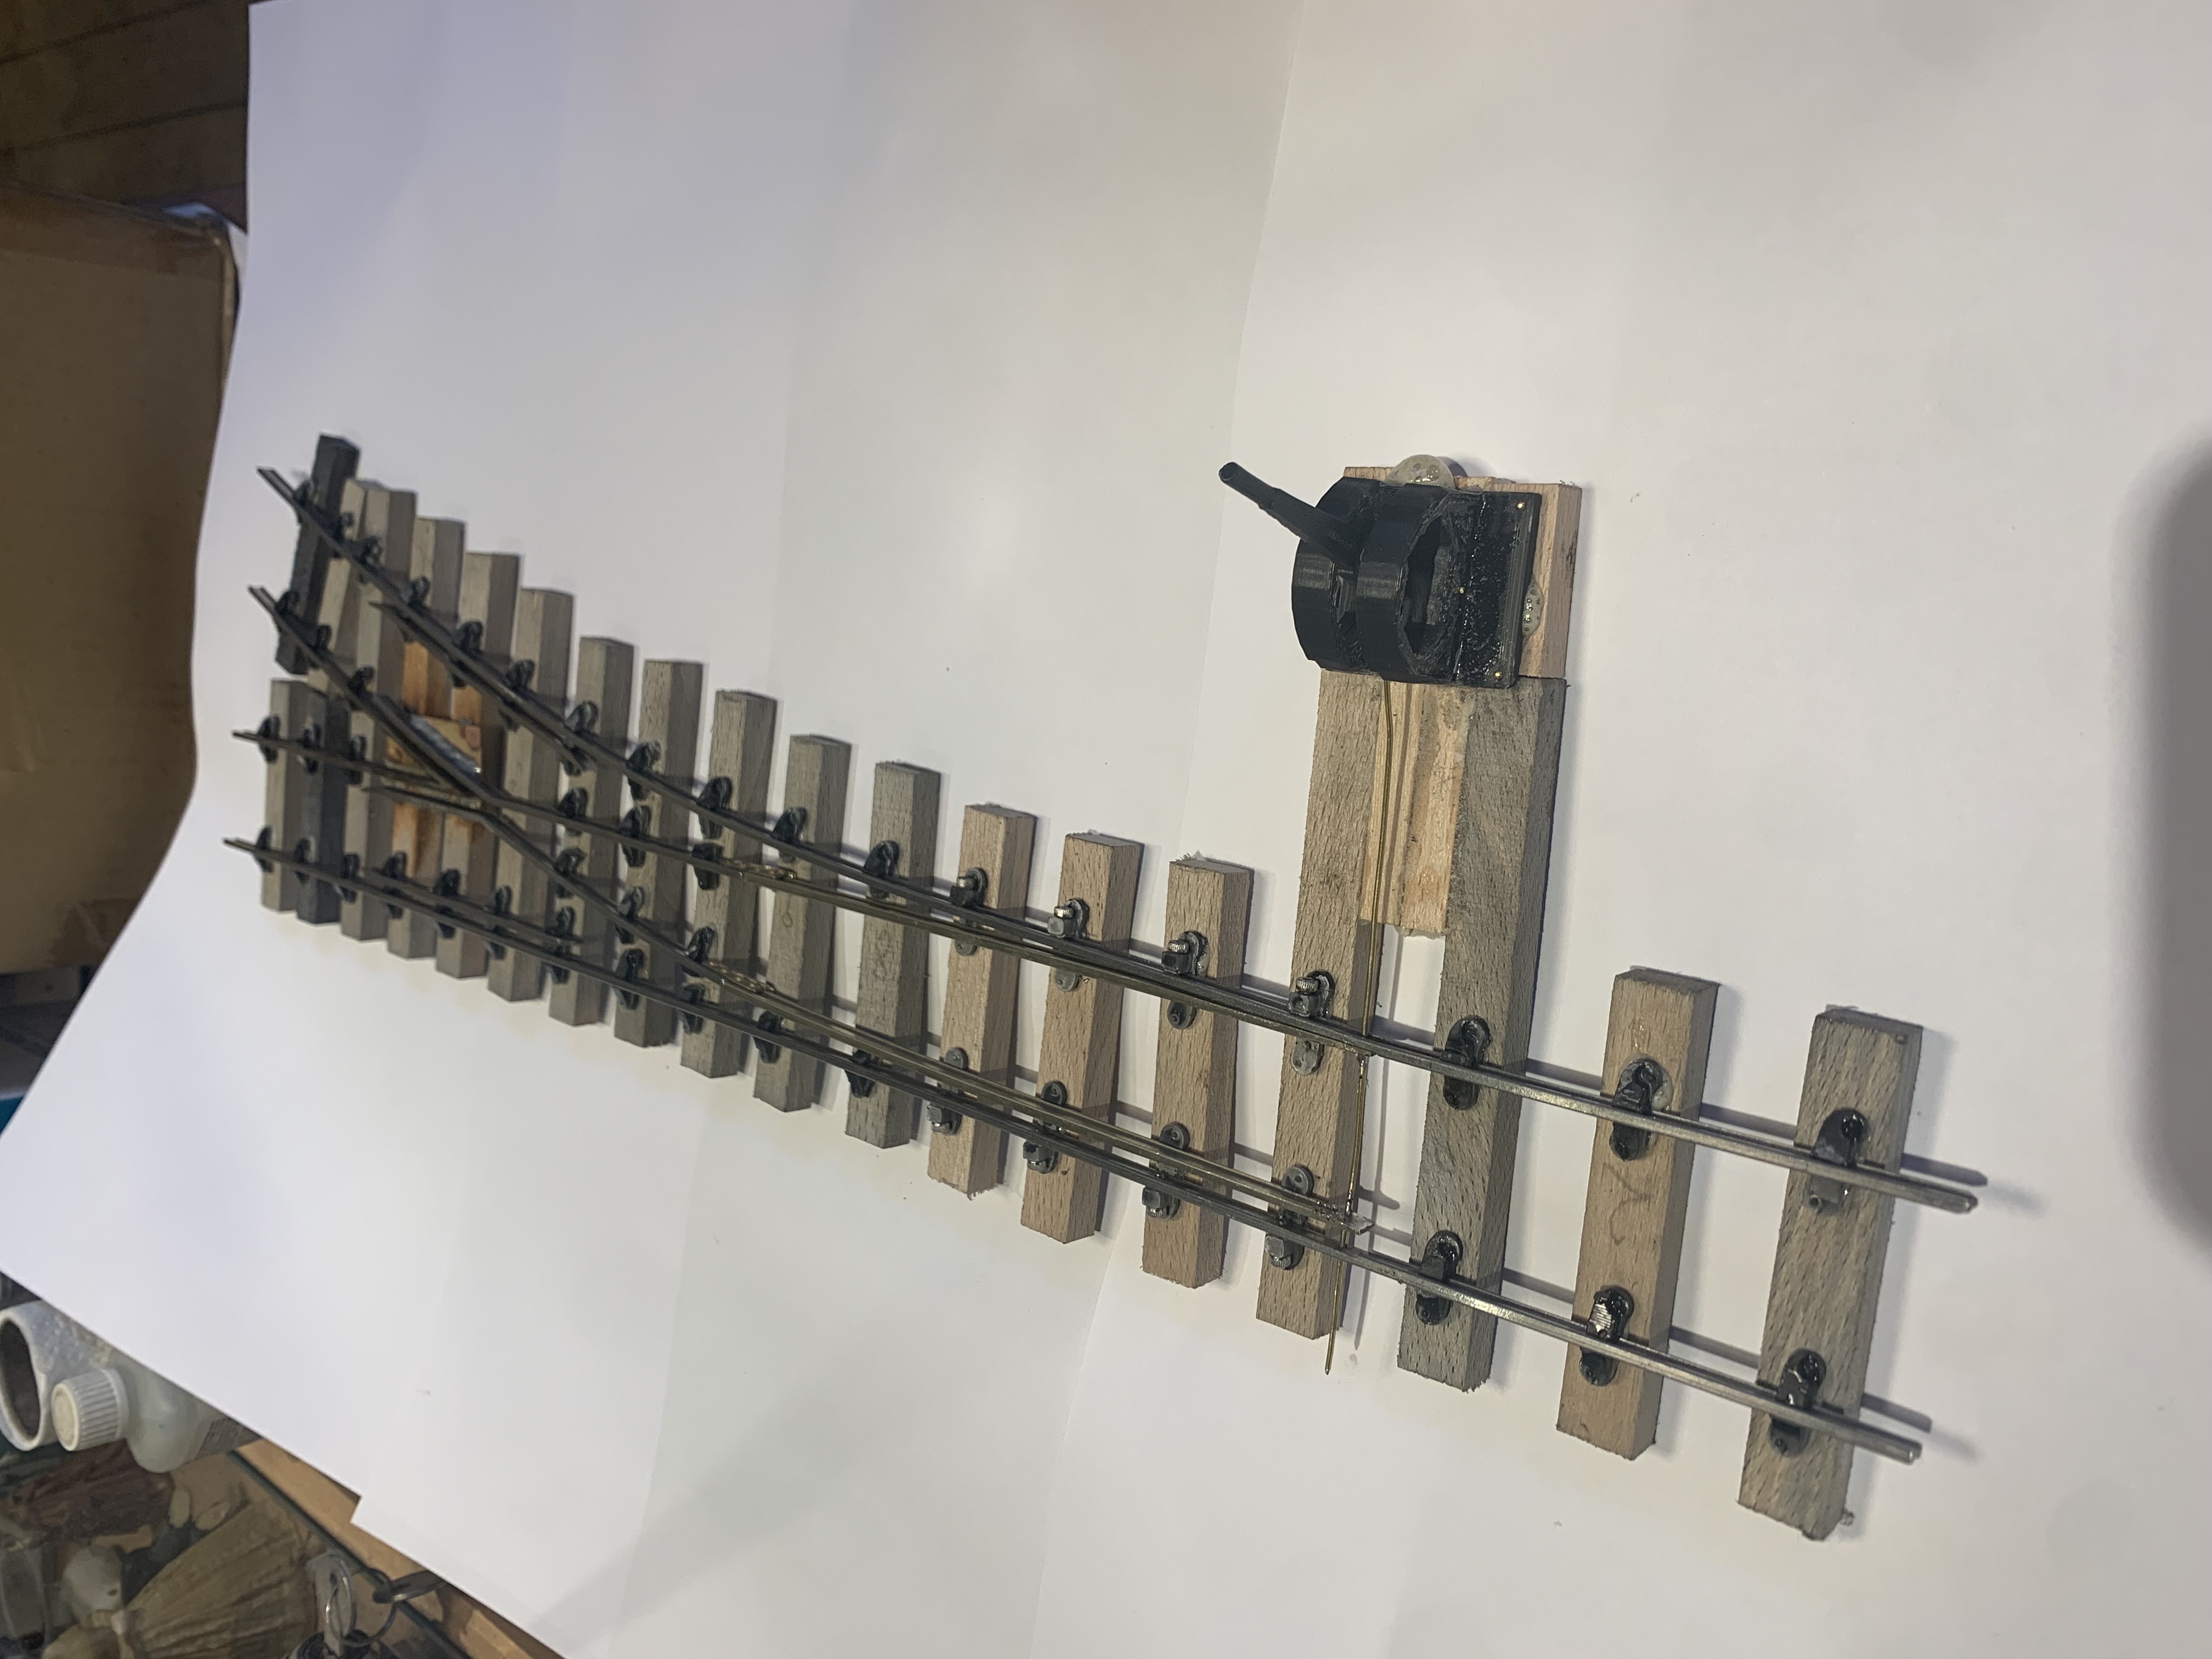
The first point is finished:
- IMG_3721.jpeg (1.53 MiB) Viewed 1323 times
The rail is stainless apart from the point blades which are nickel silver, which is easier to solder reliably. I have used the same printed point lever I used the last time I made points. It seems to work and is quicker to make than the same made from brass.
Bolting the half chairs to the rail in way of the blades worked well, and I didn't even have to grind off any of the bolt to clear the blade. I think the trick to getting the correct track gauge in way of the blades is to introduce a slight kink in the rail on the curved rail. You will be able to see the kink in the photo. A detail showing the bolted chairs and the point blades:
- IMG_3722.jpeg (1.57 MiB) Viewed 1323 times
I have found the most effective way of linking and controlling the blades is to drill a 1.3mm hole through the outer rails and the blades. Then pass a 1mm brass wire through the holes. Using whatever point actuator is fitted to this point I then solder the wire and the blade on the inside faces of the blades. In this case I measured the throw of the lever ar 4.5mm, so I placed a 4mm drill between the blade and the rail, while soldering them together. I then moved the lever so that the soldered side touched its rail, and repeated the soldering operation on the other side. After slight tweaking to even out the slight spring in the wire, the blades sat neatly where they should.
The wall building is progressing , if slowly, and I hope to install the passing loop this week. On to the next point.
Trevor
Re: The Railway in the Valley of the Mill
Posted: Sun Feb 25, 2024 2:42 pm
by Old Man Aaron
Terrific what you can do with drill bits, besides drilling holes.

Re: The Railway in the Valley of the Mill
Posted: Sat Mar 02, 2024 10:14 am
by Trevor Thompson
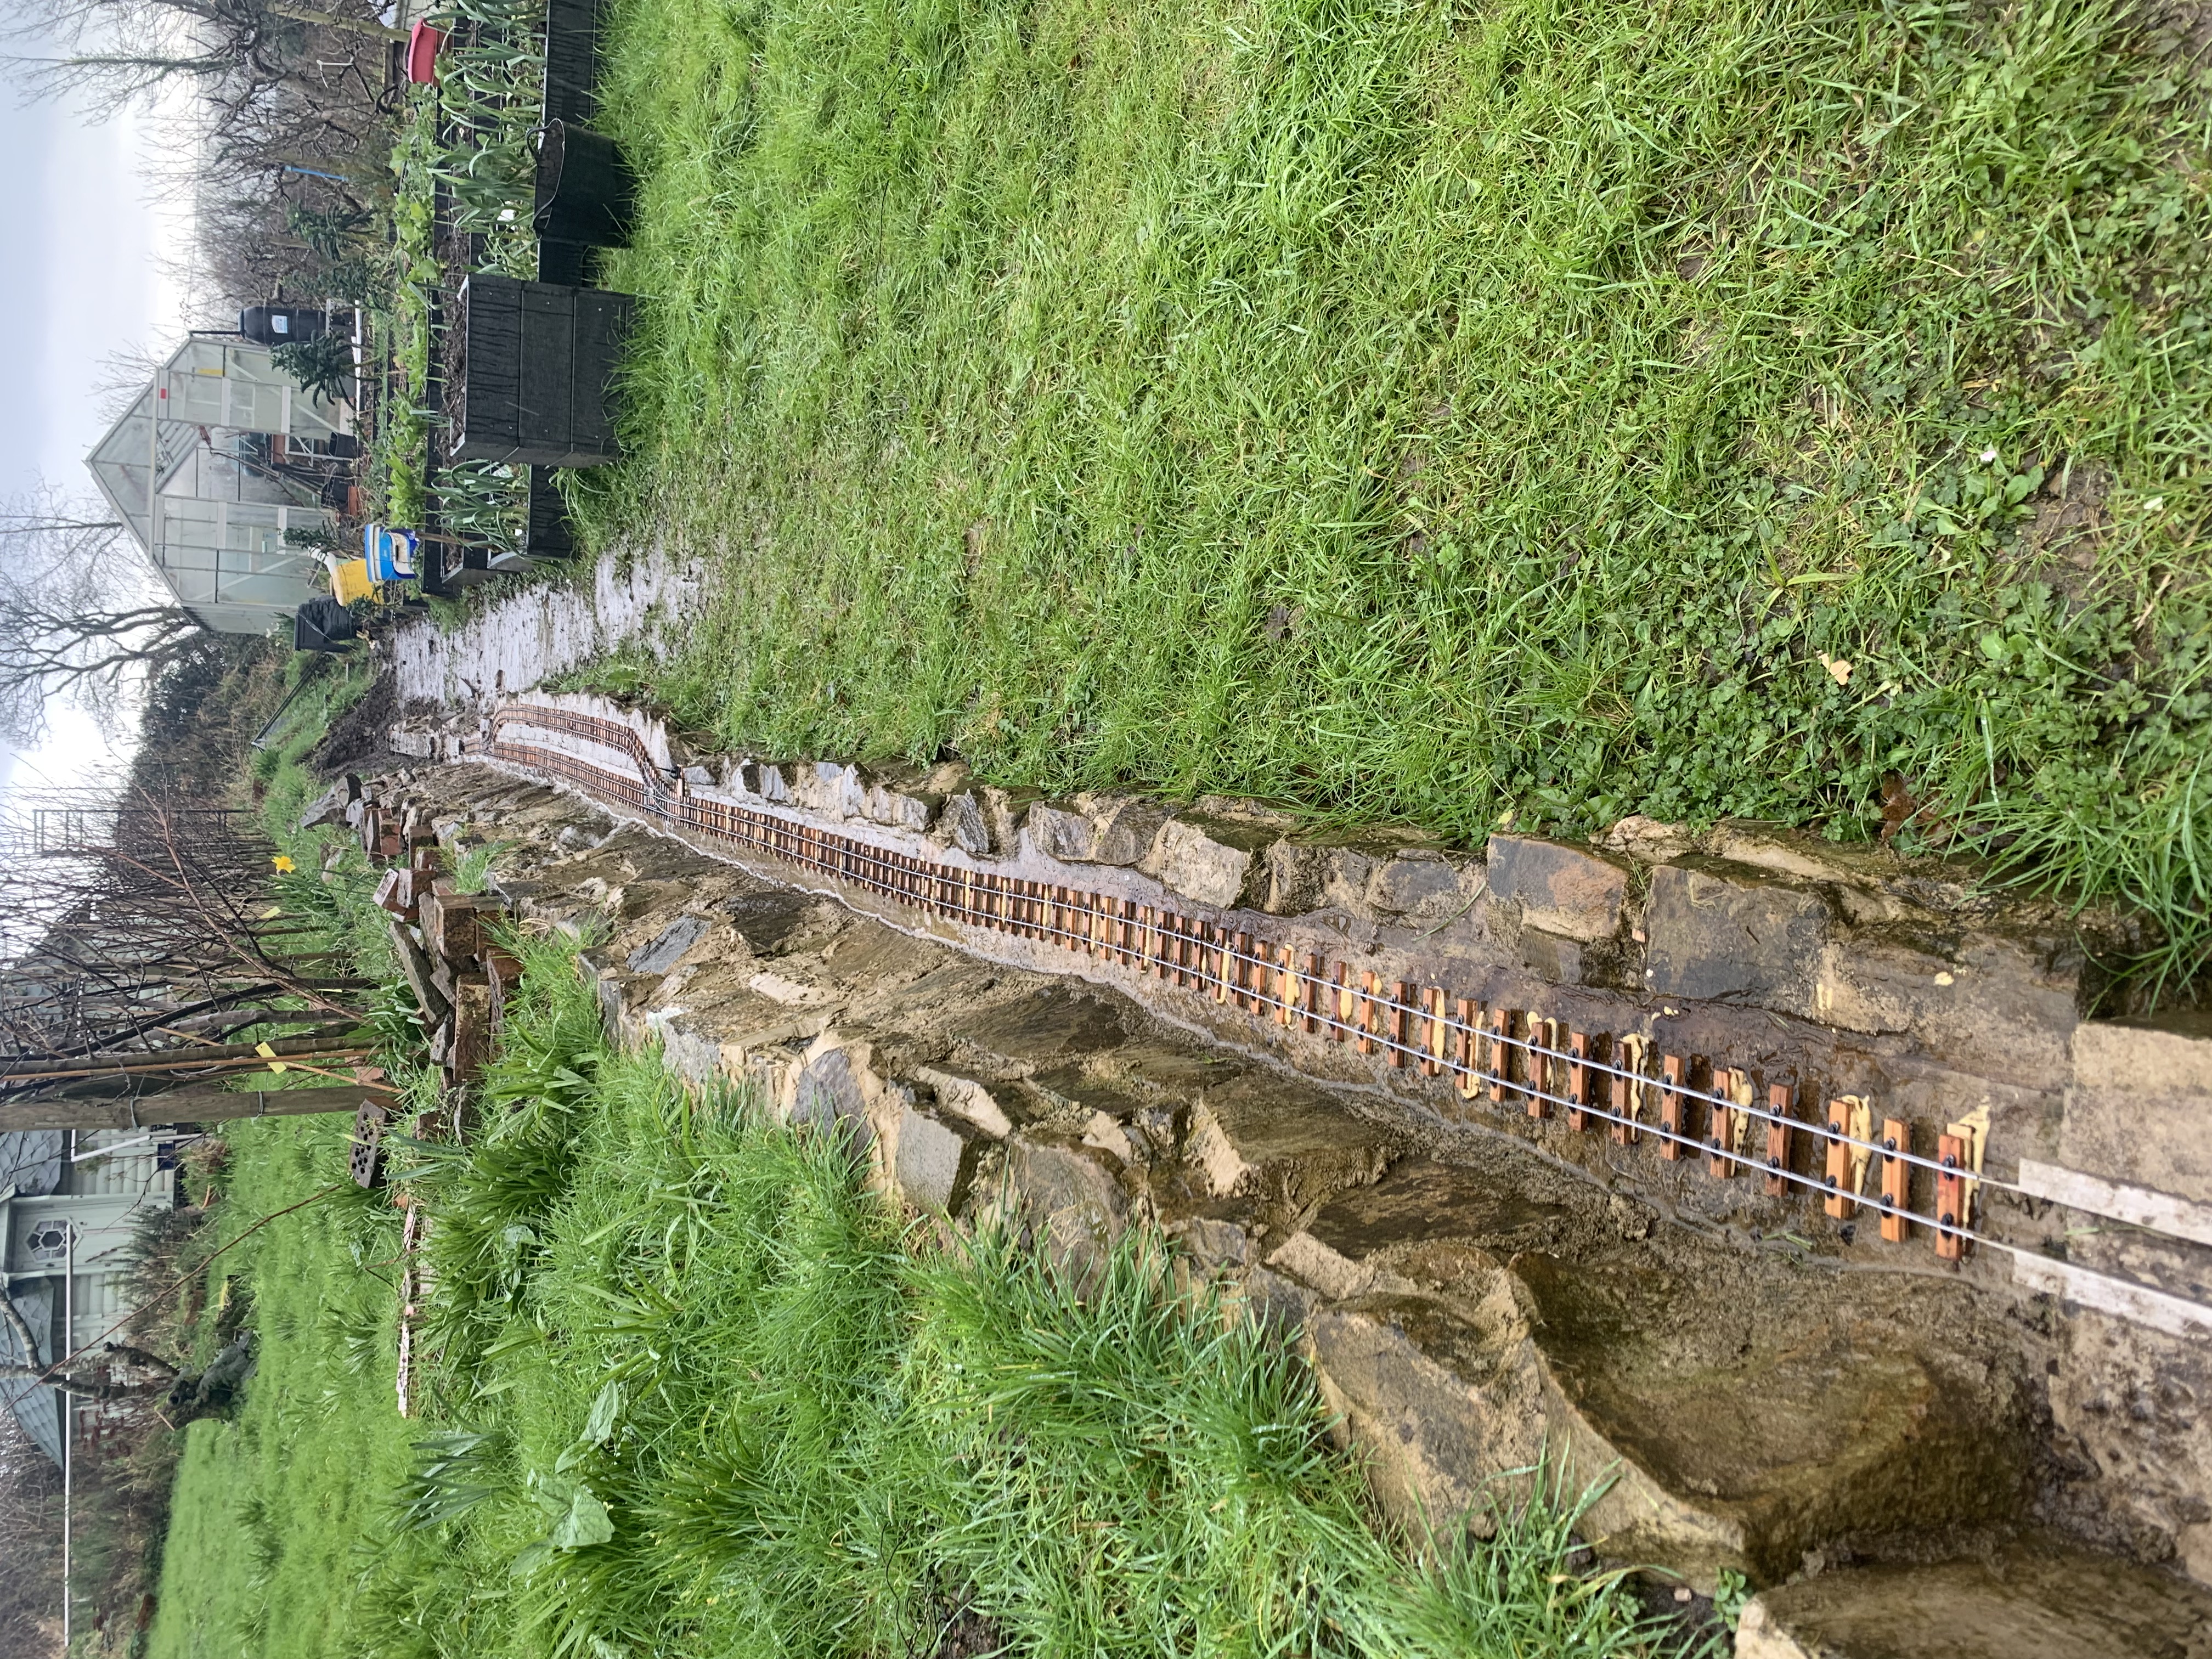
After more weather related delays I have now laid the track to create a passing loop half way between the tunnel and the proposed terminus:
- IMG_3727.jpeg (5.19 MiB) Viewed 1094 times
the retaining wall is also slowly advancing towards the greenhouse, 2 metres at a time:
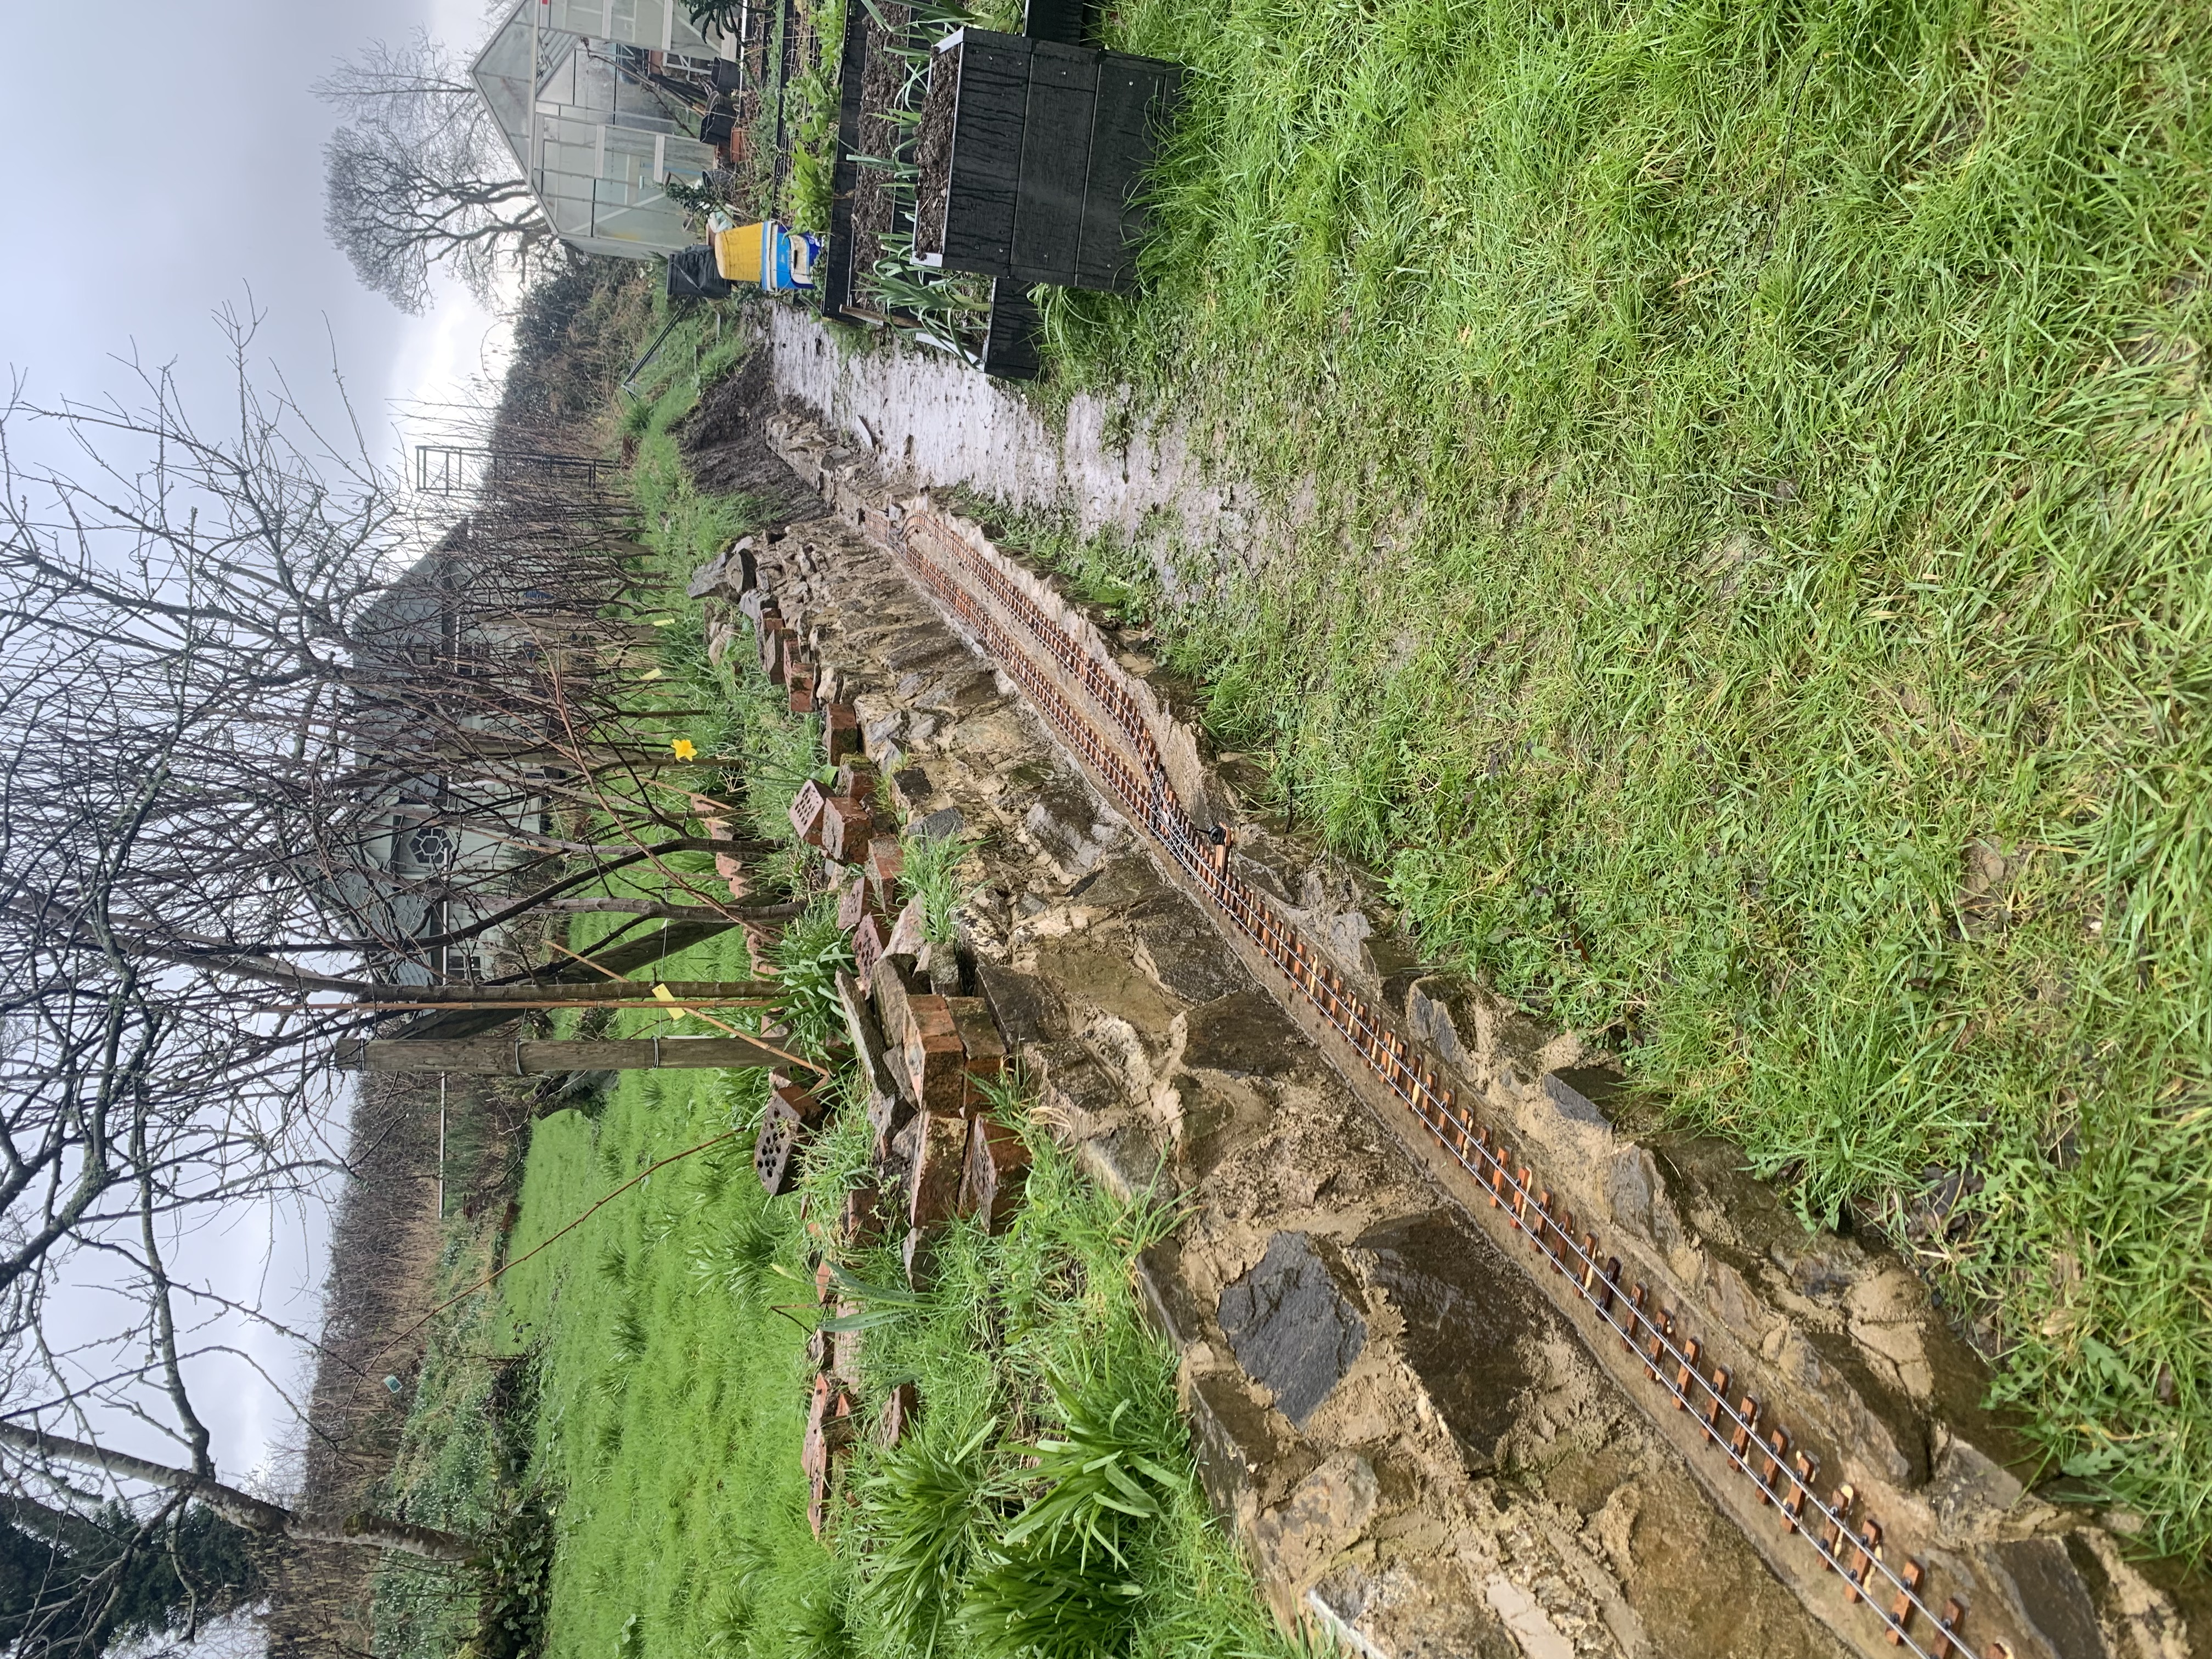
- IMG_3728.jpeg (5.33 MiB) Viewed 1094 times
I just wish we had some dryer weather!
Trevor
Re: The Railway in the Valley of the Mill
Posted: Sat Mar 02, 2024 12:35 pm
by ge_rik
Is that Gorilla Glue between the sleepers and the trackbed? Ingenious idea for both levelling and for cushioning if so.
Rik
Re: The Railway in the Valley of the Mill
Posted: Sat Mar 02, 2024 2:35 pm
by Trevor Thompson
ge_rik wrote: ↑Sat Mar 02, 2024 12:35 pm
Is that Gorilla Glue between the sleepers and the trackbed? Ingenious idea for both levelling and for cushioning if so.
Rik
Yes -it certainly is. I use it a lot for all sorts of things. I like it being cured by dampness - really useful here. The only problem is getting it on my hands which I inevitably do, and that gets me into trouble. I can't really do fiddly things with gloves on.
Trevor
Re: The Railway in the Valley of the Mill
Posted: Sun Mar 03, 2024 10:52 am
by SimonWood
Excellent! Looking forward to running round there.
I had thought it might be a bit of a squeeze behind the veg, but I can see the space you’re making turning the bank into a wall is substantial. Does look really great. (As do the leeks by the way!)
Re: The Railway in the Valley of the Mill
Posted: Mon Mar 04, 2024 4:47 am
by Old Man Aaron
Wet work, but good work.

Re: The Railway in the Valley of the Mill
Posted: Tue Mar 05, 2024 10:37 pm
by Trevor Thompson
Making track again.
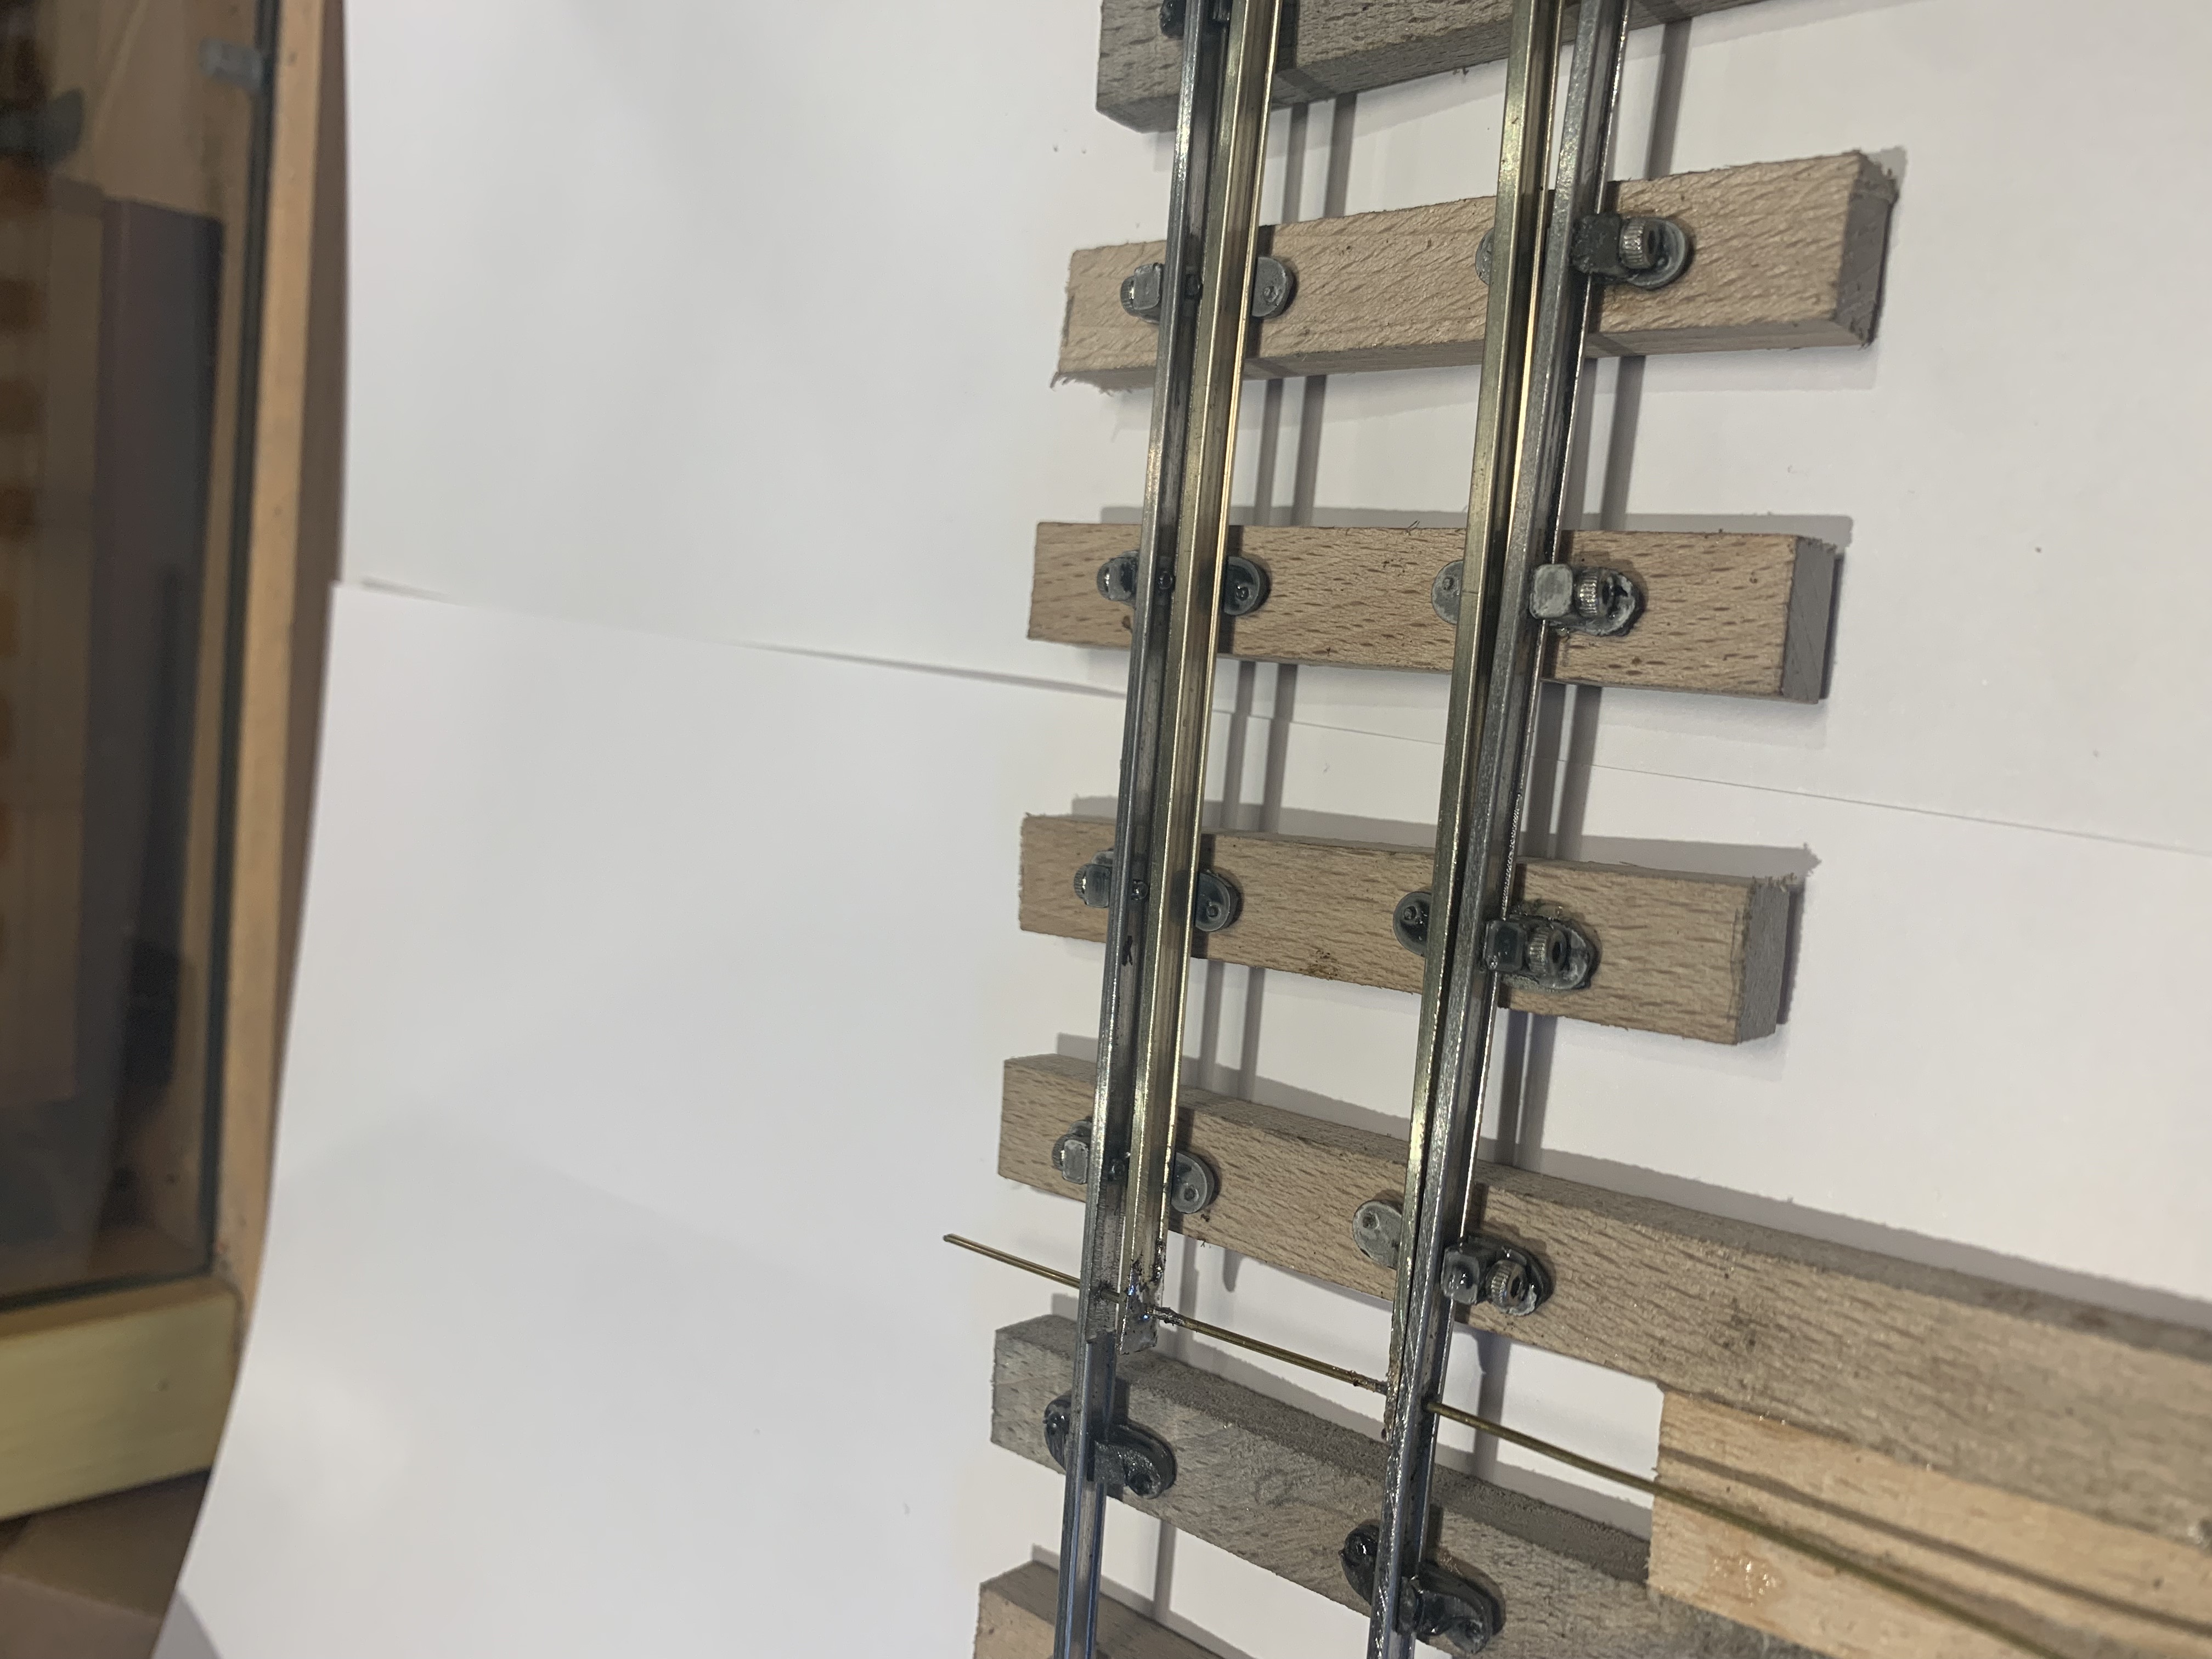
I am experimenting with ways of fixing chairs to the sleepers. I know I can successfully print my own chairs in ABS - but the weak point is the printed 3mm "pin" which fits into the hole in the sleeper. The batches of chairs with the pins printed in position don't always place the pins in exactly the correct place - there seems to be some sort of loss of registration during printing, which results in get gauge being oversize - say 34mm rather than 32mm. That has prompted me to go back to first principles and question why I was using the hole and in the first place. I suppose that I do that because that is what all of the bought chairs use. So what about doing it properly and use brass pins?
Would it be quicker to mark the sleepers (to centre the rails on the sleepers), drill the 0.5mm holes for each pin, and hammer the pins in or would it be quicker to drill the sleepers using my jigs, dip the chairs in acetone, and glue the chairs into the holes?
The design for the chairs has been altered to replace the dummy bolts with printed holes, and I'm trying it out:
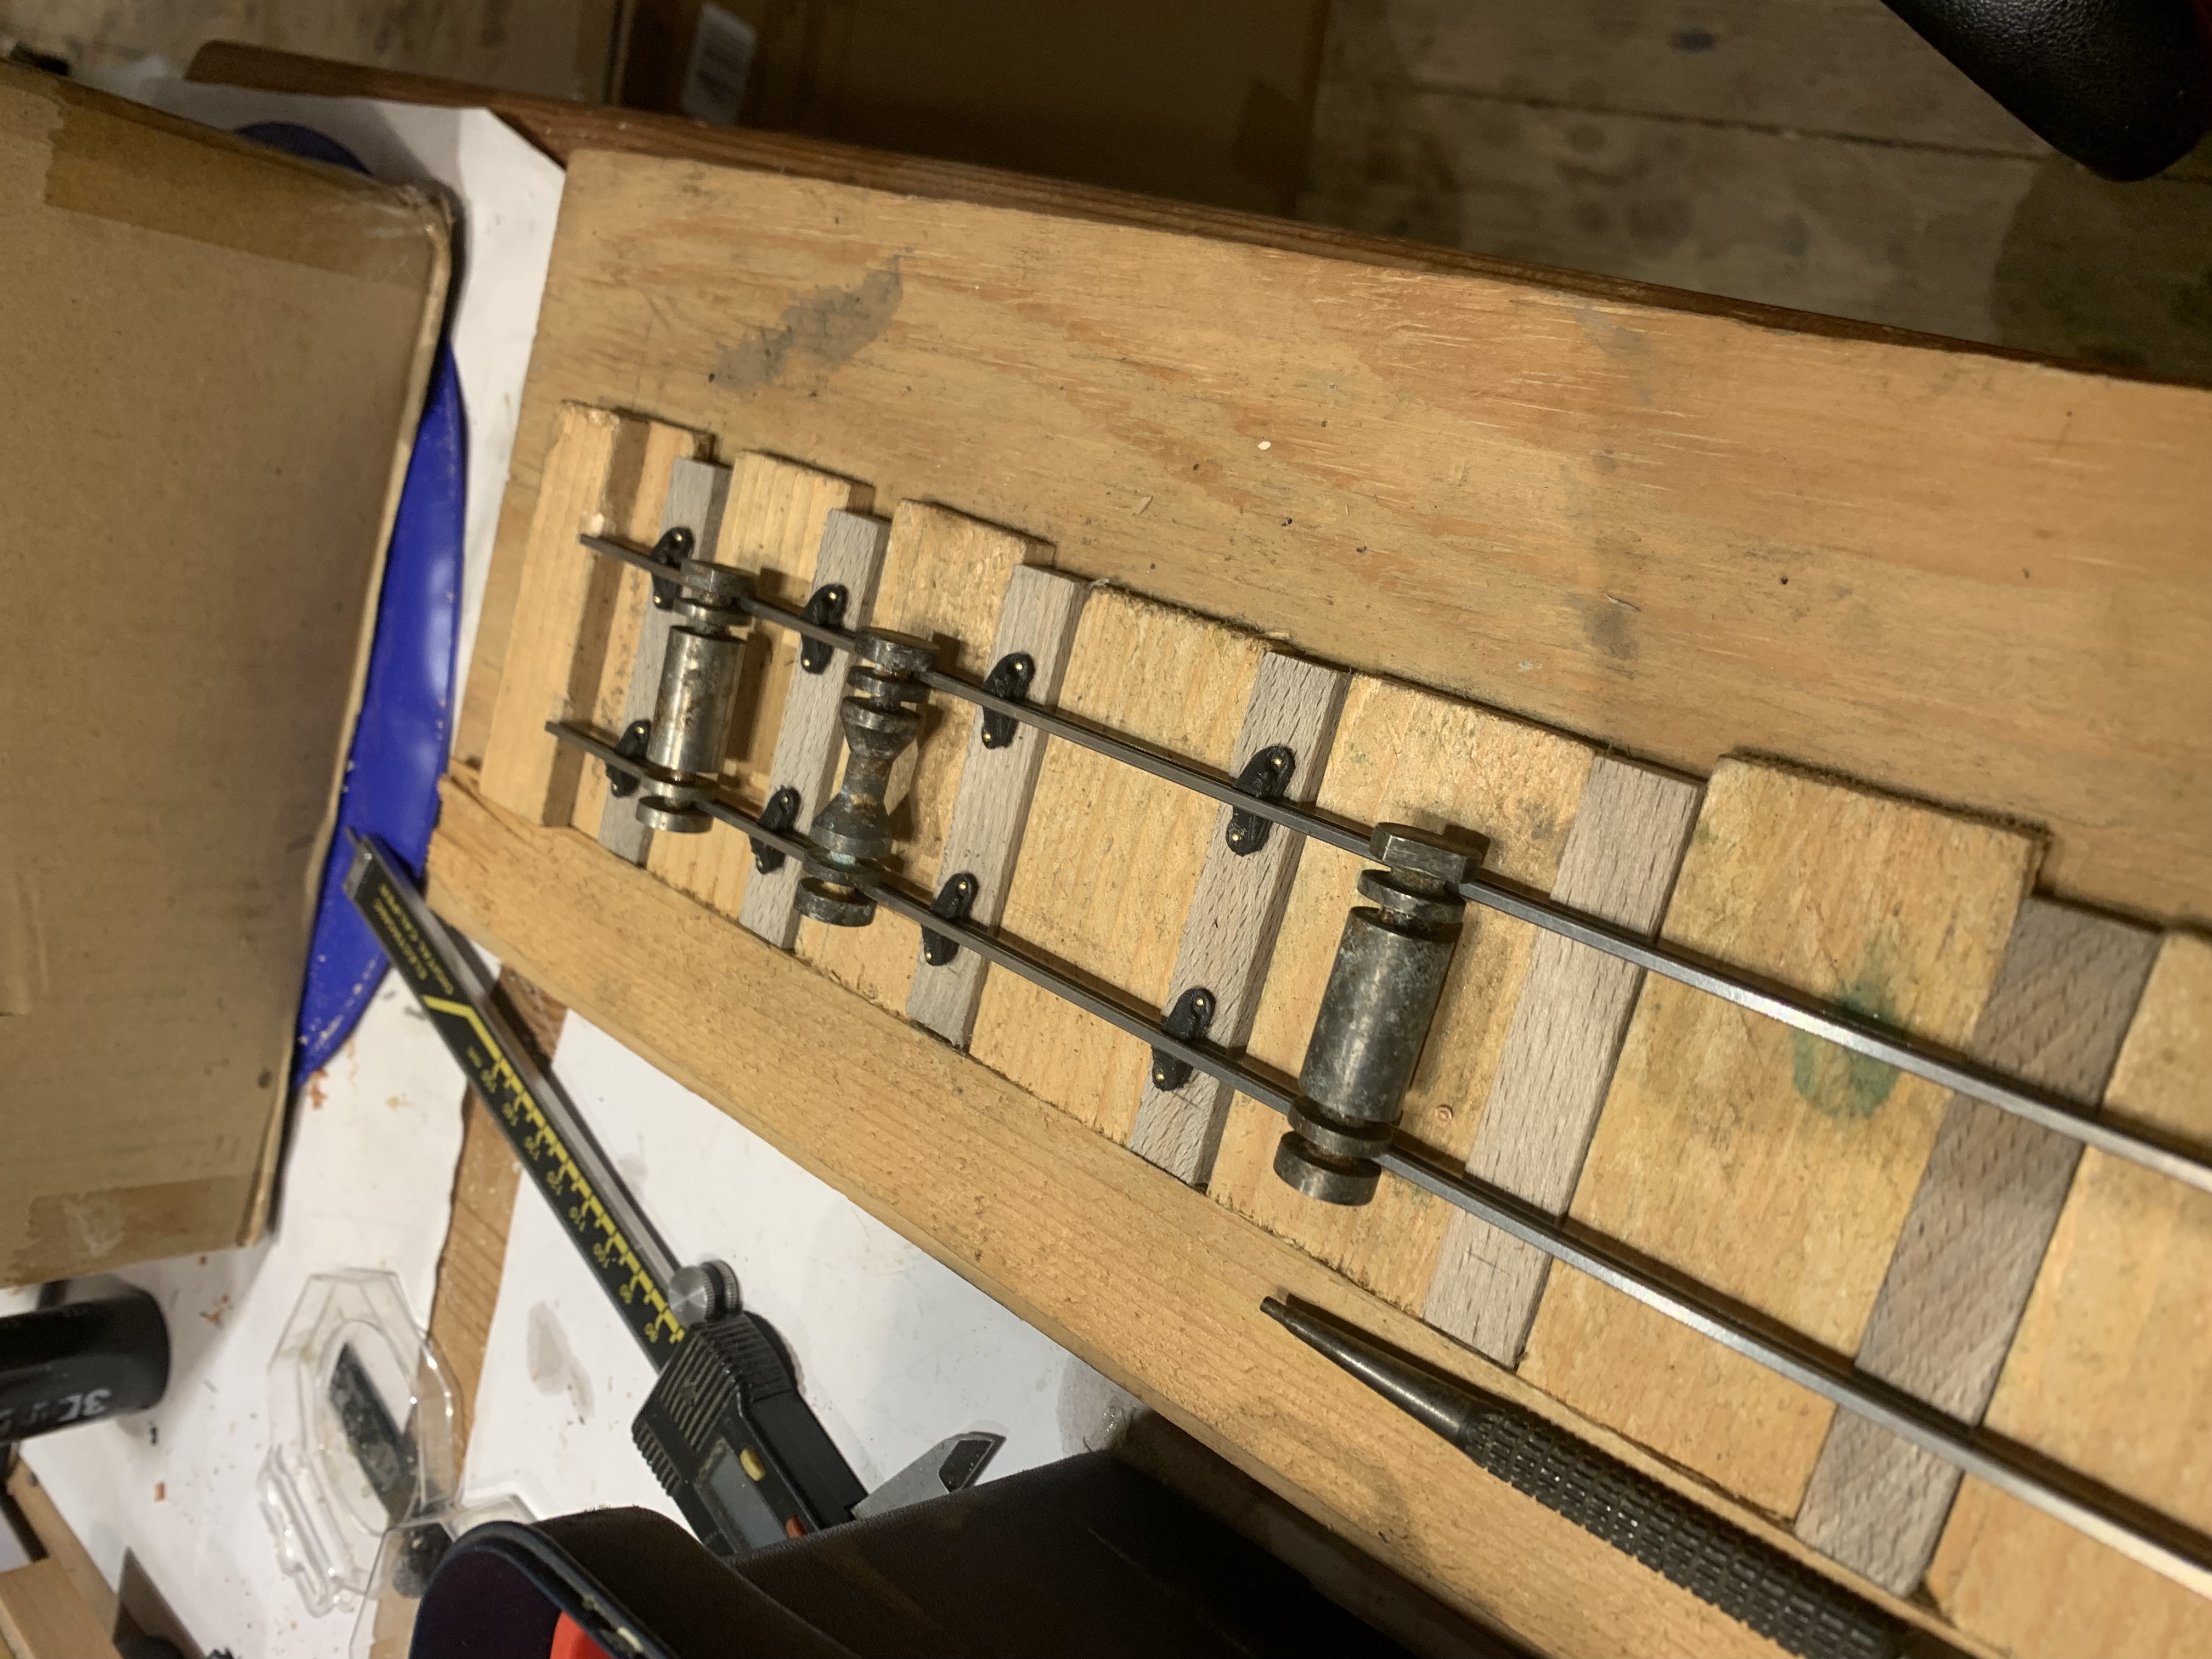
- IMG_3733.jpeg (2.46 MiB) Viewed 777 times
I have already identified that the chairs are quite strong enough as printed - it was the printed pins which were the weak point. I will let you know how I get on after the first length of track is completed.
Trevor
Re: The Railway in the Valley of the Mill
Posted: Wed Mar 06, 2024 7:13 am
by ge_rik
Are you going for 45mm gauge with this track?
EDIT: Sorry, just realised the inner groove on the roller gauges is for the check/wing rails.
Rik
Re: The Railway in the Valley of the Mill
Posted: Wed Mar 06, 2024 5:52 pm
by Trevor Thompson
ge_rik wrote: ↑Wed Mar 06, 2024 7:13 am
Are you going for 45mm gauge with this track?
EDIT: Sorry, just realised the inner groove on the roller gauges is for the check/wing rails.
Rik
Yes that is correct - the only issue with the roller gauges is that the 16mm Association standards for wing rails are 3mm not 2.5mm - so that explains why I use a 3mm drill so set the wing rails!
Re: The Railway in the Valley of the Mill
Posted: Fri Mar 08, 2024 3:07 pm
by Old Man Aaron
Individually pinning each chair into place would take longer, but from what you've said, it would give the required accuracy.
I don't know the first thing about 3D printing, but I would've thought you'd be getting perfectly consistent chairs out of it.

Re: The Railway in the Valley of the Mill
Posted: Thu Mar 14, 2024 11:36 am
by Trevor Thompson
Old Man Aaron wrote: ↑Fri Mar 08, 2024 3:07 pm
Individually pinning each chair into place would take longer, but from what you've said, it would give the required accuracy.
I don't know the first thing about 3D printing, but I would've thought you'd be getting perfectly consistent chairs out of it.
Well printing should give accurate results, but I think in this case each chair is poised on the top of a 3mm diameter pillar which is about 7mm tall. It just needs the slightest loss of alignment to make some of the chairs inaccurate. Certainly dispensing with the pillar has made them more usable, quicker and cheaper to make.
The only holdup was waiting for some "no 76" drills (0.51 mm diameter) to pre drill the holes for the 0.56mm diameter pins. These small brass pins are soft and bend readily. Now they are going together quite easily and as hoped more quickly than my old method. It is also quite satisfying to make them in the same was as the real thing. So the first length of track made this way:

- IMG_3740.jpeg (2.24 MiB) Viewed 542 times
Trevor