Page 6 of 18
Re: The Railway in the Valley of the Mill
Posted: Wed Oct 13, 2021 9:23 am
by Trevor Thompson
Many thanks for going to all that trouble Philip
Trevor
Re: The Railway in the Valley of the Mill
Posted: Fri Oct 15, 2021 8:29 pm
by gilfachphil
At the Welsh Botanic Garden today in the Japanese garden I spotted Leptinella Squalida which is a low growing mat forming plant which might be suitable for the bank.
Re: The Railway in the Valley of the Mill
Posted: Sun Oct 17, 2021 9:23 am
by Trevor Thompson
gilfachphil wrote: ↑Fri Oct 15, 2021 8:29 pm
At the Welsh Botanic Garden today in the Japanese garden I spotted Leptinella Squalida which is a low growing mat forming plant which might be suitable for the bank.
I will have to look for that - its about time we visited again
Trevor
Re: The Railway in the Valley of the Mill
Posted: Sun Oct 17, 2021 11:25 am
by philipy
Trevor Thompson wrote: ↑Sun Oct 17, 2021 9:23 am
gilfachphil wrote: ↑Fri Oct 15, 2021 8:29 pm
At the Welsh Botanic Garden today in the Japanese garden I spotted Leptinella Squalida which is a low growing mat forming plant which might be suitable for the bank.
I will have to look for that - its about time we visited again
Trevor
It's fairly widely available. I got two at different times, but neither have survived, don't know why. It comes in two different colours, a greenish one and a dark brownish purple colour.
Re: The Railway in the Valley of the Mill
Posted: Sun Oct 17, 2021 1:16 pm
by Jimmyb
philipy wrote: ↑Sun Oct 17, 2021 11:25 am
Trevor Thompson wrote: ↑Sun Oct 17, 2021 9:23 am
gilfachphil wrote: ↑Fri Oct 15, 2021 8:29 pm
At the Welsh Botanic Garden today in the Japanese garden I spotted Leptinella Squalida which is a low growing mat forming plant which might be suitable for the bank.
I will have to look for that - its about time we visited again
Trevor
It's fairly widely available. I got two at different times, but neither have survived, don't know why. It comes in two different colours, a greenish one and a dark brownish purple colour.
Looked this up and I have some, the spot in which it was planted died, but it has spread, and though difficult to see in the photo (it is the black variety) it is everywhere in just two years.
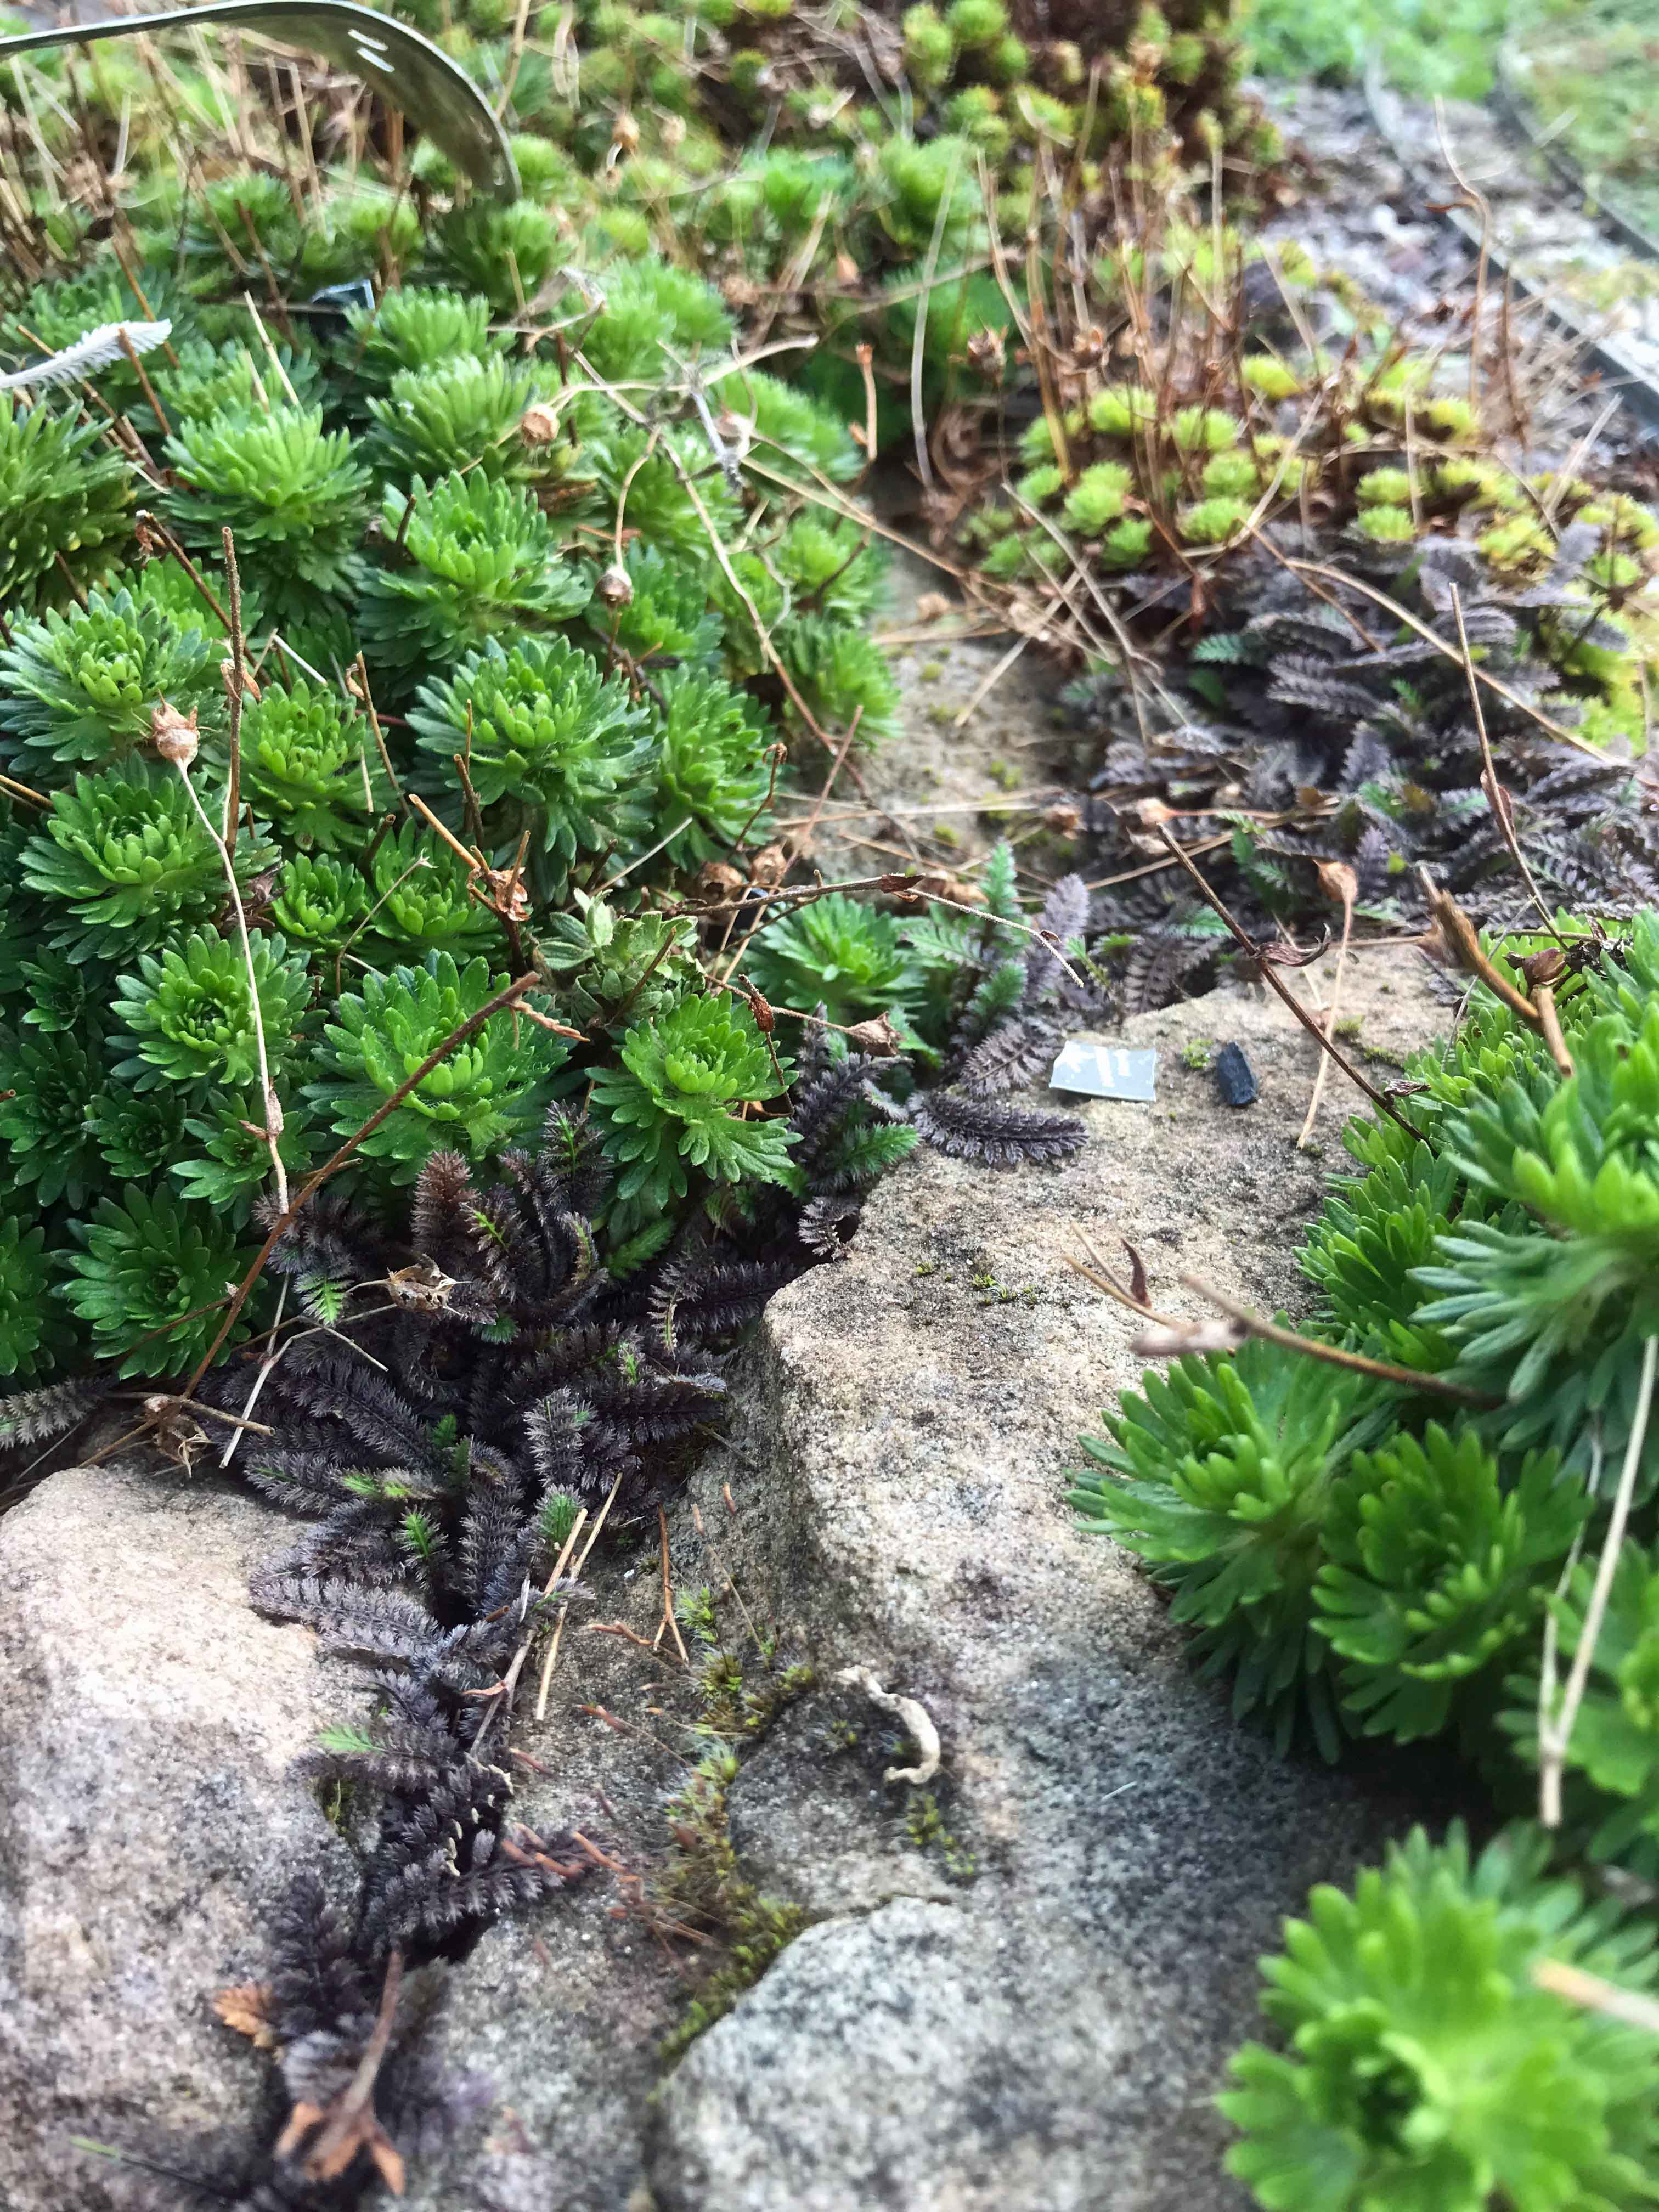
- IMG_1264.jpg (799.57 KiB) Viewed 3340 times
Re: The Railway in the Valley of the Mill
Posted: Sun Oct 17, 2021 1:50 pm
by philipy
Interesting picture Jimmy, which may explain why mine died. I planted it on open borders between lawn and track, whereas yours seems to be happy in the gaps between the rocks. If thats correct then I fear it won't like Trevor's big open bank.
Re: The Railway in the Valley of the Mill
Posted: Sun Oct 17, 2021 8:15 pm
by Trevor Thompson
philipy wrote: ↑Sun Oct 17, 2021 1:50 pm
Interesting picture Jimmy, which may explain why mine died. I planted it on open borders between lawn and track, whereas yours seems to be happy in the gaps between the rocks. If thats correct then I fear it won't like Trevor's big open bank.
Ah but that is interesting in another context. There are places where something like that could fill the gaps between rocks.
Trevor
Re: The Railway in the Valley of the Mill
Posted: Sun Oct 17, 2021 8:19 pm
by Trevor Thompson
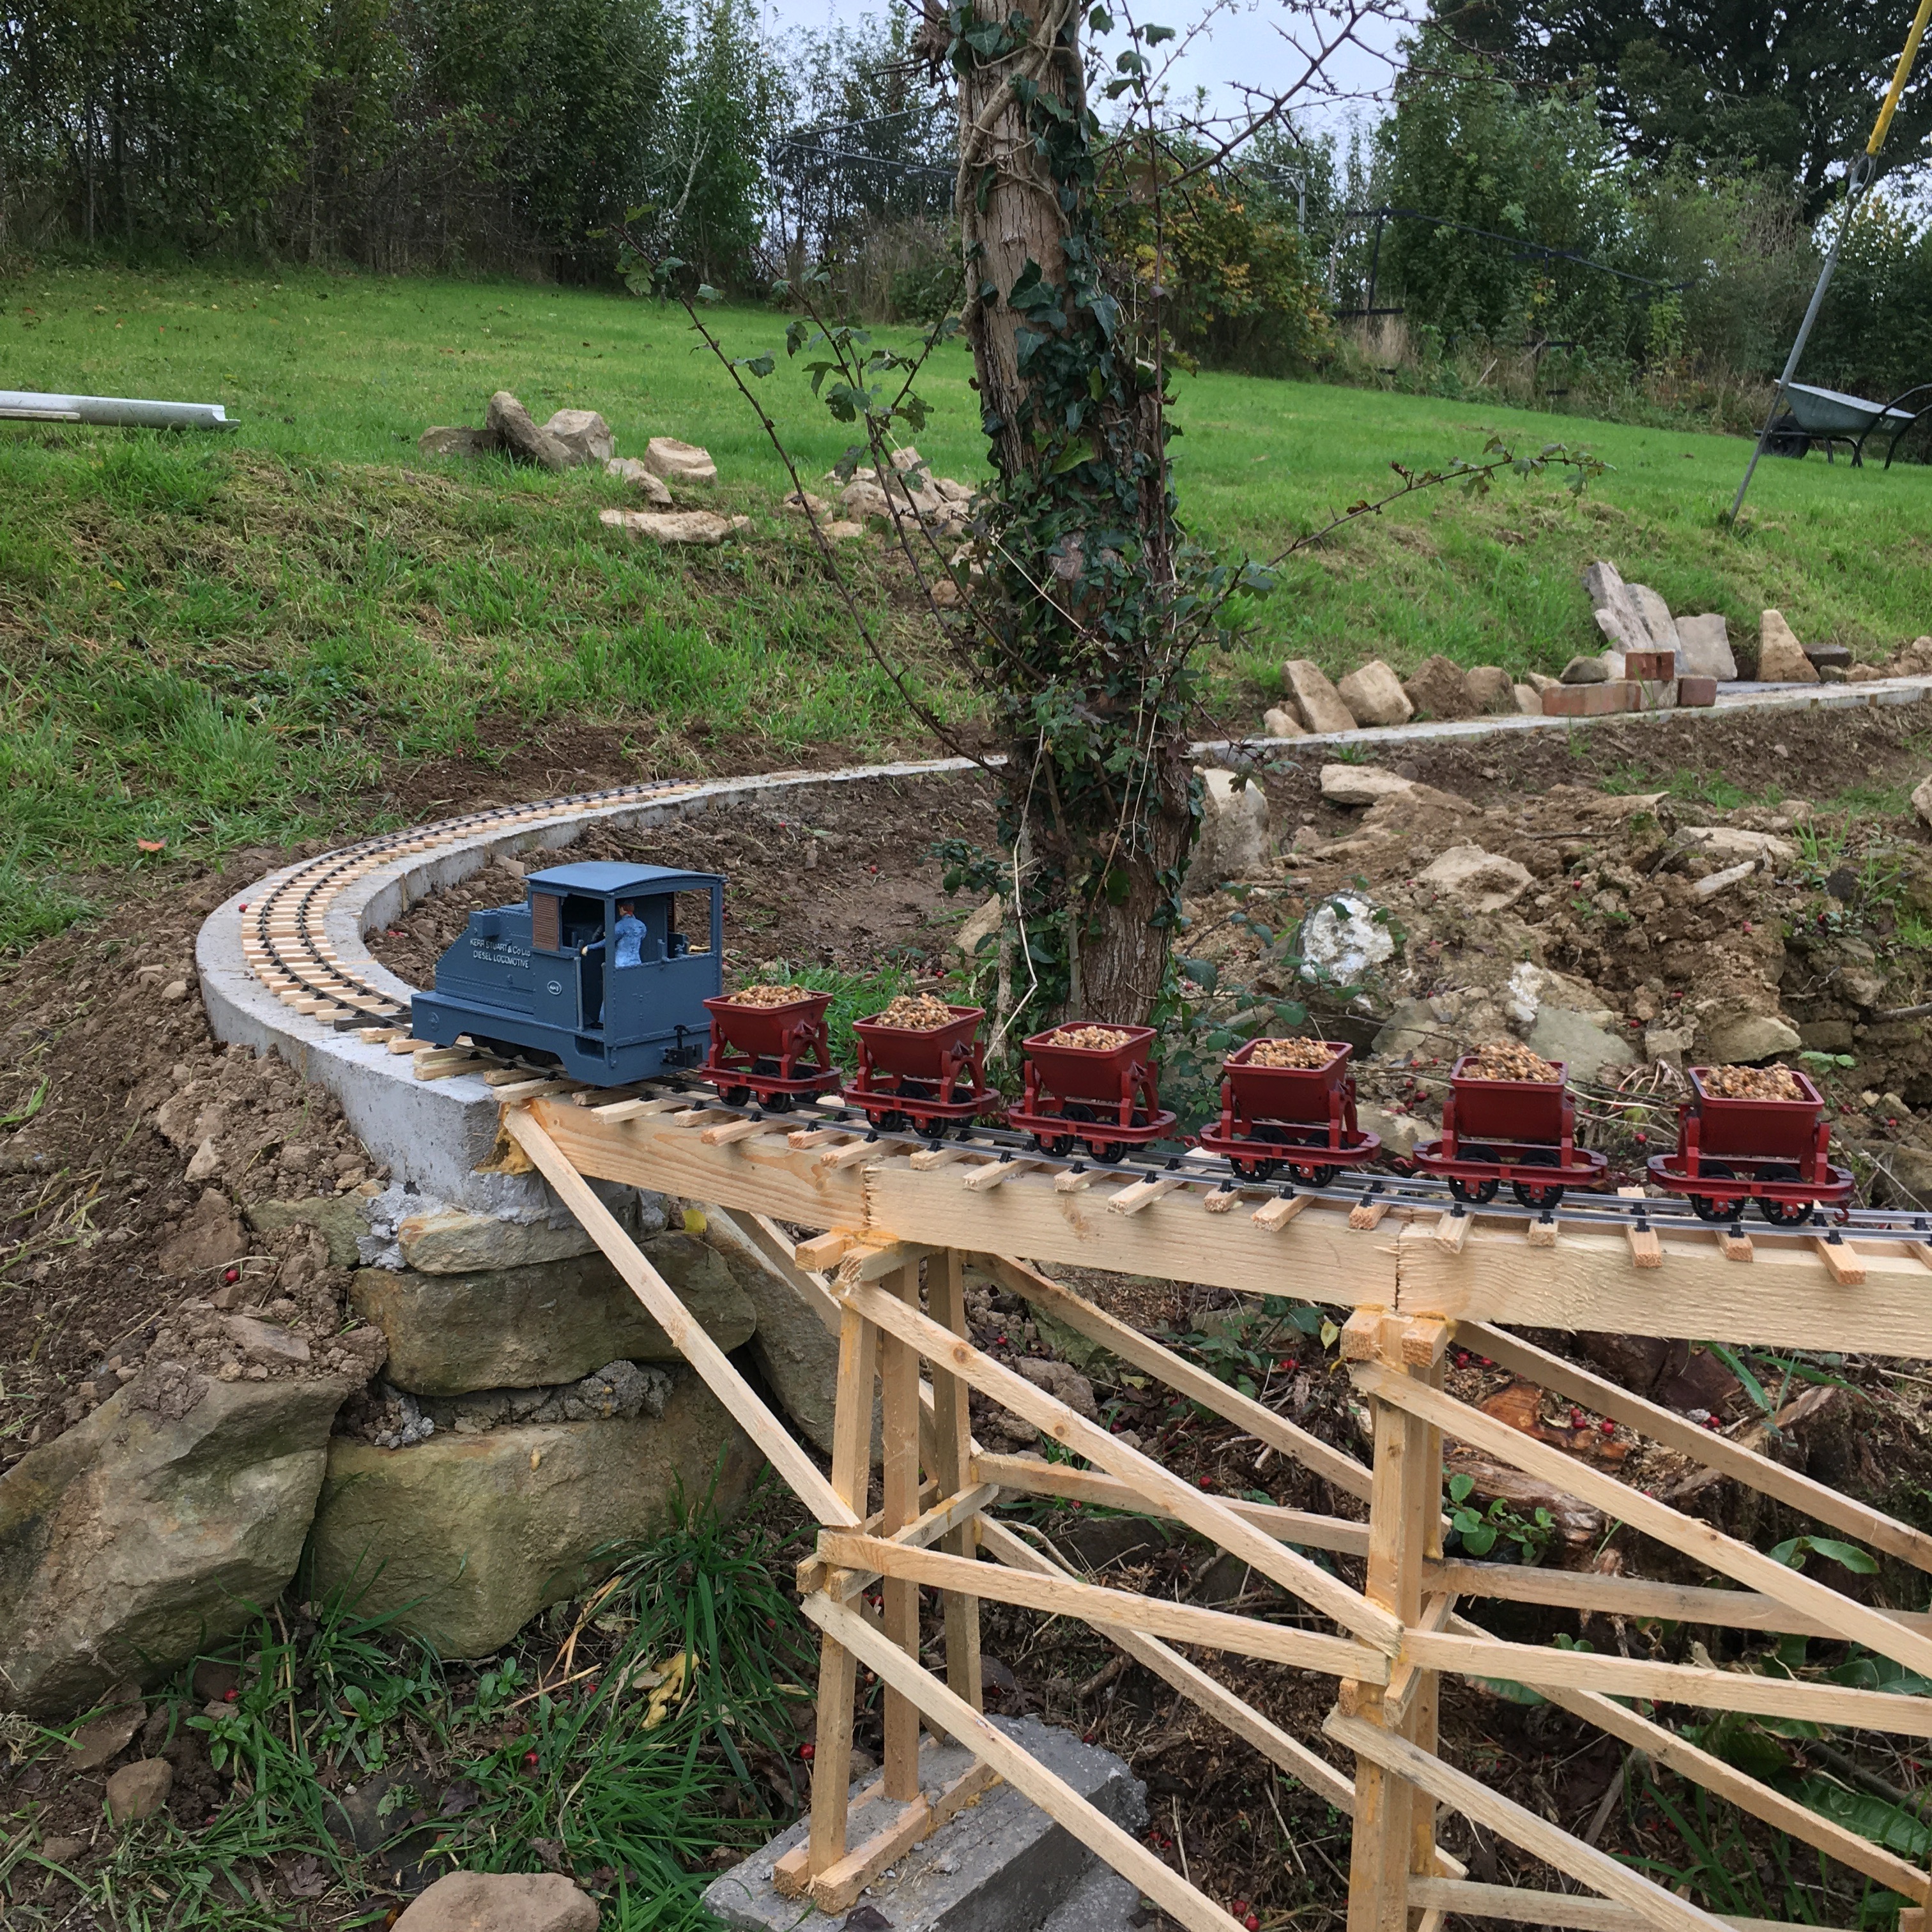
Going back to progress on extending the railway.
The track has now reached "dry land" at the other end of the viaduct:
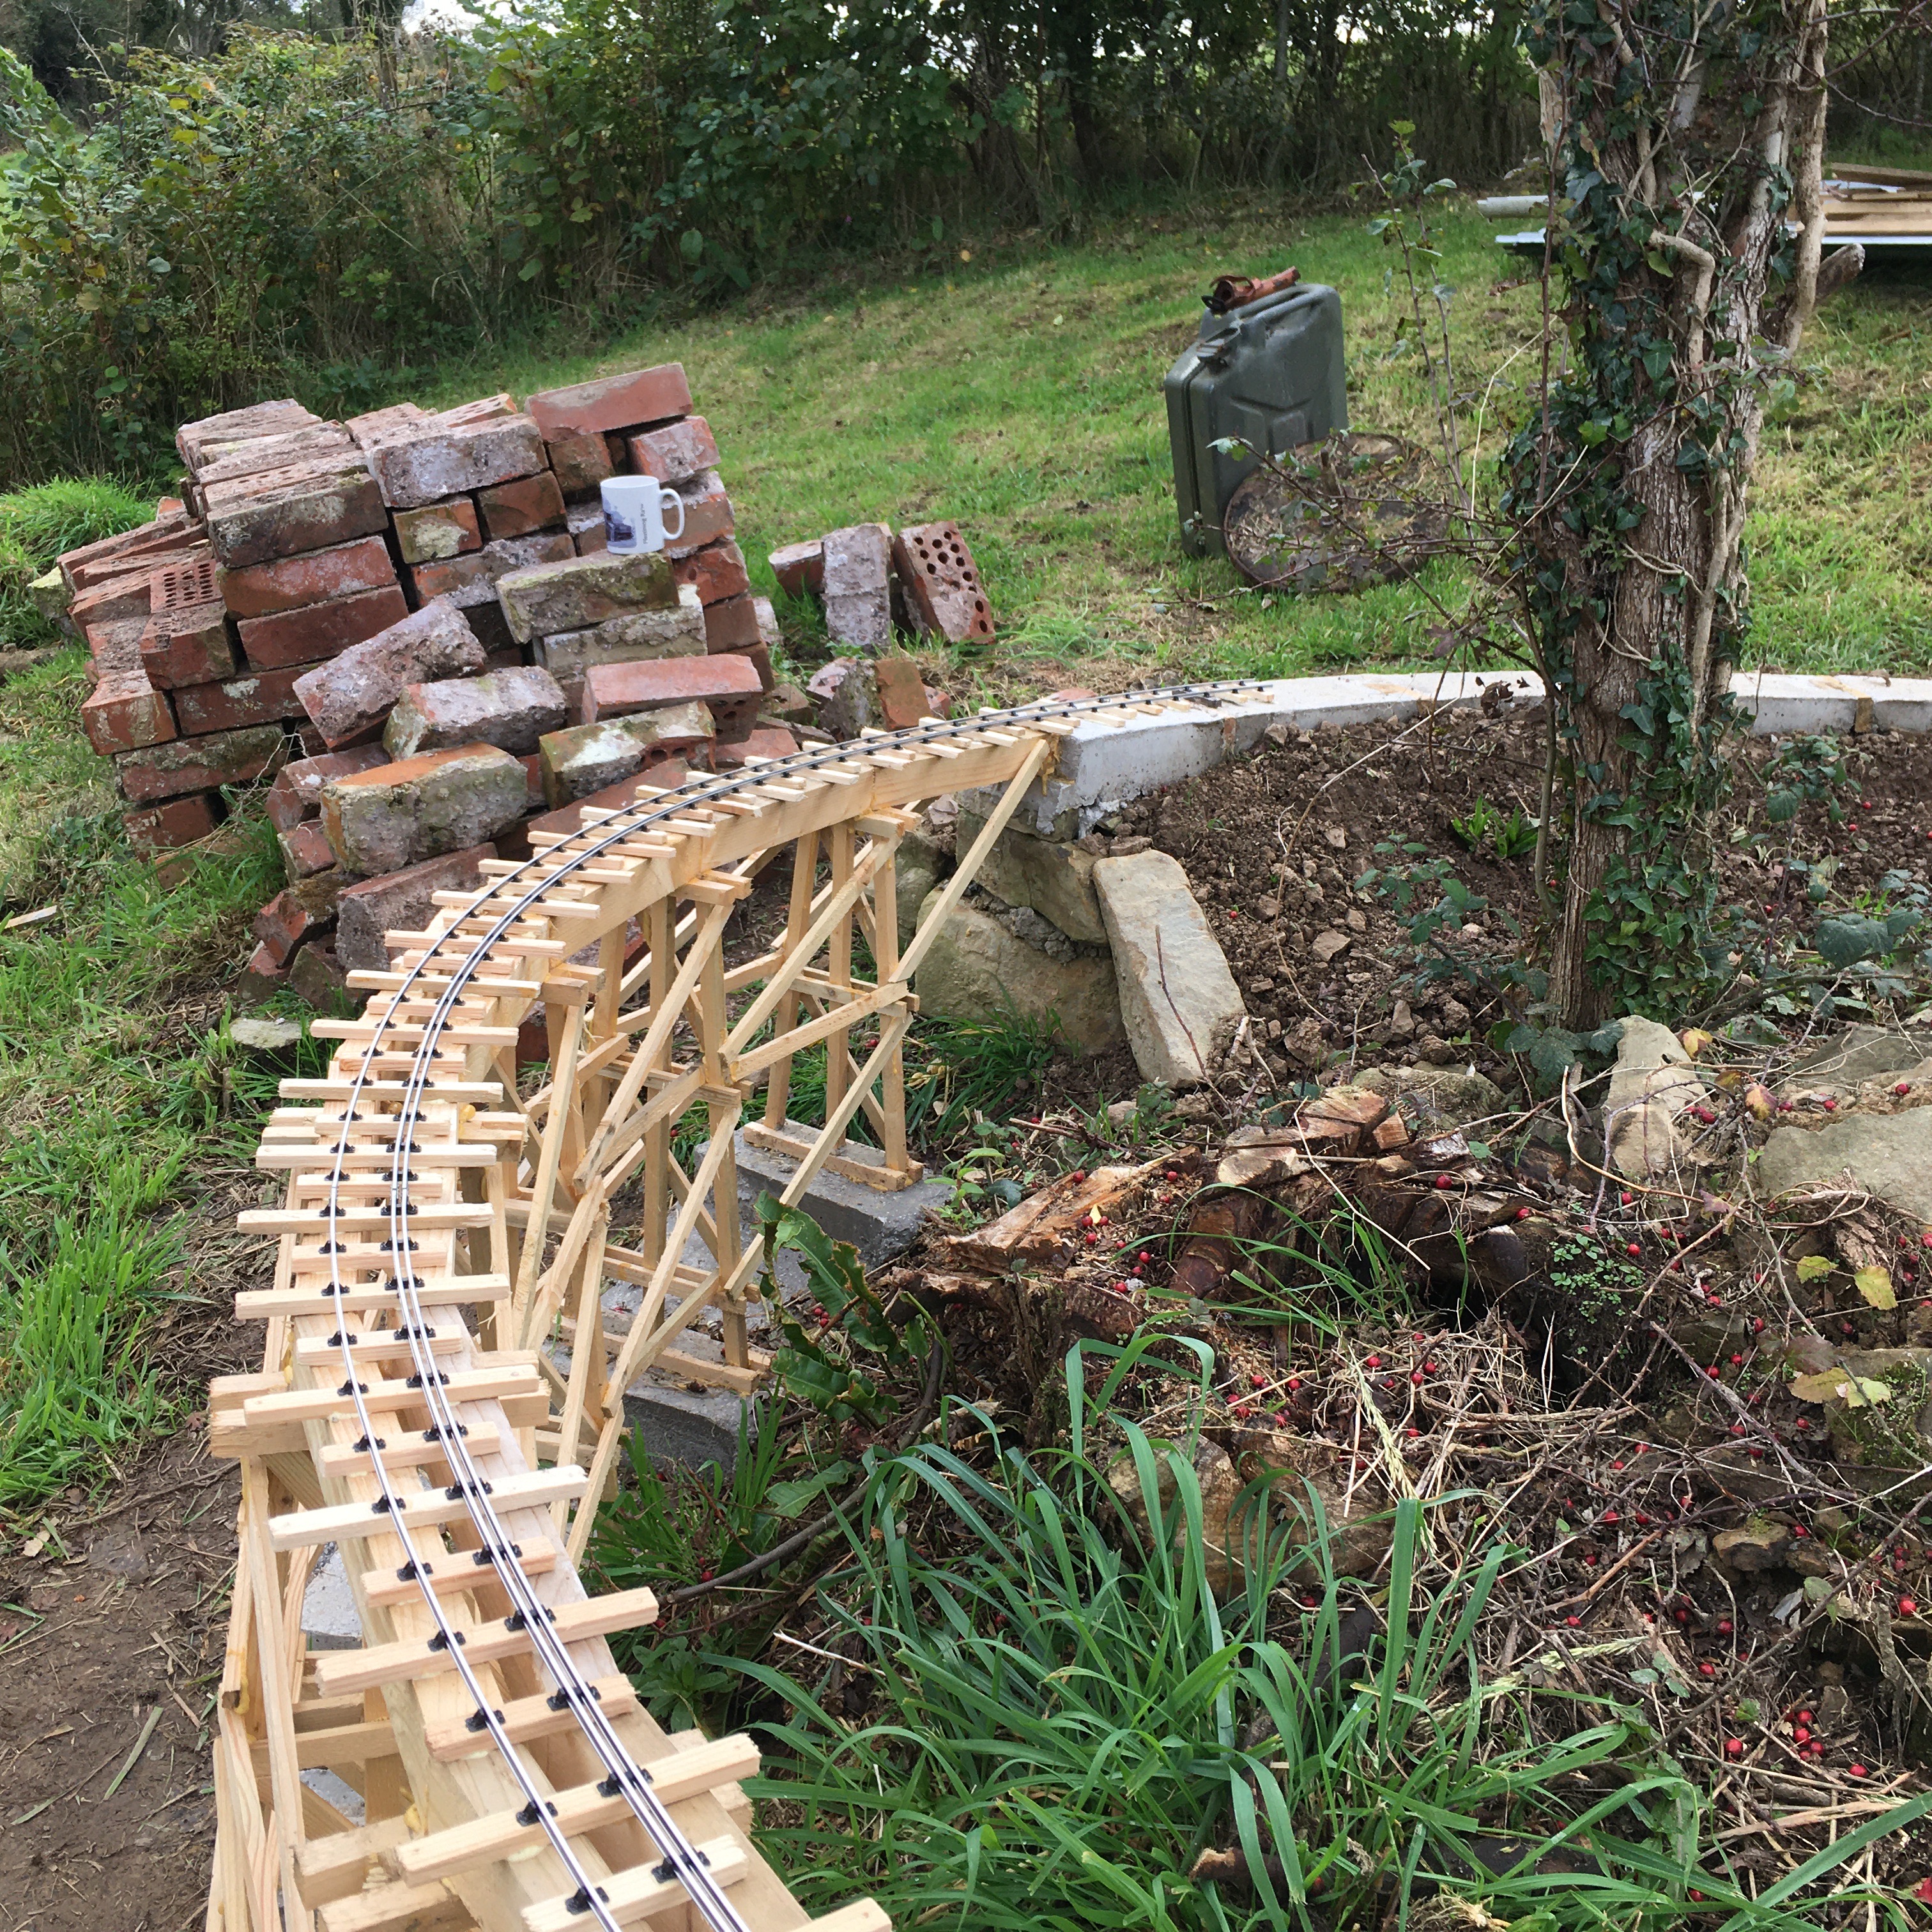
- IMG_1837.jpg (3.63 MiB) Viewed 3218 times
and I am thinking about the passing loop. The first point offered up to see if it fits:
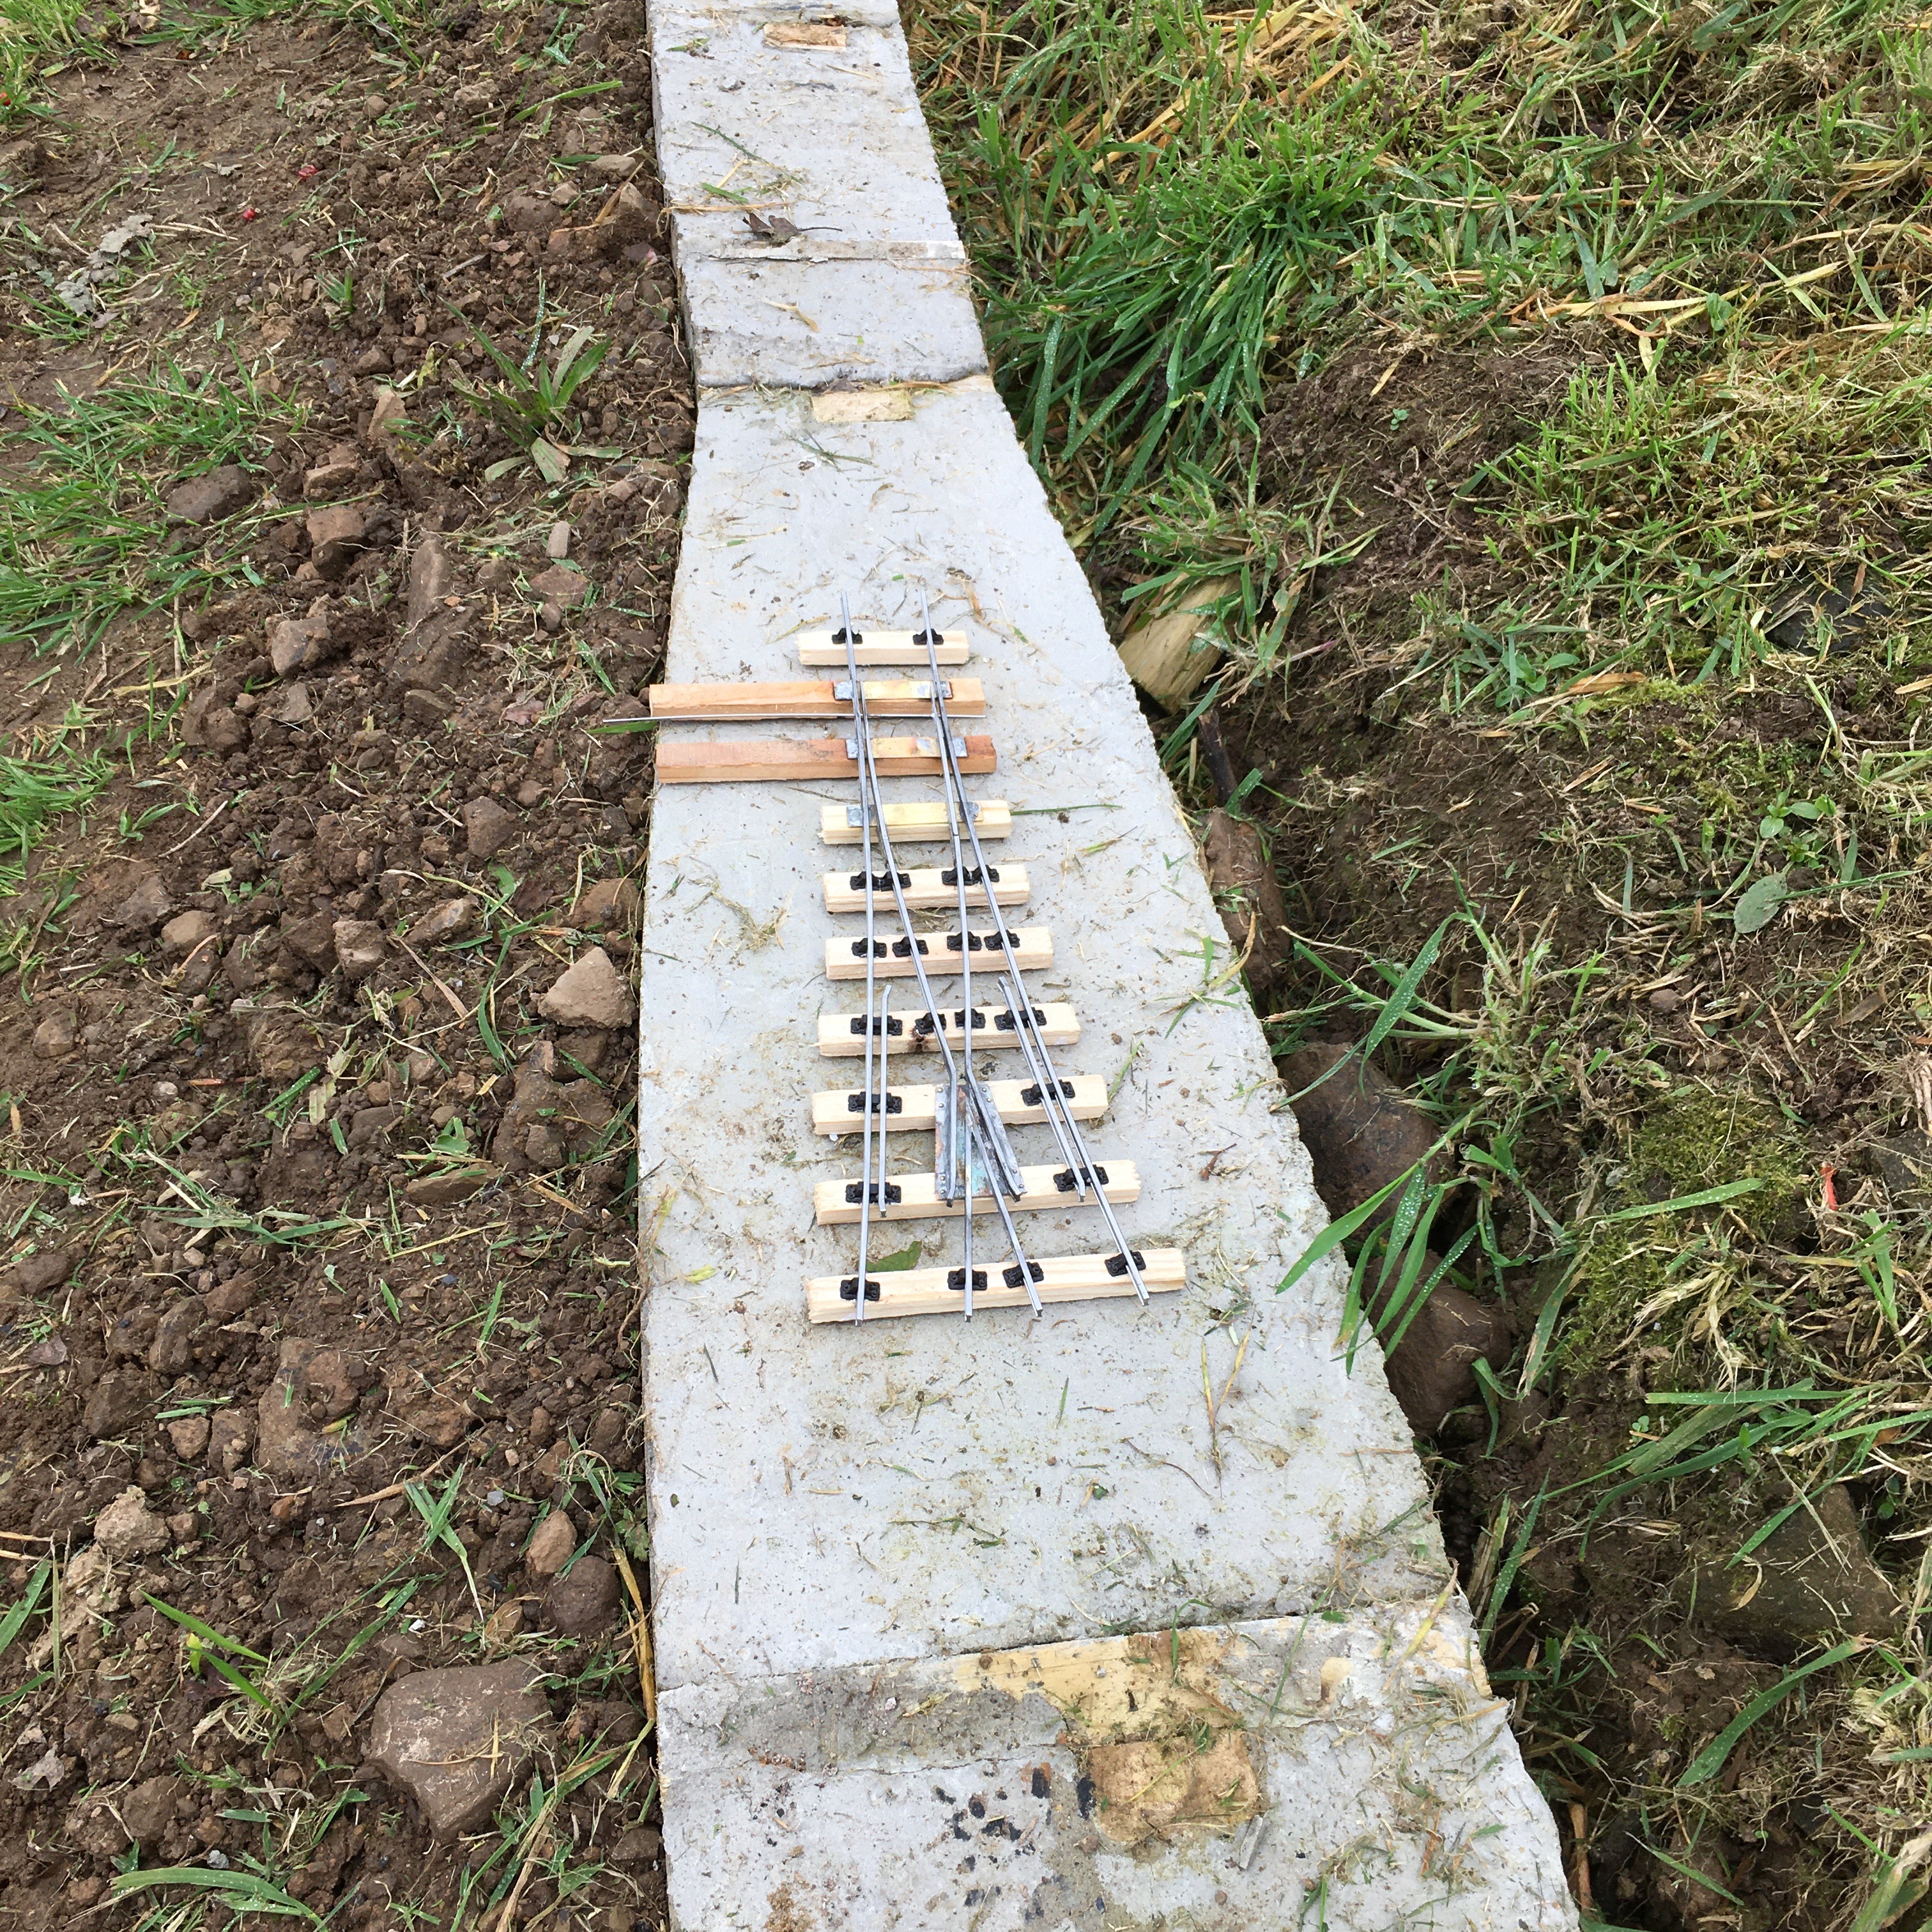
- IMG_1834.jpg (4.09 MiB) Viewed 3218 times
Trevor
Re: The Railway in the Valley of the Mill
Posted: Sun Oct 17, 2021 8:32 pm
by Trevor Thompson
Lonsdaler wrote: ↑Fri Oct 08, 2021 6:21 pm
I can't see how you've fitted the check rail - is it a double shoe or have you sliced part off the checkrail shoes? Either way it looks great. Looking forward to seeing it progressing.
I have realised that I have actually made an error here. The check rail chairs that I have used are actually designed for G1. And for Course scale G1 at that. So the end result is that the gap between running rail and check rail is 3mm rather than the 2.5mm which seems correct for 32mm narrow gauge. Bit of a pity really all that effort and extra expense and it isn't correct. Too late now! However I have tried a few different vehicles on the viaduct and the check rail isn't far off touching the back of the flanges - particularly on 4 wheel stock. Perhaps since it is on a curve that brings the flanges closer to the rail - so perhaps it isn't an issue. If you look closely at the photo you should be able to see that the flange on this wagon is near enough touching the check rail:
- IMG_1847.jpg (1.77 MiB) Viewed 3216 times
On the other hand it is an issue on the point. The wheels on test wagons just climb the frog - and its that 3mm gap which is the issue. So I am going to modify the point. I will cut through the middle of the check rail chairs (only 3 each side) and prize up the check rail. If I cut through with a cutting wheel in a dremel that should allow me to close the cut, and pin them down again at the correct spacing using a track gauge to make sure they go down in the correct position. I have noticed that if I cut off the bolt heads with a knife I can usually get a 0.9mm hole in the correct place and then use brass pins - the sort used for making model boats.
Re: The Railway in the Valley of the Mill
Posted: Sun Oct 17, 2021 8:37 pm
by Trevor Thompson
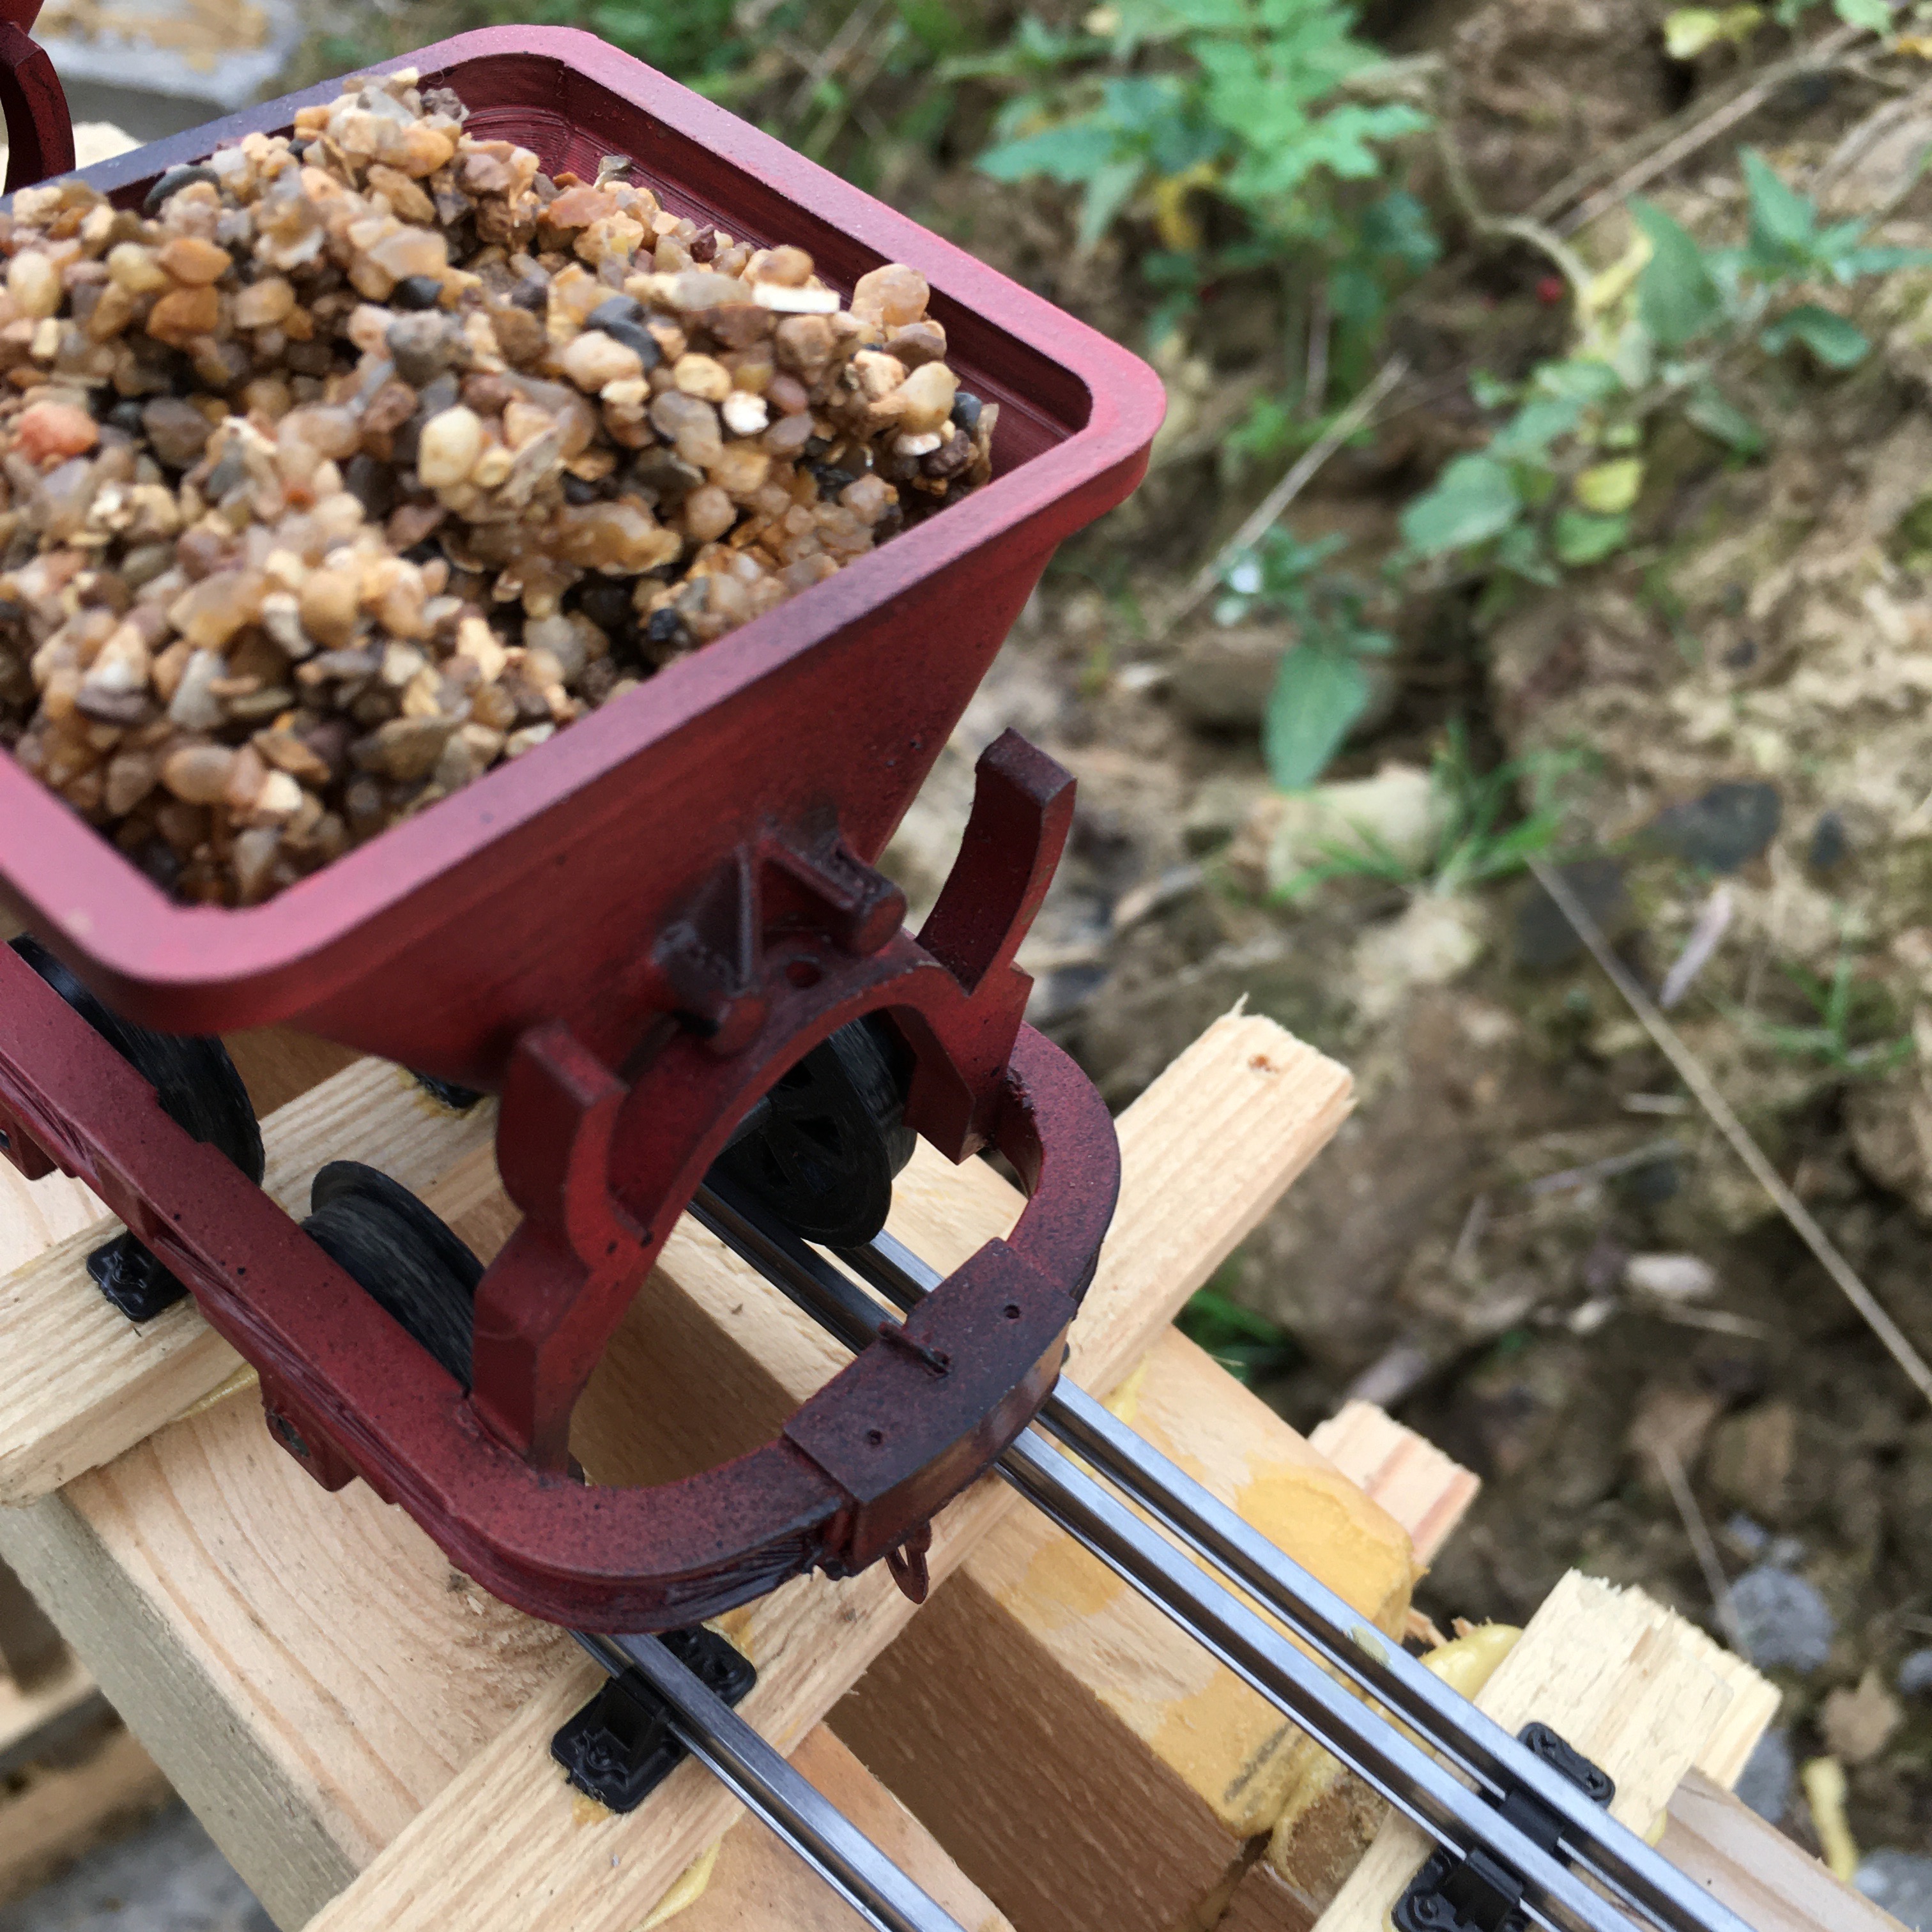
Testing the track on the viaduct:
- IMG_1844.jpg (3.29 MiB) Viewed 3215 times
The first train to pass all the way from one end to the other.

- IMG_1845.jpg (3.03 MiB) Viewed 3215 times
and to arrive on dry land at the other end.
Next stop the passing loop and Dduallt station building.
Trevor
Re: The Railway in the Valley of the Mill
Posted: Sun Oct 17, 2021 9:10 pm
by ge_rik
Trevor Thompson wrote: ↑Sun Oct 17, 2021 8:32 pm
....... the gap between running rail and check rail is 3mm rather than the 2.5mm which seems correct for 32mm narrow gauge.
Better that way round than vice versa ........

Rik
Re: The Railway in the Valley of the Mill
Posted: Sun Oct 17, 2021 10:44 pm
by Phil.P
On the point:
Could fit a thin brass shim, folded to slip over the check rail?
Something similar is often done on G scale track..
Phil.P
Re: The Railway in the Valley of the Mill
Posted: Mon Oct 18, 2021 8:54 am
by Trevor Thompson
ge_rik wrote: ↑Sun Oct 17, 2021 9:10 pm
Trevor Thompson wrote: ↑Sun Oct 17, 2021 8:32 pm
....... the gap between running rail and check rail is 3mm rather than the 2.5mm which seems correct for 32mm narrow gauge.
Better that way round than vice versa ........
Rik
Yes I think you are right. The more I think about it the more I am happy with it. I have been thinking about how a tight check rail might introduce lots of friction. Imagine a long train going uphill and all the wheels touching the check rail - that could be a lot of extra friction. So may be its just as well as it is.
Trevor
Re: The Railway in the Valley of the Mill
Posted: Mon Oct 18, 2021 8:56 am
by Trevor Thompson
Phil.P wrote: ↑Sun Oct 17, 2021 10:44 pm
On the point:
Could fit a thin brass shim, folded to slip over the check rail?
Something similar is often done on G scale track..
Phil.P
That is an idea I hadn't come across. If I had fixed the point in place it would have been a good solution. Since it is still in the workshop I think I can move the check rail.
Trevor
Re: The Railway in the Valley of the Mill
Posted: Mon Oct 18, 2021 11:03 am
by Lonsdaler
Trevor Thompson wrote: ↑Sun Oct 17, 2021 8:32 pm
Lonsdaler wrote: ↑Fri Oct 08, 2021 6:21 pm
I can't see how you've fitted the check rail - is it a double shoe or have you sliced part off the checkrail shoes? Either way it looks great. Looking forward to seeing it progressing.
I have realised that I have actually made an error here. The check rail chairs that I have used are actually designed for G1. And for Course scale G1 at that. So the end result is that the gap between running rail and check rail is 3mm rather than the 2.5mm which seems correct for 32mm narrow gauge. Bit of a pity really all that effort and extra expense and it isn't correct. Too late now! However I have tried a few different vehicles on the viaduct and the check rail isn't far off touching the back of the flanges - particularly on 4 wheel stock. Perhaps since it is on a curve that brings the flanges closer to the rail - so perhaps it isn't an issue. If you look closely at the photo you should be able to see that the flange on this wagon is near enough touching the check rail:
IMG_1847.jpg
On the other hand it is an issue on the point. The wheels on test wagons just climb the frog - and its that 3mm gap which is the issue. So I am going to modify the point. I will cut through the middle of the check rail chairs (only 3 each side) and prize up the check rail. If I cut through with a cutting wheel in a dremel that should allow me to close the cut, and pin them down again at the correct spacing using a track gauge to make sure they go down in the correct position. I have noticed that if I cut off the bolt heads with a knife I can usually get a 0.9mm hole in the correct place and then use brass pins - the sort used for making model boats.
Other than for appearances sake, I'm not sure how effective a check rail will be, but even at 3mm the gap looks more prototypical than my attempt using individual Peco chairs. It's all looking the part, and it's survived first contact with a train - well done. Interested to see what you are going to do about preserving the wood/ colouration

Re: The Railway in the Valley of the Mill
Posted: Mon Oct 18, 2021 11:59 am
by Andrew
Sorry about your check-rail woes, but I reckon they'll be worth it in the end, the trestle looks superb, as does that lovely curve into the bank...
Re: The Railway in the Valley of the Mill
Posted: Mon Oct 18, 2021 8:20 pm
by Trevor Thompson
Firstly preserving the wood. I am using wood preservative which Screwfix sell. For the track I am soaking the drilled sleepers in it overnight and then drying them over the Rayburn.
For the viaduct I intend to use the same stuff - but I was going to spray it using the compressor and either a proper spray gun, or perhaps the device I have for injecting wax oil into a chassis. Experiments to take place soon! Either way I am not intending to add any colour - just let it weather. Just need another spell of dry weather with light winds.
I have "cut and shut" those check rail chairs on the point. I used 2.3mm drills as spacers and clamped the rails up to the spacers as in the following photo. I did drill out the false bolt heads and glued and pinned the chairs down in their new position:
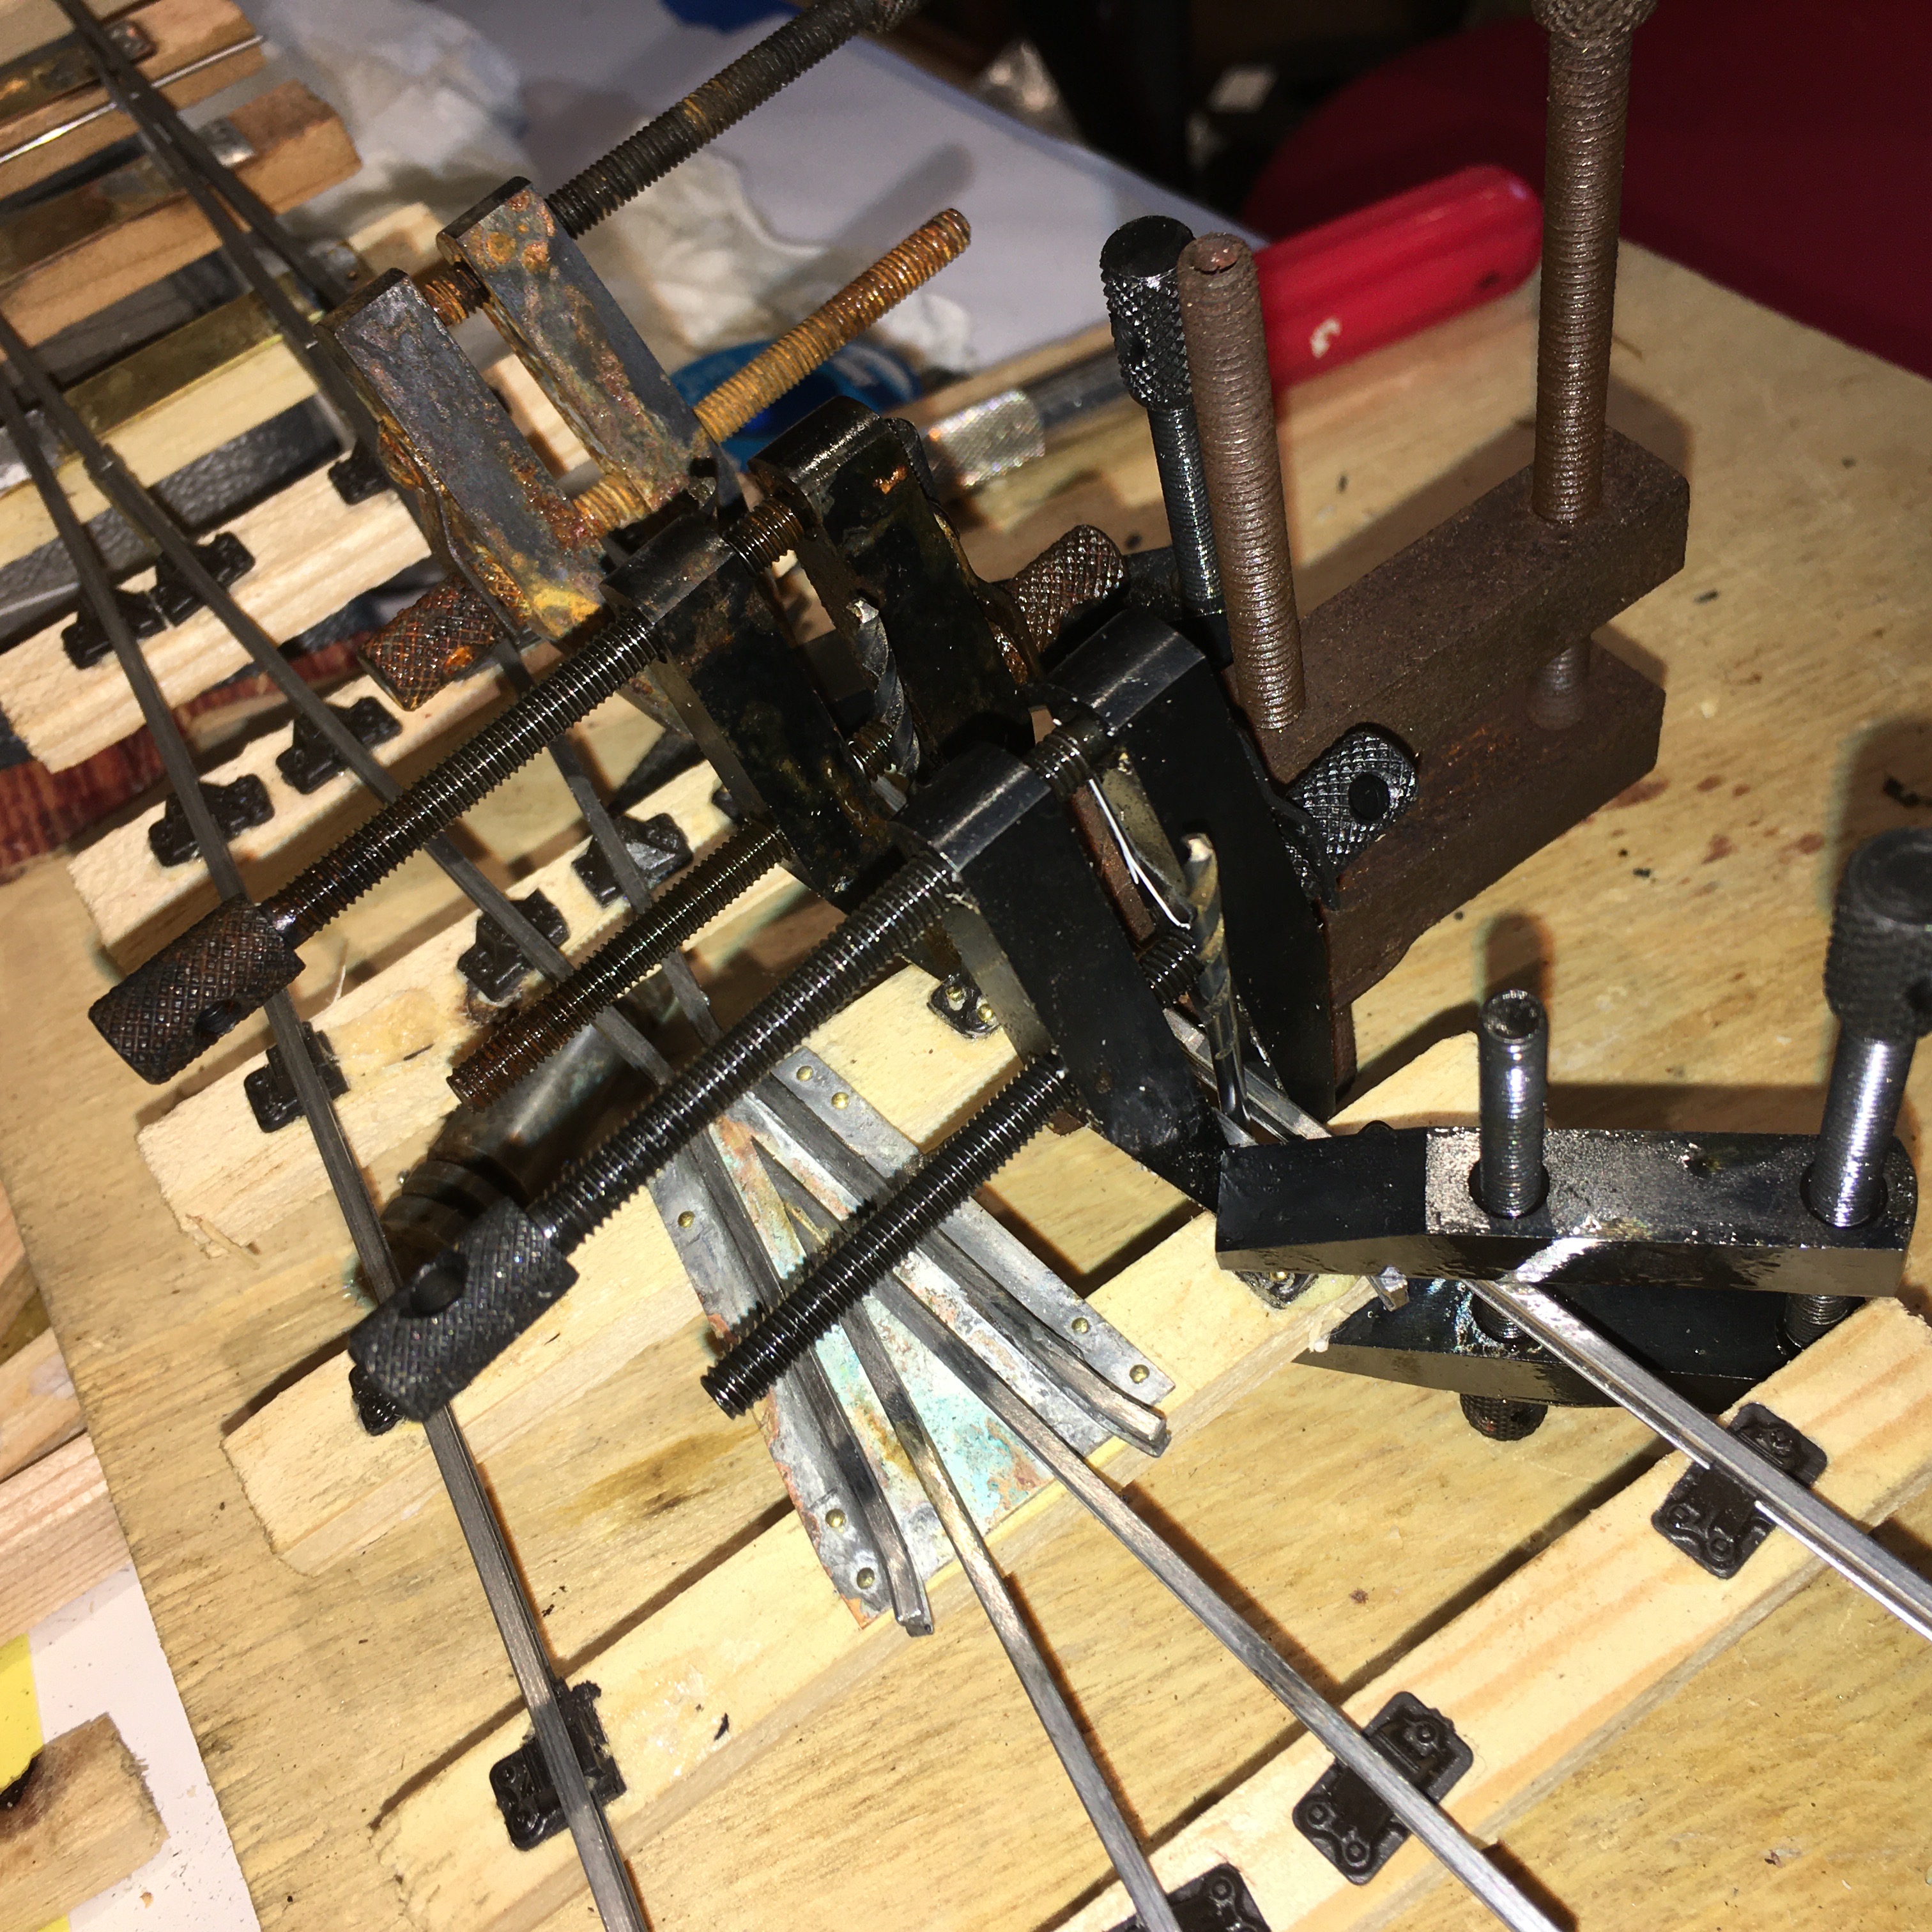
- IMG_1864.jpg (2.11 MiB) Viewed 4415 times
and finally a photo of the finished point:
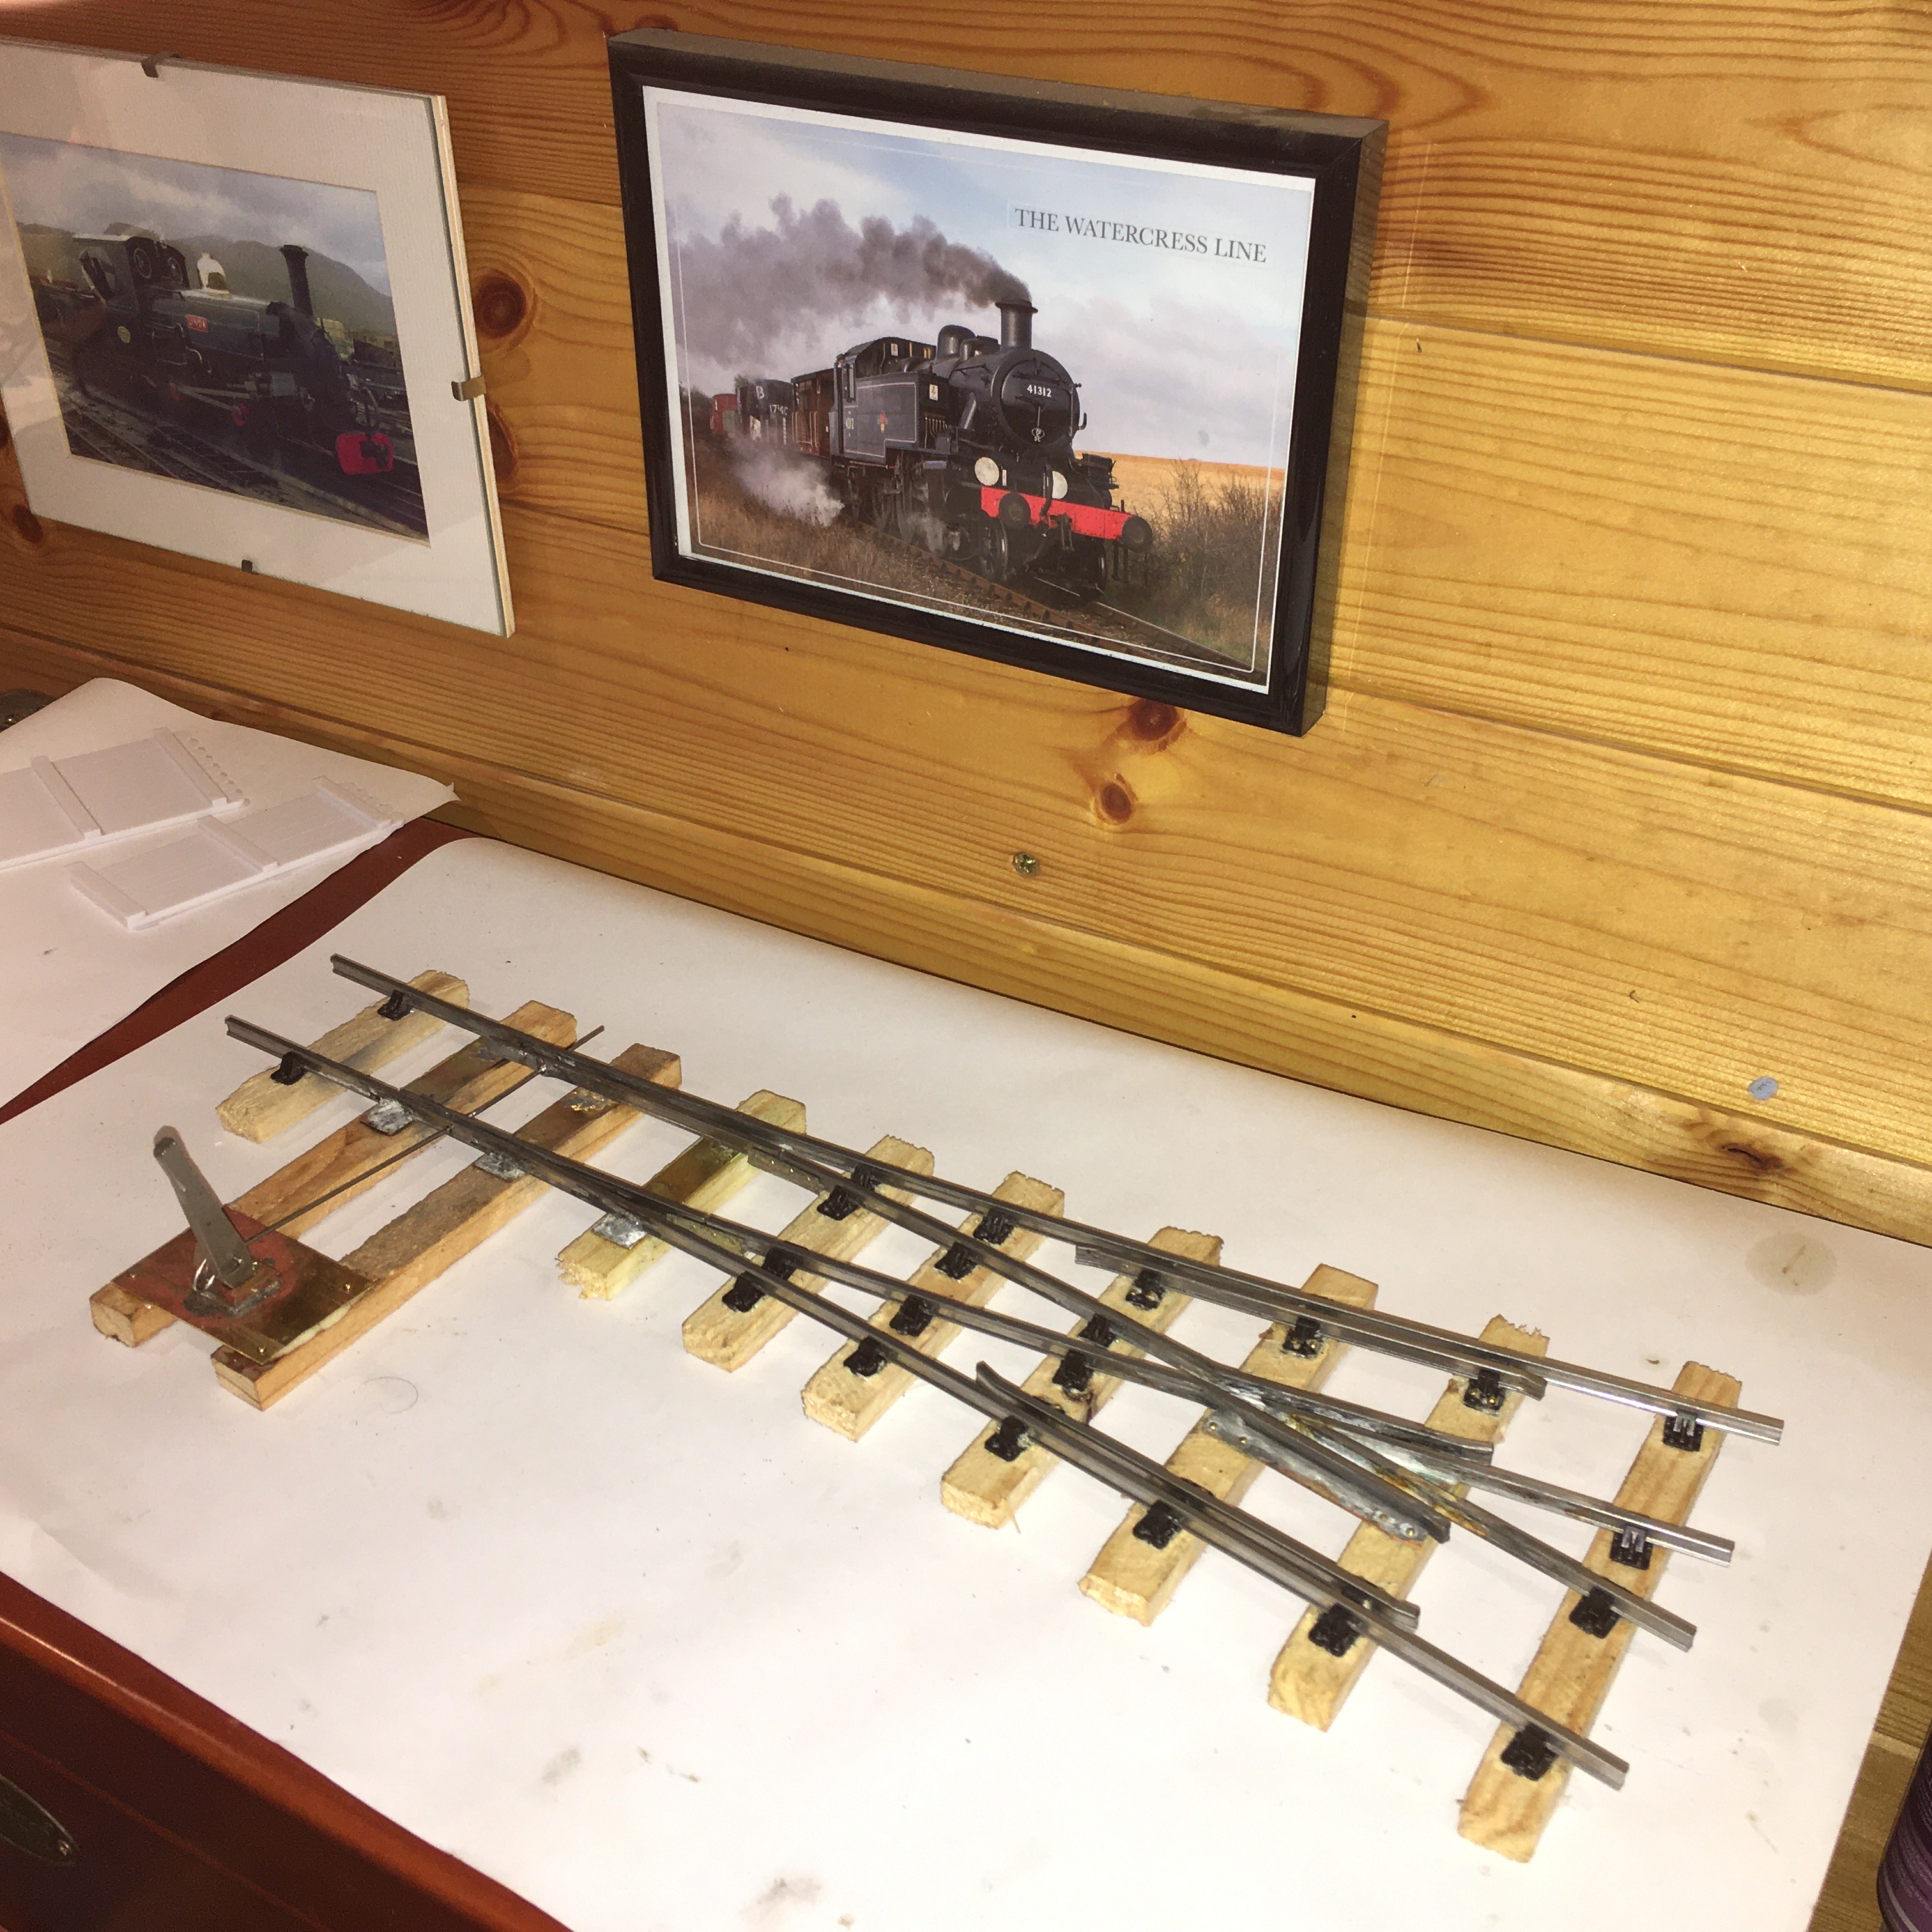
- IMG_1866.jpg (1.81 MiB) Viewed 4415 times
The gap between the check rail and running rail ended up being a pretty even gap of between 2.45mm and 2.5mm - which seems perfect to me. Of course the final test was with a wagon and coach - nothing attempted to climb the frog - so I think that is a success.
Trevor
Re: The Railway in the Valley of the Mill
Posted: Tue Oct 19, 2021 7:02 am
by Old Man Aaron
That point (and trestle) has come out very nicely. Nice robust throw, too.

Drill bits make great precision spacers, I use 1.5mm bits between the wheels and frames of Roundhouse locos when setting for 45mm gauge.
Re: The Railway in the Valley of the Mill
Posted: Tue Oct 19, 2021 8:29 am
by ge_rik
Old Man Aaron wrote: ↑Tue Oct 19, 2021 7:02 am
That point (and trestle) has come out very nicely. Nice robust throw, too.
Drill bits make great precision spacers, I use 1.5mm bits between the wheels and frames of Roundhouse locos when setting for 45mm gauge.
Thanks chaps for a really handy tip. Not thought of using drill bits as precision chunky feeler gauges or spacers.
Rik
Re: The Railway in the Valley of the Mill
Posted: Tue Oct 19, 2021 2:37 pm
by Trevor Thompson
They can also be used as bore gauges - assuming you have a variety of closely spaced sizes. If the drill just fits into a hole then you can get a pretty good idea of the hole size by measuring the drill diameter. Just be aware that drills are often less than the nominal diameter.
Trevor