
Better than my efforts anyway...
What to do with a tiny, barren wasteland?
Re: What to do with a tiny, barren wasteland?
Nicely written and very well photographed. It does please the eye when it is done well. 
Better than my efforts anyway...
Better than my efforts anyway...
ROD
Life is so easy when I run my trains.


https://gardenrails.org/forum/viewtopic ... 41&t=11364
https://www.youtube.com/@fairywoodlightrailway
Life is so easy when I run my trains.


https://gardenrails.org/forum/viewtopic ... 41&t=11364
https://www.youtube.com/@fairywoodlightrailway
-
Old Man Aaron

- Trainee Driver

- Posts: 808
- Joined: Wed Oct 19, 2016 11:08 am
- Location: Sunshine Coast QLD, Australia
Re: What to do with a tiny, barren wasteland?
Cheers!

Not much to see, but levelling off the future site of "Phase Two" was finished yesterday. Still some odd junk to tidy up, ahead of a routine tenancy inspection next week.
12/08/20
I neglected to mention the bents were also glued to the stringers yesterday, in addition to epoxy-ing the dummy bolts into the bent at right, and fitting the abutment.
Not to rely on glue alone, more nails are piloted and hammered just past flush with the bottom of the stringers, so they won't be seen. The nails are 1.6mm dia, so I've piloted the holes at 1.4mm. The minimum size my drill will hold, however, is 1.5mm. So I've just thrown my pin vice in the drill chuck. Works on the drill press and lathe, too. A bit "bush mechanic" but it works.
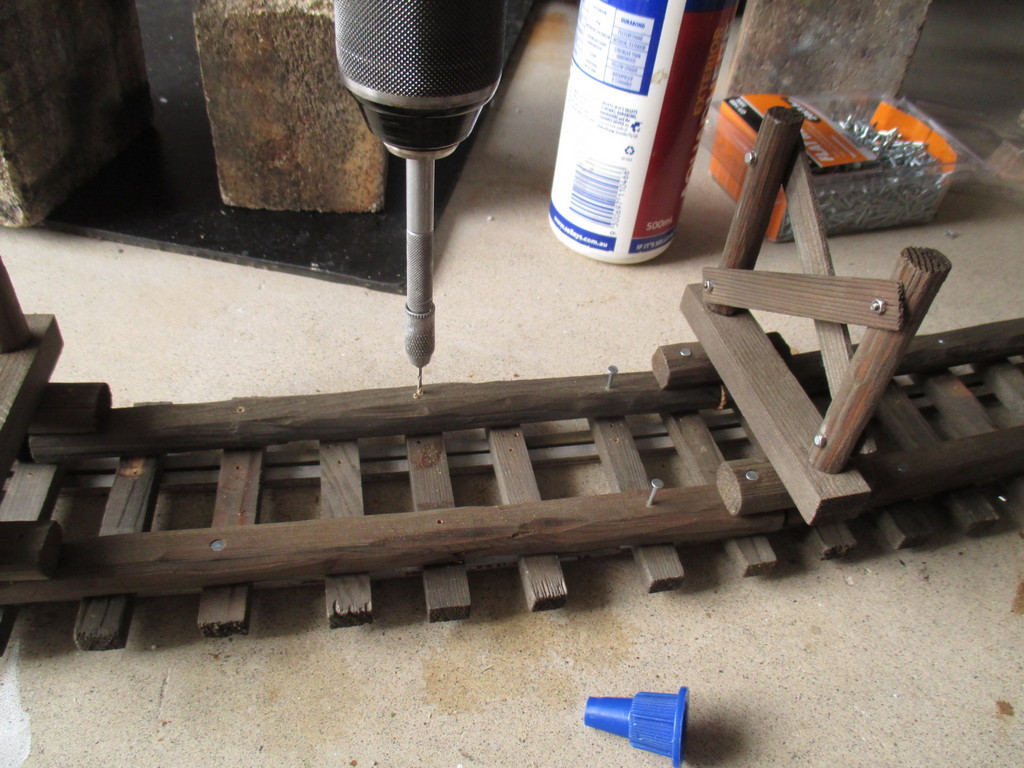
More modified nails for detailing. Not sure if the prototypes are screws, or spikes, but they fasten the stringers to the spacer blocks at each bent.
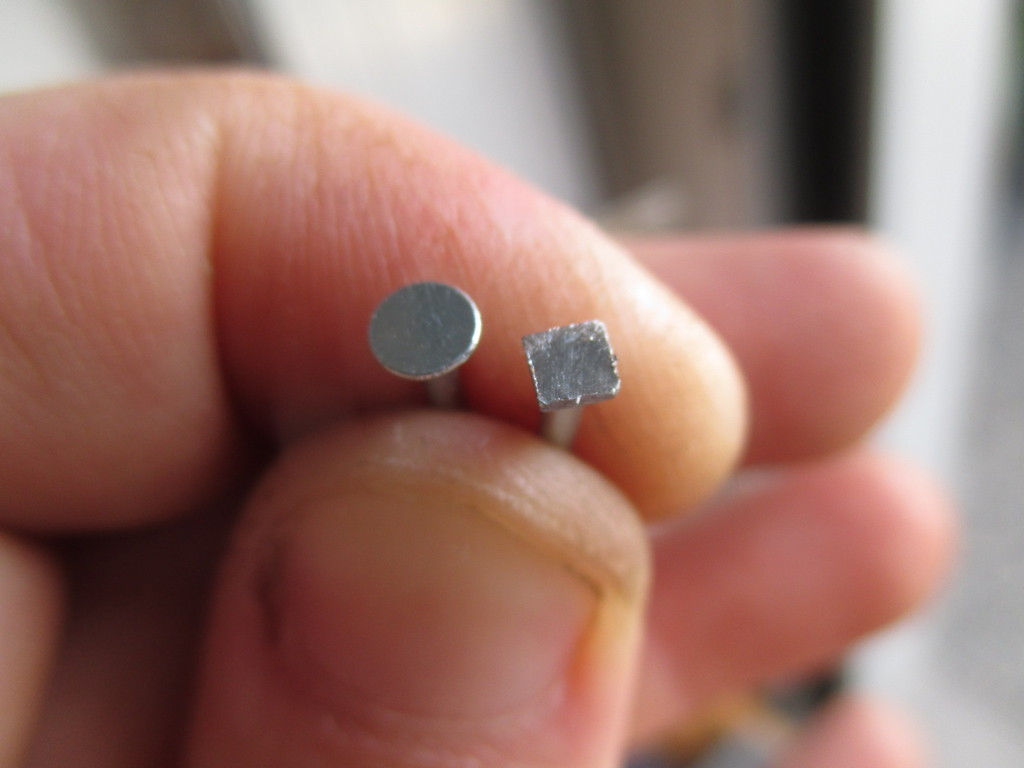
With the track already fitted, piloting and hammering in these nails was difficult, but well worth the trouble.

Quite pleased with how it's turning out so far. The reason I've only fitted one abutment, is that I had only enough leftover cedar bits to make one. Whilst I do have more cedar I could cut down, distress, stain and assemble, that's a pain in the backside. I'll either make an abutment from hebel, to represent a brick or early concrete abutment, or simply bury the stringers in soil and shrubs at that end of the bridge..
Much easier to paint the rails and nails before installation.
On the last tramway, I used Australian Export gloss Indian Red enamel, sprayed into the can's lid and brushed on. Even without primer, the paint sticks quite well, and fades to a much more appropriate rust colour over a few months. Cheap paint on dirty aluminium and brass, battered by all seasons - It shouldn't work, but somehow does.
This time, I was more sensible, and looked for the 125ml tin version - which as it turns out, isn't available in that colour. So I bought Mission Brown and mixed it with some red, for a close enough match to the sprayed-into-the-lid Indian Red I'd previously used on the points before installing them.
As the track behind the caravan gets no direct sun at all, I figured it prudent to try flattening the paint's finish. An old signwriters' trick is to mix talc into enamel paint to flatten it. I couldn't find unadulterated talc anywhere, so opted to try cornstarch-based baby powder. Again, we'll see how it comes out, when the paint dries. Another (expensive) option would be to brush Tamiya's flat clear over the gloss paint. It holds up surprisingly well in outdoor QLD.

Regards,
Aaron
In that case, perhaps I should, if nothing else but to stir the sh*t!
Not much to see, but levelling off the future site of "Phase Two" was finished yesterday. Still some odd junk to tidy up, ahead of a routine tenancy inspection next week.
- IMG_7659.JPG (321.98 KiB) Viewed 5846 times
12/08/20
I neglected to mention the bents were also glued to the stringers yesterday, in addition to epoxy-ing the dummy bolts into the bent at right, and fitting the abutment.
Not to rely on glue alone, more nails are piloted and hammered just past flush with the bottom of the stringers, so they won't be seen. The nails are 1.6mm dia, so I've piloted the holes at 1.4mm. The minimum size my drill will hold, however, is 1.5mm. So I've just thrown my pin vice in the drill chuck. Works on the drill press and lathe, too. A bit "bush mechanic" but it works.
More modified nails for detailing. Not sure if the prototypes are screws, or spikes, but they fasten the stringers to the spacer blocks at each bent.
With the track already fitted, piloting and hammering in these nails was difficult, but well worth the trouble.
Quite pleased with how it's turning out so far. The reason I've only fitted one abutment, is that I had only enough leftover cedar bits to make one. Whilst I do have more cedar I could cut down, distress, stain and assemble, that's a pain in the backside. I'll either make an abutment from hebel, to represent a brick or early concrete abutment, or simply bury the stringers in soil and shrubs at that end of the bridge..
Much easier to paint the rails and nails before installation.
On the last tramway, I used Australian Export gloss Indian Red enamel, sprayed into the can's lid and brushed on. Even without primer, the paint sticks quite well, and fades to a much more appropriate rust colour over a few months. Cheap paint on dirty aluminium and brass, battered by all seasons - It shouldn't work, but somehow does.
This time, I was more sensible, and looked for the 125ml tin version - which as it turns out, isn't available in that colour. So I bought Mission Brown and mixed it with some red, for a close enough match to the sprayed-into-the-lid Indian Red I'd previously used on the points before installing them.
As the track behind the caravan gets no direct sun at all, I figured it prudent to try flattening the paint's finish. An old signwriters' trick is to mix talc into enamel paint to flatten it. I couldn't find unadulterated talc anywhere, so opted to try cornstarch-based baby powder. Again, we'll see how it comes out, when the paint dries. Another (expensive) option would be to brush Tamiya's flat clear over the gloss paint. It holds up surprisingly well in outdoor QLD.
Regards,
Aaron
Last edited by Old Man Aaron on Wed Jul 21, 2021 2:03 pm, edited 1 time in total.
Regards,
Aaron - Scum Class Works
Aaron - Scum Class Works


Re: What to do with a tiny, barren wasteland?
It's all coming along really quickly, and looking great too - I'm guessing you've got a good picture in your head of what you're aiming to achieve and how you're going to get there...

Re: What to do with a tiny, barren wasteland?
Keep on telling us with so much detail Arron.
ROD
Life is so easy when I run my trains.
https://gardenrails.org/forum/viewtopic ... 41&t=11364
https://www.youtube.com/@fairywoodlightrailway
Life is so easy when I run my trains.
https://gardenrails.org/forum/viewtopic ... 41&t=11364
https://www.youtube.com/@fairywoodlightrailway

Re: What to do with a tiny, barren wasteland?
The use of a mirror is a brilliant idea - I can see it helping with some photo opportunities too. Your railway is coming along really well Aaron - good stuff.
Phil
Sporadic Garden Railer who's inconsistencies know no bounds
My Line - https://gardenrails.org/forum/viewtopic ... 41&t=11077
Sporadic Garden Railer who's inconsistencies know no bounds
My Line - https://gardenrails.org/forum/viewtopic ... 41&t=11077
-
Old Man Aaron
- Trainee Driver
- Posts: 808
- Joined: Wed Oct 19, 2016 11:08 am
- Location: Sunshine Coast QLD, Australia
Re: What to do with a tiny, barren wasteland?
Thanks again,
After the poor results of the first line I built, and several subsequent years of waiting, I've no intention of messing around this time. If fatigue didn't have me sitting around recovering energy half the time, I'd get things done twice as quickly. Three weeks since laying the first track, the circuit of "Phase One" is now serviceable - though detailing and ballasting are yet to follow. Certainly can't run live steam until the rails are painted..
14/08/20
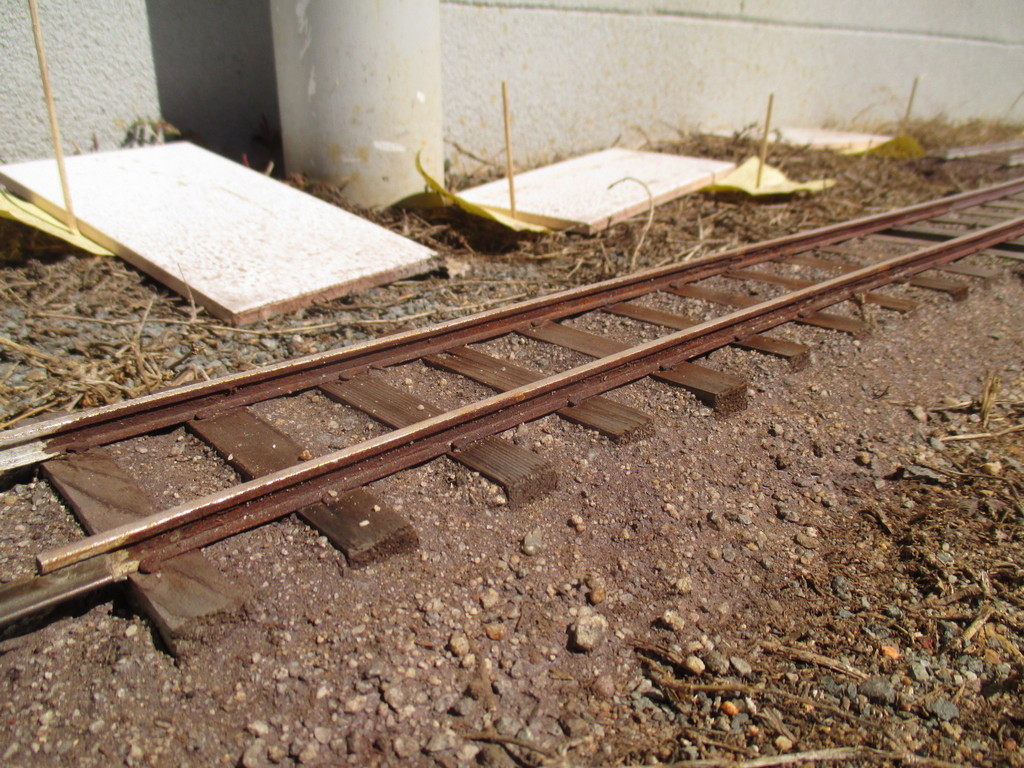
The gully needed a few more bucket-fulls of dirt removed to better accommodate the bridge. Pieces of a spare besser cap were placed under the piles as support, and packed around with gravel, before covering with soil. The track beyond both ends of the bridge were screwed down to bricks, as previously described.
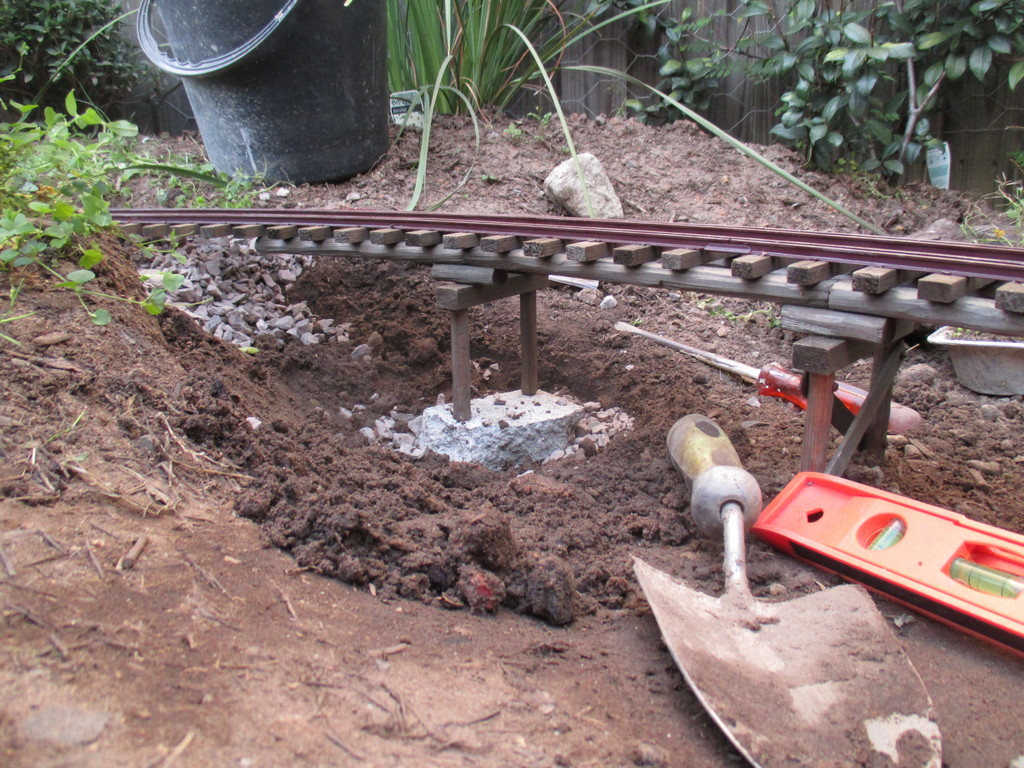
I ended up using a slice of Hebel for the abutment at the North end, but forgot to fit some support blocks under the stringers, where they meet the abutment. Will be trickier, but I'll have to clamp them into place whilst the glue dries..
The remaining yard of track was fitted in place, and the Stainz, running light, made a few laps in both directions around the tramway. Only a few very minor faults detected, I'll get to those in a moment.

15/08/20
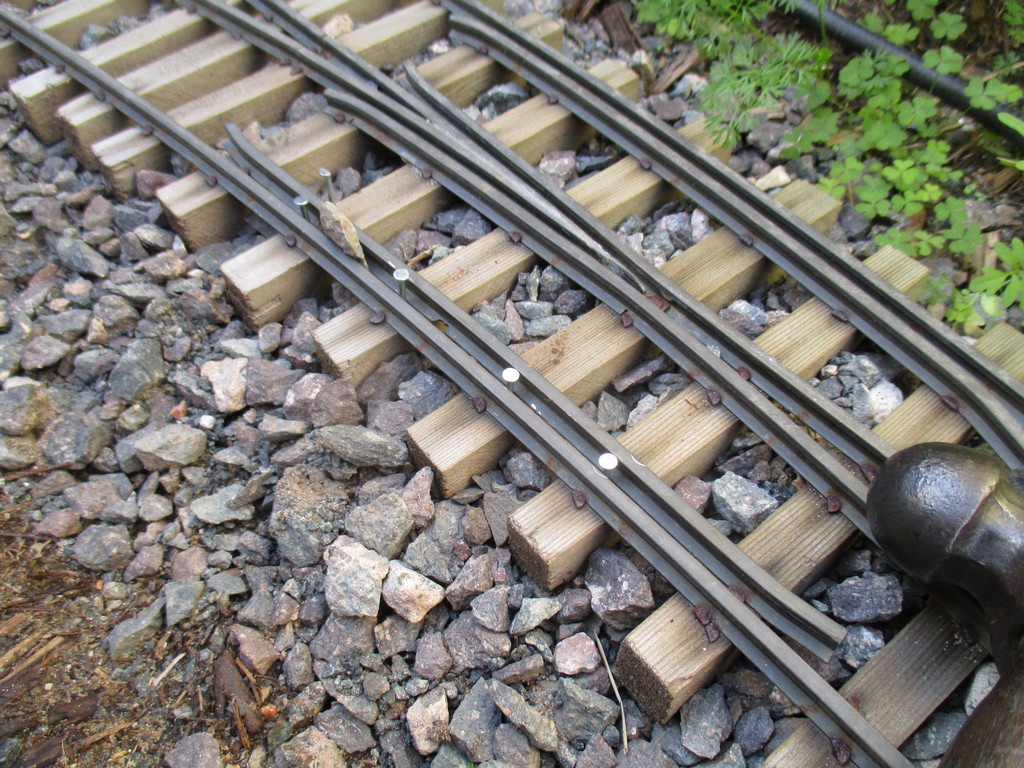
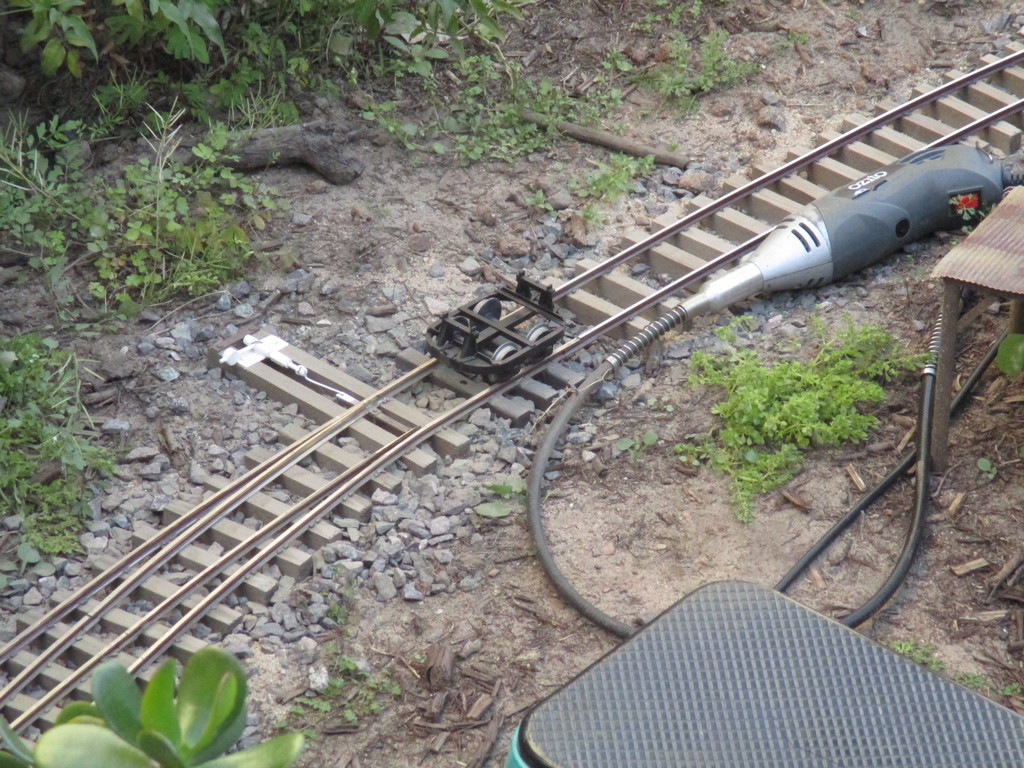
The biggest issue (though quite minor) was tackled first. Re-spiking a guard rail on the curved point, that I'd mistakenly fitted too close to the running rail, when I re-timbered the point two years ago. The Stainz' "pizza cutter" wheels were a bit tight through here. Note the high-tech basalt flangeway spacer.
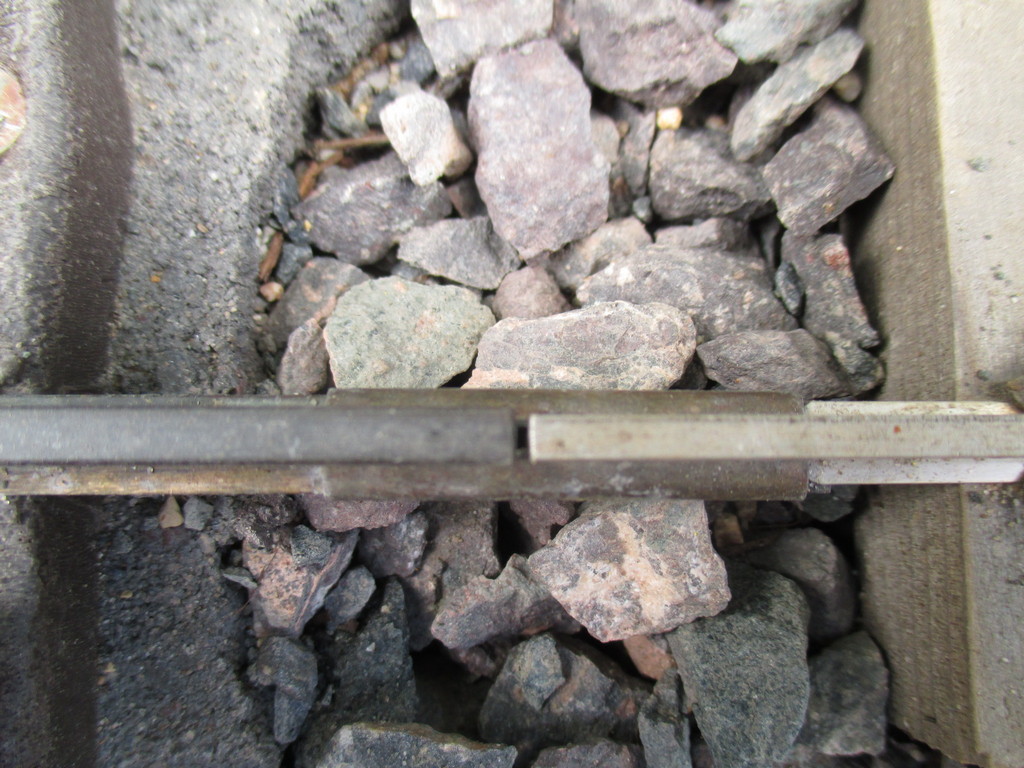
Using an eclectic mix of Accucraft, Micro Engineering, Sunset Valley and Peco rail, meant the width of railhead often differed at the joints. I doubt it would cause derailments, but don't see any harm in smoothing these joints out a bit. The dremel and sanding drums were put to work, smoothing out around a dozen of these joints. Apologies for the poor focus of this "before" shot, a storm was approaching and my camera doesn't focus well in remotely-dim conditions.
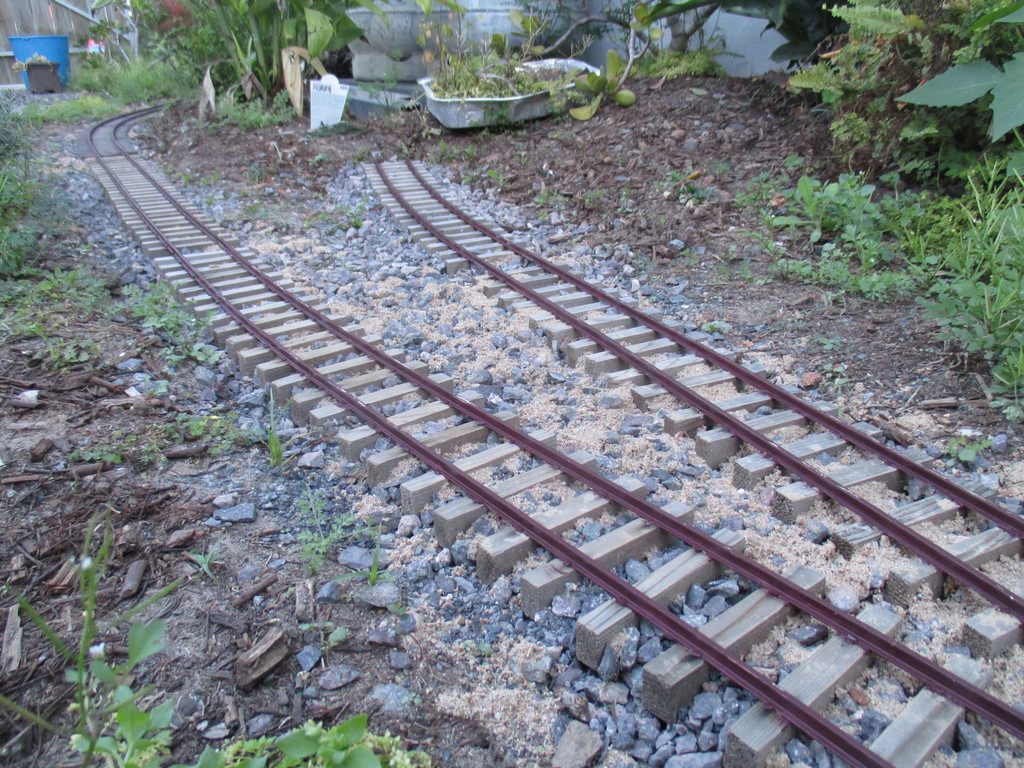
Before the storm set in however, I was able to get the last of "Phase One" laid - the general store's siding. To help support the track, handfulls of coarse sand were sprinkled over the track and spread with a brush. The idea being that the rain would wash it into the gravel. Predictably, here on the Sunshine Coast, the storm blew over and out to sea in about five minutes. I'll have to wash this in with the hose, as I did with the rest of the track.
Made a start on painting the rails this morning. Will get some photos when I complete a section..
Regards,
Aaron
After the poor results of the first line I built, and several subsequent years of waiting, I've no intention of messing around this time. If fatigue didn't have me sitting around recovering energy half the time, I'd get things done twice as quickly. Three weeks since laying the first track, the circuit of "Phase One" is now serviceable - though detailing and ballasting are yet to follow. Certainly can't run live steam until the rails are painted..
14/08/20
The gully needed a few more bucket-fulls of dirt removed to better accommodate the bridge. Pieces of a spare besser cap were placed under the piles as support, and packed around with gravel, before covering with soil. The track beyond both ends of the bridge were screwed down to bricks, as previously described.
I ended up using a slice of Hebel for the abutment at the North end, but forgot to fit some support blocks under the stringers, where they meet the abutment. Will be trickier, but I'll have to clamp them into place whilst the glue dries..
The remaining yard of track was fitted in place, and the Stainz, running light, made a few laps in both directions around the tramway. Only a few very minor faults detected, I'll get to those in a moment.
15/08/20
The biggest issue (though quite minor) was tackled first. Re-spiking a guard rail on the curved point, that I'd mistakenly fitted too close to the running rail, when I re-timbered the point two years ago. The Stainz' "pizza cutter" wheels were a bit tight through here. Note the high-tech basalt flangeway spacer.
Using an eclectic mix of Accucraft, Micro Engineering, Sunset Valley and Peco rail, meant the width of railhead often differed at the joints. I doubt it would cause derailments, but don't see any harm in smoothing these joints out a bit. The dremel and sanding drums were put to work, smoothing out around a dozen of these joints. Apologies for the poor focus of this "before" shot, a storm was approaching and my camera doesn't focus well in remotely-dim conditions.
Before the storm set in however, I was able to get the last of "Phase One" laid - the general store's siding. To help support the track, handfulls of coarse sand were sprinkled over the track and spread with a brush. The idea being that the rain would wash it into the gravel. Predictably, here on the Sunshine Coast, the storm blew over and out to sea in about five minutes. I'll have to wash this in with the hose, as I did with the rest of the track.
Made a start on painting the rails this morning. Will get some photos when I complete a section..
Regards,
Aaron
Last edited by Old Man Aaron on Wed Jul 21, 2021 2:06 pm, edited 1 time in total.
Regards,
Aaron - Scum Class Works
Aaron - Scum Class Works
Re: What to do with a tiny, barren wasteland?
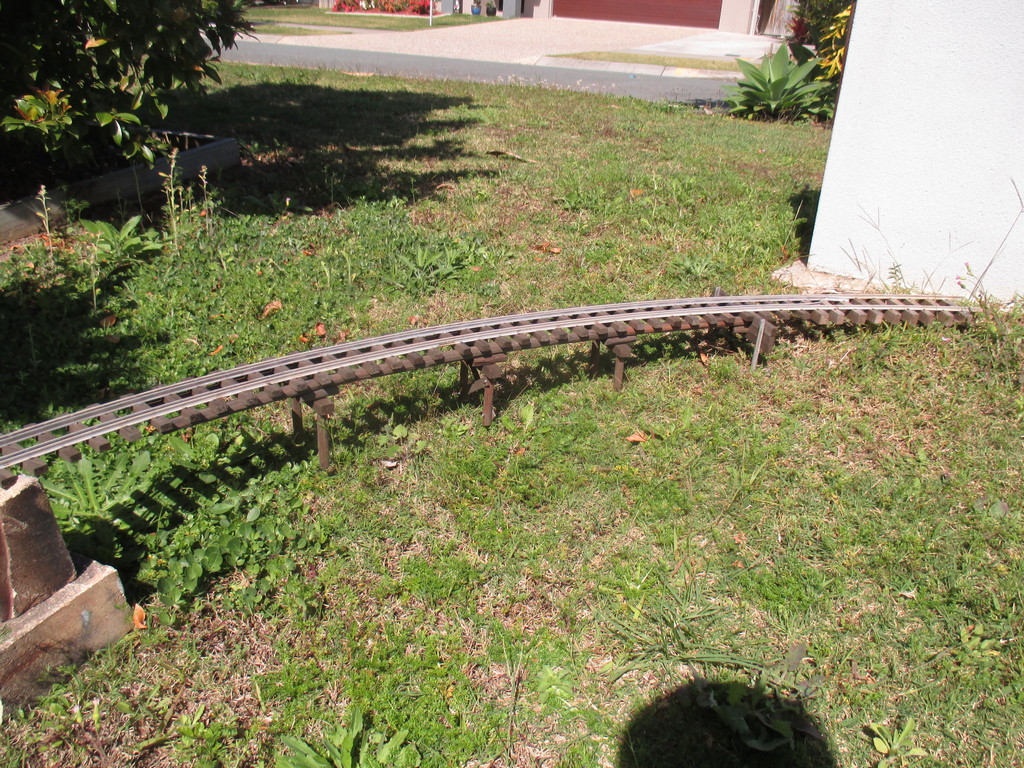
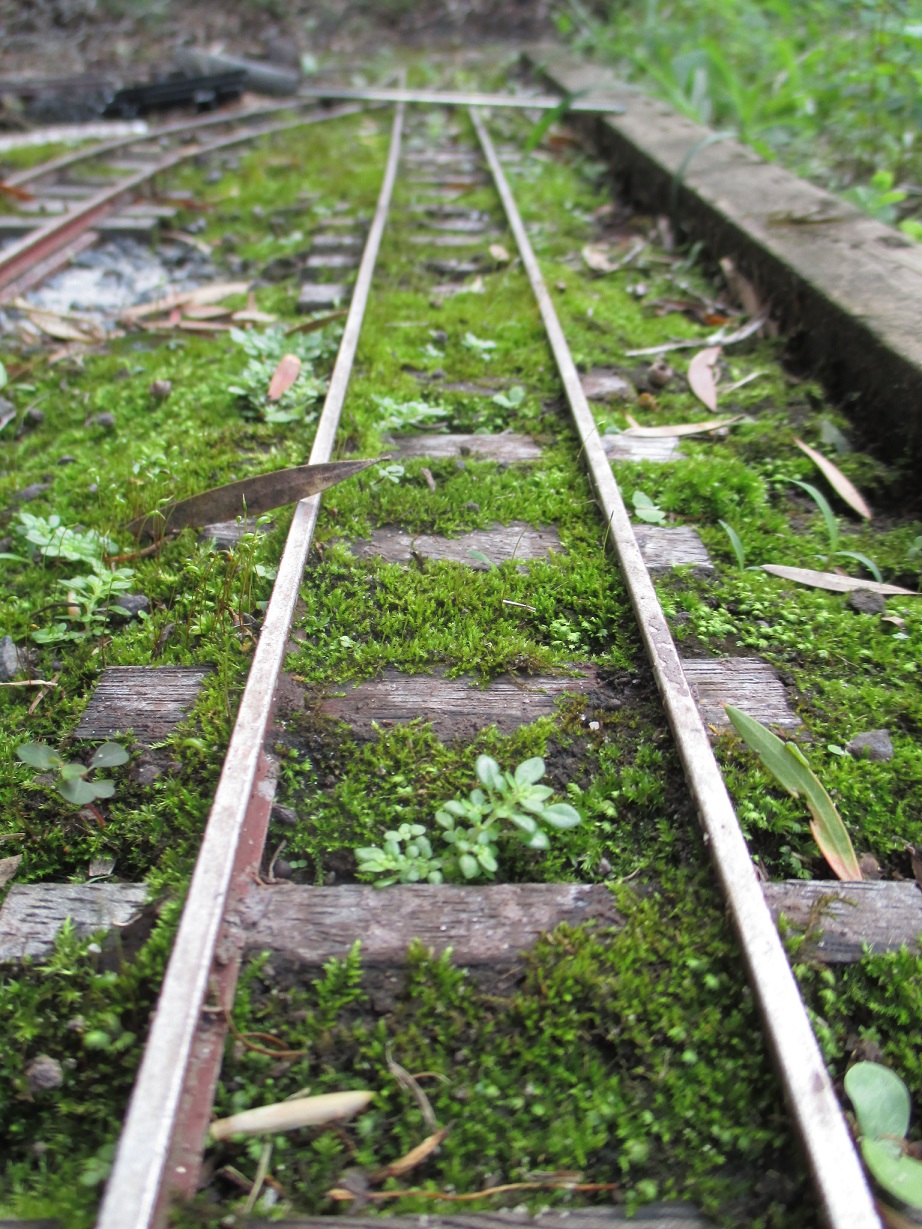
Looking good Aaron. This final shot of the trackwork is most impressive.
Philip
Re: What to do with a tiny, barren wasteland?
Great job done there. The last photo of your track is very nice indeed.
ROD
Life is so easy when I run my trains.
https://gardenrails.org/forum/viewtopic ... 41&t=11364
https://www.youtube.com/@fairywoodlightrailway
Life is so easy when I run my trains.
https://gardenrails.org/forum/viewtopic ... 41&t=11364
https://www.youtube.com/@fairywoodlightrailway
-
Old Man Aaron
- Trainee Driver
- Posts: 808
- Joined: Wed Oct 19, 2016 11:08 am
- Location: Sunshine Coast QLD, Australia
Re: What to do with a tiny, barren wasteland?
16/08/20
The mirror was again very helpful, in the agonising job of painting the rails. Whilst it would be far nicer to paint them prior to laying, one can never know quite how much track will be needed. Chances are I'll have painted too much or worse, too little track, before laying. And of course, half of the track is flexible; a coat of paint would make bending the track far more difficult - to say nothing of the paint being scraped off, as the chairs slide along the rails' feet.
Interested to hear your thoughts on painting rails, and other detailing of such ilk..

After three days on-and-off, that painful job is done. It's hell on brushes, killed two of 'em. Thankfully, one coat was enough in most places.
To flatten, about two tablespoons of baby powder were added to the paint, along with a few brass screws in the tin, to help it mix.
How the baby powder affects the life of the paint remains to be seen..
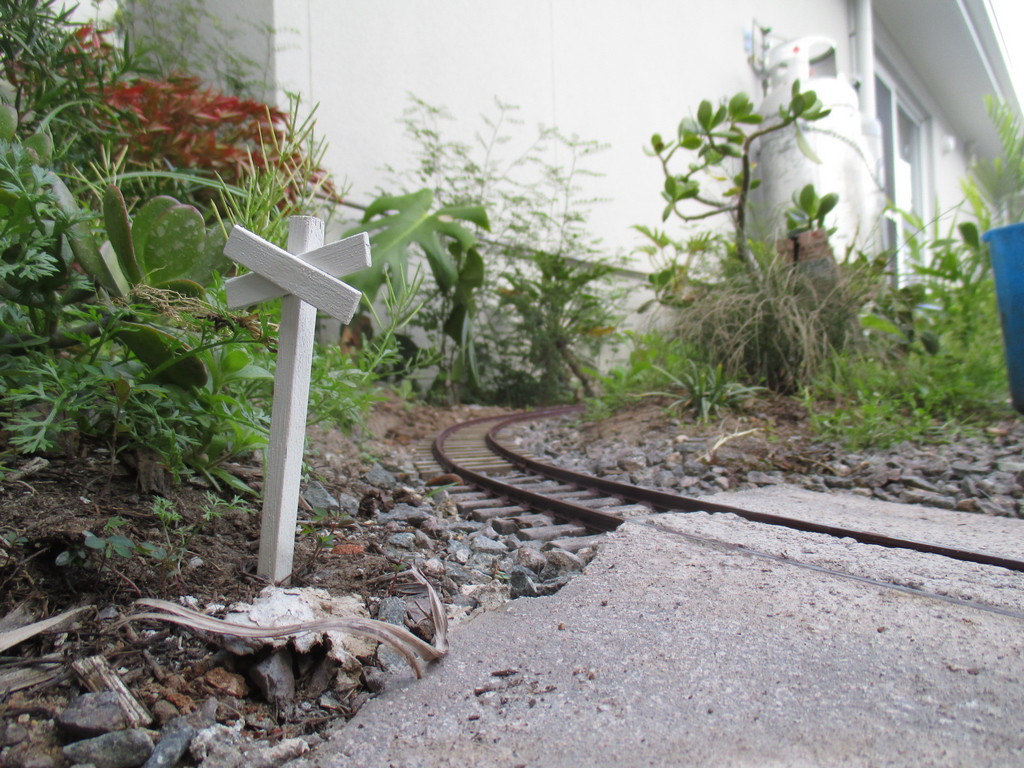
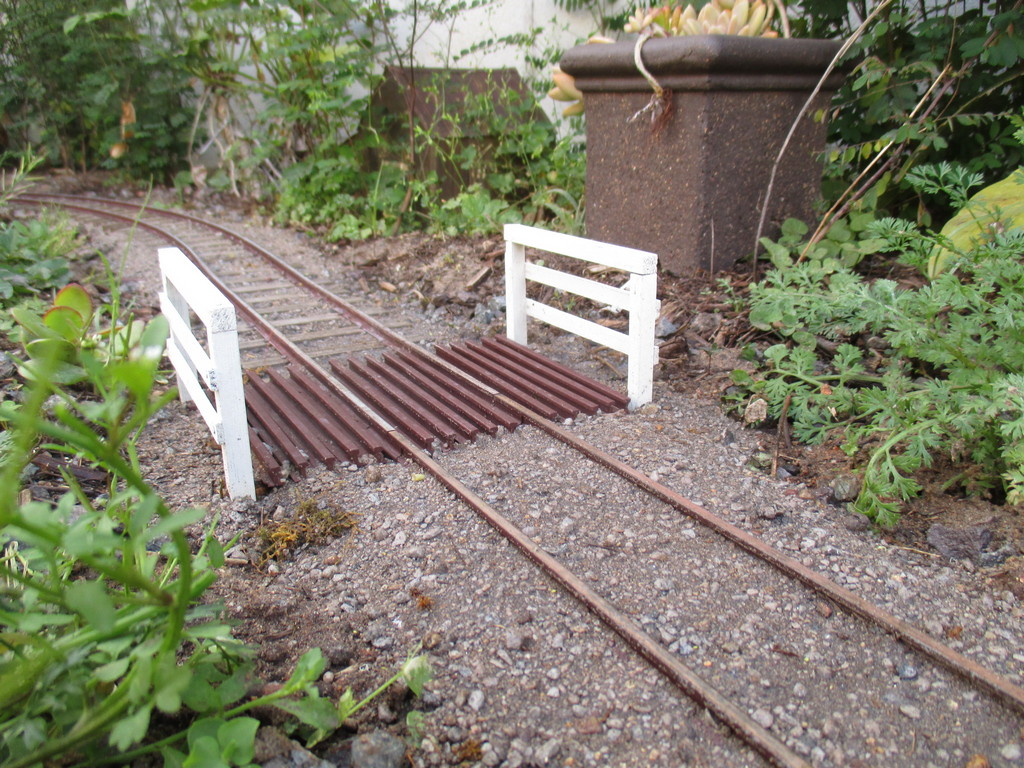
Months back, during a hold-up on repairing the caravan, I took the opportunity to make a few timber crossing signs and fences from cedar scrap. A piece of coat-hanger wire was epoxied into a hole, drilled in the bottom of each post. Parts were aged in rust/vinegar, assembled, then sprayed with Metalshield flat white, which seems to hold up on timber at the Woodford Railway. The idea behind aging the timber first, is that if the paint ever starts peeling, the exposed wood would look better if it were aged, rather than new and orange. This worked quite well on the crossing signs of my first tramway, many years ago.
19/08/20
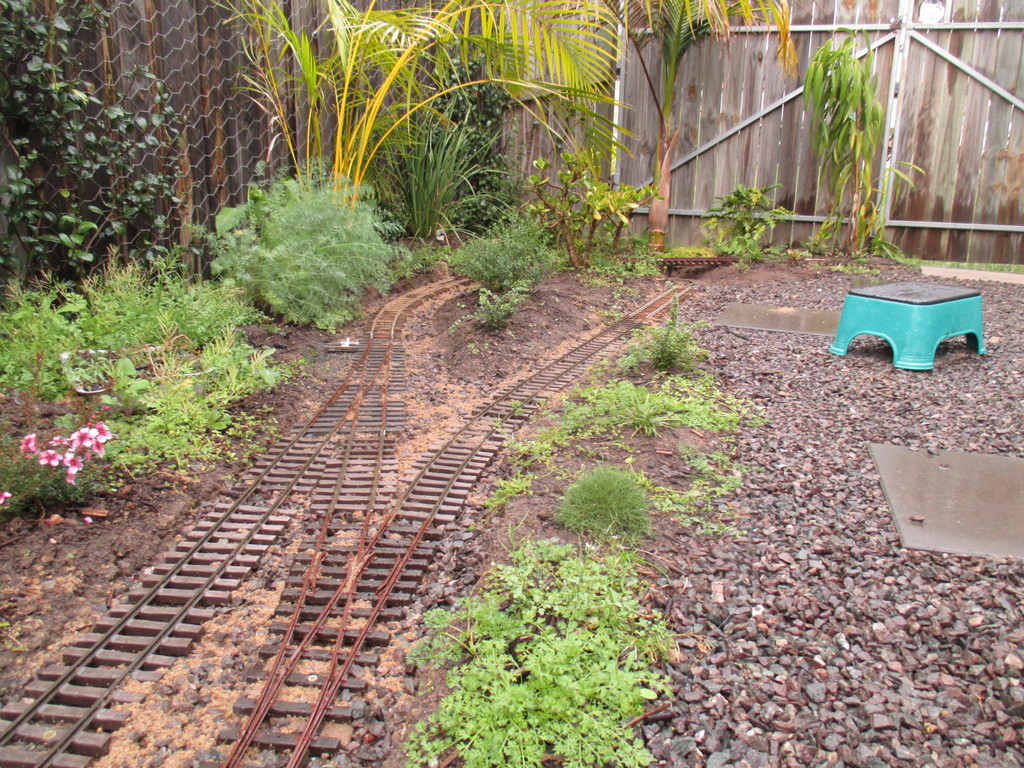
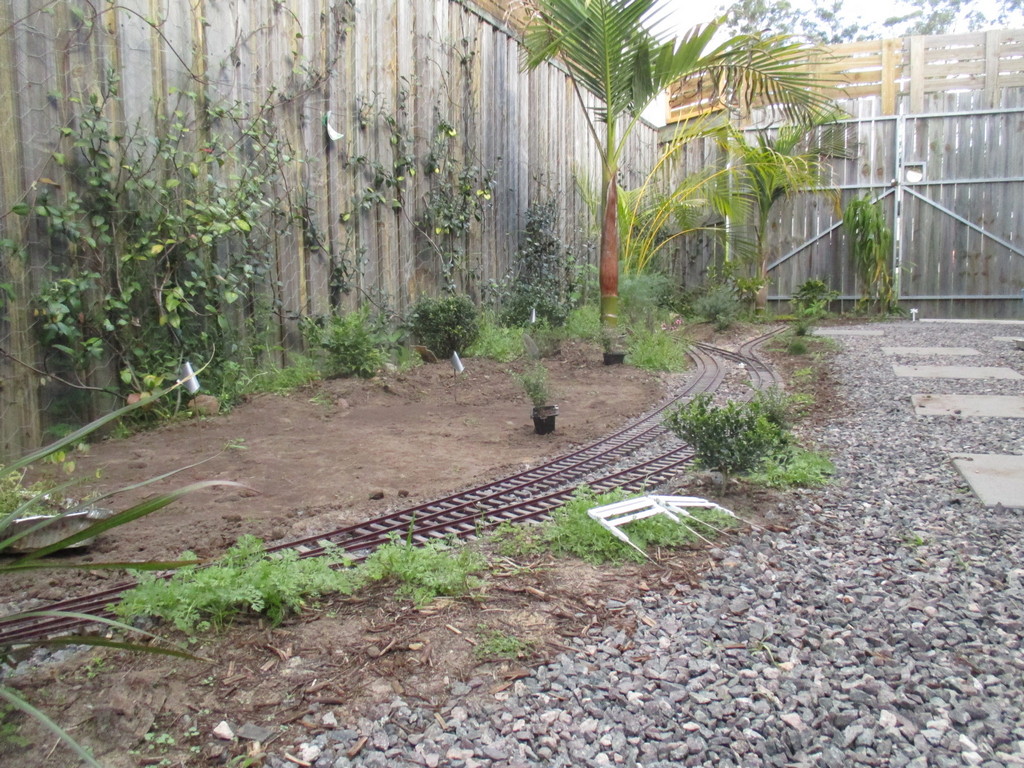
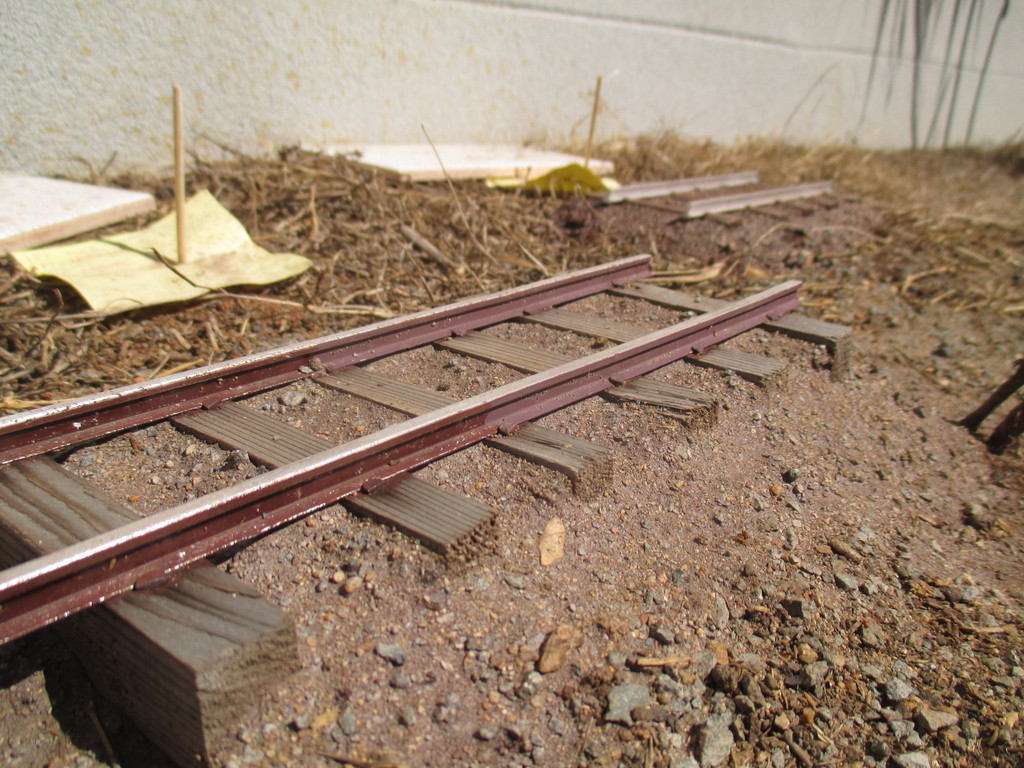
The ground on this side was built up a little higher than needed, so the track ended up in a shallow cutting along here. A few bucketfulls removed had the ground (mostly) levelled with the track. Two fence panels lay waiting in view as a reminder to work out where to "plant" them.
20/08/20
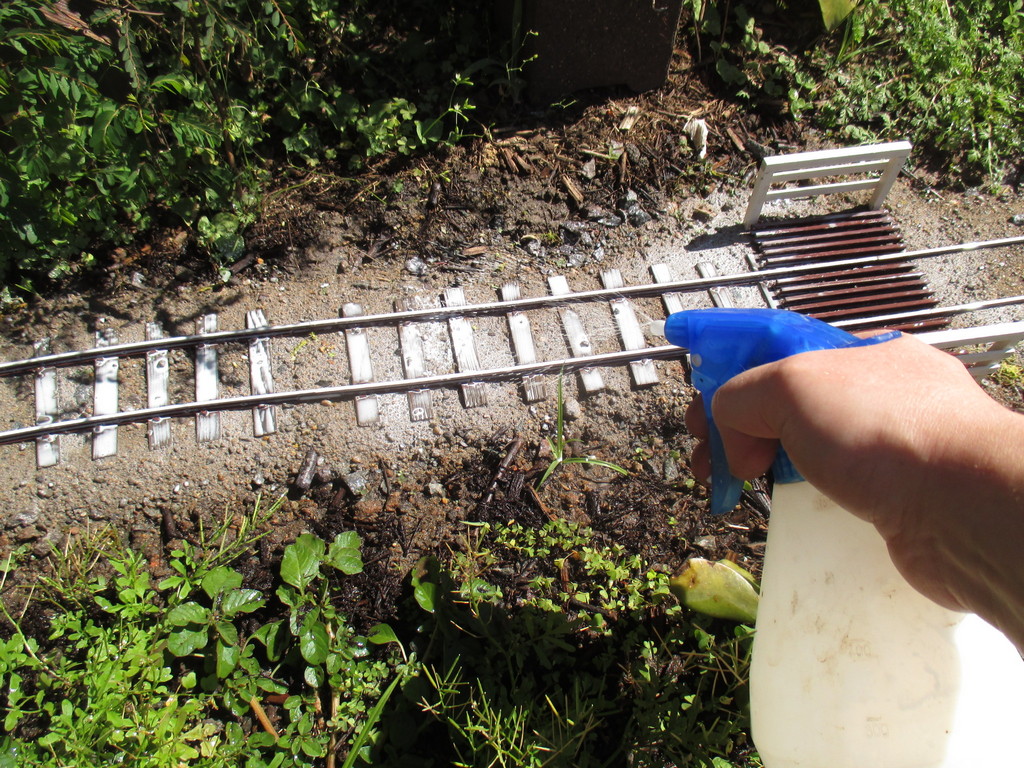
It didn't take long to realise lacquer thinners on a rag wasn't up to the job of cleaning the railheads, this long after painting. I acknowledge that track-power modellers may be offended by my solution - certainly isn't something I'd use on powered track. A light hand and a fine grit was of course, used.
Very effective though, I wouldn't do it any other way, now.

Winter's on it's way out, and some plants are starting to feel the effects of the 20-25 Celcius days we're having. This fern has drooped pretty badly, but springs back up after a good drink. A couple of other shrubs however, have all but dried out. It's anyone's guess if they can be saved - I'll have to get onto that planned rainwater tank, and pipe the house air-conditioner's moisture drain to it. I'd spend a fortune on water, otherwise..
Regards,
Aaron
The mirror was again very helpful, in the agonising job of painting the rails. Whilst it would be far nicer to paint them prior to laying, one can never know quite how much track will be needed. Chances are I'll have painted too much or worse, too little track, before laying. And of course, half of the track is flexible; a coat of paint would make bending the track far more difficult - to say nothing of the paint being scraped off, as the chairs slide along the rails' feet.
Interested to hear your thoughts on painting rails, and other detailing of such ilk..
After three days on-and-off, that painful job is done. It's hell on brushes, killed two of 'em. Thankfully, one coat was enough in most places.
To flatten, about two tablespoons of baby powder were added to the paint, along with a few brass screws in the tin, to help it mix.
How the baby powder affects the life of the paint remains to be seen..
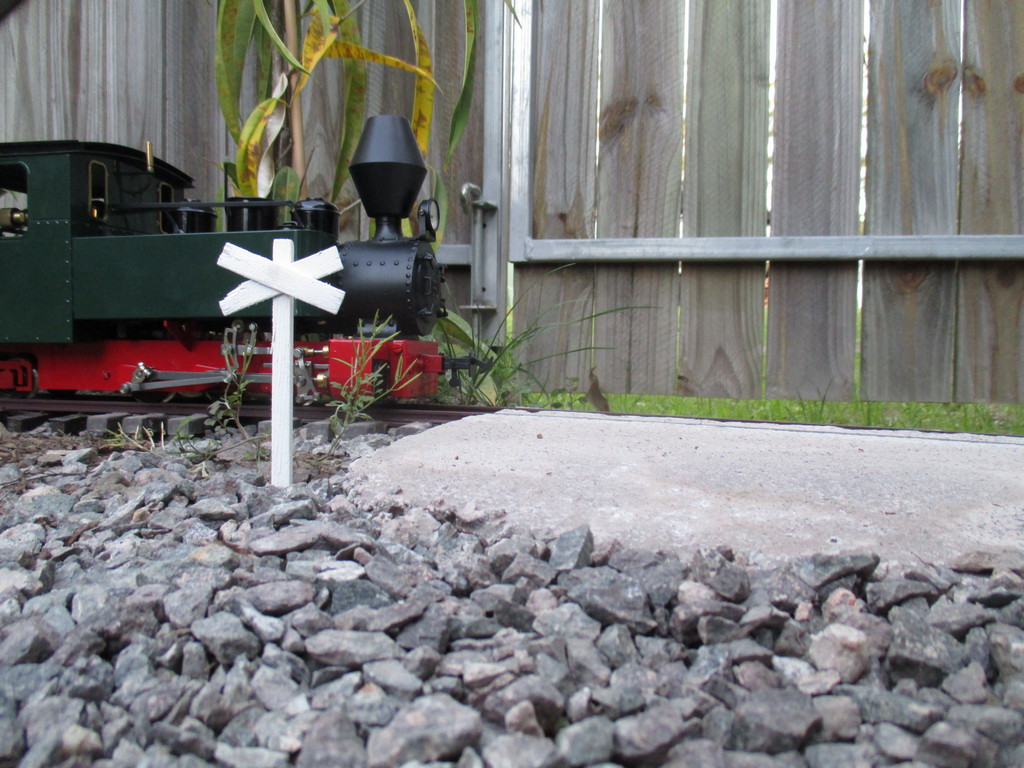
Months back, during a hold-up on repairing the caravan, I took the opportunity to make a few timber crossing signs and fences from cedar scrap. A piece of coat-hanger wire was epoxied into a hole, drilled in the bottom of each post. Parts were aged in rust/vinegar, assembled, then sprayed with Metalshield flat white, which seems to hold up on timber at the Woodford Railway. The idea behind aging the timber first, is that if the paint ever starts peeling, the exposed wood would look better if it were aged, rather than new and orange. This worked quite well on the crossing signs of my first tramway, many years ago.
19/08/20
The ground on this side was built up a little higher than needed, so the track ended up in a shallow cutting along here. A few bucketfulls removed had the ground (mostly) levelled with the track. Two fence panels lay waiting in view as a reminder to work out where to "plant" them.
20/08/20
It didn't take long to realise lacquer thinners on a rag wasn't up to the job of cleaning the railheads, this long after painting. I acknowledge that track-power modellers may be offended by my solution - certainly isn't something I'd use on powered track. A light hand and a fine grit was of course, used.
Very effective though, I wouldn't do it any other way, now.
Winter's on it's way out, and some plants are starting to feel the effects of the 20-25 Celcius days we're having. This fern has drooped pretty badly, but springs back up after a good drink. A couple of other shrubs however, have all but dried out. It's anyone's guess if they can be saved - I'll have to get onto that planned rainwater tank, and pipe the house air-conditioner's moisture drain to it. I'd spend a fortune on water, otherwise..
- IMG_7696.JPG (390.09 KiB) Viewed 6051 times
Regards,
Aaron
Last edited by Old Man Aaron on Wed Jul 21, 2021 2:09 pm, edited 1 time in total.
Regards,
Aaron - Scum Class Works
Aaron - Scum Class Works
Re: What to do with a tiny, barren wasteland?
Not being blessed with the skills (or patience) to make my own track, the first that I purchased was some Cliff Barker flexible track in stainless steel. It looked very bright, to the extent that for future purchases I went for Peco nickel silver flexitrack. Within a short time, this dulls down to an acceptable colour without further help. Six years on, the stretch of C.B. track still looks very bright! As an experiment, I tried painting a short section of it, using Humbrol enamel 'track colour' (an original tin, not the later poor imitatons when production moved to China).
That painted section has been exposed to the vagaries of the weather in the NW of the UK, and it's looking a bit sorry for itself, mainly due to my failure to prepare the s/s rail in any way whatsoever. It's a stretch of randomly alternating 'rusty' track with bright s/s showing through in many places - it looks 'wrong'.
I'm still tempted to try again, but I need to find a way to key the stainless stell so that paint will stick to it in future.
In your case, I think your paintwork really improves the look of the track making it appear more authentic. I hope you have better adhesion than I did - I suspect your use of ali rail will help in that regard.
Phil
Sporadic Garden Railer who's inconsistencies know no bounds
My Line - https://gardenrails.org/forum/viewtopic ... 41&t=11077
Sporadic Garden Railer who's inconsistencies know no bounds
My Line - https://gardenrails.org/forum/viewtopic ... 41&t=11077
-
Old Man Aaron
- Trainee Driver
- Posts: 808
- Joined: Wed Oct 19, 2016 11:08 am
- Location: Sunshine Coast QLD, Australia
Re: What to do with a tiny, barren wasteland?
Aye, it's a problem I also learned of the hard way. Had the same issue painting my RH Fowler's motion. I then realised that stainless should be treated like any non-ferrous metal, and etch-primed before painting; which did the trick. A brass wire brush (the toothbrush-sized ones) should make short work of stripping your rail. A bit of etch primer sprayed into the can's lid and brushed on, prior to the colour coat, should work. Also good for loco touch-ups.Lonsdaler wrote: ↑Mon Aug 24, 2020 1:51 pm It's a stretch of randomly alternating 'rusty' track with bright s/s showing through in many places - it looks 'wrong'.
I'm still tempted to try again, but I need to find a way to key the stainless stell so that paint will stick to it in future.
In your case, I think your paintwork really improves the look of the track making it appear more authentic. I hope you have better adhesion than I did - I suspect your use of ali rail will help in that regard.
The paint stuck to the rails too well on my last tramway. When I lifted the track and removed the sleepers, I found that even hot caustic soda had little effect on the paint. A lot of that old rail ended up quite pitted from the soda bath, and through several days of alternating between soaking and scrubbing, most of the paint was eventually removed, ready to start anew.
And thanks, that little bit of paint makes a huge difference in blending the track with the garden. Would be a useful trick for those dealing with unsympathetic "domestic authorities"..
20/08/20
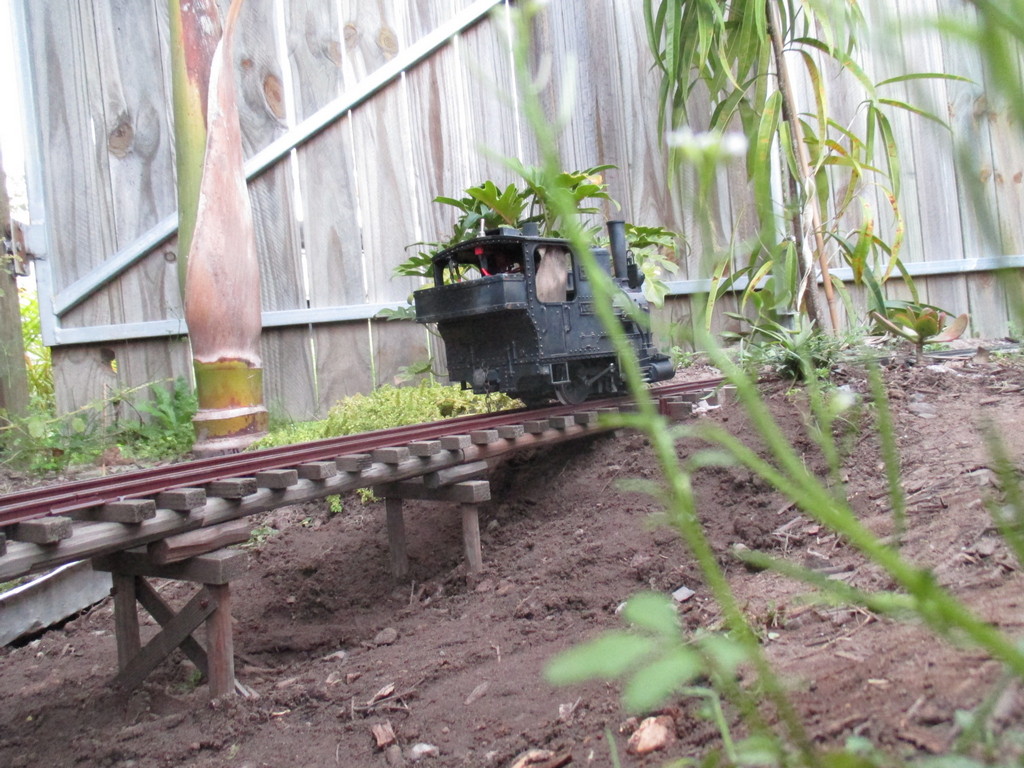
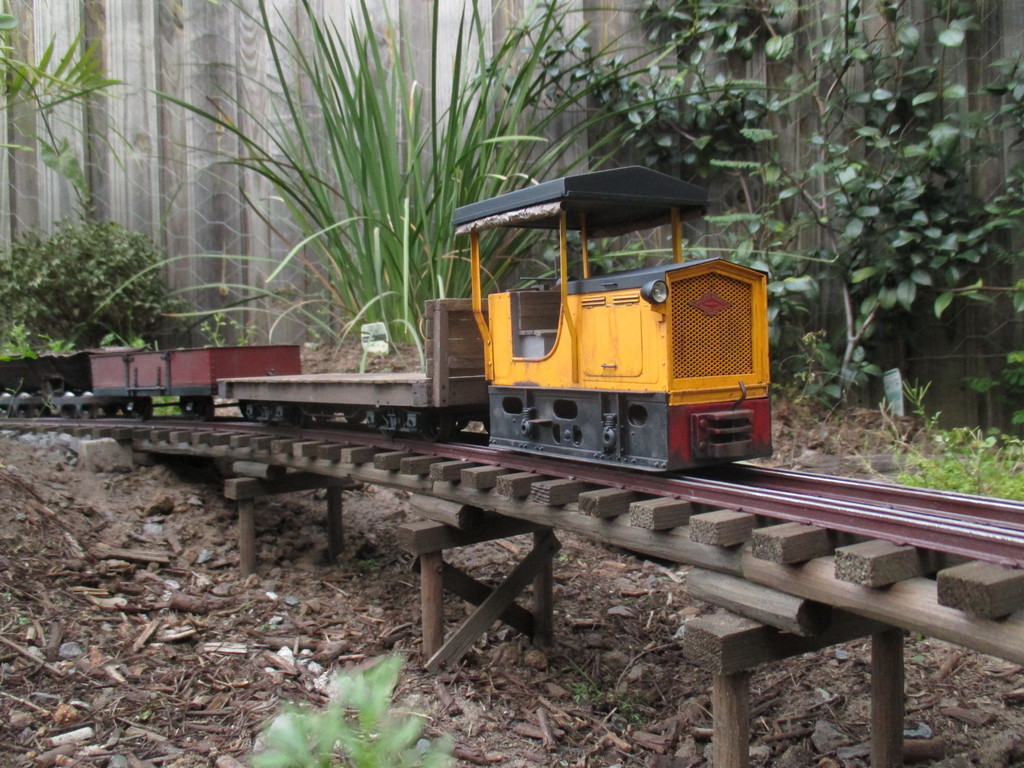
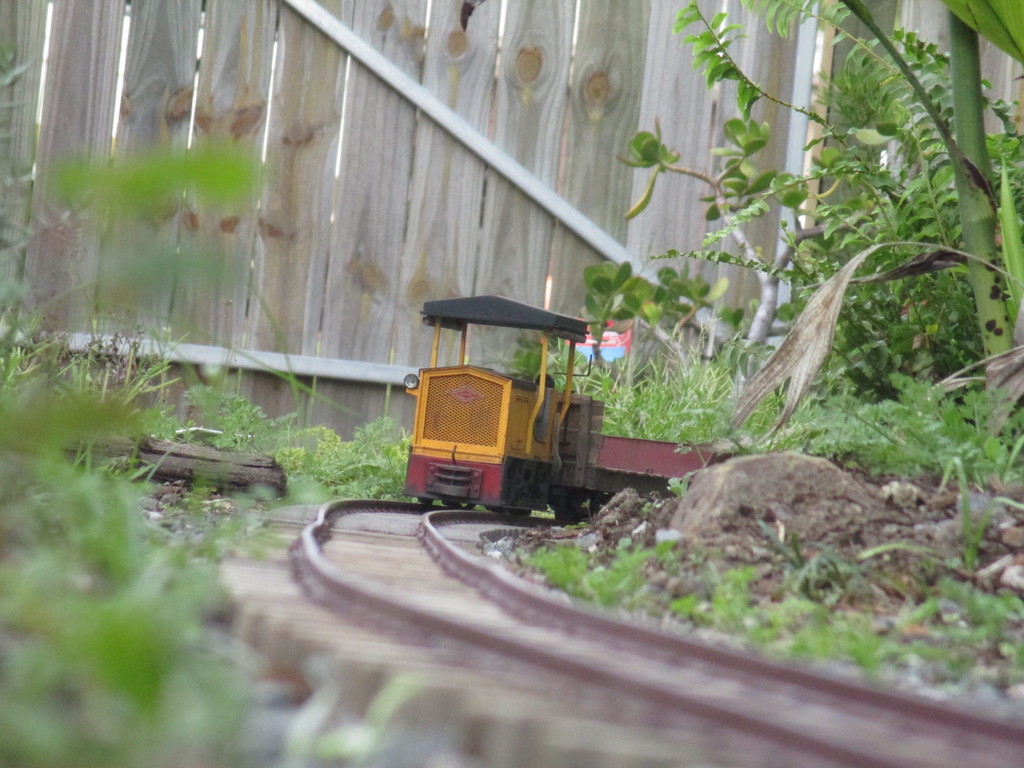
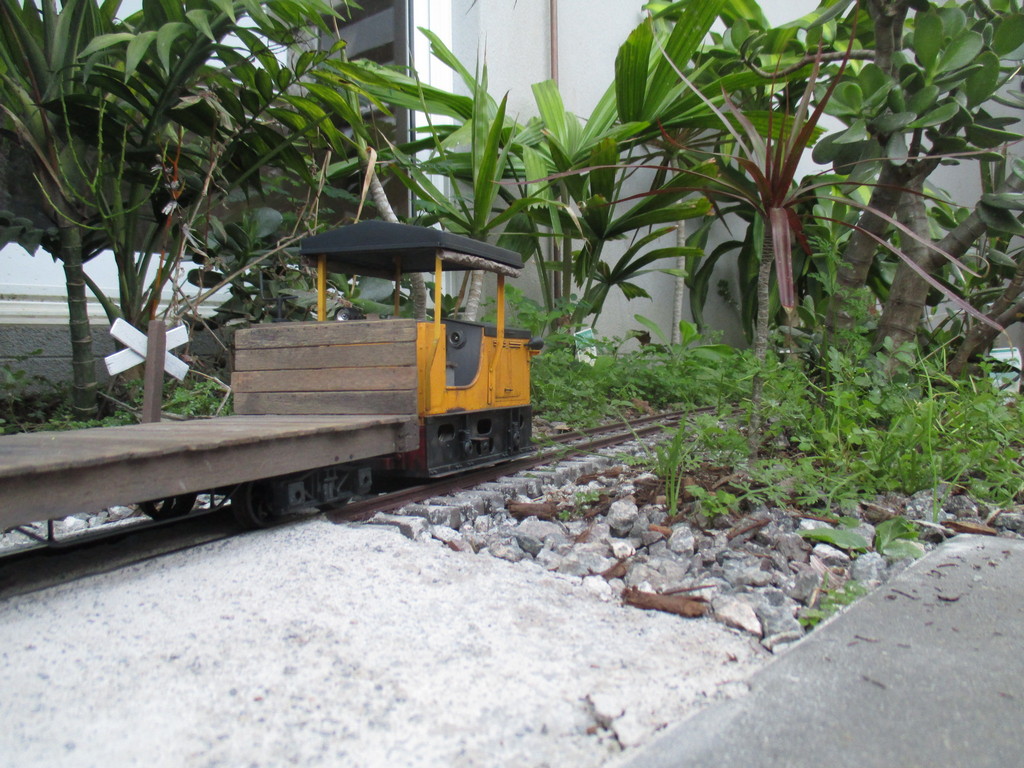
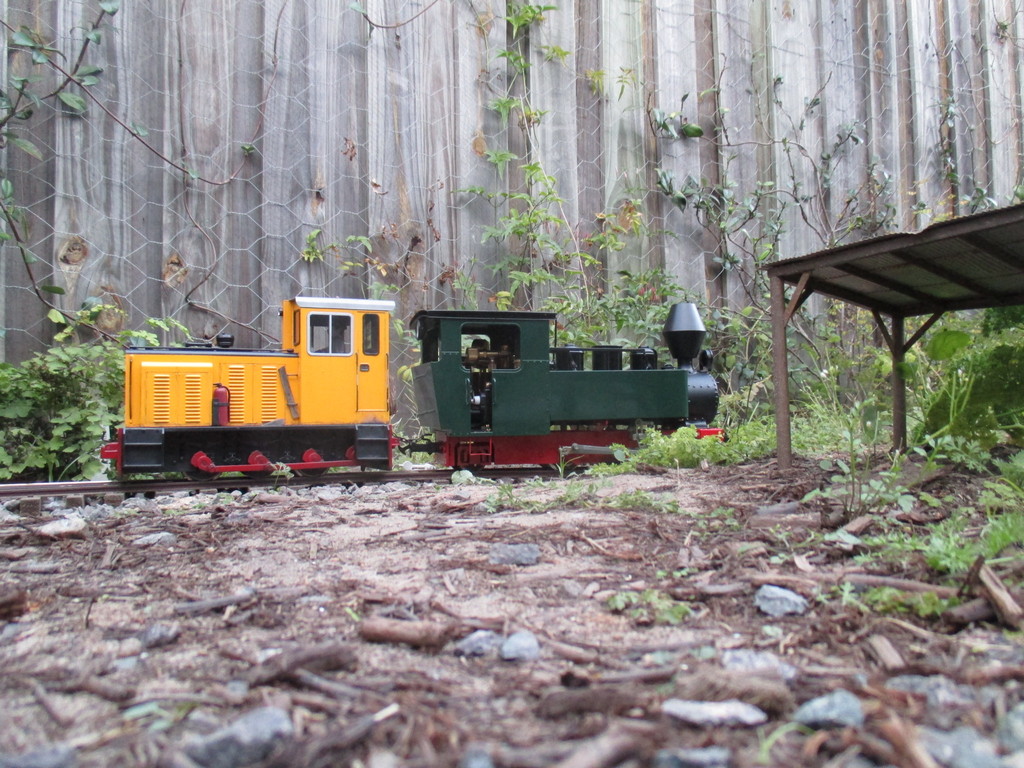
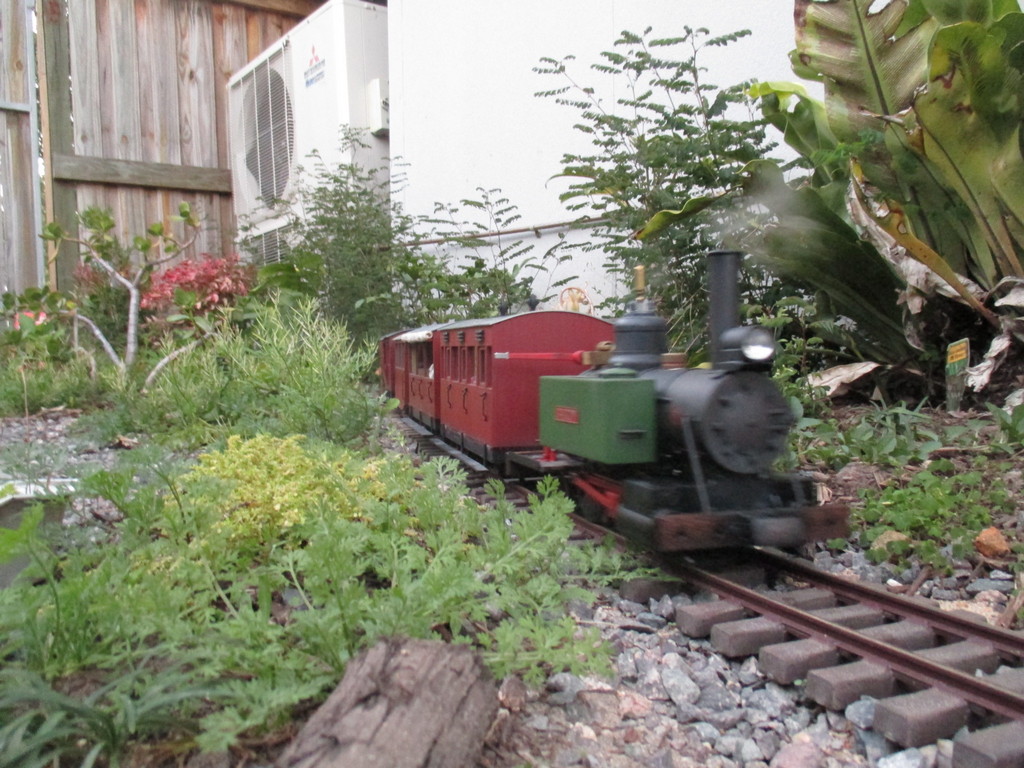
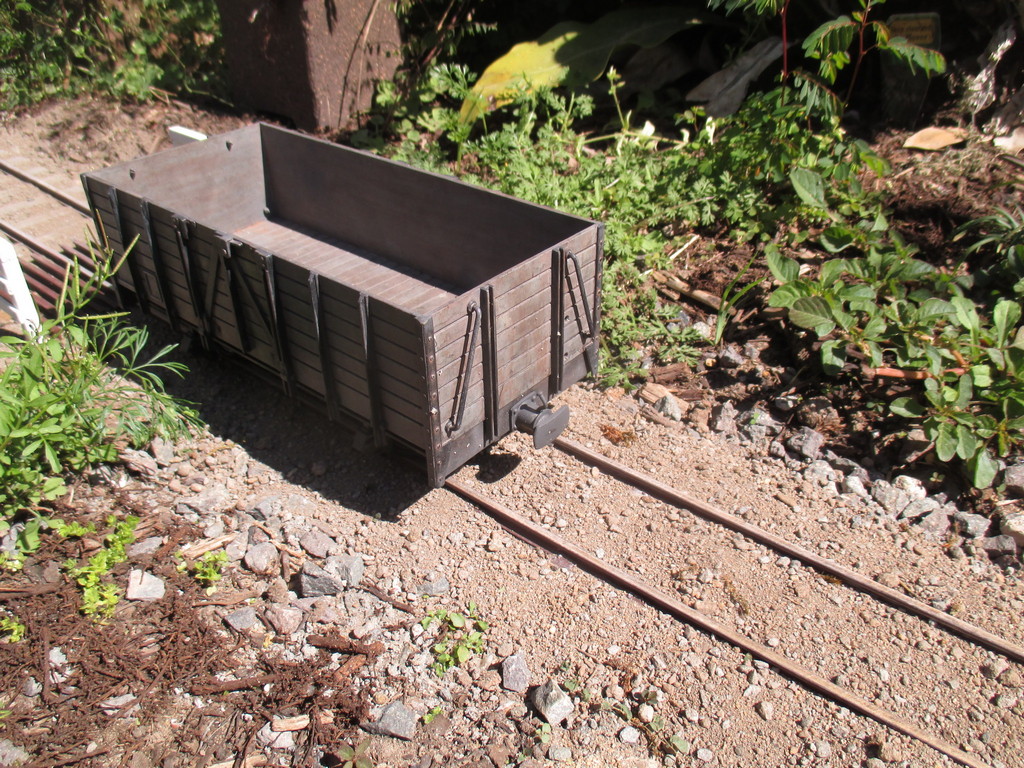
"Let the loco and wagon testing commence!"
The Malcolm Moore and navvy gear seemed appropriate for the first "proper" train. Even if the loco's driver is in a box waiting for paint..


21/08/20
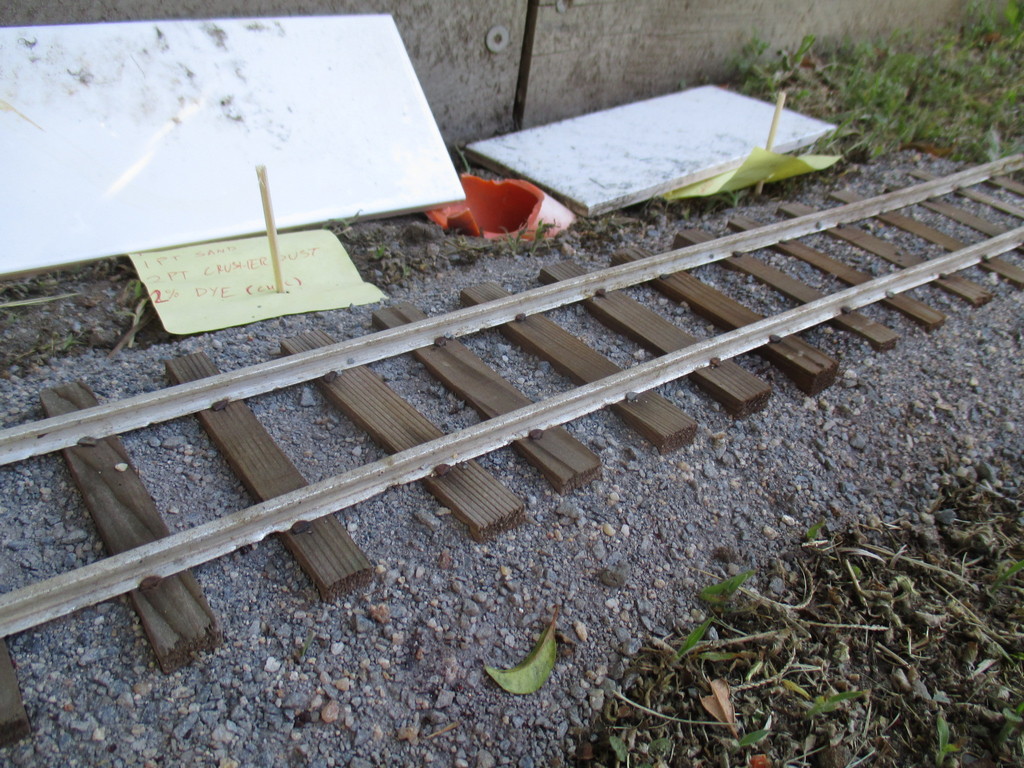
Something I should've done months ago, was to take some leftover track, and test different blends of ballast material, to see what is durable and looks right. Sticky notes were left above each test piece so I knew what ratios were used. The skewers and tiles were just to keep the notes from being blown away, whilst the ballast dried overnight. Each mix contains cement, and was applied dry, then gently watered in.
On the tramway proper, I'll be following this watering down, with diluted Sikabond outdoor PVA.
Two blends were tested on this section, and as you can see, they came out identically - both in appearance and strength. Of all the blends to follow, these were the strongest, though there was hardly any difference.
This blend would work for a modern or unusually well-maintained light railway. I might use this to model a couple of high-quality spot-repairs in the track, but for general use, it's a bit too "nice" for the overall effect I want. As they're both essentially identical, I'll just describe one blend.
It's comprised of:
1 part coarse sand
1 part cement
2 parts crusher dust
Roughly 2% by volume, of chocolate cement oxide
This one's (I reckon) a good example of old, dirty granite ballast. A good "narrow gauge mainline" blend.
4 parts coarse sand
1 part cement
2 parts crusher dust
2 parts soil
10% chocolate oxide

This one's much more like the work of a sugar mill, looks as much soil as there is ballast. The track was an early test piece to compare rail weathering methods. This end was painted with the earlier-mentioned gloss indian red paint, and coated with iron powder whilst wet, then sprayed with vinegar once dry. The effect is a bit heavy for me, but would work quite well for anything modelled near saltwater..
2 parts coarse sand
2 parts cement
1 part crusher dust
3 parts soil
10% chocolate oxide
This one's my favourite, reminiscent of the local Moreton Mill's cane tramways (until closure in 2003) that were almost entirely ballasted with soil. This blend differed in that I used fine sand, which seems to have helped lend it a particularly dusty appearance. At left, the rails were painted gloss indian red; at center, Tamiya's NATO Brown.
1 part fine sand
1 part cement
1 part crusher dust
1 part soil
7% chocolate oxide
I just wish I'd remembered to make these test pieces months ago, to see how they hold up over time. In truth though, from what I can tell in seeing similar blends used by other modellers, particularly those whom have also glued down their ballast, I expect these test pieces would last 3-5 years before serious repair or replacement..
The previous test run revealed the gauge on some sections of three points was too tight for Roundhouse wheelsets, as fitted to the Binnie skips. Most of my points were hand-laid by the previous owner, running G scale Yankee equipment - the wheels of which tend to differ slightly, to those more commonly seen on this forum.
It's also quite possible that I may have caused the issue when re-timbering the points two years ago.
A few hours of adjustment with the dremel had the points sorted. I'll have to touch up the rails' paint..
22/08/20
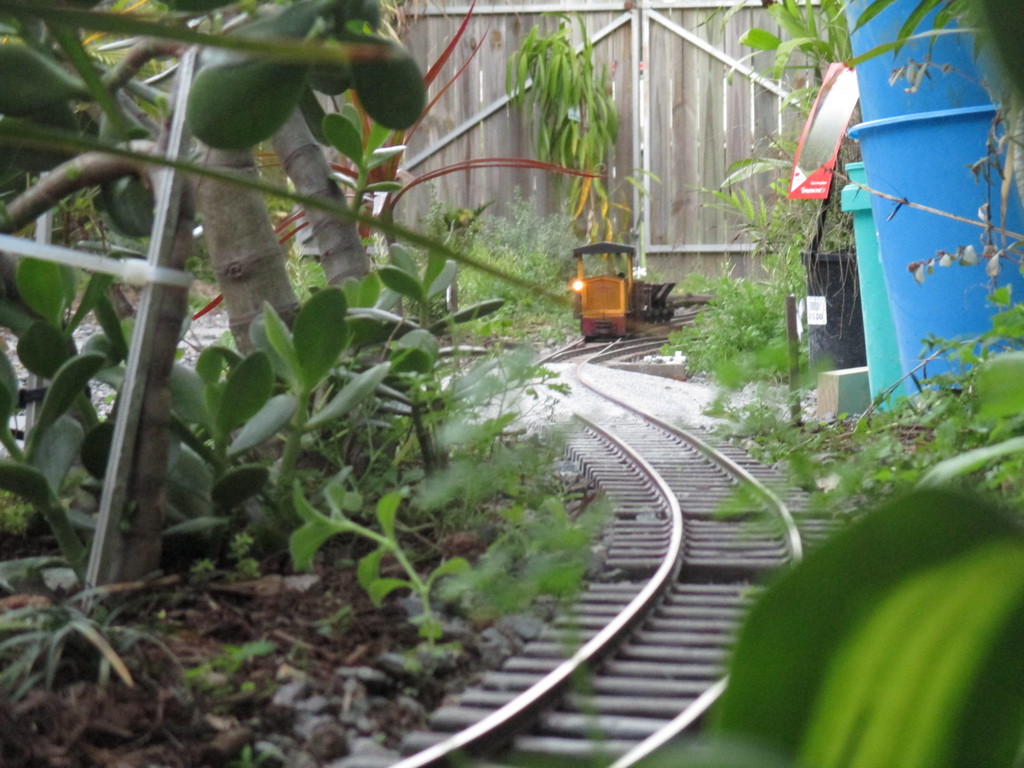
Back to something more interesting. Testing more locos and wagons before ballasting..
I had such fun running my new Bundaberg Fowler, that I neglected to take photos until the Baguley was "Thunderbird-ing" it back to a siding.
The farm shed dates from my last tramway and has survived surprisingly well for something made of pine and balsa.
I'm not even sure what these two weigh together, but I'm pleased to say the bridge stood fast.
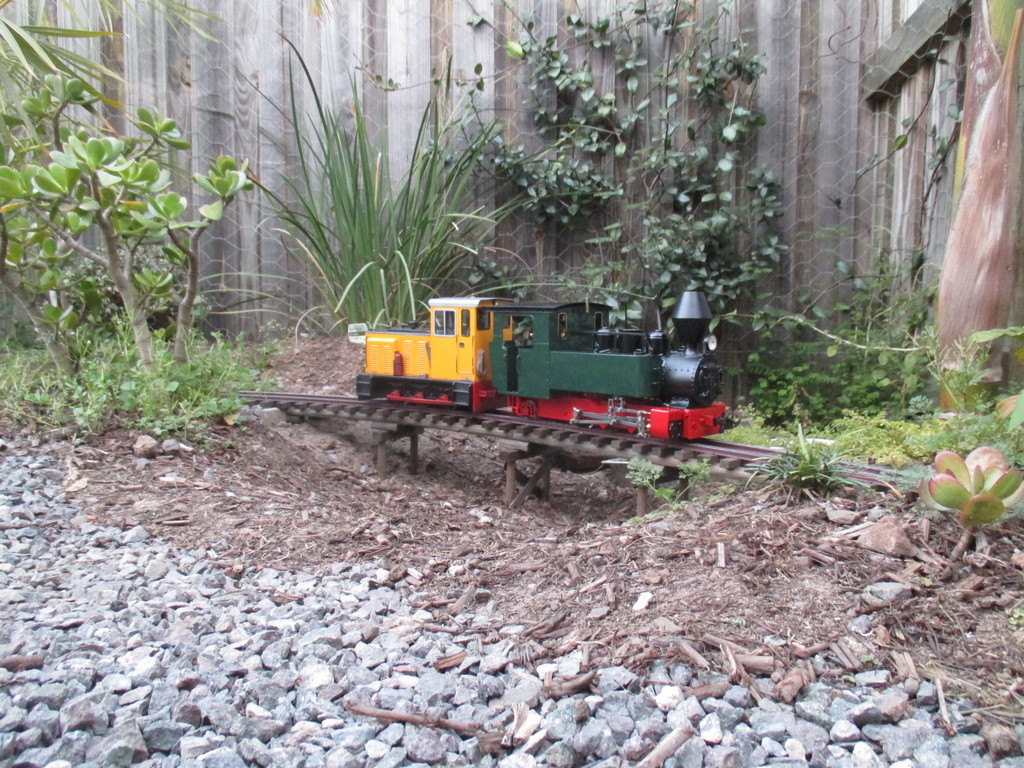
Shame about the gate right there. In time, ballasting the track and detailing that loco should sufficiently divert the eye.
I don't think I've run the passenger rake in years. The new coach (middle distance) fits the existing rake well, and the guard's van is a momentum van, which made running the Bundy even more enjoyable.
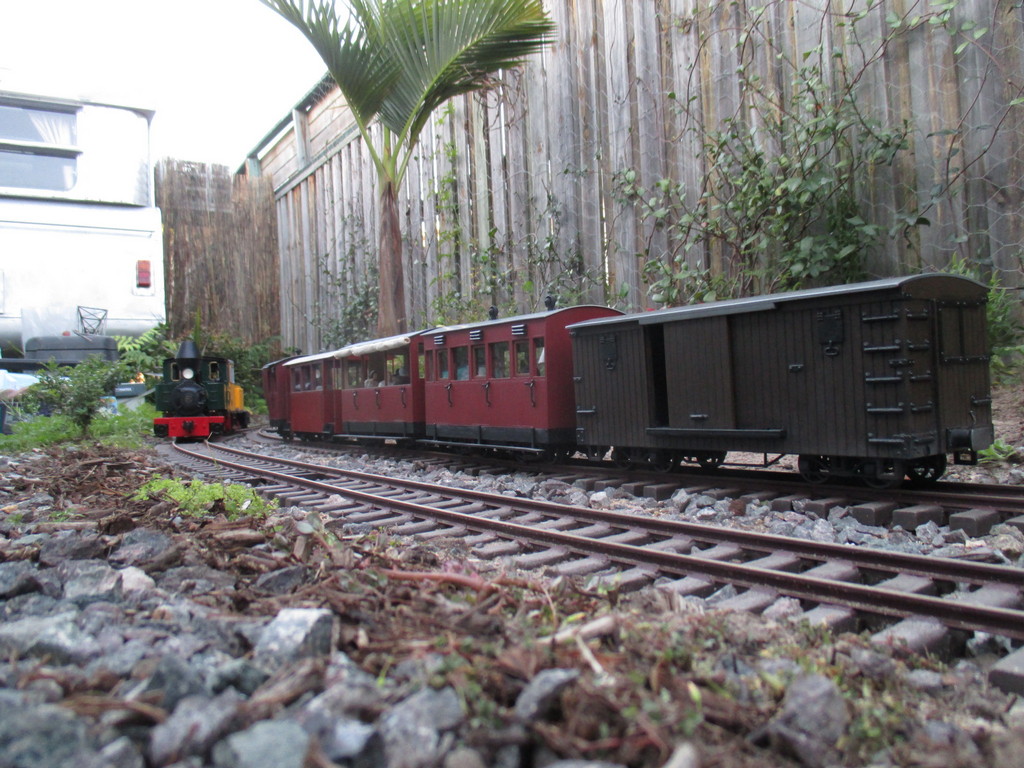
The flagship Ruby "Baron", sans cab and LH tank, also had a test run, after it's recently-retrofitted Roundhouse burner's standard No.6 gas jet, was replaced with a smaller No.3. It too, ran very nicely with the momentum van.
Regards,
Aaron
Last edited by Old Man Aaron on Wed Jul 21, 2021 2:15 pm, edited 1 time in total.
Regards,
Aaron - Scum Class Works
Aaron - Scum Class Works
Re: What to do with a tiny, barren wasteland?
I reckon that if a garden railway photo doesn't need a train to exude atmosphere, then there's something very "right" about that railway - and this is a perfect example. It's hard to believe it's all been created so recently too.
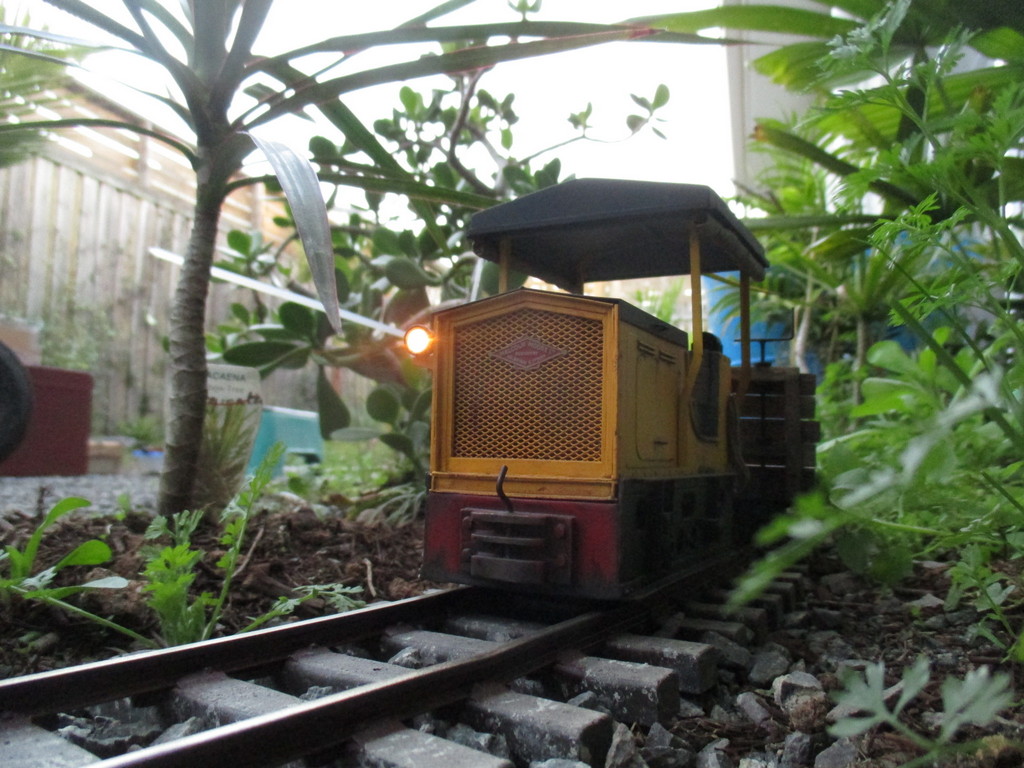
Love the first train pics as well - that little yellow diesel's a beauty, as is the passenger rake. I never really "got" the RH Bundaberg, but it looks just right in that setting. Do keep the pictures coming!
All the best,
Andrew.

Re: What to do with a tiny, barren wasteland?
Absolutely fabulous pictures there Aaron, the low angle and a track that looks like it has been there for years. Congratulations.
Grant.
Grant.

Re: What to do with a tiny, barren wasteland?
Wow! Such attention to detail has to be admired - three different recipes for ballast to suit each site! Your railway has a great feel and ambiance already.
Rik
Rik
Re: What to do with a tiny, barren wasteland?
Those ballast recipes are brilliant. Need to look into doing mine at some point, after I have sorted out a board that has lifted somewhat....
ROD
Life is so easy when I run my trains.
https://gardenrails.org/forum/viewtopic ... 41&t=11364
https://www.youtube.com/@fairywoodlightrailway
Life is so easy when I run my trains.
https://gardenrails.org/forum/viewtopic ... 41&t=11364
https://www.youtube.com/@fairywoodlightrailway
-
Peter Butler

- Driver

- Posts: 5245
- Joined: Sun Sep 09, 2012 10:33 pm
- Location: West Wales
Re: What to do with a tiny, barren wasteland?
It's all coming together very nicely, and looking established too! That little yellow loco is ideal for the line, love it!
The best things in life are free.... so why am I doing this?

Re: What to do with a tiny, barren wasteland?
Ditto. Wot Grant said..........
Once the plants get established, it will look like the line is running through rainforest. Just right for a cane tram.
A couple of observations......
As you found, caustic soda can dissolve aluminium just as easily as an acid. It also dissolves zinc, tin and lead, so you also need to be careful with it around galvanised steel, tinplate and solder.........
I also had some problems recently on the track extension with Roundhouse bogie wheels and the new turnouts, but interestingly not with the driving wheels on those locos. Turned out the bogie wheels had deeper and thicker flanges than the drivers. Instead of modifying the turnouts, I reprofiled the wheels in the lathe to the G1MRA coarse standard I use and have had no further problems.
Regards,
Graeme
-
Old Man Aaron
- Trainee Driver
- Posts: 808
- Joined: Wed Oct 19, 2016 11:08 am
- Location: Sunshine Coast QLD, Australia
Re: What to do with a tiny, barren wasteland?
Thanks again. In spite of the limited space, I'm pleased with how this "test track" is turning out.
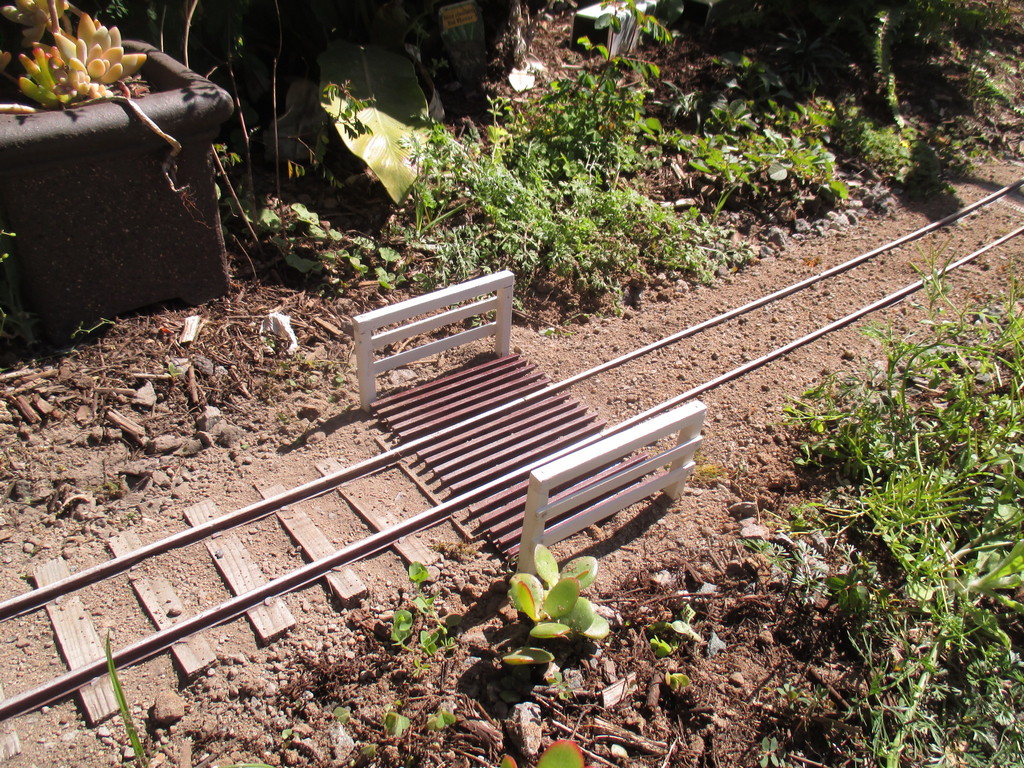
28/08/20
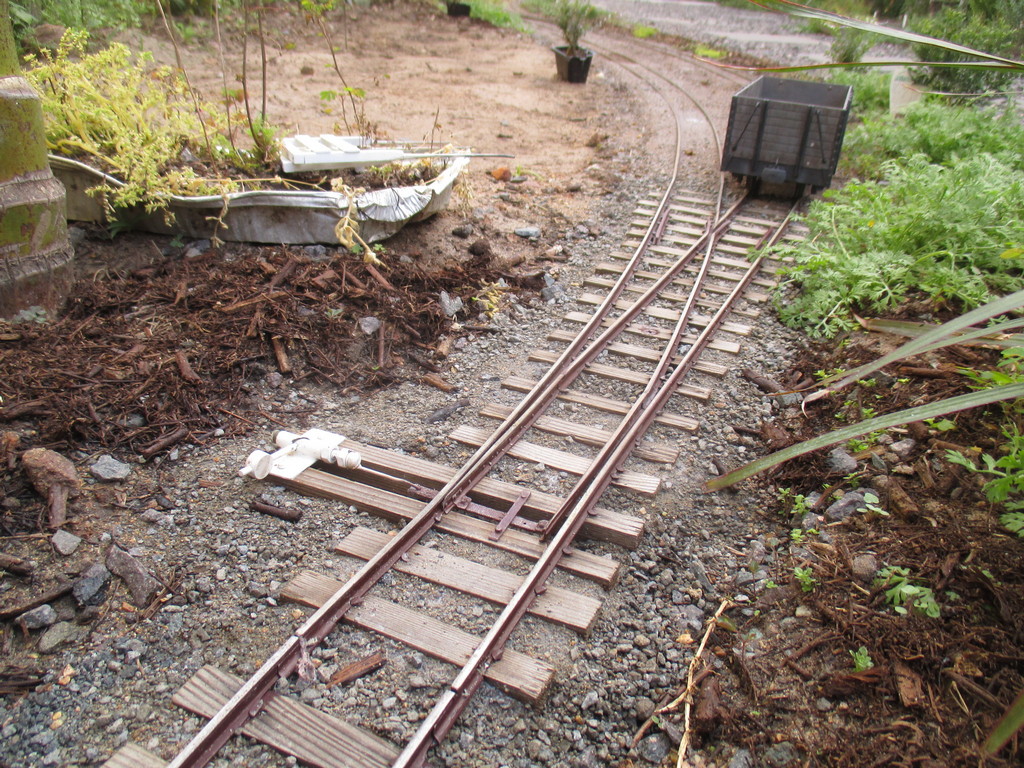
Parts for a cattle grid were made up and stored, some months back. Assembled in place with epoxy. The test runs highlighted numerous hollows in the track, which were filled by spreading hand-fulls of crusher dust into those sections, then washing it in with the hose.
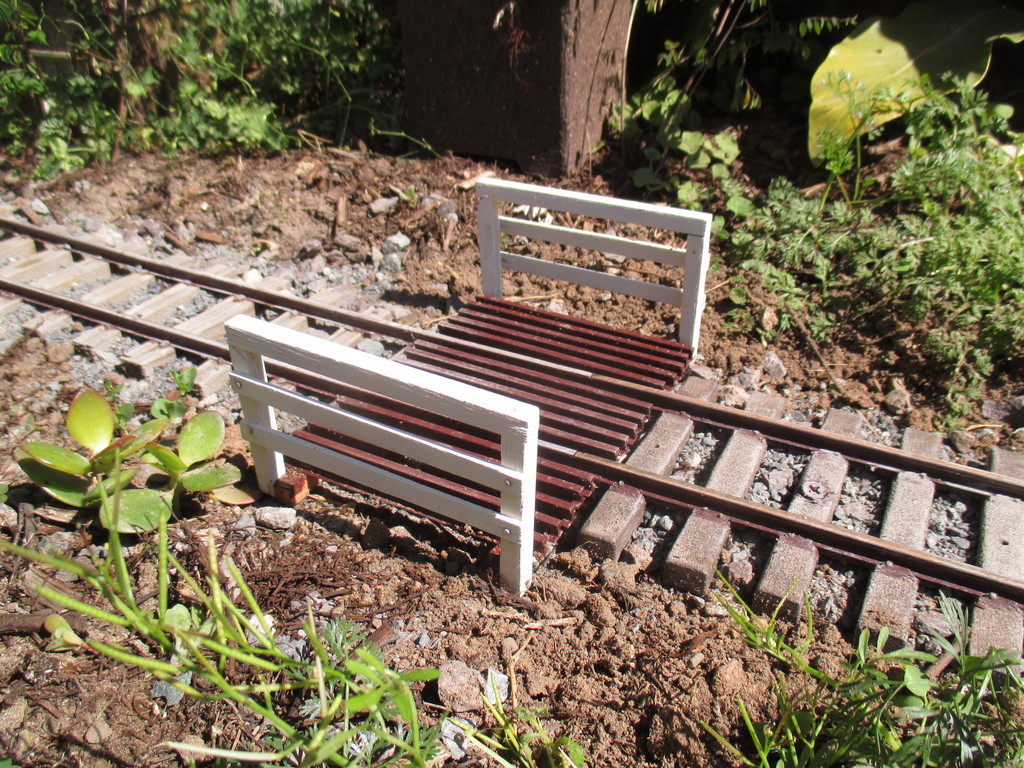
The handlaid track was ballasted leaving the sleeper tops exposed, to give the cedar a chance at lasting. The flex track's plastic sleepers however, allow more of that "narrow gauge effect". Just as last time round, moss was scraped up and torn into small pieces, then mixed with the ballast, prior to application.
I expect most of the moss will die, but some survived and spread on the last tramway:
A converted Echo Toys open wagon is ideal for this job. Unlike all my other stock, this wagon can get filthy, as I can simply hose it clean after use. And it's Binnie wheels have been temporarily replaced with the original "pizza-cutters" - which ensured any ballast wasn't fouling the pathways of sensibly-sized flanges. The excess ballast was spread away with a 3" brush.
Once content, the ballast was gently but thoroughly soaked. I know this is a bit long-winded, but it's for my own future reference - by the time I get to ballasting Stage Two, I'll have forgotten the exact methods..

A 50/50 mix of water and Sika outdoor PVA (with the usual dishwashing liquid) was then sprayed. I left it a couple minutes to soak in a bit, then sprayed again, a little more lightly this time.
(EDIT 11/10/2020: Spraying glue a second time will effectively be too heavy an application, and will result in white patches of trapped moisture in the ballast/glue, that after six weeks of increasingly hot weather has become only more noticeable. If you're going to use this method, just spray the glue once and let it soak in. When dry, the ballast won't be any weaker for it, and you shouldn't have the white patches issue.)
After another few minutes, a sprayer with only water in it, washed the glue from the sleeper tops before it completely dried.

29/08/20
Whilst I'm pleased with the effect, I should've used a mix with less crusher dust and more sand/dirt for this "tramway style" section. Might lightly sift some sand, cement and dye over this bit to give it a "soil-ier" appearance..
I also forgot to wipe the glue from the railheads, so will have to go around scraping away the dried glue, with a wood chisel..
Two points and a couple of random sleepers received the "new ballast" mix, to look as though they've been recently re-timbered.
31/08/20
Over half the ballast has turned white, in spite of no rain. Thankfully, there's an excellent forum you may have heard of, that has discussed this issue in the past. I expect this trapped moisture to clear up in the coming weeks. If not, surely our rapidy-approaching Summer will boil it out..

05/09/20
With The track of Stage One nearly complete, thoughts turned to getting Stage Two built before the weather gets too hot.
Was surprised to get this knocked up in a day.
This will be an elevated mill yard, loco shed/servicing, and navvy siding. Maybe a "dead row" if I can squeeze it in, we'll see once the points arrive..
The timber frame is only untreated pine held together with chipboard screws, as it needs only last a few years before we buy a place. A cat-run we built from the same cheap timber, lasted eight years in the constant humidity of our last yard. Cautiously-optimistic about this..
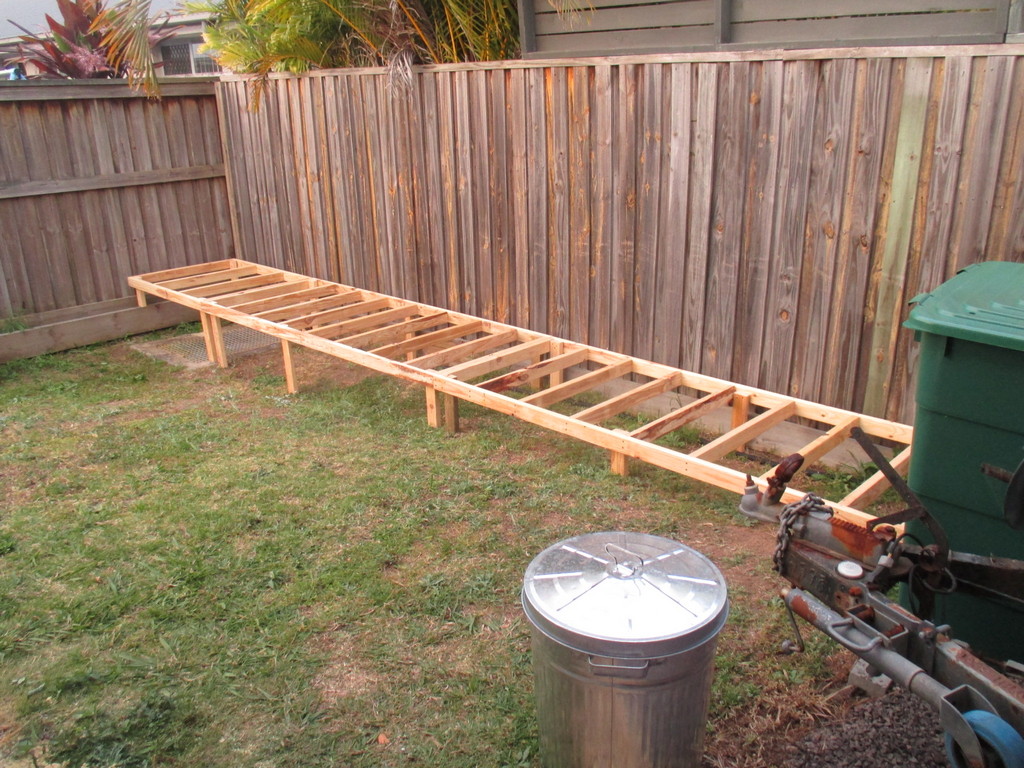
On a railway-related tangent here - Depending on the humidity of a given day, the house air conditioner's moisture drain expels 5-15 liters of clean water with every day of use. The drain can be seen at top right, and runs into the downpipe. For reasons I suspect relating to the cheap construction of this house, the drain line's gradient was almost non-existent, resulting in the line backing up, and water dripping from the air vent inside, onto the television unit. The pipe has since been disconnected from it's hole cut into the downpipe, and the water now drains without issue. But that's a lot of "free" water I could use in the garden. To that end, some 20mm PVC pipe, fittings and a 300L tank have been bought. Need another pair of Besser blocks (cinder blocks) upon which to mount the tank, before I can connect it. This lot should pay for itself within a year.

06/09/20
Stealing Mitch Stack's idea of corrugated iron as a fasica, I bought a few rolls of "miniature" iron in strips, intended for use as garden edging. (Wasn't enthused with the idea of cutting up full-size roofing sheets with tinsnips or a grinder)
The trial-and-error job of cutting the sheets to the ground's contour was less of a pain than I expected.

Some extra support timbers (mostly from offcuts) were needed before fitting the iron. The black hose is from the caravan sink, running into a convenient stormwater drain. Aye, it's legal, one can run greywater (sinks, washing machines) into a storm drain in Queensland.
I'll cut and fit the top tomorrow, weather permitting.
Regards,
Aaron
It wasn't a popular model from what I've heard, very much a niche prototype. But given it was a relatively quick conversion of the existing Innisfail Fowler, one can see why RH picked it for that year's release, whilst developing the Darj. Garratt.
Re. the caustic soda, that's good to know, cheers. Interesting that you had similar issues with your RH wheels. Now that you mention it, the difference between bogie and driving flanges is quite apparent, looking at my Innisfail Fowler atop the desk here. Never noticed that..GTB wrote: ↑Tue Aug 25, 2020 1:41 pm As you found, caustic soda can dissolve aluminium just as easily as an acid. It also dissolves zinc, tin and lead, so you also need to be careful with it around galvanised steel, tinplate and solder.........
I also had some problems recently on the track extension with Roundhouse bogie wheels and the new turnouts, but interestingly not with the driving wheels on those locos. Turned out the bogie wheels had deeper and thicker flanges than the drivers. Instead of modifying the turnouts, I reprofiled the wheels in the lathe to the G1MRA coarse standard I use and have had no further problems.
28/08/20
Parts for a cattle grid were made up and stored, some months back. Assembled in place with epoxy. The test runs highlighted numerous hollows in the track, which were filled by spreading hand-fulls of crusher dust into those sections, then washing it in with the hose.
The handlaid track was ballasted leaving the sleeper tops exposed, to give the cedar a chance at lasting. The flex track's plastic sleepers however, allow more of that "narrow gauge effect". Just as last time round, moss was scraped up and torn into small pieces, then mixed with the ballast, prior to application.
I expect most of the moss will die, but some survived and spread on the last tramway:
A converted Echo Toys open wagon is ideal for this job. Unlike all my other stock, this wagon can get filthy, as I can simply hose it clean after use. And it's Binnie wheels have been temporarily replaced with the original "pizza-cutters" - which ensured any ballast wasn't fouling the pathways of sensibly-sized flanges. The excess ballast was spread away with a 3" brush.
Once content, the ballast was gently but thoroughly soaked. I know this is a bit long-winded, but it's for my own future reference - by the time I get to ballasting Stage Two, I'll have forgotten the exact methods..
A 50/50 mix of water and Sika outdoor PVA (with the usual dishwashing liquid) was then sprayed. I left it a couple minutes to soak in a bit, then sprayed again, a little more lightly this time.
(EDIT 11/10/2020: Spraying glue a second time will effectively be too heavy an application, and will result in white patches of trapped moisture in the ballast/glue, that after six weeks of increasingly hot weather has become only more noticeable. If you're going to use this method, just spray the glue once and let it soak in. When dry, the ballast won't be any weaker for it, and you shouldn't have the white patches issue.)
After another few minutes, a sprayer with only water in it, washed the glue from the sleeper tops before it completely dried.
29/08/20
Whilst I'm pleased with the effect, I should've used a mix with less crusher dust and more sand/dirt for this "tramway style" section. Might lightly sift some sand, cement and dye over this bit to give it a "soil-ier" appearance..
I also forgot to wipe the glue from the railheads, so will have to go around scraping away the dried glue, with a wood chisel..
Two points and a couple of random sleepers received the "new ballast" mix, to look as though they've been recently re-timbered.
31/08/20
Over half the ballast has turned white, in spite of no rain. Thankfully, there's an excellent forum you may have heard of, that has discussed this issue in the past. I expect this trapped moisture to clear up in the coming weeks. If not, surely our rapidy-approaching Summer will boil it out..
05/09/20
With The track of Stage One nearly complete, thoughts turned to getting Stage Two built before the weather gets too hot.
Was surprised to get this knocked up in a day.
This will be an elevated mill yard, loco shed/servicing, and navvy siding. Maybe a "dead row" if I can squeeze it in, we'll see once the points arrive..
The timber frame is only untreated pine held together with chipboard screws, as it needs only last a few years before we buy a place. A cat-run we built from the same cheap timber, lasted eight years in the constant humidity of our last yard. Cautiously-optimistic about this..
On a railway-related tangent here - Depending on the humidity of a given day, the house air conditioner's moisture drain expels 5-15 liters of clean water with every day of use. The drain can be seen at top right, and runs into the downpipe. For reasons I suspect relating to the cheap construction of this house, the drain line's gradient was almost non-existent, resulting in the line backing up, and water dripping from the air vent inside, onto the television unit. The pipe has since been disconnected from it's hole cut into the downpipe, and the water now drains without issue. But that's a lot of "free" water I could use in the garden. To that end, some 20mm PVC pipe, fittings and a 300L tank have been bought. Need another pair of Besser blocks (cinder blocks) upon which to mount the tank, before I can connect it. This lot should pay for itself within a year.
06/09/20
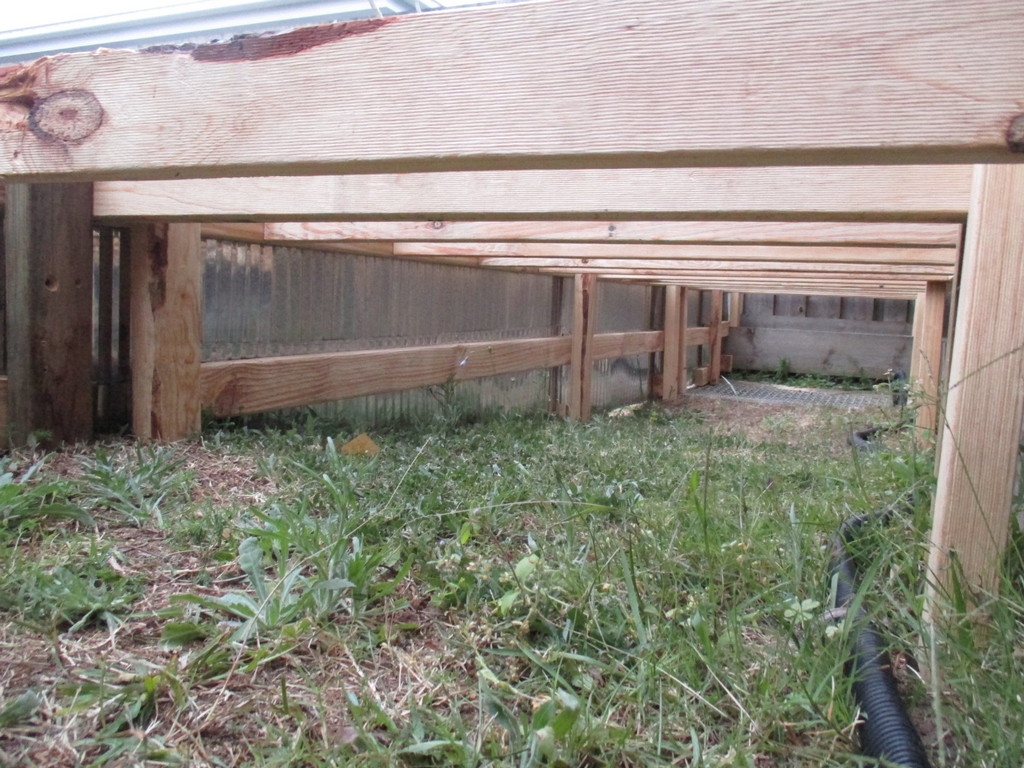
Stealing Mitch Stack's idea of corrugated iron as a fasica, I bought a few rolls of "miniature" iron in strips, intended for use as garden edging. (Wasn't enthused with the idea of cutting up full-size roofing sheets with tinsnips or a grinder)
The trial-and-error job of cutting the sheets to the ground's contour was less of a pain than I expected.
Some extra support timbers (mostly from offcuts) were needed before fitting the iron. The black hose is from the caravan sink, running into a convenient stormwater drain. Aye, it's legal, one can run greywater (sinks, washing machines) into a storm drain in Queensland.
I'll cut and fit the top tomorrow, weather permitting.
- IMG_7794.JPG (304.31 KiB) Viewed 5712 times
Regards,
Aaron
Last edited by Old Man Aaron on Wed Jul 21, 2021 2:25 pm, edited 2 times in total.
Regards,
Aaron - Scum Class Works
Aaron - Scum Class Works
Re: What to do with a tiny, barren wasteland?
Excellent write up Arron, don't worry about it being lengthy, the detail is important.
It's coming on really well.
Presumably the air con condense gives you an almost unlimited supply of loco boiler water as well!
It's coming on really well.
Presumably the air con condense gives you an almost unlimited supply of loco boiler water as well!
Philip
Who is online
Users browsing this forum: No registered users and 14 guests