An international forum for garden railway modellers in all scales and gauges. It is free to join and is funded through voluntary contributions by its members. Many thanks to all those who keep it going. https://gardenrails.org/forum/
So that's what you have been busy with Rod, well done. Clever how you have made the lamps, and the corrugated roofing material looks perfectly good to me.
Re: NEW FWLR LINE
Posted: Fri Oct 30, 2020 2:18 pm
by ge_rik
Looking good, Rod. I especially like the way you've weathered the corrugated iron roofs. Very realistic.
Rik
Re: NEW FWLR LINE
Posted: Sat Oct 31, 2020 8:39 am
by Andrew
Great to see some progress on your line Rod, and that's a very smart turntable.
I particularly like the chap watching on the bench - it reminds me of the turntable at Minehead, where turning engines feels like a real spectator sport...
Look forward to more pics in due course...
All the best,
Andrew.
Re: NEW FWLR LINE
Posted: Sun Nov 01, 2020 8:36 am
by FWLR
Thanks guys. What I like is that Anne did a little bit of modelling for the steam gauges and the wooden levers, alright it's only a bit of plastic tube and leftover offcuts of wood and some paint, she also took the time to find some printable gauges, so I guess it's counts don't you think....
Re: NEW FWLR LINE (Watermill Build)
Posted: Mon Nov 02, 2020 10:49 am
by FWLR
Now this build took some time to complete, nearly 7 months I think, it could have been more... It's something that I haven't rushed, when do I ever, but even more with health being a major factor and waiting for more materials due to the supplier being ill and the first lockdown, but never mind all that...
Here goes, it is a fairly long build and I will decide to either put in one o two threads as I go along, plus I don't want to bore the pants off you for those who are interested in my build.
It is also my take on a Watermill, it's no were near as good has ge_rik's be a long way, but again anne loves it and so does the few family members who we have been lucky enough to be able to see...
It's starts with a Plasticard box...
3FAAD8F7-E11A-4559-A655-4376EF5D5F92.jpeg (444.77 KiB) Viewed 7116 times
Then the wheel. I tried to cut a perfect circle out of Plasticard, but it was impossible for me. So I asked Nicki from SLR Models if she could make me two circles, she duly obliged. I put the inserts in the two parts with 1mm Plasticard on the inside and the paddles from 3mm card.
78ACE28E-C65A-4BE7-8D1B-CF12D29055B3.jpeg (488.2 KiB) Viewed 7116 times
Next was to cut two circles out of HIP for the braces for the wheel. I put two pieces of HIP's together and cut them out. It was a fairly easy job with the help of a circle cutter.
83B5E804-22E6-4A39-9B01-518D8BFD6BBE.jpeg (142.04 KiB) Viewed 7116 times
Next I cut thin strips of card and fixed them to the small circles. And fixed one to one side of the bigger circles.
5AB72CE5-F7D8-4F5D-9DAA-16BDC59D0FBD.jpeg (467.17 KiB) Viewed 7116 times
F075D77E-74BF-40CF-9E6C-2A7F1B9D4DA7.jpeg (454.7 KiB) Viewed 7116 times
For the other one for some reason I just can't remember it's been that long , it may come to at some point, I fixed the other strips to the other smaller circle whilst holding the part level and straight with some plastic tube and copper tube
05D56421-DC5F-4BA1-9A0E-3345A7B04323.jpeg (489.38 KiB) Viewed 7116 times
The finished and painted wheel.
A0A75E3B-5216-4A58-BDB4-B3CA6F563F4D.jpeg (476.82 KiB) Viewed 7116 times
Next I wanted to make the walls of the watermill more realistic by building them with small real bricks. I have done a smaller wall on my water tower if you remember. So off I went with four bigger walls...
23E7C516-71A8-4299-920D-164AD58F7B55.jpeg (479.91 KiB) Viewed 7116 times
Has you can see, even using smaller bricks haven't improved my brick building skills.... But after I put a emery block over them, they turned out somewhat ok..
161564F4-8746-4FD7-9148-6C5605A4DCCF.jpeg (474.61 KiB) Viewed 7116 times
The reason for using a Plasticard box is to keep the bricks fairly straight has I built up the course's and for added strength, without the box shape the bricks would just not hold up to any handling what so ever.
I added a small 12v reduced gearbox, they run about 10 to 15 rpm. I wanted the watermill to turn, so it was decided to fit one.
595D2691-1CE3-4EC1-A73A-9FACCF9B990C_1_201_a.jpeg (345.13 KiB) Viewed 7116 times
EEA1E1D8-CD9D-4853-A860-10B8F31D1B16.jpeg (464.24 KiB) Viewed 7116 times
99D9529A-7750-4BDF-9F8F-16F3DEBB247E_1_201_a.jpeg (110.23 KiB) Viewed 7116 times
A42F103B-F799-41C4-9010-70B2AA580688_1_201_a.jpeg (110.74 KiB) Viewed 7116 times
I am getting very tired again guys, so I will finish this tomorrow if that's ok with you guys....
Re: NEW FWLR LINE
Posted: Mon Nov 02, 2020 11:02 am
by Andrew
That's looking great - the finish you've achieved on both wheel and wall is brilliant.
Take all the time you need Rod, don't overdo it - I look forward to the next instalment, but in the meantime thank you for enlivening a dull morning working from home...
Andrew.
Re: NEW FWLR LINE
Posted: Mon Nov 02, 2020 11:45 am
by Peter Butler
Excellent work Rod, the wood-grain effect on your wheel is really good and nicely painted too. Those tiny bricks are most convincing and look as though they have been there for years.
Re: NEW FWLR LINE
Posted: Tue Nov 03, 2020 2:32 pm
by FWLR
Thanks guys.
Here is the rest of the build. Unfortunately my laptop had an update and I have "lost" about 200 photos from my folder including about 10 on the start of the top of the watermill. I say lost, they have got jumbled up over 12000 photos in the folder and I just don't want to take the time to look for them, it's far to tiring.......
Anyway these will show you the basic building that most of us do.
9F1D0DF4-5763-417A-94CF-8B50359D8F12.jpeg (451.46 KiB) Viewed 7090 times
4542121F-FE4E-429A-A86C-4809BB48F35D.jpeg (443.18 KiB) Viewed 7090 times
Next was to cut to length those coffee stirrers I have loads of for the boards on the building. I have a jig of sorts that I can set to cut the rounded ends of the stirrers so they get to be square. Believe me when you have cut a few dozen of them your eyes go funny....
B6562519-EA14-449A-9A8F-659680B482BF.jpeg (468.07 KiB) Viewed 7090 times
D9546A1D-4836-4BFD-A3A6-CFA4B15681FC.jpeg (493.78 KiB) Viewed 7090 times
97220ADE-8EF7-4FE9-A365-D26B9E6CC2AB.jpeg (474.89 KiB) Viewed 7090 times
0A701B54-95C6-481B-83C1-C7C67A2C3EB8.jpeg (480.01 KiB) Viewed 7090 times
Next came the roof tiles. Now they were a nightmare......
9CE9C7BF-9F8C-48AE-A3B1-25E0129AE723.jpeg (472.72 KiB) Viewed 7090 times
The curved tiles were the off cuts from the stirrers for the roof tiles. I did need to cut a few more because some were just not up for the job..
D2E1BF39-B21B-4966-A56C-753E77FB458A.jpeg (446.95 KiB) Viewed 7090 times
One side done.
6CCE3D1F-E867-432D-B9B8-16092D3D6196.jpeg (464.93 KiB) Viewed 7090 times
I wanted to have some steps leading down or up from the bank that will need to be built on the line next year, so I cut these from 2mm Plasticard. Again I have lost some photos of them but you will see the finished steps later.
BFE8BD5B-DC0E-45B2-9E4B-771DDD8A4D09.jpeg (450.89 KiB) Viewed 7090 times
I really have to apologise to you all. It seems I really have lost those photos completely. I have looked through quickly the folder that has them in and even went into the drive recall and there are not there. That was really tiring and hard work looking for the folder/folders. I have learnt now to back up my photos that I have put on to my laptop, so for any future builds I will have some photographic record of it. So I will just have to tell you what I did for the colouring of the boards and roof. I just used some black weathering wash with just a small amount of black paint, both from Vallejo, (it's what I use now for my airbrushing and I find it goes such a long way and dries very quickly), to give it some depth. I then built the steps and painted them with concrete paint and for the handrails and posts, dark umber was applied.. The watermill was put onto a large square sheet of HIPs and then that was fixed to an even larger piece of black HIPs.
Now the really annoying bit of the lost photos, I built again the water wheel support in brick, but they have disappeared also, very very annoying Also the water chute isn't in my folder....
Still I do have the finished build so you can see for yourselves what I did for the weathering and the water chute fixed to the building. It is able to come off with the building so I can get to the switch to turn the wheel on.
The finished build with the steps.
42585E39-8947-4430-AA65-558070482601.jpeg (480.98 KiB) Viewed 7090 times
And the rest of the build with the brick support pillar for the wheel and the water chute.
BD6F6588-B2FB-4AEA-A4BD-CE3A1B675A5B.jpeg (473.03 KiB) Viewed 7090 times
698968DB-F52C-4441-8B30-9BBDC741F18A.jpeg (470.54 KiB) Viewed 7090 times
27B2CC0B-5652-467E-AB6A-BE1E8F3241F9.jpeg (468.32 KiB) Viewed 7090 times
12B78721-3B59-4EF4-893F-70BF74575395.jpeg (484.48 KiB) Viewed 7090 times
I need to put some more stones around the pillar to finish it off.
I hope you like my take on a Watermill. It as been a labour of love and taken me a very long time, but hopefully when I can get it out onto the line it will look like it's been there for some time.
This is a short video of the water wheel working...
Why is it that Youtube are always messing about with their site, or is it me not loading a video properly. It has been sometime since I have you know.....
This has taken me most of the day and now I am off for a lay down....
Re: NEW FWLR LINE
Posted: Tue Nov 03, 2020 3:55 pm
by Peter Butler
That is a brilliant job Rod, the weathering colours are just right and the speed of the wheel is perfect, you should feel well proud of that.
Re: NEW FWLR LINE
Posted: Tue Nov 03, 2020 5:07 pm
by ge_rik
Excellent work, Rod. I especially like the way you've done the brickwork. Very realistic!
Rik
Re: NEW FWLR LINE (Watermill)
Posted: Wed Nov 04, 2020 1:05 pm
by FWLR
For those who don't have access to YouTube, I have now been able to load the video of the Watermill onto the forum.
Re: NEW FWLR LINE
Posted: Wed Nov 04, 2020 10:36 pm
by gregh
What a brilliant piece of modelling. How you have the patience to do that brickwork is beyond me.
Re: NEW FWLR LINE
Posted: Tue Dec 29, 2020 10:11 am
by Lonsdaler
Catching up after a prolonged absence. The water mill is very impressive Rod. An excellent build. The use of 'real' bricks just demonstrates how effective it is for producing a realistic appearance to brickwork.
Re: NEW FWLR LINE
Posted: Sun Apr 25, 2021 9:03 am
by FWLR
It's been some time since I posted about something on our line, mainly because I got myself a 3D printer has a Christmas present for me... And getting some work done on the line was put on hold because of it. That wasn't the only reason though, I have had a bad start to 2021 with health and other issues, like my youngest daughter having her own crisis. But hopefully most of it is a thing of the past.
Anyway here are a few photos for you.
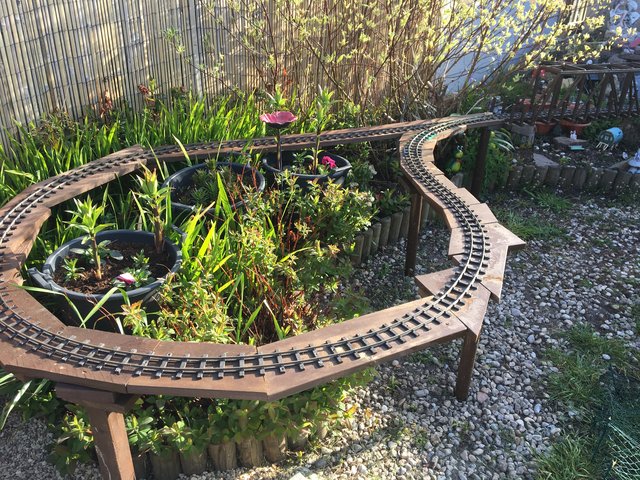
This is the line going from the raised bed over the waterfall. It was a bit tricky because Anne needs to get to her Fairy Garden because the fairies are really lazy and it gets overgrown very quickly.
The bridge is easily took off so Anne can get to the garden.
The rest of the line is now finished, although there still needs some tiding up of the boards.... They do look ugly.........
On the 3D printing side of things, I have managed to make something finally for the line. The previous things I have done were for family, like the usual stuff that seem useless to us but for them are brilliant things.
I am digressing, I have tried to print some chassis but getting them to look alright and to fit the axles is proving a little bit of a pain for me.
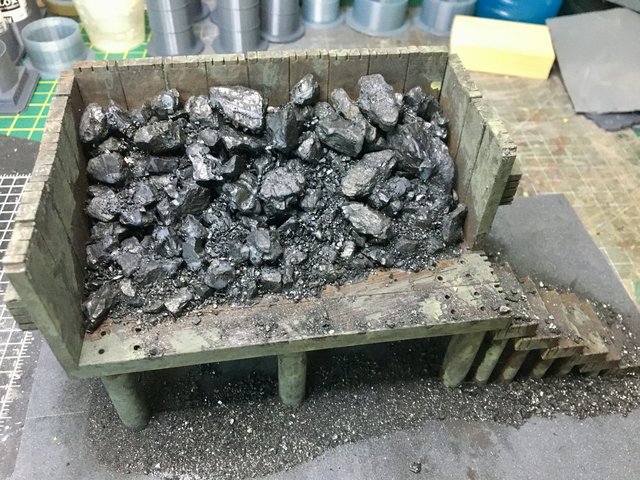
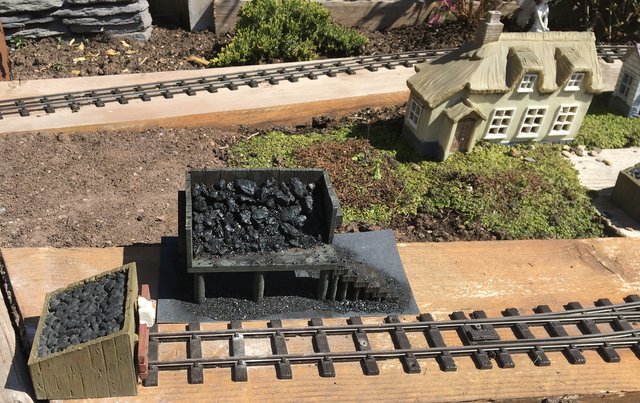
Anyway this is what I have managed to do It has taken about 10 hours to print off the individual sleepers.
The steps I managed to print completely.
I need to finish the weathering yet, it does look rubbish. I have used real coal and crushed, bashed the bits of coal, that helped me immensely with some problems I have had....
This is were I intend to place the coal stage on our line. It's were the locos will come too when I get the shed made for it.
Hopefully we can start to run some trains this year now, unless other things get in the way.....
Now hopefully Steve will reply, when he is not too busy, with his superior chassis so I can get some rolling stock onto the our line too. More builds......
Re: NEW FWLR LINE
Posted: Sun Apr 25, 2021 10:38 am
by ge_rik
Looking good, Rod. I hope your daughter is over the worst.
Rik
Re: NEW FWLR LINE
Posted: Sun Apr 25, 2021 10:40 am
by Lonsdaler
I think the coal staithe looks really good Rod - suitably weathered I would have said
Re: NEW FWLR LINE
Posted: Sun Apr 25, 2021 6:30 pm
by BWLR
The coaling stage looks great! I wouldn't change much on the weathering either, it looks rather good as it is to me.
Re: NEW FWLR LINE
Posted: Tue Apr 27, 2021 9:39 am
by Andrew
BWLR wrote: ↑Sun Apr 25, 2021 6:30 pm
The coaling stage looks great! I wouldn't change much on the weathering either, it looks rather good as it is to me.
I agree, it's looking really good. Great to see so much progress Rod, looking forward to seeing some trains running when the time's right.
Andrew.
PS You're quite right about the theraputic effects of bashing a lump of coal!
Re: NEW FWLR LINE
Posted: Tue Apr 27, 2021 10:22 pm
by Peter Butler
Nice work Rod, I really like the coaling stage, you have worked wonders with your printer, I wouldn't have a clue.