Page 6 of 10
Re: A stream for the Elderbury & District Light Railway
Posted: Sat Nov 10, 2018 9:00 am
by Lonsdaler
Well done Philip, your description has made the construction sound simple, but I know from experience that carving aerated blocks is a real chore. The original tunnel mouths on my line were made that way, but nowhere near as well as your bridge came out.
With regard to colour, I think the problem you have is that the 'base colour' (the block) is too light. I would go for a dark grey or even black base coat, and then colour from there. it will tone down the yellow you are trying to achieve, IMHO. But excellent work, and well done for having only the one breakage

Edited to add: this is one of the two tunnel portals that I 'carved'. I cheated and used aluminium angle to support the cross piece. Also the colour of the stonework is very different now it has weathered, with greys and greens mellowing the yellow. They've now been replaced by portals from Brunel Models, heavily modified.
- 2014-09-18 19.02.24_zps2ad84dul.jpg (42.5 KiB) Viewed 5005 times
Re: A stream for the Elderbury & District Light Railway
Posted: Sat Nov 10, 2018 1:47 pm
by philipy
Phil, your stone colour in those pictures is exactly what I'm trying to match!
You may very well be right about the base colour. I did a couple of trials a few weeks ago by casting a simple length of wall using a 1:4 cement/sand mortar, with various quantities of buff colour added. I was really quite pleased with one of them being a close match to some of the stones laying around in the pictures. However, those trials were of course on a grey mortar not the almost white block, plus the colour was uniform through the mix not just painted on the surface, which will affect the apparent depth of colour.
Anyway, I'm hopeful that I may be on the way to solving things after some experiments this morning. The cream grout powder mixed with a lot of water and painted on to a piece of scrap block, did give a surprising depth of colour as the very fine particles settled into the pores of the block. The dried finish was very similar to some of the real stones I have. I then raked out the mortar gaps because more of the grout had settled in them, and the pale grey block colour then showed through as a quite convincing mortar colour. Adding a small amount of the buff dye to a section of it has darkened it slightly to a deeper cream colour.
Re: A stream for the Elderbury & District Light Railway
Posted: Sat Nov 10, 2018 3:00 pm
by IanC
The bridge is an excellent build. The detailed write up too deserves a mention. Well done. I'm sure when it's in place and the stream is in full flow both will form a wonderful scenic feature.
Re: A stream for the Elderbury & District Light Railway
Posted: Tue Nov 13, 2018 7:32 pm
by Soar Valley Light
Cracking job Phillip! I'm thoroughly impressed.
Andrew
Re: A stream for the Elderbury & District Light Railway
Posted: Wed Nov 14, 2018 9:47 am
by Lonsdaler
philipy wrote: ↑Sat Nov 10, 2018 1:47 pm
Phil, your stone colour in those pictures is exactly what I'm trying to match!
You may very well be right about the base colour. I did a couple of trials a few weeks ago by casting a simple length of wall using a 1:4 cement/sand mortar, with various quantities of buff colour added. I was really quite pleased with one of them being a close match to some of the stones laying around in the pictures. However, those trials were of course on a grey mortar not the almost white block, plus the colour was uniform through the mix not just painted on the surface, which will affect the apparent depth of colour.
Anyway, I'm hopeful that I may be on the way to solving things after some experiments this morning. The cream grout powder mixed with a lot of water and painted on to a piece of scrap block, did give a surprising depth of colour as the very fine particles settled into the pores of the block. The dried finish was very similar to some of the real stones I have. I then raked out the mortar gaps because more of the grout had settled in them, and the pale grey block colour then showed through as a quite convincing mortar colour. Adding a small amount of the buff dye to a section of it has darkened it slightly to a deeper cream colour.
Good luck anyway. Certainly up here in the damp Northwest, those stones are no longer that colour! This is what they had 'mellowed' to last year. In fact, the green of algae or whatever is getting more prominent as time goes by.

- IMG_1340_crop.jpg (203.3 KiB) Viewed 4886 times
Re: A stream for the Elderbury & District Light Railway
Posted: Wed Nov 14, 2018 11:12 am
by philipy
Ahh, the Midlands damp is obviously more efficient than Northwest damp, these are a couple of the stones I was angle-grinding just back at the beginning of September this year!


- combined.jpg (340.54 KiB) Viewed 6324 times
That is a nice shot of your train, BTW.
Re: A stream for the Elderbury & District Light Railway
Posted: Wed Nov 14, 2018 9:04 pm
by invicta280
That skew bridge cut from breeze block is superb. It will look the business with the stream running underneath. Most impressive.
Re: A stream for the Elderbury & District Light Railway
Posted: Thu Nov 15, 2018 8:07 am
by FWLR
Re: A stream for the Elderbury & District Light Railway
Posted: Thu Nov 15, 2018 8:10 am
by FWLR
Agree with Phillip, great shot of the Loco Phil.

Must get around to a visit one day.
Re: A stream for the Elderbury & District Light Railway
Posted: Thu Nov 15, 2018 9:15 am
by Lonsdaler
philipy wrote: ↑Wed Nov 14, 2018 11:12 am
Ahh, the Midlands damp is obviously more efficient than Northwest damp, these are a couple of the stones I was angle-grinding just back at the beginning of September this year!
combined.jpg
That is a nice shot of your train, BTW.
It doesn't take long, does it? If the sun's out, that wall has the benefit of full UVa and UVb radiation in the afternoon. Maybe that helps control the algal growth?
Thanks ofr the compliment re. th train. It belongs to one of the visitors to my line, travelled down from the Ingleton Mountain Railway, IIRC.
Re: A stream for the Elderbury & District Light Railway
Posted: Sun Dec 23, 2018 11:57 am
by philipy
I just had to larf a few minutes ago!!!
Just having a passsing look around the garden, seeing how many bulbs were coming up, etc, and something caught my eye, the stream sump dustbin seemed a bit higher in the ground than when I last went near it. "Oh good" I thought, "the rain has settled the soil round it so I can top it up a bit.". Then I realised that there wasn't actually a gap, just the top of the bin about 2" above the surrounding soil level. So I bent down and pressed it down until it stopped, but as soon as I let go it gently bobbed back up again. The rain has filled the bottom of my hole, excavated from the solid clay, and the empty bin is actualy floating in a pond of its own.
Somebody did ask if I was going to use a liner for the stream....!

Re: A stream for the Elderbury & District Light Railway
Posted: Mon Dec 24, 2018 12:40 am
by IrishPeter
Ah, the joys of clay soil! We have plenty in our garden, but it seems to be broken up enough that it drains... eventually... I hope...
Peter in Va
Re: A stream for the Elderbury & District Light Railway
Posted: Mon Dec 24, 2018 11:32 am
by BorisSpencer
The delights of living in Northants. That and the inch wide cracks once the sun's been on it for an hour!
Re: A stream for the Elderbury & District Light Railway
Posted: Sun Mar 10, 2019 12:13 pm
by philipy
I haven't been entirely idle over winter, in fact I've achieved more than I thought I would be able to.
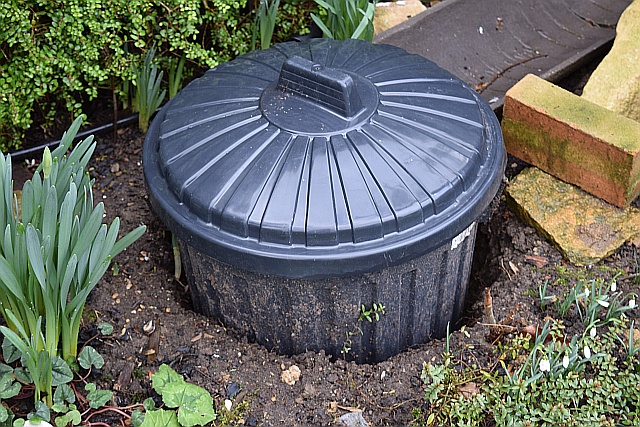
Firstly, to return yet again to my clay 'soil', sorry but this amuses me
. When I dug the hole for my dustbin sump, I had it fitting quite nicely with the top at soil level.

- DSC_0006.JPG (207.8 KiB) Viewed 5796 times
As I said a few posts back, one day I noticed that it had lifted up and discovered that there was water sitting in the hole and the bin had floated up a couple of inches.
The weather dried up somewhat and eventually it went back down more or less to where it had started.
Then it rained again and this is the result:
- DSC_0002.JPG (261.81 KiB) Viewed 5796 times
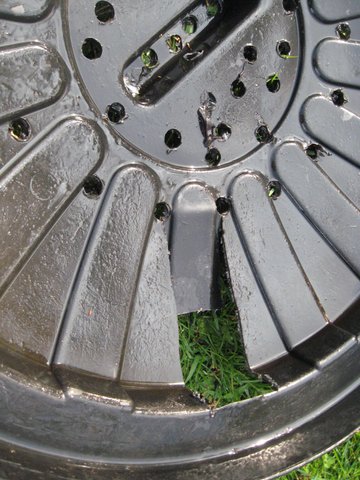
That went down again eventually, although not quite to the bottom. Yesterday I put two large concrete ridge tiles in the bin, last night it rained again and this morning it is floating with a pronounced list to one side!
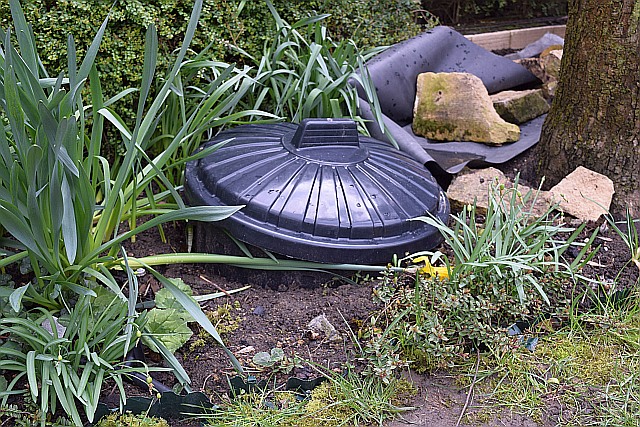
- DSC_0001 (2).JPG (245.29 KiB) Viewed 5796 times
Before anyone suggests it, I don't want to put water in the bin yet so that I can adjust heights etc to match the end of the stream bed, when I get that far. I'm just hoping that in due course the bin full of water, plus the weight of the pump, plus the weight of the pebbles on the lid, will be enough to counter the upward water pressure collecting in the hole in subsequent winters!
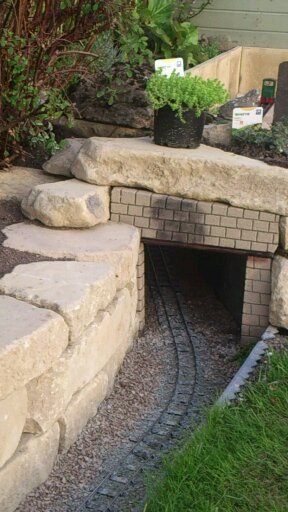
Anyway, enough of that. I have actually made some progress on the stream itself. When I originally cast the concrete trackbed, I always had it in mind that it needed facing, but being short of Tuits, I never did get around to it. It was never really exposed very much before so wasn't a major eyesore. However since the stream will be significantly lower I felt that it really had to be tackled, especially after seeing Phil's cast concrete facings in a similar situation. I did actually make a trial section using a mould but that was before I carved the bridge from the Aerated blocks. After the success of that, it was no-brainer to do the same for the facings, using up left over blocks at the same time and ending up with the same surface finish as the bridge, as a bonus. You may have already seen the comments and pictures whch Mr Spectre posted, but for completeness, this shows the facings. The joins are showing darker because the mortar/pointing was damp. When dry it is a fair match for the blocks and once I've applied water proofer to the joins I think it will blend in, especially once weathering takes effect.
- DSC_0003.JPG (229.98 KiB) Viewed 5796 times
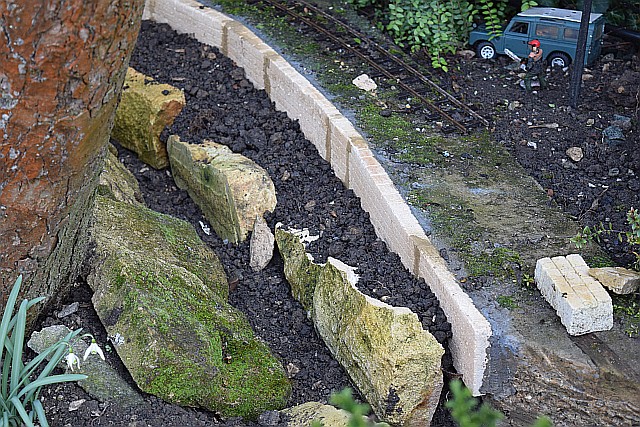
Yesterday I managed to get the underlay and liner in place and approximately trimmed. I had previously cut a large sheet of polythene to size and shape to act as a template for the actual stream liner, sdo I spread it out on the lawn and put the template on top to cut round. It was dry, but blowing a gusty 20+ mph wind which made handing large flat sheets, interesting at times!
Last night it rained again but fortunately I had deliberately folded the bottom end of the liner up out of the way to stop even more water funnelling into the bin hole. Good job I did, because this morning I have a long, thin, lake.

- DSC_0001 (3).JPG (378.12 KiB) Viewed 5796 times
Re: A stream for the Elderbury & District Light Railway
Posted: Sun Mar 10, 2019 7:39 pm
by tom_tom_go
That's coming along, I love the sound of trickling water.
Re: A stream for the Elderbury & District Light Railway
Posted: Sun Mar 24, 2019 8:45 am
by FWLR
You certainly are having some issues with that sump Phillip. I think I would be pulling what little bit of hair I left out because of it. But I am sure you will overcome it.
The stream is coming along nicely and will be a great addition to your line. I am looking forward to some more updates, especially photos.
Re: A stream for the Elderbury & District Light Railway
Posted: Sun Mar 24, 2019 8:17 pm
by Soar Valley Light
Hi Philip,
You are coming on well with the project. Between Riks account of his stream construction and your ongoing project I'm becomeing more and more keen to give it a go myself.
I remember in a previous post you were taken aback at the capacity required for the sump. Is the bin a full sized (four foot(ish)) one? Does your stream drain away completely once the pump stops?
Please keep us updated as you progress, I'm hooked!
All the best,
Andrew
Re: A stream for the Elderbury & District Light Railway
Posted: Sun Mar 24, 2019 8:39 pm
by ge_rik
Looks like things are progressing well. I never had an issue with my bin floating upwards, but maybe my water table is lower than yours. Also, I got my stream up and running fairly quickly, so it was filled with water almost from the word go.
For a while, I ran it without a cover - but was alarmed to find a dead hedgehog floating in it one morning. Spurred me on to get it covered that day. I then found a few drowned frogs in it when I cleaned it out at the end of the season. They must have somehow squeezed in through the hole for the pipe from the pump. I now make sure I keep the sump topped up and have provided frogs with an escape hatch in the lid. Since then (about twelve years ago), I have found no more drowned wildlife in the sump.
- IMG_1930.JPG (57.76 KiB) Viewed 5661 times
.
Rik
Re: A stream for the Elderbury & District Light Railway
Posted: Mon Mar 25, 2019 7:05 am
by philipy
Soar Valley Light wrote: ↑Sun Mar 24, 2019 8:17 pm
Is the bin a full sized (four foot(ish)) one? Does your stream drain away completely once the pump stops?
Hi Andrew, no it's not a full sized one, its a 70 litre. Can't remember the dims off hand and I'm away for a couple of weeks, will check when I get home.
Yes, in theory, if I get the gradient correct when I put the rocks and mortar stream bed down, it will drain completely. The soil level is currently flat from the bridge to the sump and the plan is to introduce a couple of degrees fall in the stream bed itself. More of that when I get that far. However I do have some issues with levels where the stream flows into the sump and I haven't fully resolved how to finish it yet.
Yesterday morning before we left, I managed to do a bit more and trim the liner more closely and put ( not fix) the bridge then run the pump so water flowed under it. No time to take pictures but it looked fine so far. I'll document it properly when I get back.
Re: A stream for the Elderbury & District Light Railway
Posted: Mon Mar 25, 2019 7:17 am
by philipy
ge_rik wrote: ↑Sun Mar 24, 2019 8:39 pm
Looks like things are progressing well. I never had an issue with my bin floating upwards, but maybe my water table is lower than yours. Also, I got my stream up and running fairly quickly, so it was filled with water almost from the word go.
No I don't think its water table, we live near the top of a hill and there is a 20ft deep ex-LNWR railway cutting right in front of the house! The problem is soil permeability, this thick yellow clay simply doesn't allow water to percolate through at any great speed.
ge_rik wrote: ↑Sun Mar 24, 2019 8:39 pm
They must have somehow squeezed in through the hole for the pipe from the pump. I now make sure I keep the sump topped up and have provided frogs with an escape hatch in the lid.
Yes I saw you had done that on your blog and I have it in mind. I've been meaning to ask about your pipe/cable hole. Is it actually a hole, or a slot cut in from the side to allow the inverted lid to be removed easily? I'm a bit concerned that a slot would allow warping of the lid from the weight of the pebble topping, but it will be a 'mare to try to lift it up and slide it up the corrugated pipe. I'm thinking about a removable inverted-U shaped clip to hold the ends of the cut rim together.