Page 5 of 10
Re: (WH)WHR Buildings
Posted: Thu Apr 25, 2019 8:46 am
by FWLR
Nicely worked out Andrew...Who cares if it's not quite right on the brickwork, so long as your happy with it...It's your line after all..

Re: (WH)WHR Buildings
Posted: Sun Apr 28, 2019 1:25 pm
by Andrew
Hello again!
I've managed a little more work on the tunnel mouth, completing the cladding on one wall, plus the bit above the arch. That's now scribed to represent bricks, end-on as seen on NWNGR bridges - don't look too closely, it's a bit wonky!
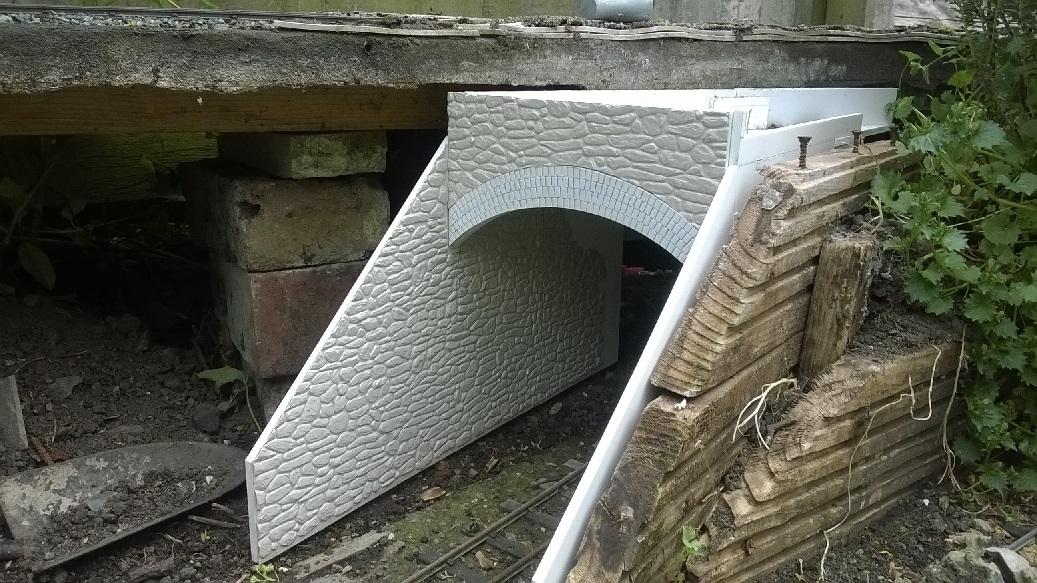
- Tunnel with cladding.jpg (350.27 KiB) Viewed 6215 times
I need to order some more cladding now, then there'll be a bit of filling to do before I can paint it...
Cheers,
Andrew.
Re: (WH)WHR Buildings
Posted: Sun Apr 28, 2019 7:51 pm
by ge_rik
That stonework looks superb, Andrew. A cracking good job. It's years since I've seen a slow worm. Glad you found him a new home.
Rik
Re: (WH)WHR Buildings
Posted: Sat Jan 18, 2020 5:40 pm
by Andrew
Hello!
It's been a while, but I'm back in building construction mode... The current project is a model of Tryfan Junction Signal Box, constructed for the NWNGR but made redundant when fixed signalling was dispensed with in the WHR years.
As is becoming my usual practice, the model features a foamboard shell, with tabs and slots to enable me to trial fit all the parts and modify as necessary before finally gluing everything in place. The window frames are from plastic strip but remain unfinished for now because the model shop have run out of the right size...

- Signalbox 1.jpg (167.24 KiB) Viewed 5751 times
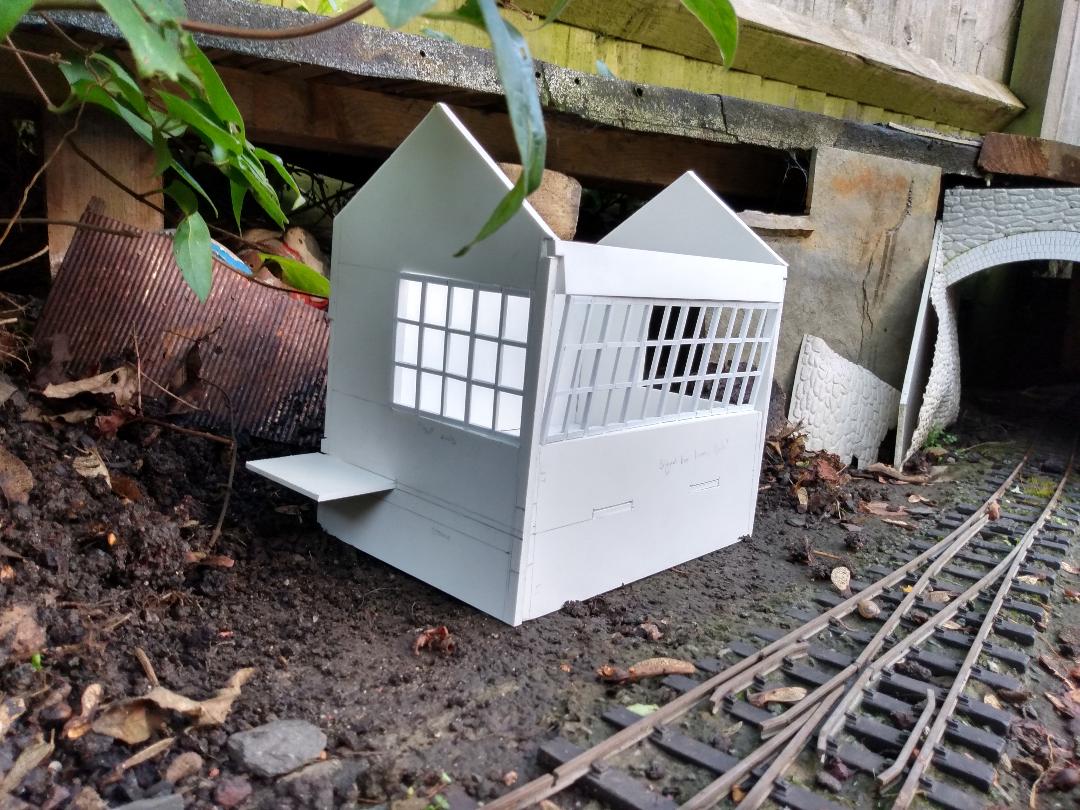
- Signalbox 2.jpg (168.02 KiB) Viewed 5751 times

- Signalbox 3.jpg (169.9 KiB) Viewed 5751 times
Since these were taken I've added a base, which will make constructing the steps easier. That's the next job, then finishing the windows, I think. The interior walls and floor need a little detailing, then I can glue it together and start on the exterior cladding.
Cheers,
Andrew.
Re: (WH)WHR Buildings
Posted: Sun Jan 19, 2020 10:58 am
by FWLR
Interesting build Andrew.Like the way you have a slight slant for the window.
Re: (WH)WHR Buildings
Posted: Tue Jan 21, 2020 1:03 pm
by Lonsdaler
Following this with interest Andrew. i have a plywood built small signal box that has been outside continuously since 2014, and is now approaching 'end of life'! This would make a good long term replacement I think.
How have you constructed the window frames? Are they just butt joints, or are they mitred or slotted?
Re: (WH)WHR Buildings
Posted: Tue Jan 21, 2020 1:26 pm
by Andrew
Lonsdaler wrote: ↑Tue Jan 21, 2020 1:03 pm
Following this with interest Andrew. i have a plywood built small signal box that has been outside continuously since 2014, and is now approaching 'end of life'! This would make a good long term replacement I think.
How have you constructed the window frames? Are they just butt joints, or are they mitred or slotted?
The window frames are butt joints - I made them up sitting on top of the drawing. As I mentioned, I've run out of strip for the time being - when I've got some more and make up the last frame I'll take some photos. I'm quite pleased with how they're turning out so far, they're pretty solid, although not cheap - I'll need four packs of strip in total, costing nearly £20... I think it would be an ideal job for laser-cutting in acrylic...
Cheers,
Andrew.
Re: (WH)WHR Buildings
Posted: Tue Jan 21, 2020 4:27 pm
by Lonsdaler
I certainly admire your patience with the windows - well done. I'd be interested in seeing your technique once you get more strip.
Re: (WH)WHR Buildings
Posted: Tue Jan 21, 2020 4:55 pm
by philipy
Andrew wrote: ↑Tue Jan 21, 2020 1:26 pm
I think it would be an ideal job for laser-cutting in acrylic...
...or 3D printing.

- DSC_0010 small.jpg (99.97 KiB) Viewed 5663 times
Nice signal box, BTW. looking forward to progress.
Re: (WH)WHR Buildings
Posted: Tue Jan 21, 2020 6:04 pm
by Andrew
philipy wrote: ↑Tue Jan 21, 2020 4:55 pm
Andrew wrote: ↑Tue Jan 21, 2020 1:26 pm
I think it would be an ideal job for laser-cutting in acrylic...
...or 3D printing.
Even better!
Re: (WH)WHR Buildings
Posted: Wed Jan 22, 2020 1:07 pm
by Lonsdaler
philipy wrote: ↑Tue Jan 21, 2020 4:55 pm
Andrew wrote: ↑Tue Jan 21, 2020 1:26 pm
I think it would be an ideal job for laser-cutting in acrylic...
...or 3D printing.
DSC_0010 small.jpg
Nice signal box, BTW. looking forward to progress.

Re: (WH)WHR Buildings
Posted: Sun Jan 26, 2020 6:23 pm
by Andrew
Hello again,
I got a little more done on the signal box today and - as promised - here's a little more on making windows.It's fairly self-explanatory really, which is just as well because the pictures didn't come out very clearly...
Here's stage one, using a drawing blown up to scale size, then taped onto a cutting mat. I make more copies of the drawing than I need, then I can cut directly onto them.
The plastic strip is 2mm x 1mm and 3mm x 1mm, which seemed about right. It's £4.90 a packet from the model shop, or £6+ "postage free" online. Hmmm... You do get through quite a lot of it, so I think ready-made windows from Jacksons or wherever will still be my preferred option where they suit the prototype.
Anyway, the first stage is to stick the horizontal strips to the drawing with double-sided tape. I don't worry about trimming the strips to exactly the right length at this stage, that can be dome later:

- Signalbox windows1.jpg (260.76 KiB) Viewed 4372 times
The rest is the built-up from there, starting with the upright strips. You can see that I've made the window slightly less wide than the drawing, partly because it suited the strip, but also because I want to add a door frame so need a little more space:

- Signalbox windows2.jpg (93.57 KiB) Viewed 4372 times
And then the "missing" bits to build the horizontals up to the same thickness, and some additional strips that go around the edge and between each individual frame. That adds some relief (even if it doesn't fully replicate how some frames would sit - and slide - behind the others) and rigidity:
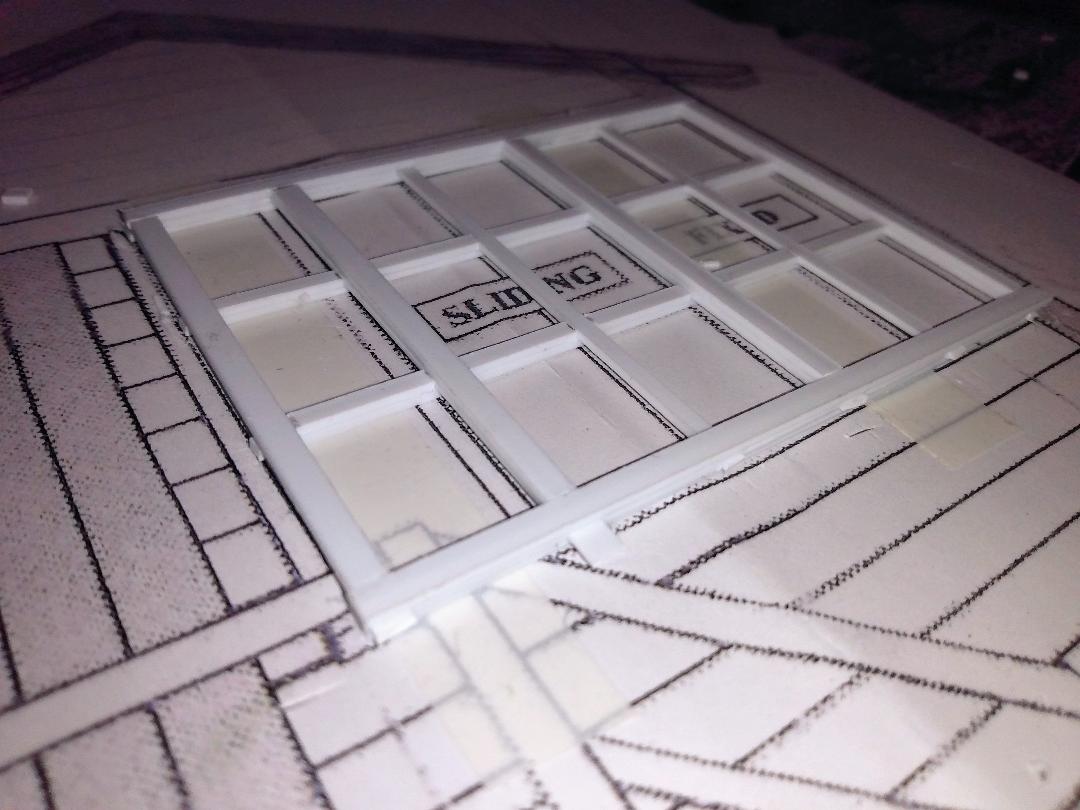
- Signalbox windows3.jpg (90.13 KiB) Viewed 4372 times
After that the whole window's peeled off the drawing, turned over and the missing bits on the horizontal strips filled in too, making to whole thing 2mm thick and bits of it 3mm - it's pretty strong by that stage.
I think I'll probably add another two strips on the back around the edge of each window. That will make them 5mm thick, so they should sit nicely in the 5mm foamboard shell, as well as providing a recess for the glazing to sit in. We shall see...
All the best,
Andrew.
Re: (WH)WHR Buildings
Posted: Sun Jan 26, 2020 8:03 pm
by Peter Butler
That looks good Andrew, and quite sturdy too! A far cheaper way would be to cut strips yourself, but probably less accurate.
Re: (WH)WHR Buildings
Posted: Sun Jan 26, 2020 8:14 pm
by Andrew
Peter Butler wrote: ↑Sun Jan 26, 2020 8:03 pm
That looks good Andrew, and quite sturdy too! A far cheaper way would be to cut strips yourself, but probably less accurate.
Yes, it is surprisingly sturdy...
Accuracy isn't really my strong point, and I think I've found in the past that plastic sheet curls when I cut it into strips, so this is an area where I've decided that spending a little money's the way to go. I did the same with my slate wagons, although they didn't use so much strip as these windows are...
Cheers,
Andrew.
Re: (WH)WHR Buildings
Posted: Wed Feb 12, 2020 8:23 am
by Andrew
Hello all,
I've made some more progress on the signalbox, having glued it all together, finished and added the windows, and started with the detailing. I had thought I'd paint the windows first and then install them towards the end of the build, but it turned out that filler would be required so I decided to do it now, while a bit of mess doesn't matter.
Here's how it looks at the moment:
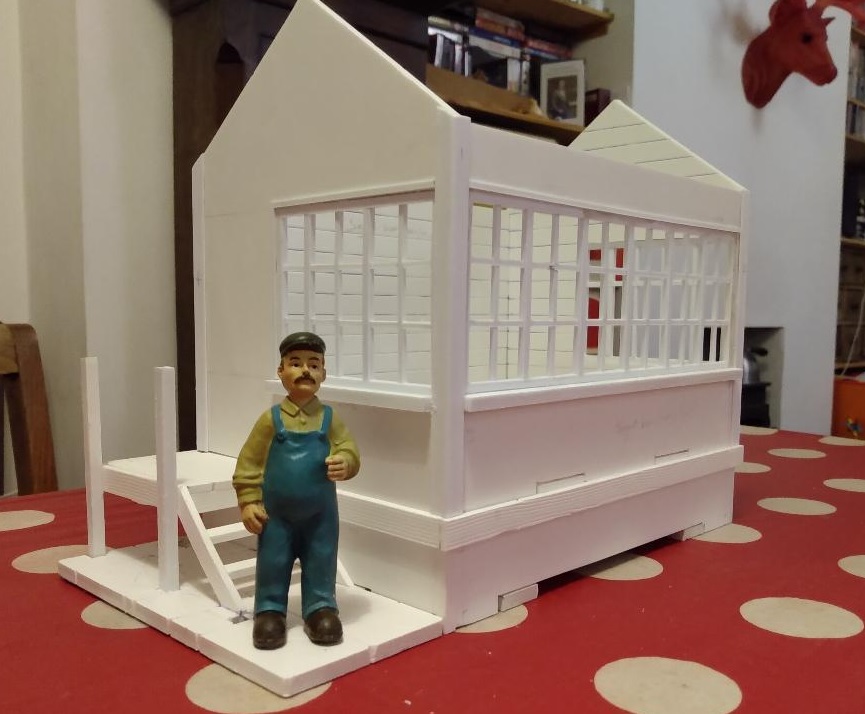
- Signalbox 4.jpg (126.45 KiB) Viewed 4239 times
I'm quite pleased with how the steps are looking so far:
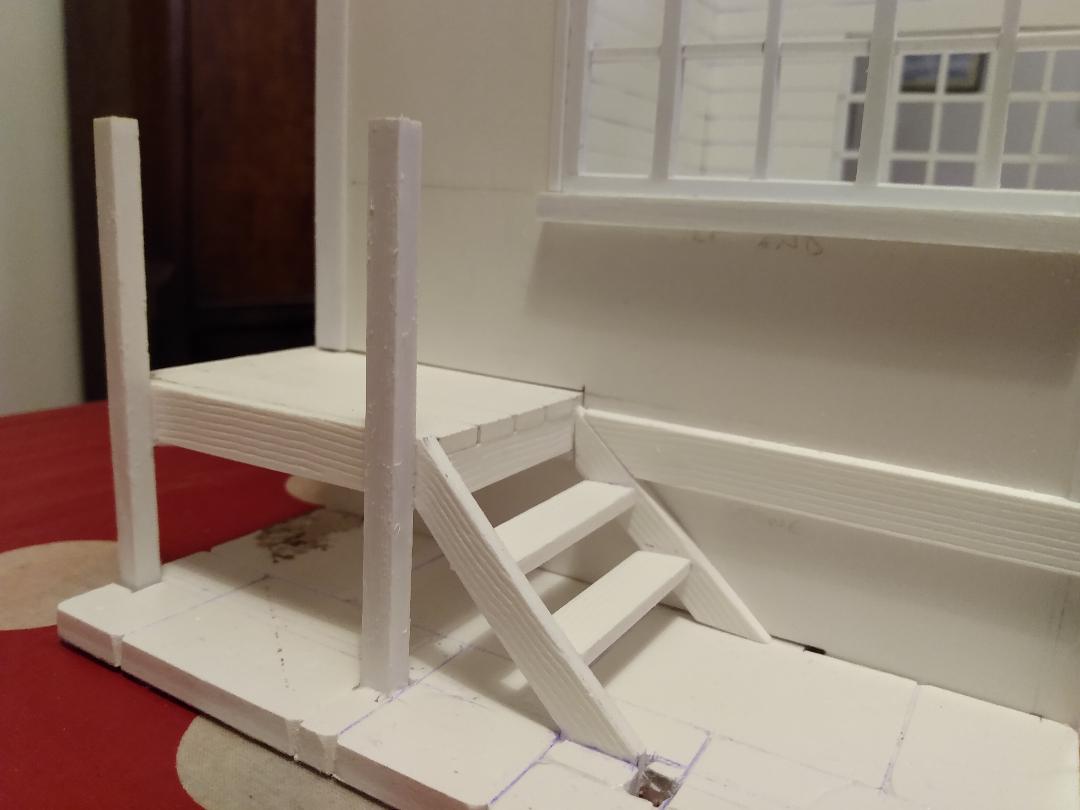
- Signalbox 5.jpg (52.51 KiB) Viewed 4239 times
They don't go anywhere at the moment - my next job is to add the door! Once that's done I'll be able to start work on the cladding - my stocks of that (weatherboard upper, stone base) are running a little low, but I should receive a delivery from Jackson Miniatures in the next day or two...
Cheers,
Andrew.
Re: (WH)WHR Buildings
Posted: Wed Feb 12, 2020 8:32 am
by tom_tom_go
Those steps need a cat sitting happily in the sun watching the world go by...
The building is coming along Andrew, the windows look the business as if they were made from a preformed kit.
Re: (WH)WHR Buildings
Posted: Wed Feb 12, 2020 8:35 am
by Andrew
tom_tom_go wrote: ↑Wed Feb 12, 2020 8:32 am
Those steps need a cat sitting happily in the sun watching the world go by...
I thought that too!
Re: (WH)WHR Buildings
Posted: Wed Feb 12, 2020 9:00 am
by LNR
I'll second what Tom said about the windows Andrew, the whole building looks very square and solid.
Certainly will have a presence on the railway when finished.
Grant.
Re: (WH)WHR Buildings
Posted: Wed Feb 12, 2020 10:42 am
by Peter Butler
Excellent work, all looks nice and square and well thought out. There's something about making your own structures which kit building just can't match.
'Bambi' looks impressed too!
Re: (WH)WHR Buildings
Posted: Wed Feb 12, 2020 10:56 am
by philipy
Everybody has already said it all Andrew. Well done, it's going to be very impressive when its finished.