Page 3 of 4
Re: Couplings
Posted: Sun May 20, 2018 11:00 am
by ge_rik
Lonsdaler wrote: ↑Sun May 20, 2018 9:29 am
This, however, is neat and cheap

My two main criteria ......, especially the latter!


Rik
Re: Couplings
Posted: Sat Jul 28, 2018 6:30 pm
by ge_rik
Latest update
Must admit, this development has been on tickover, lately. My excuse (sorry reason) is that I have been evaluating my various versions of my coupling to see how they perform. As a result, I have enlarged the loops (the smaller previous versions were difficult to align for reliable coupling-up), I've modified the hooks (provided a lower 'tail' to improve latching on to the hook), and simplified the mounting bracket because my limited metal-working skills were not up to doing a double U shaped fold with any degree consistency.
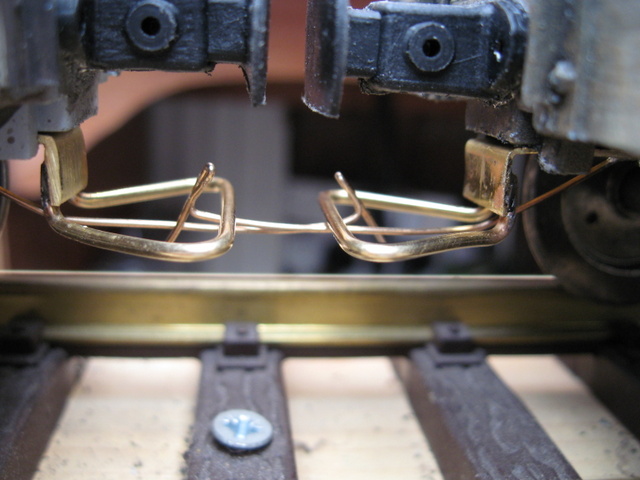
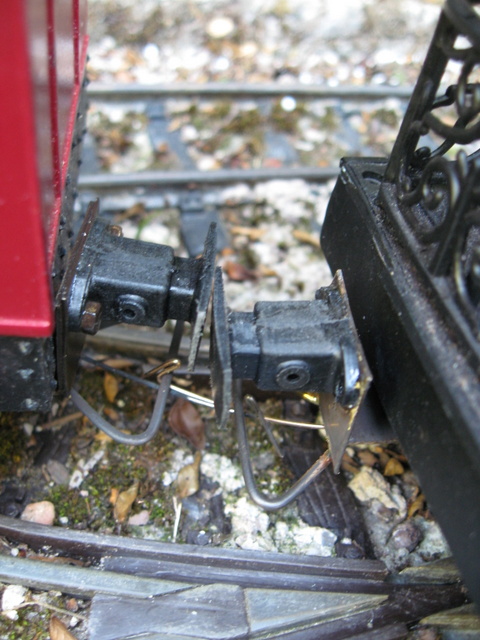
Version 3 (or maybe 4) couples with tolerable reliability to LGB style couplings
- IMG_8171.JPG (110.95 KiB) Viewed 5567 times
.
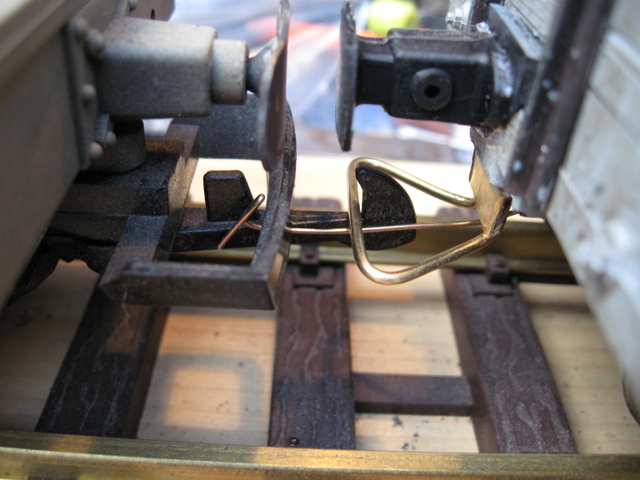
It is also compatible with itself (thank goodness)

- IMG_8167.JPG (103.54 KiB) Viewed 5567 times
.
The hook now has a tail (as you can see) which means there is now twice the amount of leeway in alignment with the loop

- IMG_8168.JPG (79.34 KiB) Viewed 5567 times
.
And the bracket is a lot easier to manufacture (and requires less brass)
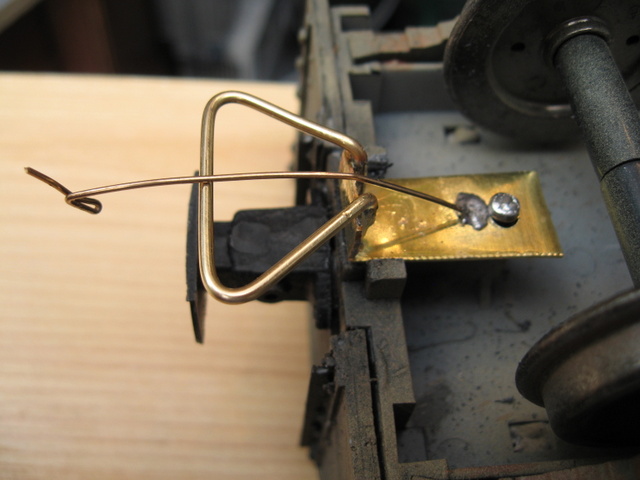
- IMG_8169.JPG (90.46 KiB) Viewed 5567 times
.
I am in the process of testing and evaluating this version to ensure it lives up to expectations and if so, I will replace all the previous versions before rolling it out across the entire fleet.
Rik
Re: Couplings
Posted: Sat Jul 28, 2018 6:37 pm
by philipy
Interesting Rik. I was wondering how you were getting on with them.
This latest version of the hook is somewhat reminiscent of an Alex Jackson Coupling hook.
Re: Couplings
Posted: Sat Jul 28, 2018 7:03 pm
by ge_rik
philipy wrote: ↑Sat Jul 28, 2018 6:37 pm
This latest version of the hook is somewhat reminiscent of an Alex Jackson Coupling hook.
Must admit that I did consider that as an option - particularly as the last version included delayed uncoupling which was attractive. However, I felt that the alignment of the couplings needed to be quite exact and they would be susceptible to damage in the garden environment. The (now larger) loop on my coupling helps to overcome any issues with hooks becoming bent in normal use. Also mine are compatible with LGB hooks and loops which means I can replace them piecemeal rather than wholesale.
In my most recent video, you can see that the Up pickup goods comprises at least half the wagons with my (RJB) couplings (see from 1:50 onwards) so they do at least work ......
 https://youtu.be/9EEkiP6c2u4?t=1m48s
Rik
Re: Couplings
Posted: Sat Jul 28, 2018 7:40 pm
by tom_tom_go
I spotted the couplings Rik when I watched it on YouTube
Re: Couplings
Posted: Sun Jul 29, 2018 7:17 am
by ge_rik
tom_tom_go wrote: ↑Tue May 15, 2018 11:59 am
They look better Rik.
Chemically blackening requires the metal is be clean (I normally go over with wet and dry paper).
Don't dunk the metal in the solution, use a brush and do several attempts cleaning the metal each time with water.
Hi Tom
Out of interest and curiosity, I dunked a coupling and a buffer into the fluid and the results are much much better. Presumably, repeated dunking will eventually alter the chemical composition of the fluid - is that the reason for advocating application by brush?
Rik
Re: Couplings
Posted: Sun Jul 29, 2018 8:04 am
by tom_tom_go
I decant a small quantity into a jar and keep it until it stops being effective so to keep the original solution in it's pure form.
Repeated brushing and rinshing in water is effective because it's a gradual attack of the chemcial. You noticed when you just dunked it in the solution the colour would flake off (this can also happen if the part is dirty).
Re: Couplings
Posted: Sun Jul 29, 2018 11:48 am
by ge_rik
tom_tom_go wrote: ↑Sun Jul 29, 2018 8:04 am
I decant a small quantity into a jar and keep it until it stops being effective so to keep the original solution in it's pure form.
Repeated brushing and rinshing in water is effective because it's a gradual attack of the chemcial. You noticed when you just dunked it in the solution the colour would flake off (this can also happen if the part is dirty).
Thanks Tom
I'll try decanting some.
Rik
Re: Couplings
Posted: Sun Aug 05, 2018 11:21 am
by ge_rik
Slowly progressing with replacing couplings with my version. However, I worked out that the buffers on the bogie coaches would have to be widened to cover 3/4 of the buffer beam if they needed to be propelled over my R2 (Trainline) crossover. I therefore decided to attach the buffers to the bogies as well as the hooks and loops.
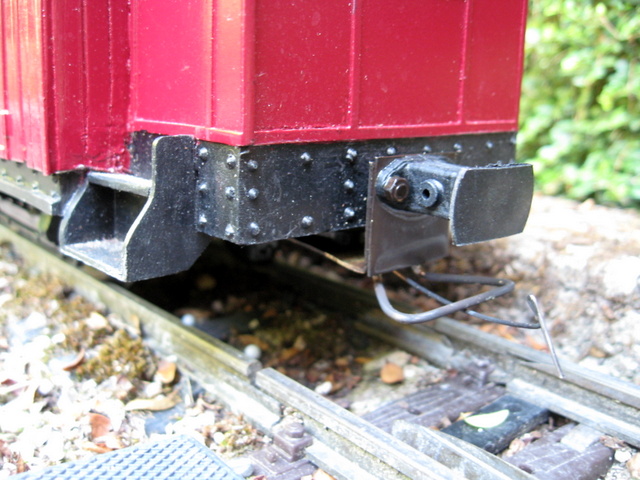
- IMG_8318.JPG (144.81 KiB) Viewed 6222 times
.
As can be seen, the buffers continue to be in contact with each other through the crossover.
- IMG_8322.JPG (139.6 KiB) Viewed 6222 times
.
Not sure if there is a precedent for this on narrow gauge railways. Be interested if anyone knows how the couplings on bogie stock are made to negotiate tight reverse curves on the real thing.
Rik
Re: Couplings
Posted: Sun Aug 05, 2018 11:45 am
by IanC
On the "real thing" the couplings are attached to the chassis or drawbar. To facilitate tight curves they are in a horizontal slot and pivoted. This allows the bogie to travel freely and guide and support the coach as intended. In our smaller scales this is not too important unless particularly bad trackwork is encountered in which case derailment can occur.
Ian
Re: Couplings
Posted: Fri Aug 10, 2018 11:14 am
by philipy
Rik,
Having just acquired some 2nd hand coaches in need of some refurbishment, I'm contemplating experimenting with your couplings at the same time. What gauge wire are you using, it's difficult to judge from the photo's?
Re: Couplings
Posted: Fri Aug 10, 2018 2:13 pm
by ge_rik
philipy wrote: ↑Fri Aug 10, 2018 11:14 am
Rik,
Having just acquired some 2nd hand coaches in need of some refurbishment, I'm contemplating experimenting with your couplings at the same time. What gauge wire are you using, it's difficult to judge from the photo's?
Hi Philip
For the loops, I'm using 1.5mm brass rod. For the hooks I'm using 22SWG (0.711mm) phosphor bronze wire from Eileen's Emporium -
https://eileensemporium.com/index.php?o ... thway=1036
If you're doing a direct replacement for LGB or HLW couplings then these are the dimensions I work to for the bracket (0.7mm thick brass sheet).
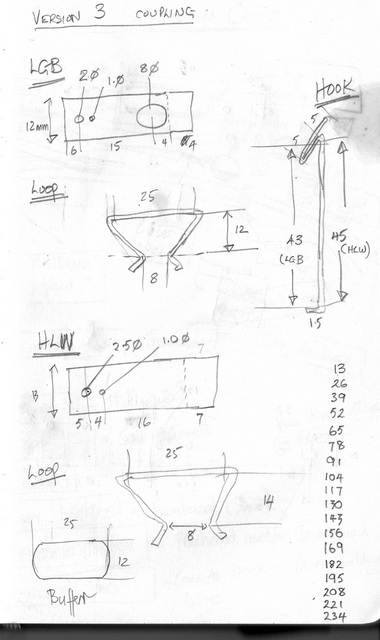
- Coupling dims.jpg (64.81 KiB) Viewed 6035 times
I've made simple wooden jigs for bending the loops and soldering the loops to the brackets.
Let me know if you want any further info.
Rik
Re: Couplings
Posted: Fri Aug 10, 2018 3:09 pm
by philipy
Thanks Rik.
Re: Couplings
Posted: Thu Aug 23, 2018 12:39 pm
by ge_rik
Well, after a bit of head-scratching and some experimentation, I have achieved my objective of creating a hook-and-loop coupling with delayed action uncoupling. However, I'm not sure how practicable it is (more later).
The loops are as before but the hook has been modified to include a forwards facing larger hook behind the normal hook. I'll call this the "delay latch".
- IMG_8395.JPG (94.96 KiB) Viewed 5947 times
.
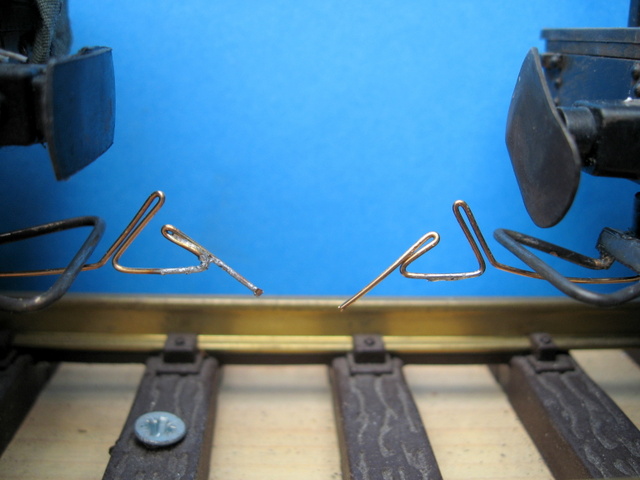
The coupling hooks couple-up in the usual way. Push one or both wagons together ......
- IMG_8395-labelled.jpg (63.13 KiB) Viewed 5947 times
.
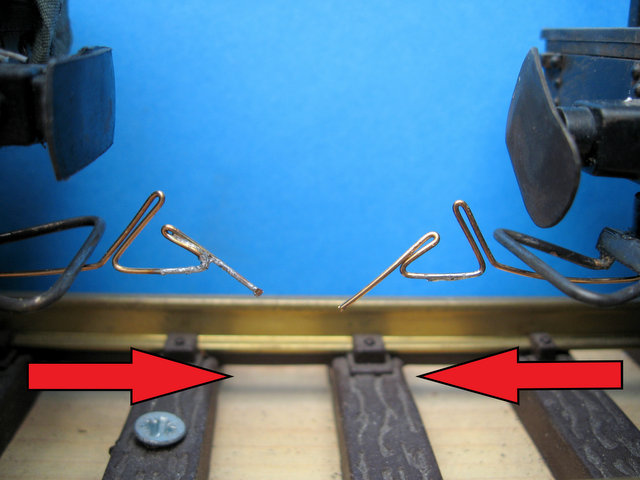
... and the hooks latch on to the loops and away we go.
- IMG_8397-labelled.jpg (74.63 KiB) Viewed 5947 times
.
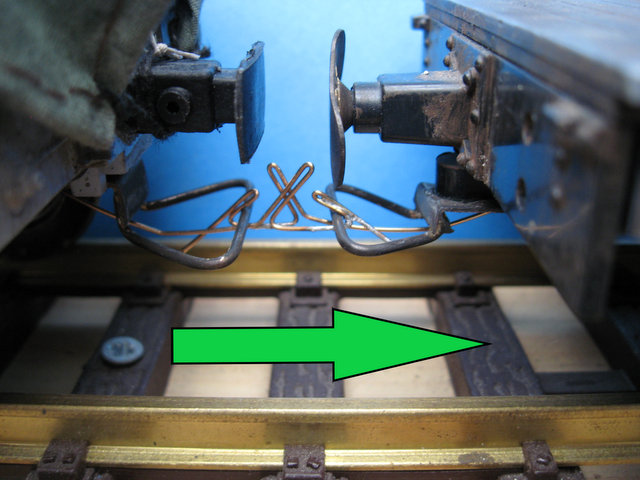
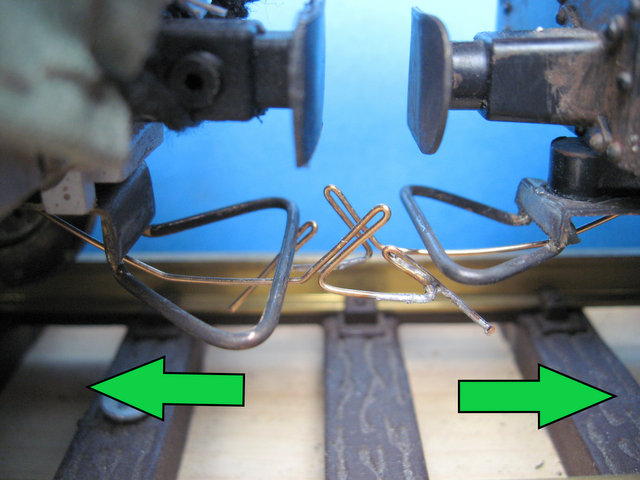
To uncouple, the wagons are propelled backwards (or one is propelled backwards and the other is stationary).
- IMG_8398-labelled.jpg (77.09 KiB) Viewed 5947 times
.
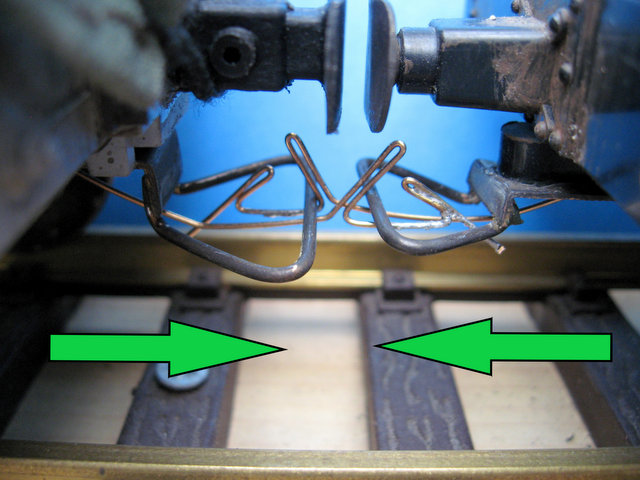
The couplings are then pushed downwards to disengage the hooks from the loops. At the same time, the 'delay latches' on the hooks force the wagons apart slightly as they meet the loop on the other wagon.

- IMG_8399-labelled.jpg (74.57 KiB) Viewed 5947 times
.
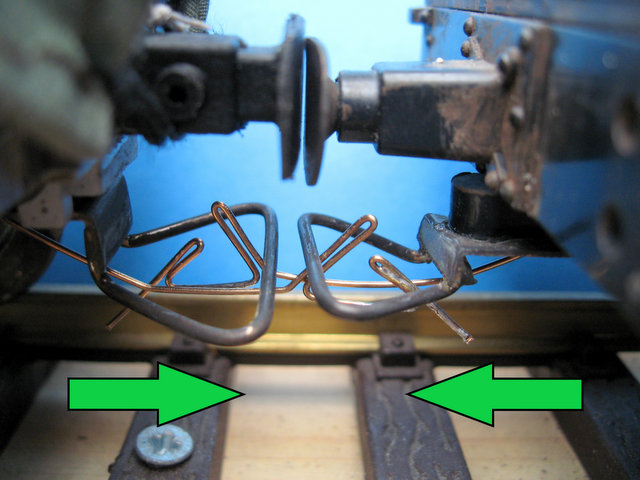
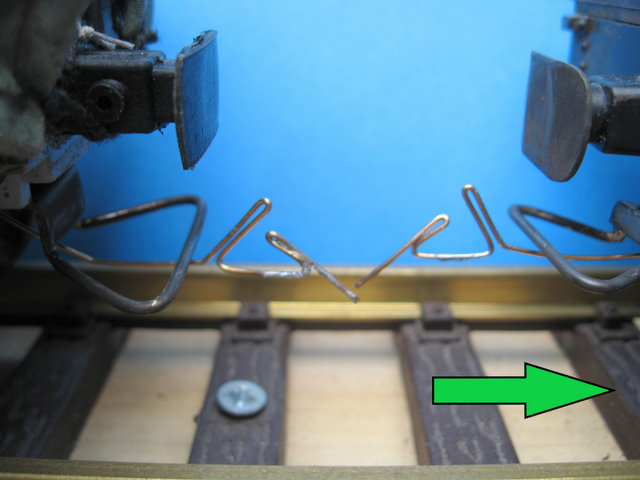
The uncoupler is removed and the wagons continue to be propelled backwards. The delay latches are now the other side of the loops on the opposite wagons.
- IMG_8401-labelled.jpg (74.61 KiB) Viewed 5947 times
.
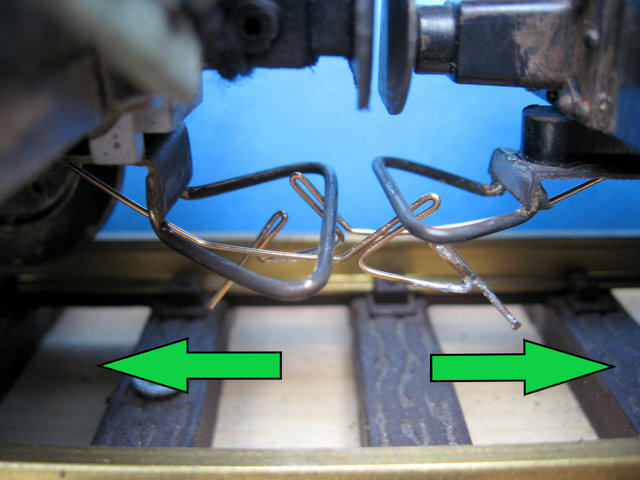
When the wagons are pulled apart (or one is stationary and the other is pulled away from it), the delay latches slide under the loops, .......
- IMG_8402-labelled.jpg (72.32 KiB) Viewed 5947 times
.
...... preventing the coupling hooks re-engaging with the loops.
- IMG_8403-labelled.jpg (72.64 KiB) Viewed 5947 times
.
Thus the wagons are uncoupled when they are pulled apart at any point after they have been uncoupled.
- IMG_8404-labelled.jpg (58.14 KiB) Viewed 5947 times
.
I have tried using magnets to do the uncoupling by soldering steel droppers to the underside of the hooks. However, I've not found magnets which are sufficiently strong to pull the hooks down and keep them held down while the delay latches come into force. I might need longer magnets.
Whilst all this is fine in theory, in reality, it's tricky getting the delay latches to work reliably. If the wagon being uncoupled is too light when the hooks are depressed the wagon springs away under the pressure from the delay latches and then when the propelling is continued the coupling hooks re-engage. If the wagon to be uncoupled is too heavy (eg if there are several other wagons behind it), then it's difficult to push the hooks down as the delay latches have to force the wagons apart slightly to work.
So theoretically, the delay latches are a workable concept - but in practice they are not really viable. If I could get the delay latches to hinge upwards somehow and then drop down again to cover the hook then it would work - but it will make the hooks too complicated to construct and might end up interfering with the coupling and uncoupling process.
So - I'll stick with the status quo - ie uncoupling wagons at each location where I want them to remain.
Rik
Re: Couplings
Posted: Thu Aug 23, 2018 1:43 pm
by philipy
Fascinating Rik.
Interestingly, I've been playing around with the same problem on and off for the last couple of weeks and I just logged on to make a post on the subject and where I've got to with it, only to find this update of yours!
I'm starting a new thread just for info, since I've not really cracked it and I don't want to hijac yours and cause confusion.
Re: Couplings
Posted: Thu Aug 23, 2018 2:36 pm
by GTB
ge_rik wrote: ↑Thu Aug 23, 2018 12:39 pm
So theoretically, the delay latches are a workable concept - but in practice they are not really viable. If I could get the delay latches to hinge upwards somehow and then drop down again to cover the hook then it would work - but it will make the hooks too complicated to construct and might end up interfering with the coupling and uncoupling process.
You've come to the same conclusion I did when I had a think about this a couple of weeks ago.
Blame LGB......... If they'd used the original LaNal coupler ala Tri-ang, instead of an inverted version, delayed uncoupling would be easy to implement.
I've seen Tri-ang couplers modified with a simple swinginging wire ring that can drop down behind the bar when wagons are buffered up with the hooks raised. They can then be pushed into position and when the loco reverses, the ring swings over and covers the hook, allowing it to ride over the bar.
I imagine the reason LGB inverted their coupler was so it could operate under the centre buffers common in Continental NG practice. You could turn your couplers over I guess, so the delay latch could work by gravity, but then you'd need different buffing arrangements.
Regards,
Graeme
Re: Couplings
Posted: Thu Aug 23, 2018 3:29 pm
by tom_tom_go
I remember spending months perfecting my uncoupling so I can appreciate the effort you have put in Rik.
Re: Couplings
Posted: Thu Aug 23, 2018 3:36 pm
by ge_rik
GTB wrote: ↑Thu Aug 23, 2018 2:36 pm.
I've seen Tri-ang couplers modified with a simple swinginging wire ring that can drop down behind the bar when wagons are buffered up with the hooks raised. They can then be pushed into position and when the loco reverses, the ring swings over and covers the hook, allowing it to ride over the bar.
I imagine the reason LGB inverted their coupler was so it could operate under the centre buffers common in Continental NG practice. You could turn your couplers over I guess, so the delay latch could work by gravity, but then you'd need different buffing arrangements.
Regards,
Graeme
Hi Graeme
It would be relatively easy to modify my hooks so they operated as per Triang tension-locks. I'm trying to visualise how the ring you mention operates. Any chance of a sketch?
Rik
Re: Couplings
Posted: Thu Aug 23, 2018 5:38 pm
by philipy
ge_rik wrote: ↑Thu Aug 23, 2018 3:36 pm
It would be relatively easy to modify my hooks so they operated as per Triang tension-locks. I'm trying to visualise how the ring you mention operates. Any chance of a sketch?
Rik
Rik,
It would be simple to make a downward facing hook, as you say, but to operate by a magnet below, you'd need a pivot so that the downward force is applied behind the fulcrum, to lift the hook. That's effectively what I tried to do and although it works, it is much more complicated to manufacture than a simple spring wire.
I'll be interested to see the ring device too, because I can't picture it either.
Re: Couplings
Posted: Thu Aug 23, 2018 6:11 pm
by BorisSpencer
With the tiny neodymium magnets available, you could mount one on the bottom of your couplings and use the repulsion of similar poles to push the coupling up. Obviously it would depend on all the magnets being mounted in the same orientation, but I suspect the repulsive force of two neodymium magnets is considerably stronger than the attractive force of one magnet and a steel wire, it would also be far more focused.