Page 2 of 4
Re: Couplings
Posted: Tue May 15, 2018 11:59 am
by tom_tom_go
They look better Rik.
Chemically blackening requires the metal is be clean (I normally go over with wet and dry paper).
Don't dunk the metal in the solution, use a brush and do several attempts cleaning the metal each time with water.
Re: Couplings
Posted: Tue May 15, 2018 4:46 pm
by ge_rik
tom_tom_go wrote: ↑Tue May 15, 2018 11:59 am
They look better Rik.
Chemically blackening requires the metal is be clean (I normally go over with wet and dry paper).
Don't dunk the metal in the solution, use a brush and do several attempts cleaning the metal each time with water.
Thanks - will get scrubbing after I've done the soldering.
Rik
Re: Couplings
Posted: Thu May 17, 2018 2:49 pm
by GTB
ge_rik wrote: ↑Tue May 15, 2018 11:19 am
I've had a go at chemical blackening. Seems a bit hit and miss at the moment. Might need to practise a bit more before I get the process perfected.
As Tom said, brass needs to be very clean before blackening it. Degreasing helps as well. Also remember to rinse the parts when finished, or the black coating can turn powdery,mwith salts on th surface..
What you use for cleaning depends on the shape of the part, I often use a fibreglass pencil to get into places sandpaper can't. A scrub with Ajax helps clean and degrease the metal as well as neutralising any flux.
Not sure where I got the idea, but using a cotton bud (swab) to apply the blackener by rubbing works for me. Sometimes you just have to dip the piece though, eg. brass chain.
Carrs used to do a solution for blackening solder, but I'm not sure it is still around. You may need to paint that area, as normal blackening solutions only work on brass and steel.
Regards,
Graeme
Re: Couplings
Posted: Thu May 17, 2018 3:25 pm
by tom_tom_go
Cotton bud, will take that idea!
Re: Couplings
Posted: Thu May 17, 2018 4:21 pm
by philipy
I usually use a cotton bud, I thought everyone did?
BTW,I have n old bottle of Birchwood Casey Gun Blue which works for blackening on ferrous and non ferrous metals without too much bother. Actually produces a sort of dirty/rusty brownish black colour, not blue at all. Perfect for axles, and various other underframe bits and pieces. I usually clean the metal and then slosh it on and leave it to dry ( not what the instructions say though!). I think I probably got it from Eileens Emporium, way back in the days of Eileen herself!
Re: Couplings
Posted: Thu May 17, 2018 4:30 pm
by ge_rik
GTB wrote: ↑Thu May 17, 2018 2:49 pm
As Tom said, brass needs to be very clean before blackening it. Degreasing helps as well. Also remember to rinse the parts when finished, or the black coating can turn powdery,mwith salts on th surface..
What you use for cleaning depends on the shape of the part, I often use a fibreglass pencil to get into places sandpaper can't. A scrub with Ajax helps clean and degrease the metal as well as neutralising any flux.
Not sure where I got the idea, but using a cotton bud (swab) to apply the blackener by rubbing works for me. Sometimes you just have to dip the piece though, eg. brass chain.
Carrs used to do a solution for blackening solder, but I'm not sure it is still around. You may need to paint that area, as normal blackening solutions only work on brass and steel.
Regards,
Graeme
Thanks, Graeme. Very helpful(as always). I'm reaching the stage now where I'm about to go into batch production. Most of the couplings will be a standard fitting, but some of them will have to be bespoke as not all my stock was originally LGB.
I've fiddled with the jig for the loops and I'm beginning to feel more at ease with it. I'm finding that over-bending and then slightly unbending again gives me a sharper angle. There's a certain amount of tweaking of angles required, but at least the bends seem to be in the right places.
Rik
Re: Couplings
Posted: Fri May 18, 2018 7:42 pm
by ge_rik
Whilst I'm awaiting delivery of more Binnie buffers, I've been experimenting with ways of replacing LGB buffers with something wider to avoid buffer lock when stock is being propelled.
The LGB buffers are somewhat small which is why they need replacing....
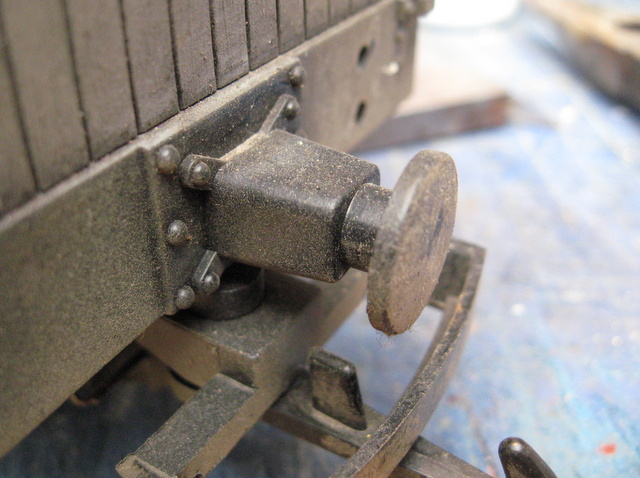
- IMG_7589-001.JPG (128 KiB) Viewed 5750 times
However, I have discovered they can be removed, leaving a 4mm dia hole. I discovered that a No.8 woodscrew is a tight fit and so will act as a self-tapper. So ......
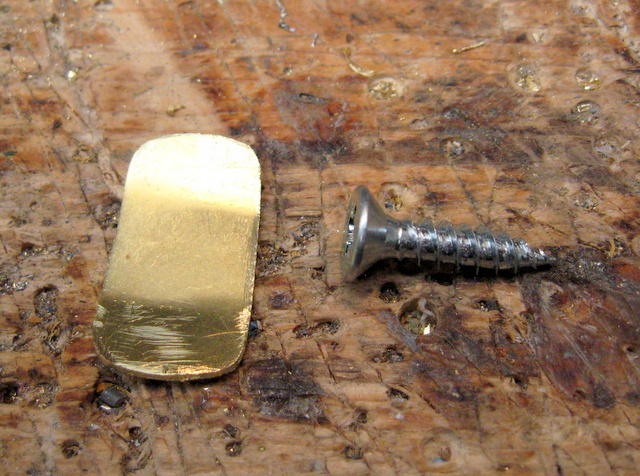
- IMG_7584-001.JPG (185.56 KiB) Viewed 5750 times
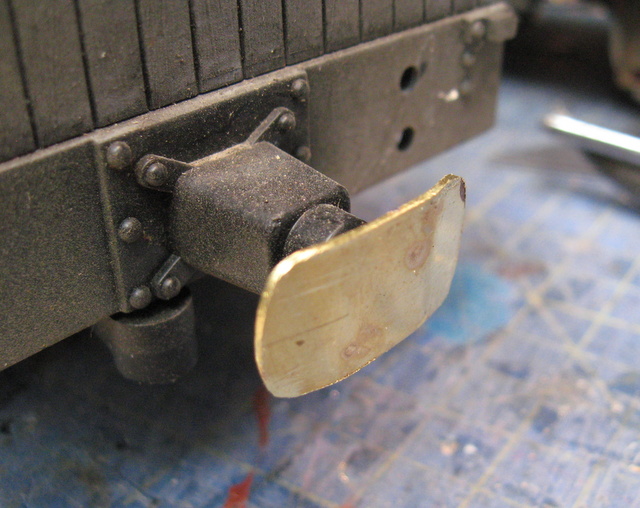
With a bit of solder and some burnt fingers, I end up with a reasonably passable buffer .......

- IMG_7586.JPG (158.94 KiB) Viewed 5750 times
Which simply screws into the housing on the buffer beam.
- IMG_7590-002.JPG (136.58 KiB) Viewed 5750 times
More importantly, it doesn't lock when the wagons are being propelled around even the sharpest (R1) curves.
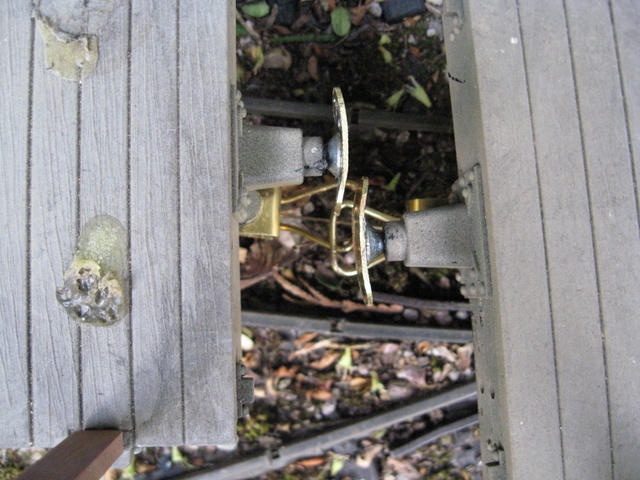
- IMG_7579-001.JPG (147.17 KiB) Viewed 5750 times
There's still a bit of tidying up needed - I've ordered some brass screws and I'll chemically blacken the the buffers, but I'm pleased to have found a relatively simple way of replacing the buffers on ex-LGB wagons with something which seems reasonably realistic, is simple to make and is cheap!
- IMG_7596-001.JPG (116.13 KiB) Viewed 5750 times
Rik
Re: Couplings
Posted: Fri May 18, 2018 8:10 pm
by philipy
Seems as though you've cracked it, Rik. Well done.
I wouldn't be surprised if there are more than a few copy cats, sooner or later.

Re: Couplings
Posted: Sat May 19, 2018 11:55 am
by GTB
ge_rik wrote: ↑Fri May 18, 2018 7:42 pm
I'm pleased to have found a relatively simple way of replacing the buffers on ex-LGB wagons with something which seems reasonably realistic, is simple to make and is cheap!
I agree with Philip, it looks like you have sorted out most of the issues you had with couplers.
For someone that claims to be a bodger, in a couple of weeks you've run through a development cycle on these couplers that probably took the LGB engineers months.
Regards,
Graeme
Re: Couplings
Posted: Sun May 20, 2018 9:29 am
by Lonsdaler
philipy wrote: ↑Fri May 18, 2018 8:10 pm
Seems as though you've cracked it, Rik. Well done.
I wouldn't be surprised if there are more than a few copy cats, sooner or later.
I may become one of them.

I've never been too fond of the three link chain and most other coupling solutions are expensive when applied over all my stock. This, however, is neat and cheap

Re: Couplings
Posted: Sun May 20, 2018 11:00 am
by ge_rik
Lonsdaler wrote: ↑Sun May 20, 2018 9:29 am
This, however, is neat and cheap
My two main criteria ......, especially the latter!


Rik
Re: Couplings
Posted: Sat Jul 28, 2018 6:30 pm
by ge_rik
Latest update
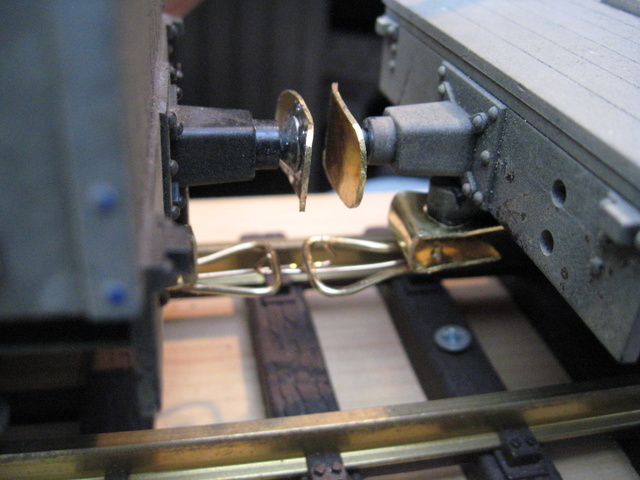
Must admit, this development has been on tickover, lately. My excuse (sorry reason) is that I have been evaluating my various versions of my coupling to see how they perform. As a result, I have enlarged the loops (the smaller previous versions were difficult to align for reliable coupling-up), I've modified the hooks (provided a lower 'tail' to improve latching on to the hook), and simplified the mounting bracket because my limited metal-working skills were not up to doing a double U shaped fold with any degree consistency.
Version 3 (or maybe 4) couples with tolerable reliability to LGB style couplings
- IMG_8171.JPG (110.95 KiB) Viewed 5525 times
.
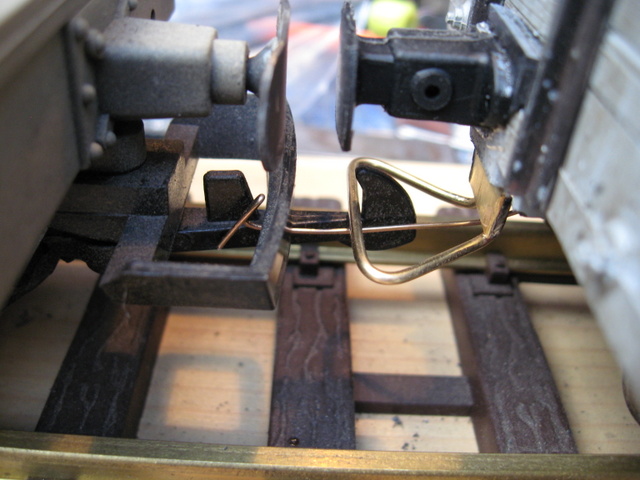
It is also compatible with itself (thank goodness)


- IMG_8167.JPG (103.54 KiB) Viewed 5525 times
.
The hook now has a tail (as you can see) which means there is now twice the amount of leeway in alignment with the loop
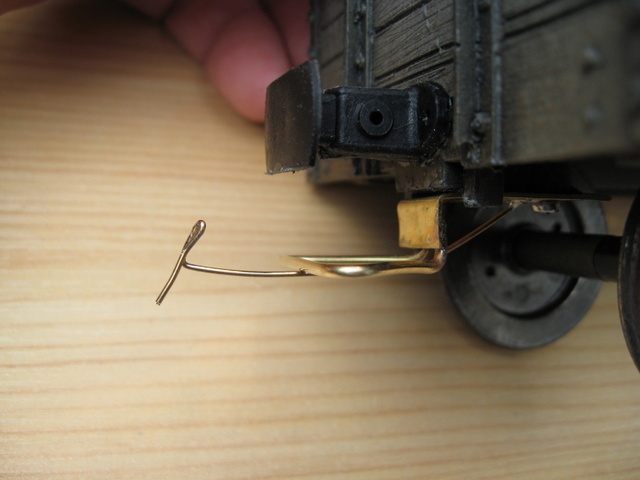
- IMG_8168.JPG (79.34 KiB) Viewed 5525 times
.
And the bracket is a lot easier to manufacture (and requires less brass)
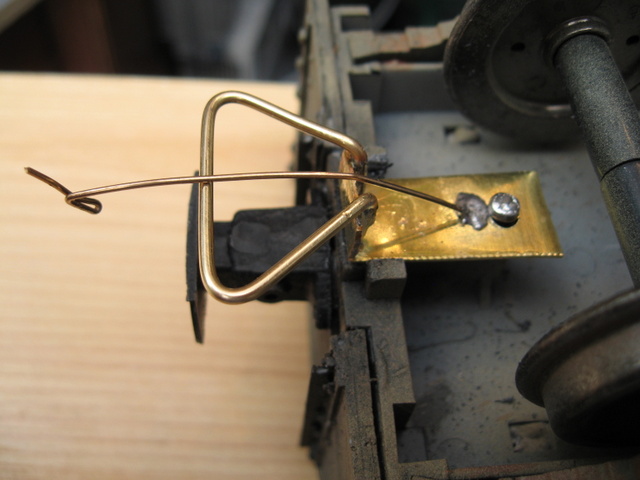
- IMG_8169.JPG (90.46 KiB) Viewed 5525 times
.
I am in the process of testing and evaluating this version to ensure it lives up to expectations and if so, I will replace all the previous versions before rolling it out across the entire fleet.
Rik
Re: Couplings
Posted: Sat Jul 28, 2018 6:37 pm
by philipy
Interesting Rik. I was wondering how you were getting on with them.
This latest version of the hook is somewhat reminiscent of an Alex Jackson Coupling hook.
Re: Couplings
Posted: Sat Jul 28, 2018 7:03 pm
by ge_rik
philipy wrote: ↑Sat Jul 28, 2018 6:37 pm
This latest version of the hook is somewhat reminiscent of an Alex Jackson Coupling hook.
Must admit that I did consider that as an option - particularly as the last version included delayed uncoupling which was attractive. However, I felt that the alignment of the couplings needed to be quite exact and they would be susceptible to damage in the garden environment. The (now larger) loop on my coupling helps to overcome any issues with hooks becoming bent in normal use. Also mine are compatible with LGB hooks and loops which means I can replace them piecemeal rather than wholesale.
In my most recent video, you can see that the Up pickup goods comprises at least half the wagons with my (RJB) couplings (see from 1:50 onwards) so they do at least work ......
 https://youtu.be/9EEkiP6c2u4?t=1m48s
Rik
Re: Couplings
Posted: Sat Jul 28, 2018 7:40 pm
by tom_tom_go
I spotted the couplings Rik when I watched it on YouTube
Re: Couplings
Posted: Sun Jul 29, 2018 7:17 am
by ge_rik
tom_tom_go wrote: ↑Tue May 15, 2018 11:59 am
They look better Rik.
Chemically blackening requires the metal is be clean (I normally go over with wet and dry paper).
Don't dunk the metal in the solution, use a brush and do several attempts cleaning the metal each time with water.
Hi Tom
Out of interest and curiosity, I dunked a coupling and a buffer into the fluid and the results are much much better. Presumably, repeated dunking will eventually alter the chemical composition of the fluid - is that the reason for advocating application by brush?
Rik
Re: Couplings
Posted: Sun Jul 29, 2018 8:04 am
by tom_tom_go
I decant a small quantity into a jar and keep it until it stops being effective so to keep the original solution in it's pure form.
Repeated brushing and rinshing in water is effective because it's a gradual attack of the chemcial. You noticed when you just dunked it in the solution the colour would flake off (this can also happen if the part is dirty).
Re: Couplings
Posted: Sun Jul 29, 2018 11:48 am
by ge_rik
tom_tom_go wrote: ↑Sun Jul 29, 2018 8:04 am
I decant a small quantity into a jar and keep it until it stops being effective so to keep the original solution in it's pure form.
Repeated brushing and rinshing in water is effective because it's a gradual attack of the chemcial. You noticed when you just dunked it in the solution the colour would flake off (this can also happen if the part is dirty).
Thanks Tom
I'll try decanting some.
Rik
Re: Couplings
Posted: Sun Aug 05, 2018 11:21 am
by ge_rik
Slowly progressing with replacing couplings with my version. However, I worked out that the buffers on the bogie coaches would have to be widened to cover 3/4 of the buffer beam if they needed to be propelled over my R2 (Trainline) crossover. I therefore decided to attach the buffers to the bogies as well as the hooks and loops.

- IMG_8318.JPG (144.81 KiB) Viewed 6180 times
.
As can be seen, the buffers continue to be in contact with each other through the crossover.
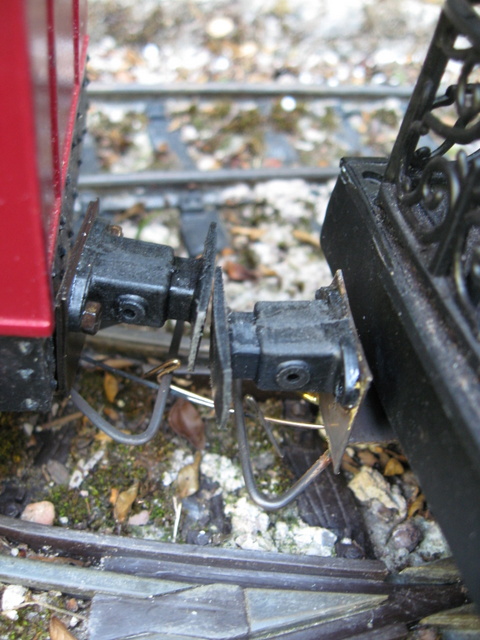
- IMG_8322.JPG (139.6 KiB) Viewed 6180 times
.
Not sure if there is a precedent for this on narrow gauge railways. Be interested if anyone knows how the couplings on bogie stock are made to negotiate tight reverse curves on the real thing.
Rik
Re: Couplings
Posted: Sun Aug 05, 2018 11:45 am
by IanC
On the "real thing" the couplings are attached to the chassis or drawbar. To facilitate tight curves they are in a horizontal slot and pivoted. This allows the bogie to travel freely and guide and support the coach as intended. In our smaller scales this is not too important unless particularly bad trackwork is encountered in which case derailment can occur.
Ian