Page 2 of 4
Re: Couplings
Posted: Sat May 12, 2018 6:32 pm
by IanC
Rik,
With a little modification the hook can be made to pivot downwards to facilitate uncoupling. It would also enable auto uncoupling if you want to add that later. It would just need a magnetic dropper. I used to use florists iron wire. Available for a few pence and already blackened too! As wire lacks depth my friend soldered a vertical piece of wire to the bar to prevent any locking issues.
Looks promising and the finished version will be better that the LGB ones.
Ian
Re: Couplings
Posted: Sat May 12, 2018 8:05 pm
by philipy
Rik,
That does look good and it also looks as though you could add a dropper ball like Tom's, to allow the delayed magnetic uncoupling?
Re: Couplings
Posted: Sat May 12, 2018 8:34 pm
by tom_tom_go
I think hands free uncoupling will improve your operating experience Rik.
Re: Couplings
Posted: Sun May 13, 2018 5:34 pm
by GTB
ge_rik wrote: ↑Sat May 12, 2018 3:30 pm
I've been doing some experiments and made some progress on developing my own couplings.
That was quick. Well done, I think you've cracked it.........
Just need to knock off the rough edges now with a pre-production batch and make up some bending and assembly jigs to make sure they all come out the same.
If you can find some suitable size phos bronze wire it is more springy than the same dia. of brass wire, but just as easy to solder. With more flexible hooks, the couplers would need less force to couple them up.
Regards,
Graeme
Re: Couplings
Posted: Sun May 13, 2018 7:46 pm
by ge_rik
GTB wrote: ↑Sun May 13, 2018 5:34 pm
If you can find some suitable size phos bronze wire it is more springy than the same dia. of brass wire, but just as easy to solder. With more flexible hooks, the couplers would need less force to couple them up.
Regards,
Graeme
Hi Graeme
Still needs some refinement but the principle seems ok. Got some phosphor bronze on order and some heavier gauge brass wire for the loops - the paper clip loops are a bit too easy to bend out of alignment.
I was hoping I could get away with using the centre buffers on my 'bashed' LGB stock but they aren't wide enough and have a tendency to lock when being propelled. Looks like I'll either have to find a way of widening them, with plasticard or brass shim, or replacing them with Binnie Carmarthen buffers.
Rik
Re: Couplings
Posted: Mon May 14, 2018 12:39 am
by gregh
ge_rik wrote: ↑Sun May 13, 2018 7:46 pm
I was hoping I could get away with using the centre buffers on my 'bashed' LGB stock but they aren't wide enough and have a tendency to lock when being propelled. Looks like I'll either have to find a way of widening them, with plasticard or brass shim, or replacing them with Binnie Carmarthen buffers.
Rik
Have you looked at these Pasidump brand? If you only need them to push, they might be OK.
https://www.ebay.com.au/itm/152805495920?rmvSB=true
Being a rough-as-guts modeller, I'd just use a piece of wood like these on my rake of coal wagons that I rarely uncouple. (I use chains on the nail you can see)
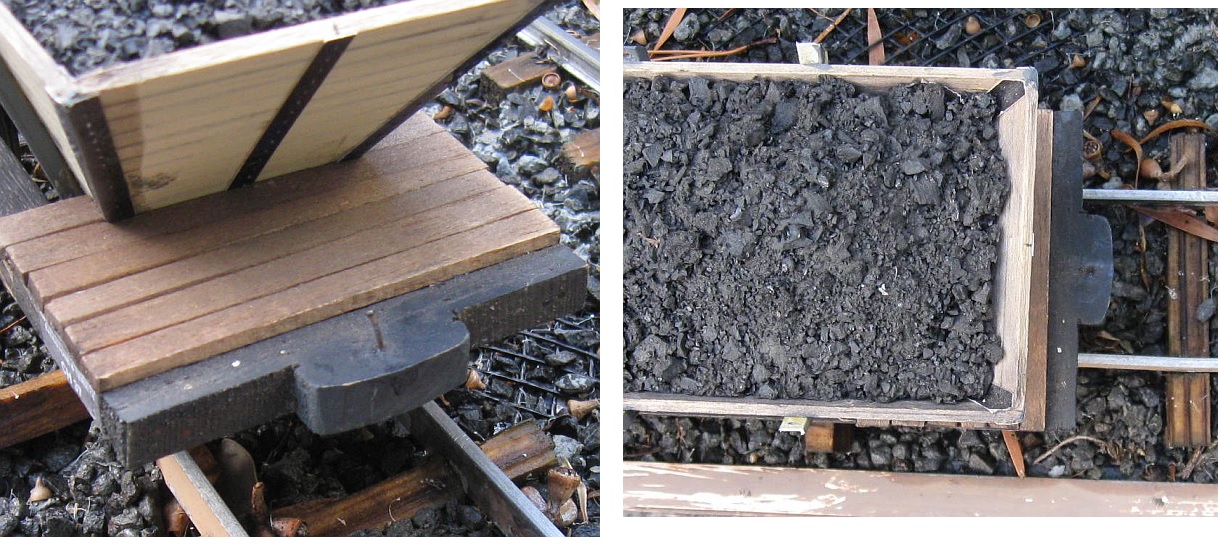
- buff.jpg (301.32 KiB) Viewed 5388 times
You could shape them better than me, I'm sure.
I certainly wouldn't use plasticard shims - breaks too easy if you do manage to lock buffers. Brass would be OK.
Re: Couplings
Posted: Mon May 14, 2018 7:42 am
by ge_rik
gregh wrote: ↑Mon May 14, 2018 12:39 am
Have you looked at these Pasidump brand? If you only need them to push, they might be OK.
https://www.ebay.com.au/itm/152805495920?rmvSB=true
Being a rough-as-guts modeller, I'd just use a piece of wood like these on my rake of coal wagons that I rarely uncouple. (I use chains on the nail you can see)
buff.jpg
You could shape them better than me, I'm sure.
I certainly wouldn't use plasticard shims - breaks too easy if you do manage to lock buffers. Brass would be OK.
Hi Greg
Yes, I did get a pack of those when I was going through the evaluation phase. I'll dig them out and see how they look. I'm struggling to get a response from Peter Binnie - may have to wait for Llanfair before I can get more Carmarthen buffers.
You're right, brass shim will be better than plasticard.
Rik
Re: Couplings
Posted: Tue May 15, 2018 6:19 am
by GTB
I'd agree with Greg, plastic buffer extensions wouldn't survive the first derailment.
I'm not sure a glued joint between a metal plate and a plastic buffer would be that strong either, although you could try 'Loctite Super Glue All Plastics'. It comes in two tubes and uses a surface activator as well as glue.
A shaped block of wood has a lot going for it. The easiest way to make a lot of them to the same shape is to shape a stick of wood to the desired cross section from above, then cut off slices to make individual blocks.
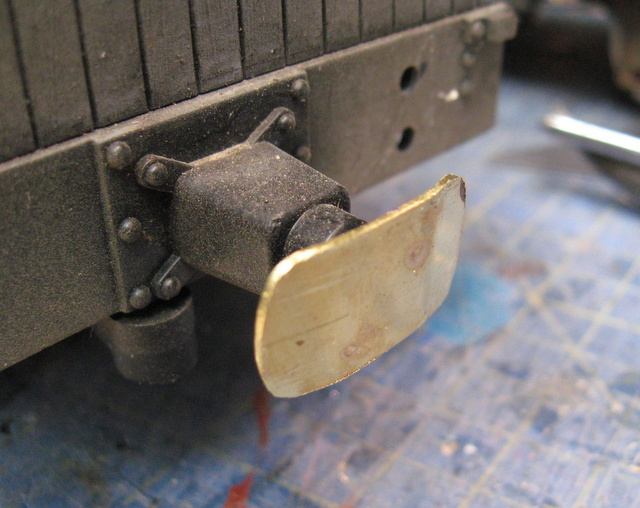
Another alternative is to use a buffing plate in front of dummy buffers like the example below, which can't buffer lock and is fixed with screws.
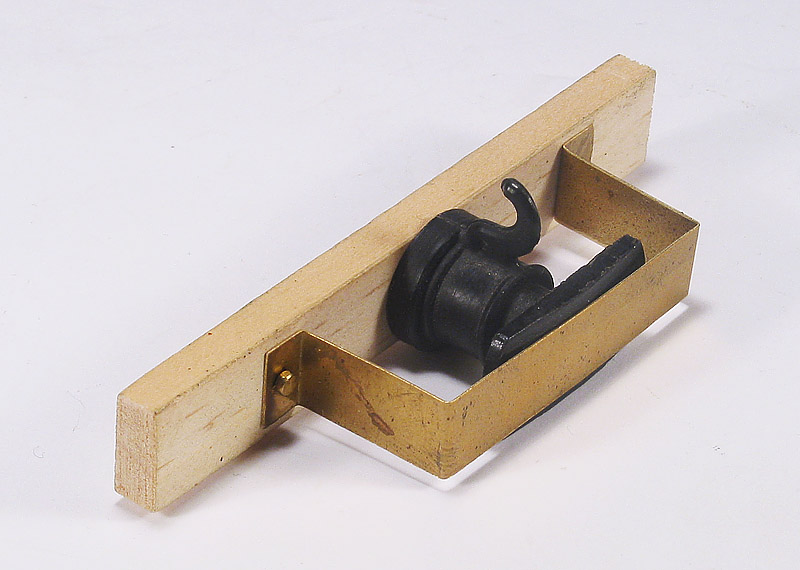
- Extended buffer.jpg (104.38 KiB) Viewed 5349 times
This was knocked up in a few minutes, which was quicker than trying to describe it in words. It looks ugly and the shape needs refinement.
It occurred to me afterwards that a piece of wire bent into a U, recessed flush with the buffer face and glued into holes in the buffer beam would do the same thing and would be a lot less obtrusive.
Something like this would work well for bogie vehicles with long overhangs and also at the rear of locos with a long rear overhang.
Regards,
Graeme
Re: Couplings
Posted: Tue May 15, 2018 7:21 am
by ge_rik
Thanks Graeme
I like to idea of a wire loop over the buffer, as you say, less obtrusive.
Had a PayPal invoice from Peter Binnie last night so, hopefully, will soon take delivery of 60 Carmarthen coupling hooks. Together with my existing supplies, that will be sufficient for half my rolling stock. I'll experiment with ways of widening the LGB buffers, but at 50p each, Carmarthen buffers are a cost effective alternative.
Rik
Re: Couplings
Posted: Tue May 15, 2018 11:19 am
by ge_rik
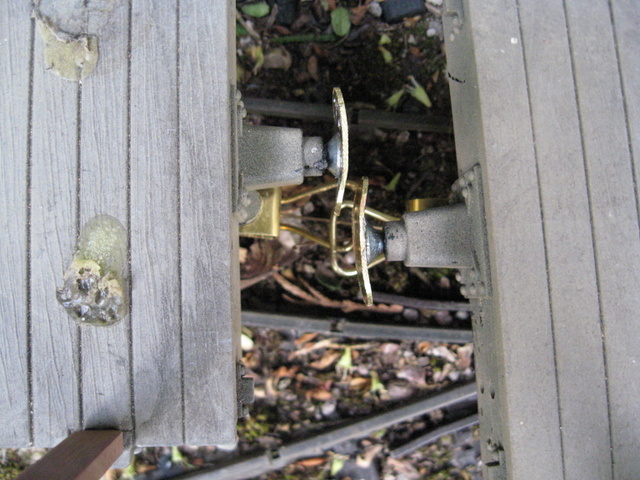
More progress. All the bits and bobs I ordered over the weekend have arrived and so I've had a chance to try out the new materials. 1.5mm brass rod for the loops and 0.7mm phosphor bronze for the hooks.
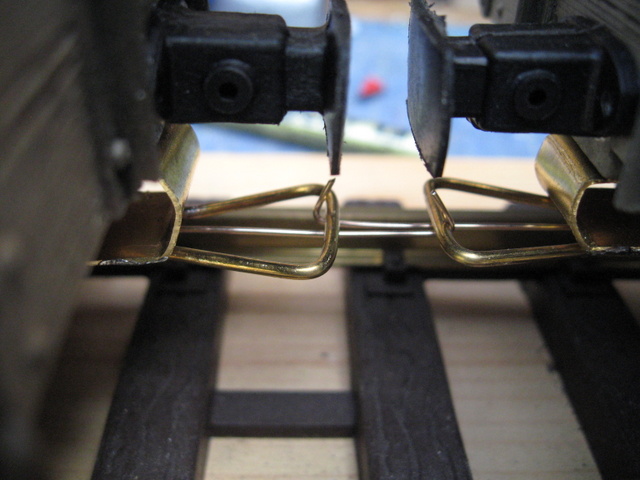
- IMG_7573.JPG (101.82 KiB) Viewed 5349 times
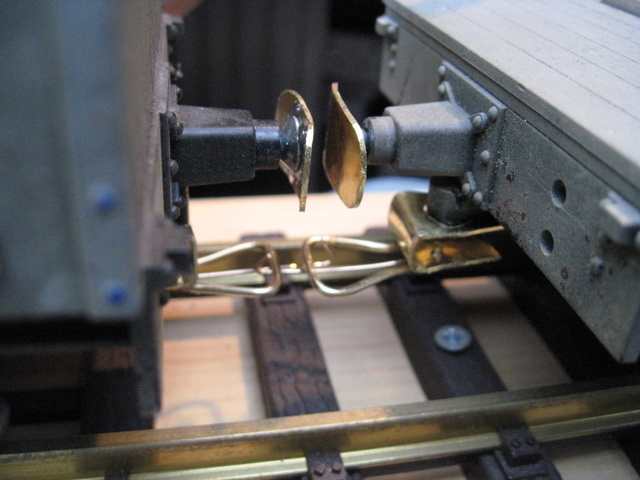
I've done some testing and this arrangement seems to overcome some of the problems I was having previously with the loops becoming misaligned and the hooks not springing back after a few uncouplings. These are the prototypes and so look a bit rough and ready. As soon as the Binnie buffers arrive (paid for this morning), I'll be able to go into proper production.
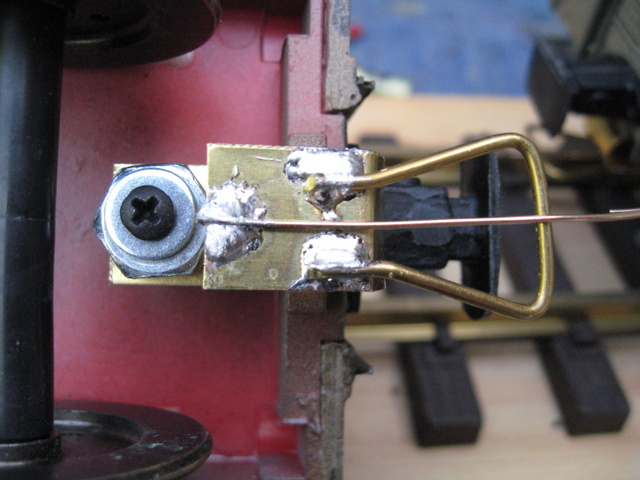
- IMG_7574.JPG (114.22 KiB) Viewed 5349 times
I've had a go at chemical blackening. Seems a bit hit and miss at the moment. Might need to practise a bit more before I get the process perfected.
- IMG_7575-001.JPG (99.1 KiB) Viewed 5349 times
Getting closer!
Rik
Re: Couplings
Posted: Tue May 15, 2018 11:59 am
by tom_tom_go
They look better Rik.
Chemically blackening requires the metal is be clean (I normally go over with wet and dry paper).
Don't dunk the metal in the solution, use a brush and do several attempts cleaning the metal each time with water.
Re: Couplings
Posted: Tue May 15, 2018 4:46 pm
by ge_rik
tom_tom_go wrote: ↑Tue May 15, 2018 11:59 am
They look better Rik.
Chemically blackening requires the metal is be clean (I normally go over with wet and dry paper).
Don't dunk the metal in the solution, use a brush and do several attempts cleaning the metal each time with water.
Thanks - will get scrubbing after I've done the soldering.
Rik
Re: Couplings
Posted: Thu May 17, 2018 2:49 pm
by GTB
ge_rik wrote: ↑Tue May 15, 2018 11:19 am
I've had a go at chemical blackening. Seems a bit hit and miss at the moment. Might need to practise a bit more before I get the process perfected.
As Tom said, brass needs to be very clean before blackening it. Degreasing helps as well. Also remember to rinse the parts when finished, or the black coating can turn powdery,mwith salts on th surface..
What you use for cleaning depends on the shape of the part, I often use a fibreglass pencil to get into places sandpaper can't. A scrub with Ajax helps clean and degrease the metal as well as neutralising any flux.
Not sure where I got the idea, but using a cotton bud (swab) to apply the blackener by rubbing works for me. Sometimes you just have to dip the piece though, eg. brass chain.
Carrs used to do a solution for blackening solder, but I'm not sure it is still around. You may need to paint that area, as normal blackening solutions only work on brass and steel.
Regards,
Graeme
Re: Couplings
Posted: Thu May 17, 2018 3:25 pm
by tom_tom_go
Cotton bud, will take that idea!
Re: Couplings
Posted: Thu May 17, 2018 4:21 pm
by philipy
I usually use a cotton bud, I thought everyone did?
BTW,I have n old bottle of Birchwood Casey Gun Blue which works for blackening on ferrous and non ferrous metals without too much bother. Actually produces a sort of dirty/rusty brownish black colour, not blue at all. Perfect for axles, and various other underframe bits and pieces. I usually clean the metal and then slosh it on and leave it to dry ( not what the instructions say though!). I think I probably got it from Eileens Emporium, way back in the days of Eileen herself!
Re: Couplings
Posted: Thu May 17, 2018 4:30 pm
by ge_rik
GTB wrote: ↑Thu May 17, 2018 2:49 pm
As Tom said, brass needs to be very clean before blackening it. Degreasing helps as well. Also remember to rinse the parts when finished, or the black coating can turn powdery,mwith salts on th surface..
What you use for cleaning depends on the shape of the part, I often use a fibreglass pencil to get into places sandpaper can't. A scrub with Ajax helps clean and degrease the metal as well as neutralising any flux.
Not sure where I got the idea, but using a cotton bud (swab) to apply the blackener by rubbing works for me. Sometimes you just have to dip the piece though, eg. brass chain.
Carrs used to do a solution for blackening solder, but I'm not sure it is still around. You may need to paint that area, as normal blackening solutions only work on brass and steel.
Regards,
Graeme
Thanks, Graeme. Very helpful(as always). I'm reaching the stage now where I'm about to go into batch production. Most of the couplings will be a standard fitting, but some of them will have to be bespoke as not all my stock was originally LGB.
I've fiddled with the jig for the loops and I'm beginning to feel more at ease with it. I'm finding that over-bending and then slightly unbending again gives me a sharper angle. There's a certain amount of tweaking of angles required, but at least the bends seem to be in the right places.
Rik
Re: Couplings
Posted: Fri May 18, 2018 7:42 pm
by ge_rik
Whilst I'm awaiting delivery of more Binnie buffers, I've been experimenting with ways of replacing LGB buffers with something wider to avoid buffer lock when stock is being propelled.
The LGB buffers are somewhat small which is why they need replacing....
- IMG_7589-001.JPG (128 KiB) Viewed 5788 times
However, I have discovered they can be removed, leaving a 4mm dia hole. I discovered that a No.8 woodscrew is a tight fit and so will act as a self-tapper. So ......
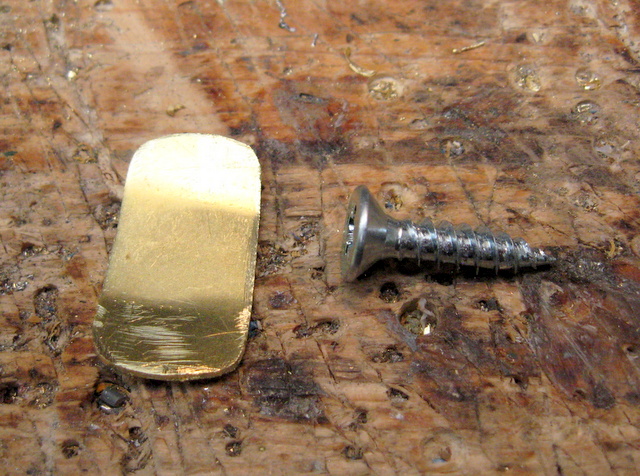
- IMG_7584-001.JPG (185.56 KiB) Viewed 5788 times
With a bit of solder and some burnt fingers, I end up with a reasonably passable buffer .......
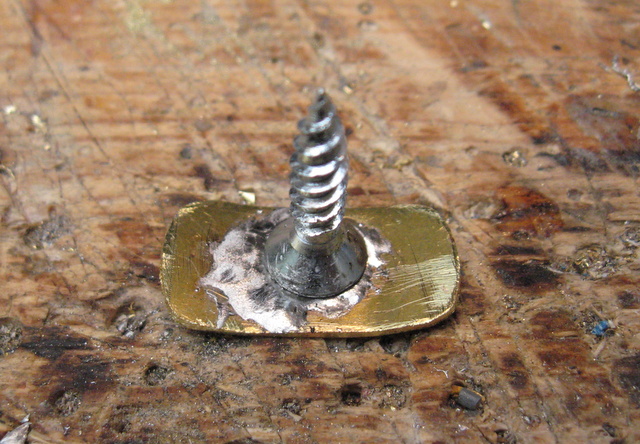
- IMG_7586.JPG (158.94 KiB) Viewed 5788 times
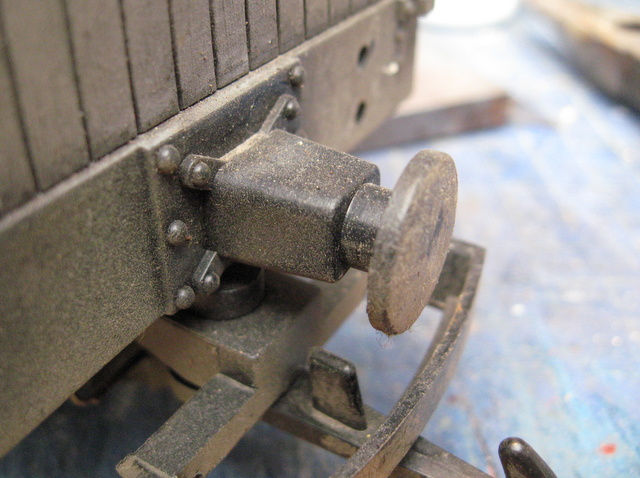
Which simply screws into the housing on the buffer beam.
- IMG_7590-002.JPG (136.58 KiB) Viewed 5788 times
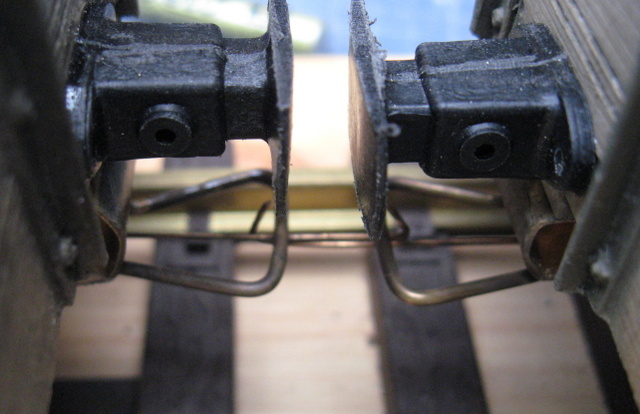
More importantly, it doesn't lock when the wagons are being propelled around even the sharpest (R1) curves.
- IMG_7579-001.JPG (147.17 KiB) Viewed 5788 times
There's still a bit of tidying up needed - I've ordered some brass screws and I'll chemically blacken the the buffers, but I'm pleased to have found a relatively simple way of replacing the buffers on ex-LGB wagons with something which seems reasonably realistic, is simple to make and is cheap!
- IMG_7596-001.JPG (116.13 KiB) Viewed 5788 times
Rik
Re: Couplings
Posted: Fri May 18, 2018 8:10 pm
by philipy
Seems as though you've cracked it, Rik. Well done.
I wouldn't be surprised if there are more than a few copy cats, sooner or later.

Re: Couplings
Posted: Sat May 19, 2018 11:55 am
by GTB
ge_rik wrote: ↑Fri May 18, 2018 7:42 pm
I'm pleased to have found a relatively simple way of replacing the buffers on ex-LGB wagons with something which seems reasonably realistic, is simple to make and is cheap!
I agree with Philip, it looks like you have sorted out most of the issues you had with couplers.
For someone that claims to be a bodger, in a couple of weeks you've run through a development cycle on these couplers that probably took the LGB engineers months.
Regards,
Graeme
Re: Couplings
Posted: Sun May 20, 2018 9:29 am
by Lonsdaler
philipy wrote: ↑Fri May 18, 2018 8:10 pm
Seems as though you've cracked it, Rik. Well done.
I wouldn't be surprised if there are more than a few copy cats, sooner or later.
I may become one of them.

I've never been too fond of the three link chain and most other coupling solutions are expensive when applied over all my stock. This, however, is neat and cheap
