
After lurking here for more that two years now, the time has now come to make a start on our garden railway. Having never built any sort of model railway before I though I'd seek some advice before I plunge in.
I would like a continuous circuit to allow trains to run around whilst having a beer, with some passing loops and sidings for added interest and operational fun.
I'd like it integrated into the garden and not just planks on posts, so planting and landscaping all add to the atmosphere.
Our garden slopes down from top to bottom and it is the bottom part that will become the railway.
[url=./myff/1982994/Small20160514_164430.jpg][img]./myff/1982994/Small20160514_164430.jpg[/img][/url]
The above picture shows the area, it is a little more sloped than it appears. The summer house has the tiled roof, to the right of this is the pond, this will be re-worked to make it less square and more natural looking and merge into a bog garden further to the right.
The green shed on the right is my workshop/brewery. A small paved area in front of this will be added to firm up access.
The falling down shed at the back left, will be coming down over the next bank holiday weekend. A small area here will be screened off to house compost bins etc...
My thoughts are to use the concrete base of the summer house as track level, with a view that in the fullness of time a loop around the summer house at ground level might be possible.
I plan to build a number of raised beds from railway sleepers which will be in-filled and planted, with the track running around.
I haven't measured yet, but as the ground is sloping these beds will be somewhere between 2 and 3 feet high.
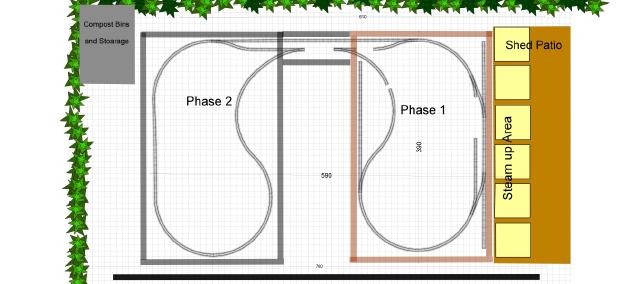
[url=./myff/1983001/GR+10a+160516+Phase+1+.jpg][img]./myff/1983001/GR+10a+160516+Phase+1+.jpg[/img][/url]
Phase 1
This will done to test my building skills.
I have used anyrail sw to design this and and to help me I have chosen to use Peco 32mm set track.
The straights are SL600
The curves are 38" radiuas
The points are 38" radius
The gaps in the track will be filled of course
The right hand side is a steam up area, which is conveniently close to the beer store.
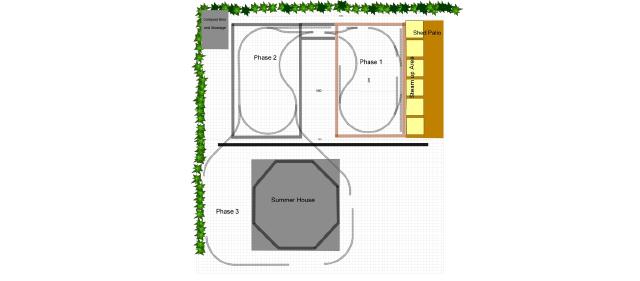
[url=./myff/1983003/GR+10a+160516+Phase+2+.jpg][img]./myff/1983003/GR+10a+160516+Phase+2+.jpg[/img][/url]
Phase 2
This design came up as I need to be able to get access to be able to the back to prune the Leylandii and also to be able to get into the layout to operate and enjoy. Again this is all 38" radius set track.
This is where some advice would be welcomed.
The layout is very curvy and I have read S curves can be particularly troublesome.
My goal would to be to run something like a Roundhouse Billy or similar sized battery powered locos with mixed goods and passenger carriages.
I guess a lift out bridge on the bottom edge would enable a continuous run around the whole thing.
[url=./myff/1983012/GR+10a+160516+Phase+3+.jpg][img]./myff/1983012/GR+10a+160516+Phase+3+.jpg[/img][/url]
Not much thought has gone into phase 3, but the above is a start.
I'll see how we get on first.
Any thought/comments would be welcomed.
This has ended up a long post, thanks for staying with it
New Railway Advice.
-
Peter Butler

- Driver

- Posts: 5246
- Joined: Sun Sep 09, 2012 10:33 pm
- Location: West Wales


I managed to see the piccies by copying and pasting the URLs into a new tab.
I can't comment on your question about the Roundhouse Billie and the S curves, as I'm not au fait with live steam. But S curves (and gradients) are no problem for battery locos.
(eg see - https://www.youtube.com/watch?v=rQs0dmT--1A
I like the way you've broken down the project into phases. A good idea to start with something fairly realistic and doable, but then have the potential for keeping your interest after the first phase is completed.
Best of luck with your project. Will be interested to see how it develops.
Rik

I agree with everything Rik has said, so good luck with the project.
The only thing I would add is that S curves are generally more of a problem when propelling a train rather than pulling . i.e for shunting operations. Its also more of a problem with conventional 2-buffer stock rather than single centre buffer types.
The only thing I would add is that S curves are generally more of a problem when propelling a train rather than pulling . i.e for shunting operations. Its also more of a problem with conventional 2-buffer stock rather than single centre buffer types.
Philip
-
MDLR

- Driver
- Posts: 4027
- Joined: Thu Jan 15, 2009 10:38 pm
- Location: Near Ripley, Derbyshire, UK
- Contact:
If you've been around the Forum for a time, you will know what I'm going to say: if you haven't already, join the 16mm Association www.16mm.org.uk - you'll get LOTS of information (one of the items in your Welcome Pack will be a manual on building garden railways) and the chance to visit other garden railways in your area - always good for pinching ideas for your own line.


Unfortunately I can't get the pics to load even by copying and pasting to my browser window.
My site was on a slight slope too. I opted to level it out by building retaining walls on two sides. The result was a level loop of about 55 feet for continuous running of my steam and battery powered engines (while drinking a beer) with a knee high steam up area.
But operations is my primary interest and this is handled by my battery powered engines. So after the loop was up and running, I added a spur that is about 25 feet long that leads away from the loop at ground level that then descends to a lower portion of the layout. The entire layout thus is integrated into the garden with none of it being planks on posts. Thus I've managed to build an elevated ground level layout that allows continuous running and switching.
Each element of my layout has a purpose. Although I haven't gotten to the point of building structures (other than a small turntable), each structure will serve a purpose in the scope of operations. For instance, the town of Hope consists of a passing siding and a switch leading to the engine facilities. When not being used in normal switching operations, it can be used as a 3-2-2 Inglenook with just the placement of a few freight cars that the train crew can't touch when switching out the seven cars used in the Inglenook puzzle. It serves a dual purpose depending on what my operations mood might be that day.
I've also attempted to come up with a customer base where each is somehow connected to at least one other. This often requires some thought on the type of freight car that can serve the customer. A boxcar can serve all customers, even it it's just to bring in supplies the customer needs. A mine for instance, aside from a string of ore cars/tippers, could get a load of cable wire for an elevator shaft on a gondola, or a boxcar load of dynamite or a flatcar with drilling machinery or timbers to support mine shafts.
Besides not going overboard with miles of track (I hand lay all mine so overall track length is a consideration), all my switches are accessible by pathways at least 12 inches wide. If I have to get down on my knees, I wanted room to do this. The pathways also allow me to tend to the plants as well as perform track maintenance.
Those are just a few thoughts to share.


Many thanks for the words of encouragement and advice.
Thanks to Rik for getting my pics up, I'll try the photobucket method next time.
I am a member of the 16mm association. I have to say its great value for money, the welcome pack was great and the quarterly magazines very informative.
As I type, a delivery of track and points has arrived from Dream Steam, I only ordered yesterday, so that's pretty good.
The building I work in has a large unused upstairs, So I think I will try the phase one layout there and take some measurements, to check that the Anyrail measurements are accurate.
Who is online
Users browsing this forum: No registered users and 5 guests