
My Garden Railway .. so far
-
Sammmm




-
Sammmm
Ahhhh ha tis a good event isnt it dougrail ...luckily since i have a static caravan there i dont have to catch the train back to Pendre
 got until the June to of got all construction and ballasting done then small detailing through summer so its not a mess ..... also need to get planting done as most of the plants died on the sunny side of the garden due to c*ap soil ...but on the damp shaded all year round sime im going to get some *mind your own buisness* ..just cant wait for leaves to appear on the bushes and everything to come into bloom to see where the empty spots on onthe gardne
...luckily since i have a static caravan there i dont have to catch the train back to PendreThanks! but still a bit to do before my parents dead line!Posted: Tue Mar 22, 2011 1:03 am Post subject:
Nice job bud, the railway looks super!
got until the June to of got all construction and ballasting done then small detailing through summer so its not a mess ..... also need to get planting done as most of the plants died on the sunny side of the garden due to c*ap soil ...but on the damp shaded all year round sime im going to get some *mind your own buisness* ..just cant wait for leaves to appear on the bushes and everything to come into bloom to see where the empty spots on onthe gardne-
Sammmm
heres some pics of my newest buildings.. The low relief house still needs a roof and doors and windows! (Inspiration from Pendo Pilot !  ) And the pillar thing is the starts of a water colum.... Also any ideas on how to seal them? since there breeze block they will absorb alot of water and in the winter i fear they may crack..


^^ its possible place =/ but i believe the plant on the right is dead

) And the pillar thing is the starts of a water colum.... Also any ideas on how to seal them? since there breeze block they will absorb alot of water and in the winter i fear they may crack..^^ its possible place =/ but i believe the plant on the right is dead
-
Pendo Pilot
You have made a right good job with those blocks mate, even put the lintels in (I forgot those 
 ). Really neat scribe work to the bricks as well, what did you use to scribe with?
Looking good, I have started a water tower base the same as yours as well.
If you do seal them let me know what with, I have not bothered to be honest. A few of the early ones I made were out all winter with no worries.
). Really neat scribe work to the bricks as well, what did you use to scribe with?Looking good, I have started a water tower base the same as yours as well.
If you do seal them let me know what with, I have not bothered to be honest. A few of the early ones I made were out all winter with no worries.
-
Narrow Minded
-
Sammmm
Thanks! And i used a Generic Saw to cut the horizontal lines then i used a tool that is meant to be used to clear weeds from in-between paving slabs to scribe the vertical ones..... works great until it get awkward in the centre of the block. and the Recesses for the door and windows were cut using a Chisel. I shall take a picture of the tool tommorrowPendo Pilot:51341 wrote:You have made a right good job with those blocks mate, even put the lintels in (I forgot those :roll:
Looking good, I have started a water tower base the same as yours as well. :D
If you do seal them let me know what with, I have not bothered to be honest. A few of the early ones I made were out all winter with no worries.
Last edited by Sammmm on Wed Mar 30, 2011 11:34 pm, edited 1 time in total.
-
Sammmm
Think i might give that a try!! Hehe looks like ive got some cereal to eat!! and yeah i applied some watered down pva to my water column but seemed to be absorbed very quickly =/ahh well time will tell...Narrow Minded:51343 wrote:When I get around to doing my bridge, I'm intending giving it a healthy coat of waterproof PVA before slopping the masonary paint on it.
I've used it on card roof tiles before and it works a treat!
and For anyone who asks why the brick is so porous its due to i cut about 5mm of the edge of the block so i end up with a surface thats slightly uneven but hasnt got those silly scribe marks in them from manufacturing....so basicly after brushing down the dust it reveals all the airpockets.. which look great in my oppinion
... perfect for moss growing (might apply yoghurt around the base)-
Narrow Minded
-
Sammmm
I shall give it a try later todayNarrow Minded:51352 wrote:That's "a good thing" - just repeat the coating at least another once (after the previous one's have dried) and you should be fine!and yeah i applied some watered down pva to my water column but seemed to be absorbed very quickly
along with the card roof tiles .. Cheers -
Sammmm
Just a tiny update of what i have been up to in comparison to 3 years ago! the picture on the right is from 2009 and the picture on the left is from 20mins ago, sorry about the quality trying to rezise a picture taken on a 14MP camera to one taken on a 2MP camera mucked it up.
Also i have these two kits i just won for quite cheap i think!!!!
http://www.ebay.co.uk/itm/320856142314? ... 500wt_1413
http://www.ebay.co.uk/itm/320856144004? ... 500wt_1413
I will defenetly start posting more on here or maybe start a new thread on it,
In this picture notice the level of the patio and how much i have dropped the line

looking down the loop, instead of the track falling away it now is resonably level
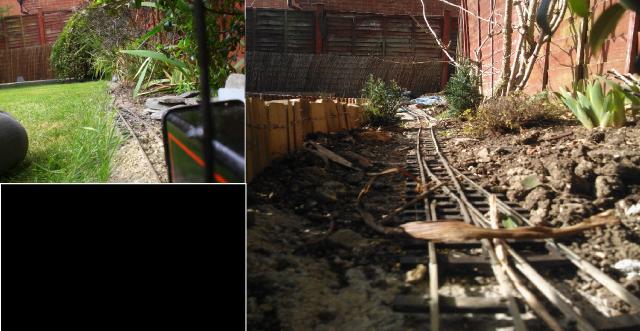
[/img]
Also i have these two kits i just won for quite cheap i think!!!!
http://www.ebay.co.uk/itm/320856142314? ... 500wt_1413
http://www.ebay.co.uk/itm/320856144004? ... 500wt_1413
I will defenetly start posting more on here or maybe start a new thread on it,
In this picture notice the level of the patio and how much i have dropped the line
looking down the loop, instead of the track falling away it now is resonably level
[/img]
-
Sammmm
My lovely new/seconhand loco arrived today from Simon,
Before i post the pics below , does anyone know how i can charge to battery pack as there is no socket on the enigne, the batters pack is
4 rechargeable 1.2V (typ 970mAh) NiMH batteries with a standard JR connector i think?
also says on the batteries " standard charge 16hrs at 93mA
Would something like this do the job?
http://www.ebay.co.uk/itm/FUSION-NX83-F ... 512wt_1396
Anyways here they are,
BIG BOX

Smaller boxes

That globe valve near the lubricator seems to be a blowdown valve

Which comes out here....

And just a general view of her

Before i post the pics below , does anyone know how i can charge to battery pack as there is no socket on the enigne, the batters pack is
4 rechargeable 1.2V (typ 970mAh) NiMH batteries with a standard JR connector i think?
also says on the batteries " standard charge 16hrs at 93mA
Would something like this do the job?
http://www.ebay.co.uk/itm/FUSION-NX83-F ... 512wt_1396
Anyways here they are,
BIG BOX
Smaller boxes
That globe valve near the lubricator seems to be a blowdown valve
Which comes out here....
And just a general view of her
-
KVSRmanager
Very nice loco, going to be a while before I can afford something like that . Answering your question yes it should be fine as all RX packs are around the save voltage and ampage and the charger should be able to work out any differences, you need to be careful with the cheap chargers though some will charge horribly slowly.
Hope that helps,
. Answering your question yes it should be fine as all RX packs are around the save voltage and ampage and the charger should be able to work out any differences, you need to be careful with the cheap chargers though some will charge horribly slowly. Hope that helps,
-
Sammmm
Thanks very much! I just bought one with thats 1.0 amp which says it charges fast becuase of the increased current, just have to charge them somewhere there is nothing that may not like th heat!KVSRmanager:67697 wrote:Very nice loco, going to be a while before I can afford something like that :(. Answering your question yes it should be fine as all RX packs are around the save voltage and ampage and the charger should be able to work out any differences, you need to be careful with the cheap chargers though some will charge horribly slowly.
Hope that helps,
-
Sammmm
Thanks Keith!
A new update, parents have agreeed to me building a full loop, and then turning one terminus into a siding and keeping the other, hopefull going to acheive 1in75 - 1in100 up to the rightside of the garden as there is a short section of 1in50 lower down the loop which had to be compensated for. my aim is to get the bit below grass level as my only rules are it must not disturb the mower, but before those pics here are some of the construction of the lower loop, more has happend since these though
first 2 batches of concrete , first was covered in hay from trying to protect it from the cold but when i removed it the last little bits had stuck =[!

Looking up what is a short 1in50 bank between the corners, all ready for breeze blocks going on

now with breeze blocks on

from another angle you can see the bank

blocks laid along the straight and the corner


now with track

now heres some pics of the end of the loop drawn out, measuring tomorow to get gradients then digging next few weeks until i have money for more track!!
left side

right side

and finaly a picture of one of my ebay bargains built cost me £10 including postage!

A new update, parents have agreeed to me building a full loop, and then turning one terminus into a siding and keeping the other, hopefull going to acheive 1in75 - 1in100 up to the rightside of the garden as there is a short section of 1in50 lower down the loop which had to be compensated for. my aim is to get the bit below grass level as my only rules are it must not disturb the mower, but before those pics here are some of the construction of the lower loop, more has happend since these though
first 2 batches of concrete , first was covered in hay from trying to protect it from the cold but when i removed it the last little bits had stuck =[!
Looking up what is a short 1in50 bank between the corners, all ready for breeze blocks going on
now with breeze blocks on
from another angle you can see the bank
blocks laid along the straight and the corner
now with track
now heres some pics of the end of the loop drawn out, measuring tomorow to get gradients then digging next few weeks until i have money for more track!!
left side
right side
and finaly a picture of one of my ebay bargains built
cost me £10 including postage!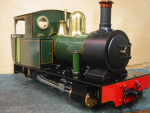

-
Sammmm
-
Sammmm
right so update again this is what the garden looked like 2 months ago ...

Now for progress pics
Trench starting to be dug for starting the last phase of construction (about 1in80 the whole way up

the track was then lifted to make a siding instead of the old loop

Also all the mud from the trench filled in the sides of the blocks here


and then finaly got a rockery in ( the chicken wire was to stop the dogs diggin in the fresh soil)

now with more plants and ballast
before:
AFTER :


the siding spur being ballasted, needs the rest of the track being laid

now the other side of the garden with all track laid (apart ffrom one siding, still needs filling in at the sides and all that pretty stuff!!

Now this corner needs alot of thought but my dad suggested some sort of water feature

also track laid on the curve

added the cotswold buff decorative stone , this will be around the whole lot eventually

this is what the garden looked like 2 months ago ...Now for progress pics
Trench starting to be dug for starting the last phase of construction (about 1in80 the whole way up
the track was then lifted to make a siding instead of the old loop
Also all the mud from the trench filled in the sides of the blocks here
and then finaly got a rockery in ( the chicken wire was to stop the dogs diggin in the fresh soil)
now with more plants and ballast
before:
AFTER :
the siding spur being ballasted, needs the rest of the track being laid
now the other side of the garden with all track laid (apart ffrom one siding, still needs filling in at the sides and all that pretty stuff!!
Now this corner needs alot of thought but my dad suggested some sort of water feature
also track laid on the curve
added the cotswold buff decorative stone , this will be around the whole lot eventually
Who is online
Users browsing this forum: No registered users and 25 guests