Page 154 of 186
Re: Time to build a railway...but where?
Posted: Tue Jul 04, 2023 5:47 am
by Old Man Aaron
Think I'll have to pinch that cutaway idea, Peter..


Greame's explanation, about 2/3 down the
first page of my thread, is worth many words.
Re: Time to build a railway...but where?
Posted: Tue Jul 04, 2023 11:23 am
by Peter Butler
Many thanks for the link Aaron, I had forgotten about your build description despite posting comments myself! I have read it through and found it most interesting. Your kit varies considerably to the one I have, although there may have been a crossover period in manufacture when parts suitable for either were included, or omitted (such as mine)? This can make it confusing as the video by Peter describes only the earlier version, however, I have now managed to get this far as described above.
Interesting to see the positioning if your charge socket (I have placed my on/off switch there), which explains your comment about the cutaway in the control panel, it does hide all that wiring but can be removed for access with two screws from the front (hidden inside the bonnet)...

- 100_0272.JPG (259.75 KiB) Viewed 7189 times
Clearly your posts show an engineering background with the emphasis on materials and fixings. Mine is very much aesthetic in comparison.
The quartering of the cranks is something I hadn't given much thought about as Peter's video gives little indication of the problems you encountered. Meanwhile I will complete as much as possible with the remainder of cab fittings and driver figure, when he arrives.
Re: Time to build a railway...but where?
Posted: Sun Jul 09, 2023 12:02 pm
by Peter Butler
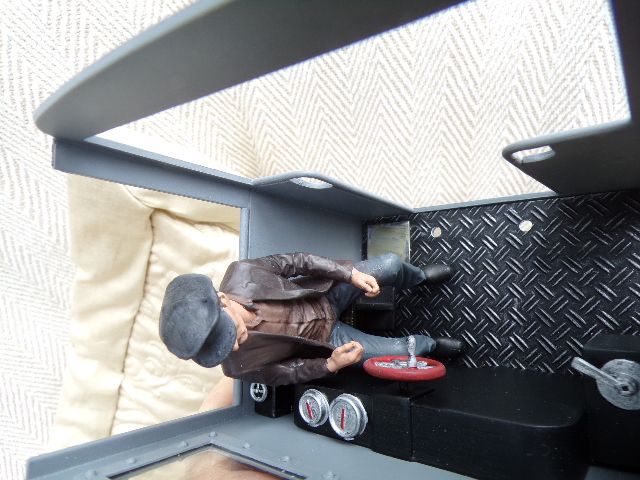
My driver figure arrived yesterday from David Clavey Models and he fits perfectly. I like David's figures very much; the ones I have used appear to be cast resin and feel solid, so show no printing lines at all. The detail is good and the poses look natural. I prefer to buy them in grey primer and paint with acrylics. This one has a poseable head so he can face either direction....

- 100_0287.JPG (222.23 KiB) Viewed 7136 times
The cab has to be fixed to the chassis by two bolts at the rear, however, one is obscured by the gear selector frame which I have now managed to make removable by adding two magnets set into the frame base and gluing a thin metal plate to the cab floor....
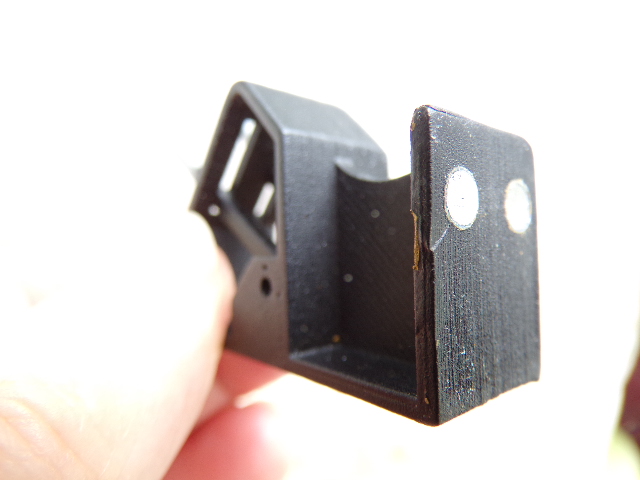
- 100_0284.JPG (153.33 KiB) Viewed 7136 times
- 100_0285.JPG (287.29 KiB) Viewed 7136 times
This works well and holds the frame securely.
Re: Time to build a railway...but where?
Posted: Mon Jul 10, 2023 6:45 am
by FWLR
Great idea that Peter, the cab is looking good too.
Re: Time to build a railway...but where?
Posted: Mon Jul 10, 2023 8:42 am
by Andrew
FWLR wrote: ↑Mon Jul 10, 2023 6:45 am
the cab is looking good too.
It really is!
I love the driver figure...
Re: Time to build a railway...but where?
Posted: Tue Jul 11, 2023 9:46 am
by FWLR
Andrew wrote: ↑Mon Jul 10, 2023 8:42 am
FWLR wrote: ↑Mon Jul 10, 2023 6:45 am
the cab is looking good too.
It really is!
I love the driver figure...
Has do i.....
Re: Time to build a railway...but where?
Posted: Mon Jul 24, 2023 11:38 am
by Peter Butler
Not much progress with the Baldwin whilst awaiting replacement worm and gear, which I managed to melt!
So... in the meantime how about another kit? Perhaps something completely different? I know, how about a Baldwin? Well, a Baldwin build of a Pechot-Bourdon design.
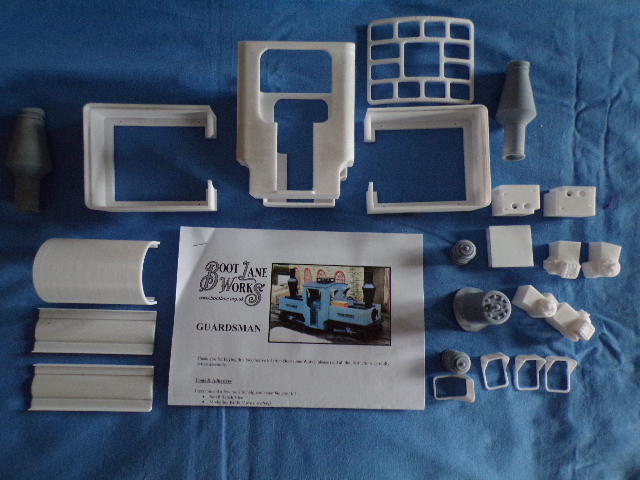
This is a superb 3D printed kit from Boot Lane Works at a very realistic price.

- 100_0321.JPG (228.87 KiB) Viewed 6937 times
A daunting experience when first opening the box and seeing the amount of parts but just a few pages of instructions. However, everything is carefully packaged to separate the different units of construction, and everything fits perfectly with the usual amount of preparation for a perfect paint finish.
Once the pieces have been handled and dry-fitted, everything becomes self explanatory.
- 100_0319.JPG (283.07 KiB) Viewed 6937 times

- 100_0320.JPG (276.85 KiB) Viewed 6937 times
Interestingly, the bogies are fitted together using screws/bolts into pre-drilled holes, so can easily be stripped down should the need arise. I am expecting a book... Trains to the Trenches.... tomorrow, so I can see more detail of these locos in service.
Re: Time to build a railway...but where?
Posted: Tue Jul 25, 2023 12:10 am
by Peter Butler
I have found a number of pictures of this type on-line and they show great variety of detailing, so I can add lots to my model. This evening I decided to make a water lifter hose and support bracket as shown here....

- Péchot-Bourdon_Baldwin_0-4-4-0.jpg (245.6 KiB) Viewed 6903 times
Swift Sixteen make a 3D printed one, which I have fitted to my 4-6-0 Baldwin, but it is far too big for this tiny loco, so I used plastic tube, heated with a hot-air gun to form the shape, and wrapped around with fine thread....

- 100_0322.JPG (283 KiB) Viewed 6903 times
The finished item is well worth the hours I spent on it....

- 100_0326.JPG (260.31 KiB) Viewed 6903 times
Re: Time to build a railway...but where?
Posted: Tue Jul 25, 2023 5:14 am
by Old Man Aaron
That driver is perfect!
Quite like the look of that 0-4-4-0T, makes me wonder about a kit for a Koppel Mallet..
Re: Time to build a railway...but where?
Posted: Tue Jul 25, 2023 6:36 am
by ge_rik
I can see this build is going to be up to and may well exceed your usual level of detail, Peter.
Rik
Re: Time to build a railway...but where?
Posted: Tue Jul 25, 2023 10:20 am
by FWLR
ge_rik wrote: ↑Tue Jul 25, 2023 6:36 am
I can see this build is going to be up to and may well exceed your usual level of detail, Peter.
Rik
That’s for sure Rik. Knowing Peter he will exceed his potential and make it look

easy, even though it may not be the case.
Peter, did you put a slightly larger piece of tubing on the end for the fixing screw. I can’t wait for this project to be finished and see what another brilliant remodel of the loco.
Re: Time to build a railway...but where?
Posted: Tue Jul 25, 2023 10:51 am
by Peter Butler
FWLR wrote: ↑Tue Jul 25, 2023 10:20 am
Peter, did you put a slightly larger piece of tubing on the end for the fixing screw.
Rod, the end of the hose is made from a tiny wooden toggle from a craft shop. It just represents some sort of connector which I don't have any details of.... it will have to do!
Just for interest, the plastic tube has another tube inserted before I softened it with a heat gun. This allows it to bend without kinking.... Useful tip?
Re: Time to build a railway...but where?
Posted: Tue Jul 25, 2023 10:57 am
by FWLR
Thanks Peter, that is a great tip. I suppose that’s so it doesn’t collapse when you bend it to shape.
Re: Time to build a railway...but where?
Posted: Tue Jul 25, 2023 12:19 pm
by Phil.P
So-called 'spring' curtain wire (from the days of net curtains! Makes a good 'bending-spring' to support plastic tubes. - If the bore of your tube is big enough, obviously.
A non-modelling use, is about 15-18 inches of this, in a battery drill. - Great for clearing plug-holes of detritus.
(I only add this, as a time-saver, to allow more time for modelling).

Phil.P
Re: Time to build a railway...but where?
Posted: Tue Jul 25, 2023 2:04 pm
by Peter Butler
Good tip Phil.... that could be very useful.
Re: Time to build a railway...but where?
Posted: Fri Jul 28, 2023 10:27 pm
by Peter Butler
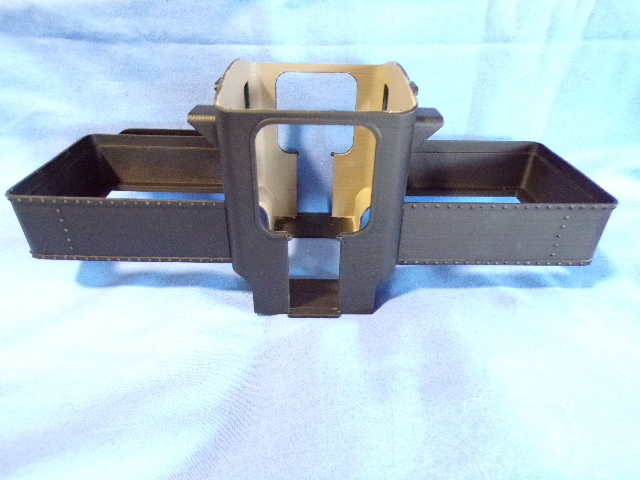
This is a great kit and I am enjoying every minute! The print quality is good but some preparation is still required. I use coarse wet and dry, followed by finer grades and a couple of filler primer sprays before top coat. This results in an even and smooth paint finish.
The cab is one unit with no seams, window and door surrounds printed separately. Each tank section is a three sided print with tank top added later....

- 100_0331.JPG (258.4 KiB) Viewed 6782 times
The central firebox is just an arch with dome separately printed....

- 100_0332.JPG (267.11 KiB) Viewed 6782 times
Cab fittings, other than firebox doors and regulators, are not supplied but I intend to add detail later.
The two power bogies make up well and feel sturdy....
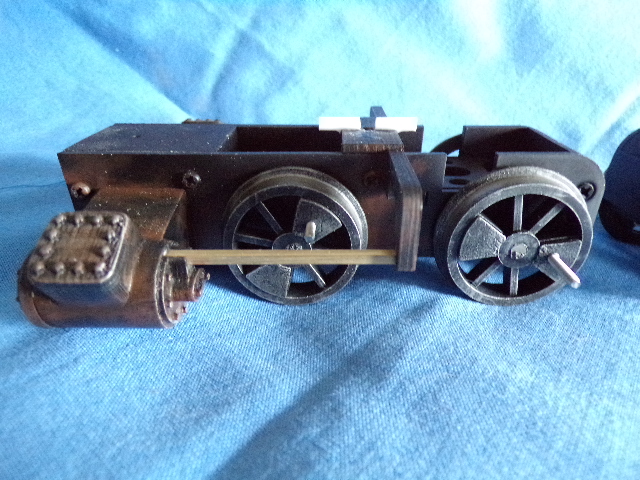
- 100_0327.JPG (267.84 KiB) Viewed 6782 times
Re: Time to build a railway...but where?
Posted: Sat Jul 29, 2023 6:20 am
by FWLR
Those power bogies do look impressive Peter.
Re: Time to build a railway...but where?
Posted: Sat Jul 29, 2023 7:24 am
by ge_rik
FWLR wrote: ↑Sat Jul 29, 2023 6:20 am
Those power bogies do look impressive Peter.
I agree. Those wheels look particularly solid
Rik
Re: Time to build a railway...but where?
Posted: Sat Jul 29, 2023 11:06 am
by Peter Butler
Thanks guys, the wheels are 'Binnie' eight-spoke standard ones with inserts supplied in the kit to press-fit using a vice to keep them even and fully located. They are such a perfect fit I doubt adhesive is required, but you know me.....
I have given everything a spray coat of black primer and dry brushed with silver and rust colours.
The instructions state the bogies are available in pairs for scratch builders, but are not priced.
The tanks and cab are screwed together (no adhesive here!) with eight nuts and bolts supplied. Rivet heads are provided but with no instructions except to indicate the presence of coal bunkers inside the tanks on the fireman's side. I also built up on top of the tanks for additional coal storage....
- 100_0336.JPG (241.72 KiB) Viewed 6780 times
The cab interior has been hand painted before the firebox is dropped in place. Driver and fireman figures are from Bachmann and fit perfectly....

- 100_0339.JPG (259 KiB) Viewed 6780 times
Cab fittings have been added just for interest... I have no idea how steam locomotives work so the driver will have to be inventive.

- 100_0337.JPG (252.31 KiB) Viewed 6780 times
Re: Time to build a railway...but where?
Posted: Sat Jul 29, 2023 11:33 am
by FWLR
The inside of the cab is really nice Peter. The driver will work it out I'am sure..

This kit seems to be for the more experienced builder I feel, but with a little bit of planing it shouldn't be that difficult do you think.

 easy, even though it may not be the case.