Some plasticard comes with a protective film on which can be very hard to spot. The sheets my kits are cut from come with this. It is usually only on one side and very difficult to spot unless you run the tip it a knife across it. If you try and join parts with this film on using MEK or plasticweld it won't hold. Remove the film and all is well. Local model shops don't always realise when they get a batch with the film on.
It appears to attract the solvent and stops it from getting to the plasticard underneath. Strange but true. I was most disconcerted (polite version) when the first of the kits turned up and the first one I built fell apart. A lesson soon learnt.
Barry
Plasticard working tips?
-
sstjc
- Fireman

- Posts: 442
- Joined: Mon Dec 22, 2008 10:47 am
- Location: Faversham Kent
- Contact:
-
ge_rik

- Administrator

- Posts: 8003
- Joined: Sun Oct 25, 2009 10:20 pm
- Location: Cheshire
- Contact:
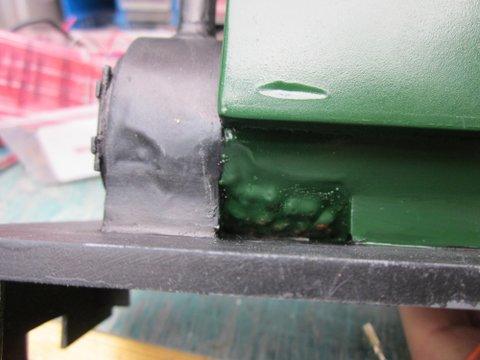
I can vouch for that! This is what happened when I used Evostik impact adhesive to fix lead air rifle pellets inside the smokebox of my plasticard scratchbuilt Manning Wardle. They say you learn from experience ......GTB:107045 wrote:
There are two varieties of contact cement (called impact cement in the UK I think). The water based ones won't attack polystyrene, but the solvent based ones will.
Graeme

Rik
-
Peter Butler

- Driver

- Posts: 5717
- Joined: Sun Sep 09, 2012 10:33 pm
- Location: West Wales
Rik, I'm sorry to see the damage to your loco after using Evostik, however, I think it may be because it has not been used as an impact adhesive in your instance. If thin layers are applied it goes off quite quickly before causing such devastation, but if it is poured in it will have time to react with the Plasticard before setting.
My first choice would have been two part epoxy resin.
It may be possible to repair your damaged loco with Milliput so not all is lost!
My first choice would have been two part epoxy resin.
It may be possible to repair your damaged loco with Milliput so not all is lost!
The best things in life are free.... so why am I doing this?
-
steampig
I have to say the somewhat gnarled cylinder I made at my first attempt is growing on me - maybe I'll finish it off.
Rather than waste most of an A4 sheet of self-adhesive labels to print 15 sq cm of parts, I pasted (yes, pva again) of paper pattern to a 36mmx88mm address label, resulting, when the glue had dried, in self-adhesive cardboard. However, it seems to do the job when stuck to the plasticard, possibly at the expense of unnecessarily blunting the knife. I also got wiser about cutting out, making all the scores before freeing parts so the work-piece was easier to handle - the smallest part is 4.5mmx12mm. Also used a square to line-up the right-angles, rather than trusting to the possibly wet-distorted print.
Operations were suspends when the craft-knife handle from the pound-shop kit broke - the blue plastic part that grips the blade and is screwed into the handle against a metal tube to tighten it snapped - investigation reveals the plastic has the tensile strength of green cheese. Failed to mend it with acetone, MEK and Plastic Magic, although the latter two did pick up the blue on the brush. Did get adhesion using an 'activator' pen from a long defunct plastic super-glue kit, and cheapest new super-glue (this had the largest glue-delivery orifice I have ever seen; useful any time you need an undirected 1/2ml of superglue in a hurry). Leaving it to set but I don't think it will have a hope. In a bit I shall make an emergency handle by splitting the end of a piece of dowel and putting a small hose-clip round it to tighten up.
PS - how do you bend plasticard? I have vague memories of boiling water being involved.
Rather than waste most of an A4 sheet of self-adhesive labels to print 15 sq cm of parts, I pasted (yes, pva again) of paper pattern to a 36mmx88mm address label, resulting, when the glue had dried, in self-adhesive cardboard. However, it seems to do the job when stuck to the plasticard, possibly at the expense of unnecessarily blunting the knife. I also got wiser about cutting out, making all the scores before freeing parts so the work-piece was easier to handle - the smallest part is 4.5mmx12mm. Also used a square to line-up the right-angles, rather than trusting to the possibly wet-distorted print.
Operations were suspends when the craft-knife handle from the pound-shop kit broke - the blue plastic part that grips the blade and is screwed into the handle against a metal tube to tighten it snapped - investigation reveals the plastic has the tensile strength of green cheese. Failed to mend it with acetone, MEK and Plastic Magic, although the latter two did pick up the blue on the brush. Did get adhesion using an 'activator' pen from a long defunct plastic super-glue kit, and cheapest new super-glue (this had the largest glue-delivery orifice I have ever seen; useful any time you need an undirected 1/2ml of superglue in a hurry). Leaving it to set but I don't think it will have a hope. In a bit I shall make an emergency handle by splitting the end of a piece of dowel and putting a small hose-clip round it to tighten up.
PS - how do you bend plasticard? I have vague memories of boiling water being involved.
-
Peter Butler
- Driver
- Posts: 5717
- Joined: Sun Sep 09, 2012 10:33 pm
- Location: West Wales
Steampig, my best advice to you is avoid cheap cutting knives at all costs..... your fingers have a limit on repair options.
I always use a Stanley knife holder with a fixed blade (not retractable) and 1991 blades, which are finer than the normal or heavy duty blades. These have little chance of breaking and flying off towards your face! I do use scalpel blades too, but for an entirely different purpose where minimum pressure is required or possibly for finishing.
As for bending Plasticard, dependent on the thickness it should be possible to hold a steel rule in one hand (right in my case) and draw the sheet across the edge whilst holding it under your thumb, (right thumb). Perhaps not the best description I have ever made but if you try I think you will see it works. You might need to do it more than once to achieve the bend you require.
I always use a Stanley knife holder with a fixed blade (not retractable) and 1991 blades, which are finer than the normal or heavy duty blades. These have little chance of breaking and flying off towards your face! I do use scalpel blades too, but for an entirely different purpose where minimum pressure is required or possibly for finishing.
As for bending Plasticard, dependent on the thickness it should be possible to hold a steel rule in one hand (right in my case) and draw the sheet across the edge whilst holding it under your thumb, (right thumb). Perhaps not the best description I have ever made but if you try I think you will see it works. You might need to do it more than once to achieve the bend you require.
The best things in life are free.... so why am I doing this?
-
MDLR
-
steampig
Care helps. but I would hate to see knives like these in the hands of a child. The dowel handle is working a treat! A full-on Stanley is rather too heavy for fine work on plasticard for me (I used one to cut out the first set of parts); light and sharp seems the way to go. If the bug bites, I shall certainly invest in a better class of craft knife.Peter Butler:107128 wrote:Steampig, my best advice to you is avoid cheap cutting knives at all costs..... your fingers have a limit on repair options ...
I need to form a quadrant of 5mm (external) radius for the cylinder - that might be a bit much for 1.5mm sheet even heated up. I have some 0.5mm sheet planned for that part - pre-curving it with an edge (as one does with ordinary card?) sounds worth a try.
-
steampig
Not doing a whole lot better with carefully cut parts and using various right-angle blocks etc to assemble as true as possible. A major problem seems to be that a weld consumes dimension - I put a stretcher between two parallel pieces, and when that's set no other stretchers fit and have to be filed down, which I cannot do accurately, the parts being so small.
Perhaps I should be working with a glue that has body to fill - super glue?
I also discovered that though my kitchen work-top is impervious to MEK, the surface joiners aren't , and that the lightest touch of MEK on a plasticard snapped edge, which appears light with the black card due to fractional stretching, restores it to lustrous black.
Perhaps I should be working with a glue that has body to fill - super glue?
I also discovered that though my kitchen work-top is impervious to MEK, the surface joiners aren't
, and that the lightest touch of MEK on a plasticard snapped edge, which appears light with the black card due to fractional stretching, restores it to lustrous black.-
Peter Butler
- Driver
- Posts: 5717
- Joined: Sun Sep 09, 2012 10:33 pm
- Location: West Wales
Superglue is not the solution to your problem here. It may well join two parts together but will not have the strength of MEK or similar.
The superglue is an adhesive whereas MEK is a solvent and welds two surfaces together to become one!
Keep practising... that's the best advice I can offer.
The superglue is an adhesive whereas MEK is a solvent and welds two surfaces together to become one!
Keep practising... that's the best advice I can offer.
The best things in life are free.... so why am I doing this?
-
Big Jim
Sorry to slightly hijack the post but...I can vouch for that! This is what happened when I used Evostik impact adhesive to fix lead air rifle pellets inside the smokebox of my plasticard scratchbuilt Manning Wardle. They say you learn from experience ......
I have had problems in the past using lead and glue as a weight. It would appear that some types of lead alloy can react with chemicals in certain glues and over time can expand or deteriorate with interesting results. Many years ago I built a 7mm Jinty using a Lima 4f as a base. I packed the side tanks with lead shot and secured it in place with something that might have been silicone sealant or UHU. Over a number of years the lead shot corroded and the resulting expansion was enough to destroy the side tanks. There was also evidence of the plastic being attacked by the resulting mess.
One of the problems maybe that the 'lead' in shot is not real lead any more due to environmental concerns.
-
steampig
I was unprepared for how soft - squashy even - plasticard is compared to the lego blocks (ABS?) I have cut about to bodge things up previously - that's much harder and you can do fine work with a saw and file, and acetone welds it a treat. The fact that an end-butted plasticard work-piece disappears into the MEK weld (presumably dissolving to provide filler and fillet) is a blow - it may only lose 0.1mm but that's enough to throw things the way I've been trying to work, and it's virtually impossible to remove that little from other parts to make them fit again (and then when the MEK gets on them they're fractionally too short ...).
I shan't attempt a 1.5mm version - that's far to heavy for something this size and there are already issues concerning the verticality of the cleft you get with score-snap at 1mm. The only reason for 1.5 was to imitate the thickness of the injection-moulded part being copied, but the quality of results I'm getting doesn't make that worth while. I'll finish up the 1mm version (it really does need 1.5mm parts where it clips to the running-plate) and slather it in the all-concealing.
Weights - if you can't lay your hands on depleted uranium, lead-based plumber's solder has the advantage that you can cast it at low temperatures to the shape of your requirement easily in wood or even stout cardboard (stand back) moulds, if you can find any about. The lead-free stuff is probably too light.
I shan't attempt a 1.5mm version - that's far to heavy for something this size and there are already issues concerning the verticality of the cleft you get with score-snap at 1mm. The only reason for 1.5 was to imitate the thickness of the injection-moulded part being copied, but the quality of results I'm getting doesn't make that worth while. I'll finish up the 1mm version (it really does need 1.5mm parts where it clips to the running-plate) and slather it in the all-concealing.
Weights - if you can't lay your hands on depleted uranium, lead-based plumber's solder has the advantage that you can cast it at low temperatures to the shape of your requirement easily in wood or even stout cardboard (stand back) moulds, if you can find any about. The lead-free stuff is probably too light.
-
Peter Butler
- Driver
- Posts: 5717
- Joined: Sun Sep 09, 2012 10:33 pm
- Location: West Wales
Steampig, from your description of the material you have.... 'squashy' and easy to disolve, I am wondering now whether you have the genuine article?
Was the black sheet sold to you as Plasticard in the first place?
It might pay you to go to a model shop to see some more to make a comparison.
Was the black sheet sold to you as Plasticard in the first place?
It might pay you to go to a model shop to see some more to make a comparison.
The best things in life are free.... so why am I doing this?
-
steampig
Ah-ha! The 1mm I'm working with came from Antics in Glos when I wanted something to fill in the roofs of faller play-trains that had lost their shutters. It has a matt side and a semi-matt side (unlike the Force) and I'm sure it's not SLATERS plasticard - but there are other suppliers (high impact polystyrene?). It was not sold as plasticard particularly - I knew when I saw it it was just the job for the cab-roof filling.
Sitting on my bench (OK, bedside table) are 1.5mm and 0.5mm sheets from an Ebay supplier which is definitely described as plasticard, possibly even Slaters; they sport a protective sheet on a high-gloss side. I am about to broach them (0.5 for the curves, 1.5 where it needs to be). I will report back on how similar it seems to be to the 1mm.
Squashy was unfair. The 1mm is hard on the flat surface, where MEK takes a while to get going, but the edges seem softer and the MEK eats them up, as does a warding file.
Sitting on my bench (OK, bedside table) are 1.5mm and 0.5mm sheets from an Ebay supplier which is definitely described as plasticard, possibly even Slaters; they sport a protective sheet on a high-gloss side. I am about to broach them (0.5 for the curves, 1.5 where it needs to be). I will report back on how similar it seems to be to the 1mm.
Squashy was unfair. The 1mm is hard on the flat surface, where MEK takes a while to get going, but the edges seem softer and the MEK eats them up, as does a warding file.
-
steampig
It's not plasticard - probably not polystyrene. The thickness difference made comparison difficult, although the genuine stuff did seem a tad harder and the 1.5mm-thick showed some sign of conchoidal fracturing under score & snap, which the 1mm wasn't close to, and sawed reasonably well, but getting MEK on the genuine article was like night and day - immediate dissolve and weld.
However, I think the 1.5mm will be to hard to work, so either I get some genuine 1mm plasticard and make up yet another cylinder, or stop while I'm ahead. Plastic Magic does seem to be able to stick whatever it is the current 1mm is made from reasonably well.
Thanks for all your interest and patience.
However, I think the 1.5mm will be to hard to work, so either I get some genuine 1mm plasticard and make up yet another cylinder, or stop while I'm ahead. Plastic Magic does seem to be able to stick whatever it is the current 1mm is made from reasonably well.
Thanks for all your interest and patience.
-
Peter Butler
- Driver
- Posts: 5717
- Joined: Sun Sep 09, 2012 10:33 pm
- Location: West Wales
-
steampig
Tip one - use plasticard.
What bugs me was it was only when I found out the 1mm wasn't that I tried the Plastic Magic instead of MEK on it, which seems to be just as good as MEK on the real stuff. Maybe I'll make a (hopefully) clean version out of the 1mm using the Plastic Magic - the two already made have suffered all the dimensional problems and surface contamination from ladling on the MEK to try to get a join.
What bugs me was it was only when I found out the 1mm wasn't that I tried the Plastic Magic instead of MEK on it, which seems to be just as good as MEK on the real stuff. Maybe I'll make a (hopefully) clean version out of the 1mm using the Plastic Magic - the two already made have suffered all the dimensional problems and surface contamination from ladling on the MEK to try to get a join.
-
GTB

- Driver
- Posts: 1716
- Joined: Sat Mar 05, 2011 2:46 pm
- Location: Australia
A bit of basic polymer chemistry may help........
Plasticard is a trademark of Slaters, not a polymer name. It's not commonly available here in Oz, but I have used their embossed sheets in the distant past.
Polystyrene is the brittle clear stuff, used for things like packaging Ferrero Rocher chocolates and the clear parts of Airfix kits.
High impact polystyrene (HIPS) is actually a mixture of two polymers, polystyrene and polybutadiene (a synthetic rubber). The mixture makes the polymer slightly flexible and in the raw state it is translucent white. This is the one used for model making and signwriting. Slaters sell it as 'Plasticard' and Evergreen Scale Models sell it as 'styrene sheet'.
My personal preference is the Evergreen product. Very nice to use and it comes in a wide range of sizes. Plasticard was a little harder and more brittle when I used it, but it may have improved since.
Evergreen do large sheets, but they aren't easily available locally, so for large scale I buy 2' x 4' sheets of HIPS from a local industrial supplier. Not as nice to use as the Evergreen product, but more like I remember Slaters Plasticard.
There are a range of other polymers available in sheets.
ABS is another polymer mixture in wide use, as it is stronger than polystryrene. To all intents and purposes it is HIPS with the addition of polyacrylonitrile. MEK doesn't work very well with it. It is commonly used in models made in China and I use Plastruct 'Plastic Weld' for ABS.
PVC is also available in sheets, but isn't in common use for model work. It should glue OK with MEK, but I've used PVC pipe for oil tank models and found the plumbers glue worked better.
Clear sheets can be made from several polymers. PET, PETG, Polycarbonate and acrylic are common ones. Personally I prefer to use acrylic (Perspex) sheet for windows in this scale. It is clearer than glass, just as flat, but not as brittle, and hard enough to resist scuffing.
Polyolefins like polyethylene and polypropylene are close to impossible to glue. The preferred fabrication method is welding, using a hot air gun and a stick of the relevant polymer. I've seen the same process used for PVC.
Commonly used for flexible parts of models are the polyacetals, such as Delrin. Also close to impossible to glue, but welding works.
Contrary to popular opinion it is possible to glue fluorocarbon polymers like Teflon and I've seen it done, but the process uses some very nasty chemicals. Not for hobby use.....
There are other polymers in hobby use. The one LGB use/used has a reputation for not being easy to glue, but I doubt it is available as sheets for hobby use.
There are a couple of good books around for modelling with polystyrene sheet. Evergreen publish one on using their product, which is still available. If you can find a copy, David Jenkinson's book on building 7mm passenger carriages, published by Wild Swan is more specific, but very good.
Regards,
Graeme
Plasticard is a trademark of Slaters, not a polymer name. It's not commonly available here in Oz, but I have used their embossed sheets in the distant past.
Polystyrene is the brittle clear stuff, used for things like packaging Ferrero Rocher chocolates and the clear parts of Airfix kits.
High impact polystyrene (HIPS) is actually a mixture of two polymers, polystyrene and polybutadiene (a synthetic rubber). The mixture makes the polymer slightly flexible and in the raw state it is translucent white. This is the one used for model making and signwriting. Slaters sell it as 'Plasticard' and Evergreen Scale Models sell it as 'styrene sheet'.
My personal preference is the Evergreen product. Very nice to use and it comes in a wide range of sizes. Plasticard was a little harder and more brittle when I used it, but it may have improved since.
Evergreen do large sheets, but they aren't easily available locally, so for large scale I buy 2' x 4' sheets of HIPS from a local industrial supplier. Not as nice to use as the Evergreen product, but more like I remember Slaters Plasticard.
There are a range of other polymers available in sheets.
ABS is another polymer mixture in wide use, as it is stronger than polystryrene. To all intents and purposes it is HIPS with the addition of polyacrylonitrile. MEK doesn't work very well with it. It is commonly used in models made in China and I use Plastruct 'Plastic Weld' for ABS.
PVC is also available in sheets, but isn't in common use for model work. It should glue OK with MEK, but I've used PVC pipe for oil tank models and found the plumbers glue worked better.
Clear sheets can be made from several polymers. PET, PETG, Polycarbonate and acrylic are common ones. Personally I prefer to use acrylic (Perspex) sheet for windows in this scale. It is clearer than glass, just as flat, but not as brittle, and hard enough to resist scuffing.
Polyolefins like polyethylene and polypropylene are close to impossible to glue. The preferred fabrication method is welding, using a hot air gun and a stick of the relevant polymer. I've seen the same process used for PVC.
Commonly used for flexible parts of models are the polyacetals, such as Delrin. Also close to impossible to glue, but welding works.
Contrary to popular opinion it is possible to glue fluorocarbon polymers like Teflon and I've seen it done, but the process uses some very nasty chemicals. Not for hobby use.....
There are other polymers in hobby use. The one LGB use/used has a reputation for not being easy to glue, but I doubt it is available as sheets for hobby use.
There are a couple of good books around for modelling with polystyrene sheet. Evergreen publish one on using their product, which is still available. If you can find a copy, David Jenkinson's book on building 7mm passenger carriages, published by Wild Swan is more specific, but very good.
Regards,
Graeme
-
GTB
- Driver
- Posts: 1716
- Joined: Sat Mar 05, 2011 2:46 pm
- Location: Australia
For something like a loco cylinder, consider laminating up rectangles of the 1.5mm sheet into a block and then shape that with a file. Finish off with a sanding block, then add any other bits like cylinder covers to the shaped block to provide the detail. Cut a card template to use as a guide while filing down. A lot easier than trying to form a radius in thick sheet.steampig:107191 wrote: However, I think the 1.5mm will be to hard to work, so either I get some genuine 1mm plasticard and make up yet another cylinder, or stop while I'm ahead.
For small sanding jobs, I make my own blocks by cutting a suitable rectangle of 1.5mm polystyrene, glueing another rectangle to one side as a handle and then fixing a piece of sandpaper to the flat side using double sided tape. Replace sandpaper as necessary. I find the Openkote type, which has stearate powder between the particles the best to use, as it is less likely to block up when sanding a soft material like polystyrene.
Regards,
Graeme
-
steampig
Who is online
Users browsing this forum: No registered users and 12 guests